The VAZ 2114 stove valve , as on many other cars, is designed to shut off and supply hot antifreeze to the small circuit of the cooling system. The technical serviceability and condition of this part, just like the heating system as a whole, depends on both operating conditions and the quality of the coolant. And the heater tap itself should, preferably, not be a factory model. We will try to give answers to the most important questions on this topic.
The device of the VAZ stove tap
Operating principle of the device
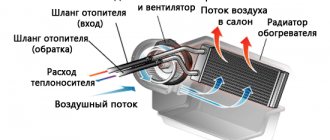
The heater valve serves as a tool for controlling the flow of coolant that flows through the radiator of the so-called heater. It is opened with the onset of cold weather, when there is a need to warm up the windshield and interior. Passing through the radiator, the working medium heats the air pumped by the fan. In the warm season, there is no need for additional heating, so the tap must be turned off.
It is easy to control the flow of warm air when the system is working properly: in winter, to open the tap, just move the lower lever to the right (“red zone”) on the climate control panel in the cabin. Accordingly, in the summer, in order to shut it off, you need to turn the tap to the left (“blue zone”). We should not forget that we also need a stove in the summer. At this time, it serves for ventilation. The damper, which blocks the flow of coolant in a small circle through the radiator or bypasses it, is actuated by a cable from a lever on the panel.
Faucet location
Where the heater valve that controls the coolant flow is located in the VAZ-2114 model is easy to determine if you have at least a little understanding of the structure of your car.
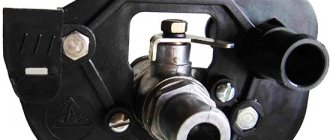
To see it, you need to remove the side panel located at the passenger's feet next to the driver's seat. The crane is located under the dashboard in the central part of the console. Two pipes are connected to it, and to replace the device, you need to pay attention to the drawing.
To replace the faucet, it is not necessary to completely remove the panel and drain all the coolant from the system. But in this case, you will have to do most of the work by touch and with your head down, which is not very convenient.
If the faucet is heavily oxidized, it may jam, which will prevent the possibility of adjusting the temperature of the warm air supply from the furnace.
With the help of the video tutorial, you will be able to replace the heating tap yourself without much effort, even if you have not done such manipulations before. The main thing is to strictly adhere to the recommendations of the master and follow the sequence of actions.
Where is the heater valve on the VAZ 2114
The place where the faucet of the stove is located on a VAZ 2114 or on a VAZ 2109
In order to see the location of the heating valve on the VAZ 2114, it is enough to remove the right side trim at the bottom under the center console at the feet of the front passenger . You will see it on the partition with the engine compartment, there are 2 more pipes that go to it. In some cases, in order to understand the nature of the breakdown of the heater tap on the Samara, you can also crawl up from the driver’s side (after first removing the side plastic cover from the dashboard and removing the carpet). But keep in mind that when dismantling you will also need to find its location in the engine compartment, under the steering rack . By the way, it’s more convenient to get there from underneath the car, since you’ll have to unscrew a couple of nuts from the studs securing it (located near the exhaust pipe, in the area of the oxygen sensor) with a “10” key and remove the two supply pipes.
The new faucet of the VAZ stove is leaking from under the damper
How to understand that the faucet is leaking
The main symptom that the heater tap is leaking is a characteristic smell in the cabin and a puddle under the front passenger's rug. It is true that a similar situation can arise in the event of a leak in the heater radiator. So if you see water under the rug, check these two elements of the cooling system first. As a rule, traces of antifreeze leakage on the faucet are visible to the naked eye; you just need to remove the plastic cover. Also, in some cases, a leak from a faucet can be observed visually, but to do this you will first have to get close to it and then move the valve by the cable (this situation can even arise on a new but defective part). When the problem with the faucet is only at an early stage, then a symptom that it is time to replace it is poor performance of the heater (when the damper is fully open, it blows barely warm or vice versa). This situation occurs if the valve is stuck in one position or is leaking (not closing enough).
The stove doesn't heat well
Car owners begin to notice that the stove is not heating well only with the arrival of cold weather, although the reasons for poor performance arise much earlier. Most often, the stove in a car heats poorly due to: airing, a faulty pump, a clogged radiator and cabin filter Read more
Removing the radiator of the VAZ 2114 stove
Replacing the VAZ 2114 heater radiator occurs if the old radiator leaks. If it is intact, you may need to remove the heater core to clean it from dirt. More details
Stove
The radiator of a car's interior heater is called a stove. Designed for heating inside the car and is part of the small engine cooling circle. When functioning properly, the temperature should not fall below +16 even at -25°C. Main fault.. Read more
Troubleshooting
If the stove begins to heat poorly, the air from it is slightly warm, then first of all you need to check the antifreeze level. If it is insufficient, circulation in the engine-heater radiator circuit stops. After topping up, an air lock may form in the cooling system.
Cooling system VAZ 2110
To eliminate it, you need to lift the front part of the car, for example, driving the front wheels onto an overpass, and let the engine idle for 10 minutes. If there was air in the system, you will need to add antifreeze.
Filling antifreeze into a VAZ 2110
The rotation speed of the heater fan on the VAZ 2110 is adjusted in steps by a switch. If only the maximum speed is turned on, and the electric motor does not work on the other two, then most likely the heater resistor has failed and needs to be replaced.
Sometimes, even at maximum fan speed, the air flow is insufficient. A possible cause may be a violation of the closing and opening of the dampers, but most often it is contamination of the cabin filter. In this case, a specific smell of dampness and mustiness is usually additionally felt. It is advisable to change the filter at every maintenance.
Carbon cabin filter VAZ 2110
The most common malfunctions in the heating of the VAZ 2110 are leaks of the stove and faucet. The crane has always been a weak point in VAZ cars. During production, dozens of cranes were first installed, then cars were produced without it, then they began to be installed again, but this time structurally modified.
When antifreeze leaks, a puddle forms in the front passenger's feet, and there is a strong smell in the cabin. Sources of leakage can be the heater radiator, faucet, pipes where they are secured with clamps. This can only be accurately determined after disassembly, so it is better to replace it as a whole, especially since the pipes “tanner” after 3–5 years.
Heater radiator VAZ 2110 DAAZ aluminum
Causes of heating tap failure
Of the entire cooling system, the heater valve of the VAZ 2114 is the most vulnerable part. Moreover, problems most often appear with the onset of cold weather. This is where one of the reasons for the failure of the heating tap lies: in the summer we don’t use it, it “sours” and requires repair.
The most common reasons for the failure of the VAZ 2114 heating tap:
- Leakage due to depressurization of the housing . This is a serious problem that needs to be fixed as soon as possible. If this is not done, a large leak of the cooling fluid directly into the vehicle interior may soon occur. This leak begins with the flooding of your feet - you can miss this signal, especially when there is a rug under your feet, and if you do not carefully monitor the condition of the working units.
- Souring of the locking device . The stove tap, which cannot be closed or opened, indicates that it has “soured.” Don’t rush to the service station, the matter is not urgent, but the problem should be fixed.
- Contamination with antifreeze deposits . Just like in a radiator, various deposits accumulate in the tap pipes (as a result of the breakdown of coolant or other type of dirt). So, since the damper regulates and then increases the flow of fluid, it delays it, debris accumulates inside the part, and as a result, jamming and further failure.
The technical condition of the tap, like the entire heating system, depends on the condition of the coolant. There are too many fakes on the market, which have a very negative effect on the operation of the car’s stove.
One of the reasons for the failure of the faucet and the heating system as a whole may be low-quality coolant. Don't take just anything! Make purchases in trusted stores.
But besides the quality of the liquid and materials, there are other factors that influence the rapid failure of the faucet. Therefore, at the end of the article we will give some useful tips that will extend its life or notice a malfunction in a timely manner so as not to freeze in winter. Well, for now, let’s pay attention to the choice of the heater valve for the second generation VAZ “Samara” - VAZ 2113, 2114 and 2115, or the first one - 2108 and 2109.
Additional heater on UAZ 09 Apr 2010 11:54 #3
- Dolphin
- Off site
- Administrator
- Posts: 10647
- Reputation: 3
NOW a few words about additional options.
1. Electric pump from GAS Improves the circulation of coolant in the heating branch of the cabin, and is also useful in removing air pockets from the system. Available in several configurations (including with internal heating). You can put it in a chain break, and in any segment. During operation it makes some noise, but considering the general noise of the engine, it is almost imperceptible. Before installation, it is recommended to disassemble and lubricate with sealant, otherwise in severe frosts antifreeze begins to leak due to deformation of the plastic parts.
Source
Which heater tap to choose
The ceramic faucet from YVVA is, according to most, the highest quality.
For VAZ-2113-2114-15 models, a single valve from 2108 is suitable. The car is equipped with far from the highest quality spare parts from the assembly line, since the membrane valve is completely plastic. True, analogues have not gone far. So, the opinions of many auto repairmen differ regarding which heater tap to choose for the VAZ 2114 and other Samar models. Some claim that you shouldn’t overpay and just buy a regular plastic one. Others say that a ceramic one can last a little longer than 50 thousand km (approximately the same service life of a standard heating faucet) and if it is not possible to install a ball one, then it is better. And still others even advise redoing the system in order to move the whole thing under the hood, and install a regular water tap there to forget about the leak problem forever. Therefore, let’s see what the manufacturers offer us, what the price is for the heater tap, and decide which one is best for your “four” to choose.
Plastic membrane (original)
In the factory configuration, the machine has a standard coolant control valve 21080-8101150-00 , which has only one, and even then a dubious, plus: low price. But you have to pay these 60 rubles again and again, every season - the leak starts where the flow control axis is located. So, given the problems that you have to face due to the failure of your car’s heating tap, it’s worth considering more reliable options. Although, to a large extent, the quality of the stove’s membrane tap depends on the manufacturer, and there may be several of them. For example, a standard plastic heater valve for the VAZ 2108 is produced by DAAZ, and in several packages (one of them is specifically for AvtoVAZ). But besides them, on store shelves you can also find such budget ones as: Aroki and Grand RiAl. This means that the problem of unreliability may lie precisely in an unscrupulous manufacturer.
Ceramic heating tap
Ceramic Luzar and ball Chance-auto heater valves for VAZ 2108-14-15 from the middle price category and the same quality.
Of all the options listed, this one is the leader in popularity. But don't think this is an obvious choice. Quite often it fails no less than the standard one, and only lasts for a couple of seasons. It is chosen solely because the ceramic curtain inside the locking mechanism keeps it tightly closed. This is where the advantages end; like the previous one, it is also not deprived of disadvantages. Firstly, it is a higher cost compared to the factory and ball models. Secondly, the throughput in this option is lower than the ball one. Thirdly, there is a lot of defects, and either at the junction or from under the lever (damper axis), a leak soon begins to appear. Moreover, most often it is the latter problem that is the reason for replacement. And all due to the fact that at the factory the hole for the rod is made with poor quality and the rubber seals quickly wear out. If reducing the incoming heat is not critical for you, and the presence of a share of high-quality parts does not frighten you, you can also purchase a ceramic heating tap.
The situation with them is exactly the same as with standard ones, different manufacturers - different quality. According to reviews of many owners of VAZ 2108, 2109 and 2113-15 cars, they are looking for the Ulyanovsk YAVVA (spare part code 2108-8101150-12 ) which will cost 350 rubles, since it has good equipment (fastening nuts, washers, rubber sealing rings), aluminum body, ceramic insides. LUZAR LV0108 on the market (100 rubles cheaper, but few are satisfied with the quality, since it lasts for 2 years or even less), modified Pramo (21088101150P), quite expensive PEKAR (costs about 500 rubles), and also the Polish Avrora (HV-LA2108) and the very budget TSN 852 (even more quality problems than the Luzar).
Ball valve for radiator
This is already a more suitable part if you focus on the price-quality ratio. for a radiator ball valve (cat. no. 2108-8101150-14 ) is slightly higher than for a standard model, but the quality is also higher, but compared to ceramic valves it is even cheaper. However, here too there is a relatively high susceptibility to souring.
The market represents only a couple of manufacturers of such faucets: Ulyanovsk ( Simbirsk Foundry Alloy ) and Chance-Auto . One of the main disadvantages of the SLS ball valve is that it is very difficult to move it from the closed state to the “open” position. And this, in turn, negatively affects the stops in the plastic drive mechanism of the dampers and the tap at the places where the cables are attached. Owners of "Samar" probably encounter such a problem even with regular efforts. So, most likely it will have to be modified, but the thickness of the walls of the pipe and the quality of the plastic inspire confidence. But the axis, although it wobbles a little, but the ball rotates in the plastic inserts and holds it very tightly. Which is true, just like ceramic, over time it will flow along the lever bushing.
Water tap in car
Yes, and this method has a right to exist. Some people think this is an overly simple solution to the problem, while others have been using it for a long time without any problems. Below we will look at this option in more detail.
How to replace the heater tap in a VAZ-2106 car
Replacing the VAZ-2106 heater tap may be necessary suddenly when the owner of a domestic vehicle discovers a malfunction of the heating device. As a rule, most car enthusiasts encounter this problem precisely in the cold season, when it is not possible to heat the interior to a comfortable temperature. The material below discusses the principle of replacing the heater tap on a VAZ-2106 car. Acting according to the instructions, even a novice amateur mechanic can repair a faulty structural element.
Prevention of breakdown of the VAZ 2114 crane
Following a few useful tips will help extend the life of your heater tap.
In order to prevent the faucet from turning sour, it is necessary to periodically move the closing/opening lever of the faucet from one position to another. This problem is especially relevant when the seasons change, when you drive all winter with it open, and in the summer you turn off the supply. By the way, in the heat or when you have to drive in low gears, in order to avoid engine overheating, it is recommended to slightly open the heater valve (move the control lever to the “red zone”), but to prevent heat from the radiator from entering the cabin, completely close the air damper.
Modification of the heater tap
On some faucets (in particular, very often these are Luzar and YAVVA), not only the locking mechanism itself can break, but also the plastic tube can burst, so to make the faucet last longer, you can select the diameter and insert an additional tube . Recently, the box from Luzar already has such a through tube and it is made of brass. According to many experienced car owners, installing a YVVA faucet without modification makes no sense at all - the passage pipe is flattened. And in its through tube it is necessary in any case to install a long (thin-walled) tube with an outer diameter of 15 mm.
It also goes without saying that regular preventive inspection of components is necessary - timely detection of problems will not only minimize your costs, but will also protect your health and that of your passengers from danger, since antifreeze vapors are highly toxic!
How to change
Tool
You will need the following tools:
Tools needed for replacement - gallery
To replace the stove faucet, keys No. 10 and 13 are useful. Use a screwdriver to remove the pipe clamps. You will need 4 liters of coolant. Pliers are needed to adjust the stove valve. A flat screwdriver is needed to dismantle the clamps.
Repair of VAZ 2114 crane
As a rule, faucets are not repairable and if they become sour, leak, or changing the lever does not produce the desired result, they are replaced. This is much faster than trying to repair it. But what if it is not possible to buy a new faucet, and the problem has already occurred? Then there is only one way out - to try to repair the heater control valve. When liquid runs out from under the rod, you, of course, are unlikely to be able to somehow eliminate this, because only a few can select bushings or machine a new rod and sealing rings. But if the through pipe bursts or shrinks, then installing a tube of the same diameter into it and coating it with sealant will help for a while.
In the case when we are dealing with plastic, the cause of the leak is a damaged rubber membrane; the problem is also fixable, although not simple. You need to remove the valve from the heater and disassemble it. You will have two parts: the body itself and the lid with a cone and cuff. To remove the cover from the body, it is necessary to cut off the rolling belt from the side of the cover. The easiest way to do this is with an electric drill, in the chuck of which you attach a chisel or scraper.
Where to loosen the clamps
Next we have to do the flaring. To do this, drill 4 holes through (size from 0.1 to 3 mm.). This should be done strictly along the edge of the rolling. Do not allow the drill to deviate towards the middle of the cover. If this happens, further work on repairing the VAZ 2114 crane will be greatly complicated due to damage to the sealing band located on the seating surface of the cuff in the body.
The next step is to drill out the rivet that is in the cone, remove the old cuff and the remains of the rivet. You will get a hole where you need to make an M4 thread.
The new cuff can be cut from a car inner tube (preferably from a truck). The heater valve must be in the closed position. Next, you need to cut along the contour of the cover (top), making four holes for fasteners at their location (along the edges and in the middle).
A new cuff is secured to the top of the cover using a screw (M4 - the hole for it is already ready), as well as the valve itself, then you need to align the holes and tighten them with screws (M3). In this case, the nuts will be on the side of the cover.
Inlet pipe
In general, the work on repairing the VAZ 2114 heating tap is completed; now we check the tightness by first closing the outlet channel and blowing from the inlet pipe.
Think about whether you have the strength to repair it yourself? No? Then there is only one way out - only replacement.
Replacement procedure
There is no point in trying to repair the old mechanism for regulating the supply of coolant to the heater. Purchasing a new set is much easier and sometimes even cheaper. Plus, it will last for many years, unlike a refurbished device. To ensure the proper level of sealing of the plumbing faucet, it is recommended to combine all purchased components with a threaded connection using fum tape in parallel. It will eliminate possible gaps, liquid will not leak, and therefore the fastening will be reliable and durable. Considering the design features of the Loaf and the location of the engine, as well as the installation location of the faucet itself, you will have to work a little. Although in reality everything does not look as complicated as on some other cars.
- Place your UAZ on a flat surface. An empty container should be placed under the radiator to drain the cooling fluid. If you are going to refill it into the system, choose a clean container. Now you can drain the coolant.
- Next, the coolant will need to be drained from the engine, for which a corresponding drain hole is provided.
- Loosen the hoses that connect the faucet and the cooling system of your loaf engine. Then it will be possible to remove the hoses from the pipes.
- Loosen the fastenings on the side of the faucet itself. Disconnect the hoses going to the stove radiator.
- Remove the fasteners that are directly responsible for the standard tap of your UAZ Bukhanka. It may be difficult to give in. Apply force, but do not overdo it, so as not to break or damage anything.
- The tap can be removed, remembering to first disconnect all connections.
- A new system is screwed into its place. It is important to add here that first of all it is recommended to connect all the hoses connecting the tap to the heater and the engine cooling system, and only then fill in the coolant.
The installation process may be complicated by not the most convenient access. It will take some getting used to the layout of the UAZ Bukhanka, but as a result, all car owners of this miracle managed to realize their idea. You can do it too. The stove valve, although simple, is a very important element of the stove equipment of any car, including the Loaf. It’s up to you to use analogs of a factory faucet, or to use some non-standard solutions in the form of plumbing faucets. But in practice, it has been proven that a faucet from a plumbing store works excellently and provides convenient control. In this case, no special difficulties arise during the installation process.
Source
How to remove and replace the heater valve
The price for replacing a stove faucet at a service center will be about 1000-1500 rubles, so despite the complexity of the procedure, many try to remove and change it themselves. In addition, it is much easier and faster than doing repairs. To completely replace a VAZ 2114 heating tap, a simple set of tools is sufficient, in particular:
- Wrenches of different sizes (socket wrenches, open-end wrenches for “10” and “13”), and if it’s a head with a cardan, that’s great.
- Worm clamp with a diameter of 16-23 mm
- Silicone sealant.
- Rags.
- Screwdriver with Phillips bit.
- New heating tap.
- We also recommend that you immediately buy two pipes going from the heater tap to the radiator (since they lose their elasticity over time and can leak).
- A container where you will need to drain the coolant.
- Well, if possible, use the freshest coolant, so as not to pour back the old one.
And besides the tool, it is advisable to have an inspection hole or overpass at your disposal, since the tap is unscrewed from the engine compartment, and an assistant is needed from inside the cabin.
The work of replacing the heater tap on a VAZ 2114 car is carried out according to the following algorithm:
- Make sure the engine is completely cool before starting work. Having installed the car in the pit, remove the crankcase protection.
- Then you need to drain the coolant from the engine block (drain bolt behind the ignition module) and the cooling radiator (faucet at the bottom), as well as from the pipes leading to the faucet from the engine compartment. At the same time, treat the stud nuts with a wedge, let them dry out until the moment when we unscrew the faucet, this will greatly facilitate its dismantling.
- Next in the cabin, on the front passenger side, you need to remove the side trim of the torpedo (unscrew 5 screws) and remove the carpet to get to the faucet and its pipes.
- To prevent the interior from flooding with antifreeze when the hoses are removed (by loosening the clamps with a Phillips screwdriver), the first step is to lay a rag.
- To make it convenient to remove the tap, it is better to remove the pipes from the stove.
- Go back under the car and use the key or 10mm head to unscrew those nuts from the studs and go back up into the cabin.
- Using pliers and a flat-blade screwdriver, disconnect the drive cable of the faucet locking mechanism, after first removing the bracket holding the rod. It will be more convenient to do this on the driver’s side, but then you will also have to remove the trim there.
- Now you can extract the culprit of all events.
- Take a new faucet and install it in the same place, after replacing the rubber gaskets. We install the control cable in place and check the tension.
- We carry out the same steps in reverse order. Be careful when tightening the pipe clamps, especially on the through plastic ones. After all, if you don’t hold it in enough, then in cold weather it will start to suck in air, but if you overtighten it, then many taps have such a quality of plastic that they simply burst.
After installation, all that remains is to check its operation. Turn on the fan by opening the air intake damper. Open or close the access of coolant to the stove. If the flow is blocked, the air temperature in the cabin should decrease. But do not rush to install the side covers back and during the check, look to see if the faucet is running back, since such cases have occurred more than once, especially if it is ceramic. They all have one common disease - the constipation lever begins to leak. And all because the two o-rings that are there are either weak or quickly wear out during operation.
Repair and replacement of the heater control unit VAZ 21083 and 21093
The interior heater control unit of VAZ 21083 or 21093 (models with a “high” dashboard) must be removed and checked for faults in cases where:
- Too much force is required to shift the lever
- when switching the corresponding levers, there is no change in the direction of the air and/or a change in the temperature of the air supplied to the cabin.
The cause of the above malfunctions may be a broken bracket of the retaining bracket on the control unit housing, or deformation of the bracket or its absence for some reason. In order to understand what actions need to be taken - reinstall the brackets or replace the heater control unit, the latter will have to be dismantled.
To do this, you will need to unscrew the two bolts securing the lower body of the front panel
and take her downstairs.
We unscrew the two screws securing the control unit to the panel body.
By pressing the control unit down, remove it. But it will not be possible to fully extract it, because... it is held in place by damper drive cables and terminal wires.
A visual inspection is necessary. If there are no staples at their installation location,
but the places where the brackets are installed are not damaged, then we simply install the bracket. If the installation location is broken, it is necessary to replace the heater control unit.
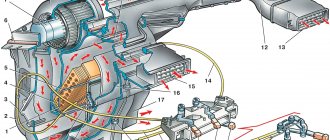
Replacing the control unit must begin with its correct dismantling. To do this, remove the terminal from the heater fan speed controller and two terminals of the backlight (in the figure below - numbered 1, 2 and 3, respectively). Having removed the terminals, remove the cable fixing brackets (the figure shows the direction of the applied force):
Before removing the cables, you need to remember which lever they belong to (or better yet, sign them). We remove the cable from the holes in the levers:
We remove the control unit itself. It is necessary to remove the pointer from the removed control unit
and the fan speed controller itself, as well as the backlight.
To remove the regulator relay, you need to unscrew the plastic nut. To do this, insert a flat-head screwdriver into the grooves of the nut and unscrew it
The backlight lamp is removed by turning it counterclockwise:
We perform the installation in reverse order. We install the backlight lamp along the grooves and turn it clockwise until it stops. The relay, before tightening the nut, must be installed in the groove.
Tighten the nut. We connect the terminal to the relay and two terminals to the backlight. Let's start installing the cables. Before securing the cable with a bracket, we install it in such a way that the end of the casing rests against the protrusions on the body, and the cable passes between them:
We install the bracket so that the “nose”
and snap it in place.
Similar operations must be performed with the remaining cables. Before installing the panel casing, you need to make sure that all levers are working correctly, that the backlight and fan speed control are working.
Having checked everything and made sure that it is working correctly, we install the control unit in place and fasten it with two self-tapping screws,
and then install the panel.
This completes the work.
Please rate the article
The article was very useful, thanks for the detailed and visual photo report!
It's a pity they didn't show the lamp itself. What is she like?
Serg, a view of the lamp from the inside is shown in the illustration that follows the text “The backlight lamp is removed by turning it counterclockwise.”
Heating system modification
One of the controversial decisions is to move the heating tap under the hood and replace it with a regular household one. Before you dare to use this know-how, you should weigh the pros and cons. One of the advantages of this action is that you do not have to worry about leakage into the cabin . In general, the service life of the parts increases, but in order to open and close the tap, you need to run to the hood or reach into your feet and turn the valve. Or, in the summer, drive with the air flow damper into the cabin closed.
And yet, perhaps you are one of those for whom this will be the optimal solution that will help you not bother with repairing the stove tap. For clarity of removal and upgrading, watch the video instructions:
How to remove the heater valve VAZ
Replacing the faucet with a water one and moving it under the hood
As you can see, despite the certain efforts required to repair or replace the faucet of the VAZ 2114 stove, it is still better to do this before the interior is filled with antifreeze. At the moment, heating taps are presented on the markets in three main types: standard, ball and ceramic. But in fact, of all those available, there are no normal ones that you can install once and forget about the problem. Plastic ones etch, ceramics melt and run, the ball one is also not without its drawbacks, but is still more reliable compared to others. Remember that preventative repairs of parts of your car, in particular the heater valve, can prevent other, significant problems.
Tap selection
Before you begin replacement, it is important to select a new, high-quality faucet that can reliably serve the heating system of your VAZ 2109. Factory
Factory
| Crane type | Peculiarities |
| Factory | This is a standard type of faucet that the VAZ 2109 is equipped with from the factory. Its main advantage is its affordable price. As for the reliability and frequency of jamming, here we are talking about obvious shortcomings. It is worth taking such a faucet as a replacement only if you could not find others |
| Ceramic | It is more expensive than the factory device, has high strength, but its throughput is lower compared to the third option. Low throughput rates can lead to the fact that the efficiency of the stove in winter will leave much to be desired |
| Ball | Excellent throughput, high reliability and durability. Alas, even such faucets turn sour, although their prices are higher than their analogues |
Considering the features of the presented taps, the optimal solution would be ball or ceramic. The second option is more suitable for those who live in regions with not very severe winters.
Ball
Reasons for decreased performance
Despite the simplicity of the design, problems with the VAZ-2114 stove often arise. They are mainly associated with a drop in the performance of the heating system - the stove heats the air poorly, blows cold or slightly warm air. In this case, the reasons for poor operation of the stove can be both general (warming up is weak at any control unit settings) and when operating in a certain mode, for example, at idle. Or, for example, cold air or slightly warm air blows only on the side windows, and in other modes the heating works normally.
Heater maintenance
To ensure that the VAZ-2114 heater heats well in winter, carry out maintenance of the heater before the cold weather:
- Remove it from the car.
- Disassemble and clean.
- Check the functionality of the dampers, seal their ends with sealants.
- Seal the joints with sealant.
- Flush the radiator.
- After assembly, adjust the drive cables so that when moving the sliders, the valves and the tap become in their extreme positions.
These measures are enough for the heating system to function normally in winter, providing warmth to the car interior.
Finally, we note that the reasons for the poor operation of the stove were discussed above, but it still continues to function. But this unit also has breakdowns and then the stove fails and stops working completely. Such reasons include breakdown of the radiator, leaks at the joints of the pipes, fan malfunction (open circuit, exhausted motor life or burnout).
Owners of domestic vehicles, for example, such as the VAZ 2114, periodically encounter a problem that appears in winter - the heater stops functioning properly. Problems may result in the fact that warm air stops coming from the stove or the motorist will not be able to turn on the heating unit at all. Therefore, in such a situation, when the windshield of a vehicle is covered with a layer of dense ice “blanket”, which obstructs normal visibility, the motorist must know how to act correctly at such a moment. In view of this, if problems arise with the heater, you must first understand the structure of the system and know the circuit diagram of the unit, which will help find the cause of the malfunction.