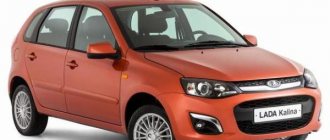
You have to remove the relay and fuse box on Lada Kalina and Grant cars if it is replaced with a new one, or to gain access to other parts, for example, the central locking control unit. Removing the mounting block with your own hands is not difficult if you know the location of all the fastening screws.
Required
: small ratchet with a cross bit.
- Remove the steering column cover (lower the steering column clamp downwards and remove the fastening screws).
- Remove the cover of the mounting block (snap off the cover in the sequence: 1, 2, 3, 6, 4 and 5).
- Remove the right mounting block screw using a small ratchet with a Phillips bit.
The process of removing the fuse box is also shown in the video:
Let us remind you that you can find the design of the relay and fuse box here (for Lada Kalina and Lada Granta).
In a Lada Granta car, the block where the fuses are located is a very important element that ensures the safety of the on-board electrical network. Without this unit, any pantograph can be damaged if a short circuit occurs in electrical lines. Among the likely consequences of such unpleasant phenomena as a short circuit, fire of wiring is present in the foreground. In view of this, the process of installing the fuse box is of particular importance. The driver must know where the fuses are in his car.
About fuses in Grant
Sometimes failures of elements in the vehicle's electrical on-board network occur. For domestic models, this malfunction is much more relevant in comparison with foreign analogues. The causes of damage to the electrical network can be very different. Among the most common factors causing blackouts is the usual overvoltage. Most likely, after this phenomenon, the owner will need to replace the corresponding fuse. A painfully familiar model, the Lada Granta, can serve as an example.
In the car we are considering, the lion's share of electrical circuits and current collectors is protected by fuses. We should not forget about the lack of protection for three nodes:
- battery charging circuits;
- generator electrical circuit;
- starter.
Types of fuses
There are two types of devices installed in a Korean car. The main ones are responsible for the operation of wires with a high current layer, the typical ones are responsible for the operation of wires with a low current level. In total, a Korean foreign car produced after 2011 has 46 fuses, 16 in the interior, and 30 under the hood.
Element ratings range from 10 A to 80 A. Small fuses can be purchased in blocks so that you always have a replacement if they fail. A burnt-out part can be recognized by a slightly melted plastic eyelet located on the top and side of its body.
The location of each element in the block does not differ for cars produced in 2011, 2012, 2013, 2014; it will be standard everywhere. The fastest-melting typical devices are located mainly in the interior torpedo unit, while the more powerful ones are located under the hood. The process for replacing them is almost identical, with minor exceptions.
Features of the first mounting block
Once you know where the blocks are, you can talk about their features. Another significant difference between the Lada Grant and representatives of previous generations is its numerical composition. Now it is equal to 32 units. For a detailed understanding, you will need to carefully familiarize yourself with the block diagram. For example, fuse F1 has a function to protect the circuits of such current collectors:
- ignition coils;
- nozzles;
- motor and fan control unit.
Element F2 is responsible for the safety of the electrical power window mechanism circuits.
F3 and F4 respectively “monitor” the safety of circuits belonging to:
- hazard warning lights and windshield wipers;
- airbag.
Elements F9 and F10 are “entrusted” with controlling the wiring to the side lights.
It is important to remember that each safety element has a current limit that it can withstand.
- F8, “standing guard” of the rear window heating circuit, is designed for a maximum of 30 Amps;
- F6, which controls the operation of the reversing light, can only withstand 7.5 A.
It is easy to guess that these values of this parameter are directly dependent on the required electrical consumption of a particular pantograph.
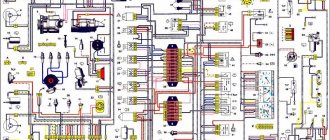
To familiarize yourself in detail with the circuits and the fuses that protect them, it is recommended to resort to the diagram (Fig. 3).
If we move on to the consideration of relays, then in the Lada Granta they are present in the amount of 12 units. These elements are designed to maintain the functionality of many current collectors (heating system fan, starter, electric fuel pump, etc.).
Location of fuses on Priora
The fuses on the VAZ 2170 and its modifications are concentrated in different places as follows:
- In the interior mounting block, which is hidden behind the dashboard cover opposite the driver’s left foot;
- In the additional relay and safety block on the right under the lining of the floor tunnel near the navigator's left leg;
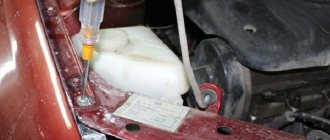
- In the main fuse block under the hood near the expansion tank. It is there that the most powerful safety system is located, designed to ensure the operation of power electrical circuits;
- In the relay and safety block of the air conditioner next to the front left shock absorber strut cup.
Of course, each block contains fuses and/or relays responsible for the operation of a particular electrical system, so you need to take a closer look at where and which of them are located.
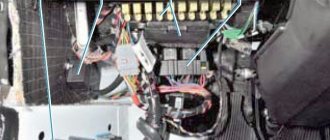
Relays and fuses of the mounting block in the passenger compartment under the dashboard
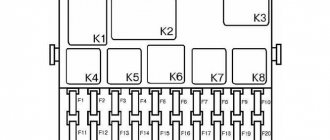
So, under the dashboard cover we will find the interior relay and safety unit, also called the “black box”. There are no such number of relays and fuses anywhere else, so most of the problems are associated with this relay-fuse group. It is also the subject of greatest interest. Relays are marked with the letter K and a digital designation, which for this block has the following interpretation. (Indicated in Fig. 1)
In addition, the interior mounting block contains fuses, marked with the letter F, which protect the following circuits (Indicated in Fig. 2):
The wiring diagram for the interior mounting block can be seen on the back surface of the cover that covers it.
Safety relay group of an additional block in the floor tunnel
This block is called additional and contains relays (marked with the letter K) and fuses (F) of such technical systems (See Fig. 3):
The nuances of manipulating the power unit
To correctly replace an element in a LADA Granta, you should use specific rules and know where the so-called fuse box is located. If a burnout occurs, do not rush and replace the failed part with an analogue one. It is recommended to check the serviceability of the current collectors protected by this fuse.
We replace the element that contains the fuse box in strict accordance with the requirements of the circuit. There is no need to resort to installing fuses designed for a higher current limit, as this can cause a fire. It is also necessary to disconnect the negative voltage from the battery.
Removal and Replacement Guide
Changing fuses yourself
Before you begin replacing the safety devices located in the main unit, you must turn off the ignition and battery terminals under the hood.
The replacement procedure is carried out as follows:
- Find the installation location of the device. There are latches on the plastic cover of the block; press them. After removing the cover, you will be able to see a diagram printed on the reverse side, which indicates the location and purpose of all used elements.
- Then you need to identify which device has failed and needs to be replaced. Sometimes a breakdown can be determined visually - the component itself may be burnt out, sometimes a broken thread is clearly visible in it.
- Under the cover of the device you will see tweezers, which can be used to remove the device. If you don't have tweezers, you can use pliers.
- Remove the burnt out element and replace it with a new one, then replace the cover and connect the battery terminals (video filmed and published by the AVTOCLUB_22 channel).
Replacing fog lamp fuses
If the fog optics break down, you should first diagnose the operation of the device. The component is located inside the car.
To check and replace, follow these steps:
- First you will need a Phillips screwdriver, use it to remove the two switches located in the middle of the console, near the audio system.
- Using a screwdriver, you will need to press out two fasteners.
- Then remove the plastic insert.
- You can now remove the fuse housing. Remove the protective cover of the device and replace the part with a new one.
Changing the fuse box
Removing and replacing the block with components is done as follows:
- First, open the engine compartment of your car and remove the air filter housing. Unscrew the nuts that secure the housing using a Phillips screwdriver.
- Then under the device you will be able to see a plug with cables connected to the device, you need to unplug it. The product body itself is marked in colors; it corresponds to the color of the connected connectors. By taking these plugs into account, the need to label cables can be avoided.
- After this, you should climb into the vehicle interior and remove the shelf, which is located under the control panel. After this, unscrew the bolts that hold the glove box housing.
- Next, disconnect the plug with cables connected to the connectors directly on the device. Once you do this, you will be able to see the color coding.
- Using a wrench, remove the bolts that secure the block itself. Please note that the outermost screw on the case is hidden, so you will not be able to see it immediately.
- At the end, remove the block with the devices, now the device can be replaced. Installation of a new device, as well as assembly of components, is carried out in the reverse order.
We act in the salon
- The fuse box is located on the left side of the instrument panel. Remove the cover with the outdoor lighting mode switch integrated into it. If the work is carried out on the LADA Granta “Lux” and “Norma” modifications, then do not forget about the need to disable the button used to unlock the trunk lock.
- Armed with the diagram, we determine whether the cigarette lighter fuse or the fuel pump fuse has become unusable, and so on. We look at the integrity of the thread and draw the appropriate conclusion. If the element is unfit, then we replace it with a new analogue by fixing it in the mounting socket. We repeat this action with the entire list of blown fuses.
- We connect the “minus” back to the battery and check the functioning of the electrical unit in which the fuse was replaced.
The process of replacing the specified elements, which contain the fuse block, of the engine compartment of the Lada Granta is implemented in a similar way. The cover on the safety module is removed using a simple action - just pull it up and quietly replace the marked elements.
Fuse box VAZ 2107 injector and carburetor
When operating a VAZ Seven, owners sometimes encounter a situation where one or another fuse blows. In this case, every car enthusiast should know and navigate where the fuse block (FB) is installed and which electrical circuit this or that element protects.
Where is it located?
The fuse box on the VAZ 2107, regardless of the engine power system, is located under the hood on the right side opposite the passenger seat. The unit has two versions - old and new, so in order to clarify the situation, it is worthwhile to dwell on each of them in more detail.
The choice of power supply sample does not depend on the vehicle's power system.
Old version of the block
The old mounting block consists of 17 protective elements and 6 electromagnetic type relays. The number of switching elements may vary depending on the vehicle configuration. Fuse links are arranged in one row, made in the shape of a cylinder, and are held using spring-loaded contacts. With this connection method, the reliability of the contacts is quite low, since at the moment large currents pass through the protective element, not only does it heat up, but also the spring contacts themselves. The latter become deformed over time, which leads to the need to remove fuses and clean oxidized contacts.
Where is the Tuareg Air Suspension Compressor Relay located ~ AUTOTEXNIKA.RU
Air suspension compressor replacement control
Porsche Cayenne, VW Touareg, Audi Q7
When replacing the air suspension compressor
The vehicle ignition must be turned off!
Recommendations before dismantling the compressor
You need to set the front wheels to a straight position. Tuareg air suspension compressor relay; since there is air under pressure and... It is necessary to use a lifting platform (lift) that is capable of raising the vehicle body until the wheels are suspended.
Then you need to lift the car, having previously looked in the operating manual, where the support points that serve to lift the body are located in the vehicle. We should not forget that moving a car on a lift can be harmful to health.
Removal from the car body
Let’s move on specifically to dismantling. An illustrated guide to replacing the air suspension compressor is located below. Remove the protective cover, which is located
under the car on the passenger side to gain access to the compressor. Then you need to disconnect the two cable ties that hold the connecting wires.
After this, you need to disconnect the three electronic connectors
the air suspension compressor .
Note: To remove the air lines from the quick connect fitting, you must push it inward using both sides of the fitting (you can use an appropriately sized open-end wrench to do this) and then pull the air line out.
Tuareg / Replacing the relay / Complete guide
Hello my viewers and subscribers! Today we will replace the relay
activation
of the air suspension compressor
Touareg GP 3.0 diesel / Why you need to change the air compressor relay / VW Touareg 3.0 TDI
Tuareg
GP 3.0 diesel / Why it is necessary to change
compressor relay
/ VW
Touareg
3.0 TDI
Relay
burn out.
After this, you need to disconnect the pneumatic line of the air suspension compressor.
located between the dryer and the compressor.
Then you need to disconnect the pneumatic lines from the pneumatic valve block (the black wire (P) must be left in place).
After this, remove the three mounting bolts that connect the compressor to the body. Compressor, Replacing the air suspension compressor relay c. Now you need to disconnect the brown pneumatic line, which is located on the back of the air compressor. To remove the pneumatic line, you need to press the quick-release fitting and pull out the wire, after which you can remove the compressor.
Replacing Volkswagen Touareg fuses
Discussion of the section Replacing Volkswagen Touareg fuses
Owen
Good morning. After turning on the ignition, the fuel pump sensor shows one thing; after I start driving, the needle starts to show less than in the tank; when I stop, turn off the car, turn on the ignition again, and again it shows more than when driving. can you tell me what the problem is? auto vaz 2113 benzene pump of a new type as here.
Raleigh
... the price of the issue was 200 rubles, I bought it and wouldn’t .. Moscow.
- Lun
- consumption 30 liters per hundred, excellent car wow
- Konrad Badaley
- why is the radiator cooling fan not working please tell me
- Kolchuk Isak
- Looks better than 2109 :-) haha nothing compares to 9
- Olympus
And what helped!?
- Frundkov Igi
- thank you! everything is clear
- Ortiz Ayaz
Please tell me, on my Chery Tiggo T11 the injector power fuse has blown. With what it can be connected? Thank you.
- Michnik Erbol
- Hello, can you help me connect the wipers?
- Arturik
There are no hydraulic compensators in this engine!!! No 2.0L either!!! You're a moron, you don't know anything about the car!
- Martsev Bart
- Flat tire
- Fazliddin
- Everything about diagnosing the injector and its sensors is here: All useful tips from an auto electrician are here: All playlists are here:
- Charlie Shkunaev
- Every year, swap the outlet and inlet on the heater radiator supply and return and you will be happy)) once every two years anti-corrosion antifreeze
- Sevan
Some kind of strange switch 2140. I have such a switch P-315, so it is collapsible and has 2 working positions + pressing.
Philosopher Yaraliev
Perhaps if the HF was set to the 9° mark, setting the slider in the area of the distributor marks would work. But if you say that even a small turn of the distributor has a strong effect, you would still have to adjust it with a strobe, or the adjustment by test drives on the road.
Lootah
Christ is born! Pasha, my situation is the same: when it’s frosty, the speedometer doesn’t show any indication, and then after a few kilometers, when I’m driving, it starts to work normally. What can you do?
Karelia
I changed the light bulb in the trunk and shorted it to the housing, the light in the trunk and interior stopped burning. Please tell me where this fuse is. Thank you.
Riordan
Thank you, Good Man. Never in my life would I have thought that it was under the back seat.
Swamp of Temenders
Who can tell? There was a problem - electrical flickering (dashboards, headlights, etc.), i.e. voltage surges, when installing an external RR according to the proposed scheme, the flickering disappeared, there are no voltage surges, but along with it the voltage on the battery dropped (at idle without load 12.3V, at full load from 10 to 11V). What could be the problem?
Irshat
Only inferior people put dislikes...
- Valera Boechin
- My compressor does not work, but I checked and there is no gas there, this could be the reason
- Martuni
I need your help. The battery light comes on and charging disappears. After turning on the headlights, charging appeared and the battery light went out. Now it goes out only when the low beam is turned on. The relay regulator has been replaced; the contacts on the chip are fine. Thanks in advance
leave a comment
Source: https://officially-official.ru/volkswagen/touareg/predohraniteli/
VAZ 2114 fuses burn out - how to prevent
The easiest way to eliminate a breakdown is to take proactive action. High-quality and timely diagnostics help prevent breakdowns and sudden circuit failures.
The manufacturer recommends performing basic procedures in a timely manner.
- Treatment of contact groups with special oils. The products isolate metals from exposure to oxygen and water.
- Periodic control of the seating density of elements. Over time, mounting connections can become loose, leading to loss of contact and the potential for arcing, which can burn out metal parts.
- Strength of fastening of consumers in sockets. The size fuse of the VAZ 2114 may blow out if the light bulb dangles in the lampshade or water gets inside when it rains.
- Serviceability of blocks and main mechanisms. It is necessary to carry out diagnostics of vehicle devices in a timely manner. The VAZ 2114 starter fuse often fails when there is damage to the electric motor or the retractor element touching the body.
The power supply system of a domestic car has its own disadvantages and design features. To prevent unexpected breakdowns, it is recommended to carry out diagnostics of the machine in a timely manner. The VAZ 2114 fuse panel will help troubleshoot the problem.
What can cause a fuse to blow?
A fuse protects a circuit from higher current than the circuit can handle. If the fuse is blown, it means there is a short circuit somewhere. It can be between two wires or the power wire and ground (car body).
A fuse can also blow if the equipment draws more current than it is designed to handle. For example, if the windshield wiper or fan motor is blocked when turned on, it will draw higher current and possibly blow a fuse.
The same thing can happen if the winding inside the motor is shorted. There are several common problems that cause fuses to blow in many cars:
- The most common case is when a metal object (such as a coin) falls into the cigarette lighter socket.
- The wire harness that goes into the trunk lid frays where it bends and shorts out and trips the fuse associated with the taillights or brake lights.
- An incorrect bulb installed in one of the headlights or taillights can also cause the fuse to trip.
- Damage to trailer wiring harness.
- A wiring harness connected to any equipment inside the engine bay is wiped and shorts the fuse. For example, in some older Mercedes-Benz vehicles, it was a fairly common problem where the insulation on the engine wiring harness would crack, shorting out the wires.
Previous post Intake manifold - how it works, what malfunctions occur
Next entry Generator - how it works, problems, symptoms, testing
Removing the head unit
In some situations, it may be necessary to remove the mounting block. This is usually caused by voltage surges or part of the circuit burning out. Also, if fuses burn out on a VAZ 2114, the reason may be hidden in oxidized or melted tracks or connecting terminals.
When asked how to remove the fuse box on a VAZ 2114, you must follow the simple dismantling instructions:
- open the negative terminal on the battery;
- from the inside of the cabin, you will need to disconnect the five main connectors of the wiring harnesses;
- dismantle the cover of the mounting block by clamping two terminals;
- the sixth pin connector is disconnected on the top side of the module;
- using a key No. 10 with an adapter, you need to unscrew the fastening of the main module;
- lift the mounting diagram with a screwdriver;
- remove the last terminal blocks from the bottom side;
- remove the mounting device.
Reinstallation is performed in the opposite order. The simplicity of the procedure is due to the fact that all terminals are different from each other and it is impossible to confuse their location.