Main malfunctions and the order of work to replace the muffler
The main malfunctions of Lada Kalina mufflers include:
- muffler corrugation burnout;
- catalyst malfunctions;
- gasket burnout;
- breakage of rubber fasteners, etc.
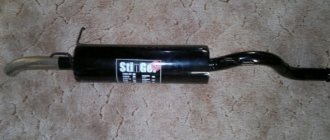
However, the main and defining defect remains muffler burnout. Therefore, we will study the issue of replacing the Lada Kalina muffler with our own hands, having previously prepared plumbing tools and the car itself for this. When preparing a vehicle for repair, we select a platform without slopes and install the car in the parking brake mode and first gear engaged.
The order of work when dismantling the muffler on the Lada Kalina:
- Having prepared the necessary tools for the repair, we dismantle the clamp that tightens the muffler pipe at the junction with the resonator. This operation is carried out using a pair of keys set to “13”; for convenience, you can select a head with a knob and a ring wrench.
- It happens that the nuts securing the plug are stuck to the base and are very difficult to unscrew even with the help of special liquids. When there is no longer any hope of safely dismantling the product, it is easier to prepare new fasteners, and the old nuts must be cut off with a grinder.
- After dismantling the tightening clamp, it is necessary to apply several gentle blows with a mechanic’s hammer along the circumference of the muffler bend to facilitate complete removal of the product. After this, use your hands to press the muffler in the direction opposite to the direction of travel of the vehicle.
- Then remove the rubber fasteners on the sides of the product.
- We dismantle the “glushak”, set the unusable part aside and install a new part, and do everything according to the “reverse” principle.
The technological operation takes only a couple of hours, after which the car is ready for use again.
Typically, mufflers can withstand quite a long service life. In my memory, there were many cars, and almost all of them had the same muffler service life. For example, on the Twelfth we replaced it at about 50,000 km, and on the Seven the resonator recently burned out when the mileage was 60,000 km. So far I have driven a little more than 40 thousand on Kalina, but thank God, so far everything is fine and there are no signs of burnout.
I’ll say right away that I didn’t want to remove and put it back using Kalina as an example, I’ll just show from previous experience how this procedure is performed, but with photographs using the example of my station wagon. I’ll just show you clearly what needs to be removed and unscrewed and where.
So, to perform this repair, you will need:
- WD-40 lubricant or its analogues, such as all kinds of liquid wrenches
- Keys size 13, preferably a socket and a head with a knob
- Hammer (may not always be needed)
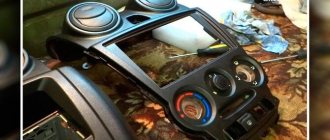
First, I’ll show you where the clamp connecting the resonator and muffler is located, since it is this that will need to be unscrewed.
First of all, be sure to apply lubricant to the bolts and nuts securing the clamp, since they stick thoroughly and in some cases it is simply impossible to unscrew it. After 10 minutes, unscrew the nuts. On one side you can completely, and the other just slightly unscrew.
After this, we move the clamp to the side and now you can knock it off the junction with the resonator with small knocks on the bend of the muffler. Often there are no problems with this step and it can be easily knocked down or even removed without any extra effort.
After this, you need to free the muffler from the fasteners and remove it from the rubber bands that hold it. There are two of them in total. The first is located near the rear beam. Shown more clearly in the photo below:
And the second is in the back of the car, almost at the exhaust pipe. Its location is also shown in the picture:
After these steps, you can safely and without any obstacles remove the muffler and replace it with a new one. Installation occurs in the reverse order of removal. The price of this part in auto parts stores is approximately 1050 rubles.
Tuning: replacing the catalyst on Kalina 8 valves with a 4-2-1 insert
Replacing valve seats with your own hands video
When you need to replace the catalyst on a Kalina with an 8-valve engine, how to change it to a 4-2-1 spider insert and the main stages of the process.
In a car exhaust system, a catalytic converter is needed to burn harmful elements in the exhaust gases to the level of H2O and CO2. It is quite difficult to predict its service life, since it depends on many factors. But many owners of VAZ cars prefer to get rid of the collector before the end of its service life. For these purposes, they use special inserts, which are an inexpensive alternative to a neutralizer. Further more…
Join the group and you will be able to view images in full size
One of the questions that interests novice drivers is the functional features of such a part as a catalyst. Why is this element needed in the car, what problems can arise with it and how to solve them? A catalyst (catalytic converter) is one of the elements of a car’s exhaust system; it reduces the proportion of toxic substances in the exhaust.
The gas that comes out of the exhaust pipe contains hundreds of dangerous compounds, including CO2 - carbon dioxide, NO, NO2 - compounds of nitrogen with oxygen, CH - hydrocarbon, etc. They have a detrimental effect on human health, a great deal the concentration of these poisons in the air can lead to the emergence of dangerous diseases. The Lada Kalina catalyst contains noble metals. With their help, toxic elements break down into substances that are safe for humans.
The operating time of the catalyst is on average 100,000 kilometers, but its breakdown can occur even earlier. The reason for this may be malfunction of the starter, low-quality gasoline, or damage to the integrity of the part due to driving on an uneven road.
Replacing the catalyst with a “spider”
Features and replacement of the VAZ 2114 catalyst
Lada Kalina cars of both the first and second generation are equipped at the factory with a collector-type catalytic converter-neutralizer. It is made in the same housing with the receiving manifold. Depending on the environmental class of the car (“Euro-2” or “Euro-3”) it has one or two oxygen sensors. When the catalyst fails, there is a need to replace it.
If the message “Check” appears on the information panel, the first thing you need to do is conduct computer diagnostics of the electronic control unit. With its help, you can determine whether the problem is really a malfunction of the car's filtration system or whether there is another breakdown. When the program confirms a malfunction of the catalyst, it is necessary to replace it - the part cannot be repaired. Most often, car enthusiasts prefer the option that involves installing a “spider” instead of a broken catalyst.
How to independently check whether the catalyst is clogged or not?
If for some reason you do not want or are not financially able to take your vehicle to a service station, you can carry out the diagnostics yourself. Below we will give a couple of recommendations.
1. Having provided yourself with an impressive flashlight, turn it on inside the part. If necessary, you can remove the catalyst. It can seriously fix to the base of the vehicle. It is recommended to lift vehicles on a bracket.
2. You can also find out by using instinct and scent. If you carefully read what was described above, the catalyst will emit gases with a rather unpleasant and very pungent odor.
3. The last method is to place your hand near the exhaust pipe. If everything is working fine, you will feel a tremendous amount of resistance. When the catalytic converter is clogged, you will not feel much resistance.
How to repair a muffler
Replacing a catalyst with a flame arrester: what consequences can there be
If your car's muffler requires repair or complete replacement, it is not recommended to do this work yourself, since there is a high risk that you will only worsen the condition of the exhaust system, and possibly the entire vehicle as a whole. In order to prevent such a situation, contact only specialized car services. In our car service center, qualified specialists with the necessary competence in the field of working with exhaust systems will competently diagnose the exhaust system of your car, and, if necessary, repair or install a new muffler in the shortest possible time.
If you encounter any malfunction in the exhaust system and you need to diagnose it, repair it or replace the muffler, then our salon specialists will be happy to help you with this, since we carry out all types of this work!
Tools:
- Medium Phillips screwdriver
- Medium flat screwdriver
- Pliers
- Ratchet wrench
- Extension
- 8 mm head
- 10 mm high head
- 13 mm high head
- Open-end wrench 13 mm
- Open-end wrench 17 mm – 2 pcs.
- Open-end wrench 19 mm
- 10mm straight box spanner
- Knife (or scraper)
- Metal brush
- Chisel
- Hammer medium
Parts and consumables:
- Intake manifold and catalytic converter gasket
- Sealing gaskets for intake module pipes (if necessary)
- Additional muffler gasket
- Aerosol lubricant such as WD-40 or similar
- Graphite grease
- Rags
Notes:
The sealing gasket of the intake manifold of the VAZ 11183, VAZ 21116 and VAZ 11186 sandwich type engines is made of two thin-sheet steel plates connected to each other by contact welding, lined with a non-shrinking heat-resistant material. The gasket is made common to the intake manifold and catalytic converter of the exhaust gas exhaust system.
If the intake manifold gasket is damaged, unstable engine idling may occur due to the suction of additional air into the intake tract, as well as exhaust gas breakthrough (the manifold “cuts”). If tightening the nuts securing the intake manifold and catalytic converter does not restore the tightness of the connection, replace the gasket.
1. Reduce the pressure in the supply system as described here.
2. Disconnect the wire from the negative terminal of the battery.
3. Disconnect the wire connector and air supply hose from the throttle body as described here.
4. Loosen the clamp securing the hose to the vacuum brake booster and remove the hose from the intake module.
5. Disconnect the hoses of the small branch of the crankcase ventilation and canister purge system from the intake module.
6. Using a 13 mm high socket, unscrew the rear nut securing the intake module.
Replacing the Lada Kalina catalyst: reasons for replacement
The most common reason that entails the installation of a spider instead of a catalyst is clogging of the honeycomb of the base of the catalytic element, both by fuel combustion products and by exfoliating particles of the base itself.
Natural degradation is normal. The catalyst, under favorable operating conditions, is designed for a service life of about 100 thousand kilometers.
Let's take a closer look at the moments when replacing the catalyst on a Lada Kalina car becomes necessary.
There are a number of factors that can significantly accelerate the destruction of the device:
- Problems with the formation of the correct fuel-air mixture. Both rich and lean mixtures have a negative effect here. A rich mixture leads to incomplete combustion of hydrocarbons and their deposition on the walls of the base cells. A lean mixture causes an abundance of oxygen in the exhaust gases, which has an oxidizing effect on the body at high temperatures. Also, due to an insufficient amount of fuel in the cylinder, misfires occur and unburned fuel is released into the catalyst. It can ignite while already in the manifold with the next portion of hot exhaust gases.
- Incorrect ignition timing. The fuel-air mixture is ignited at the wrong time. This leads to improper combustion and the formation of additional thermal loads on the catalyst.
- Gasoline is of poor quality. Gasoline saturated with impurities, after combustion, leaves soot deposits on the walls of the cells. In this case, rapid clogging of the catalytic element occurs.
- Coolant or oil getting into the cylinders. A leak in the lubrication and cooling systems leads to unauthorized penetration of working fluids into the combustion chamber. When they are burned, compounds are formed that lead to clogging or destruction of the catalyst.
In addition to the breakdown of the catalytic element itself, the housing itself often fails due to design flaws. The weld at the junction of the pipes of the first and fourth cylinders with the catalyst body is often destroyed. The escaping exhaust gases create increased noise. Exhaust also penetrates the interior, causing discomfort.
A failed catalyst increases the load on the engine, as it creates resistance to the passage of exhaust gases. This may manifest itself in the following symptoms:
- increased fuel consumption;
- reduction in engine power;
- failures when trying to accelerate sharply;
- reduction in maximum speed;
- problems with starting.
Description and device
Their presence can damage the device and negatively affect the operation of the motor itself if it enters the combustion chamber. The engine controller reacts to this by writing an error message to the ECU memory. The first oxygen sensors were heated only by exhaust gases. The name “lambda probe” is also found. On automobile forums, many pages have long been written on the topic of what a lambda probe is and what malfunctions it has.
The sensor is located in a special hole in the exhaust manifold on a thread very close to the cylinder block. With a faulty oxygen sensor, you will not be able to legally pass a scheduled technical inspection. The car will be sent for repairs, and the ECU will put it into emergency mode, in which it will not deliver its full power potential.
- single-contact;
- two-pin;
- three- and four-pin.
The quality of the fuel, namely the presence of organometallic additives in it, directly affects the accuracy of lambda readings. These additives are the most dangerous pollutants for the oxygen sensor when forming exhaust gases.
How to replace the speedometer cable on a VAZ 2101-VAZ 2107?
Note! Before buying this sensor in a car store, take exactly the same one that you had (you need to look at the markings for this on the old sensor, but for this, of course, you will have to remove the sensor), if you neglect this, the engine will most likely not work as expected should, we also categorically do not recommend that you take oxygen sensors without heating, (Even if your car was equipped with one), such sensors may not always give correct readings until they warm up, due to which the engine will again not work correctly, so before When purchasing a new sensor, be sure to take all these nuances into account!
1. The sensor is removed very easily, first remove the negative terminal from the battery (How to do this, read “in this article”, point 1) and then disconnect the deck and wire connectors, as soon as this is done, unscrew the sensor itself by the thread that is on applied to it and thereby remove it from the hole in the exhaust manifold and that’s it, you can install a new one.
Additional video: Watch the video that talks about the oxygen sensor, which is located below:
The Kalina oxygen sensor (photo 1), also known as UDC, allows the engine control system to adjust the fuel supply if the oxygen level in the exhaust gases increases, that is, the air-fuel mixture becomes lean. Oxygen creates an electrical potential difference, which amplifies the sensor signal.
Technical features of the insert for Lada Kalina 8V
The industry offers two types of tuning inserts, the design of each of them depends on the location of the pipes. Moreover, each design is designed for a specific power unit:
- Insert 4-1 is installed on forced engines with a speed range from 5,000 to 10,000 rpm. structurally suitable only for 16-valve engines.
- The 4-2-1 insert operates over a wider range and is considered a "low-end" insert. It is possible to increase engine power by about 3-5%. This is the model most often installed on the VAZ 1118.
Since it will not be possible to install a preliminary flame arrester on this VAZ car, you will have to carefully approach the issue of choosing an insert. The installation process of the part will not take much time if you follow all the recommendations.
Summary
According to some motorists, after tuning the car becomes faster, there is no hysterical roar when the revolutions approach 5,000. The exhaust sound has also changed, it has become more pleasant. In most cases, there is a decrease in fuel consumption. The financial component is also very noticeable - installing a 4-2-1 spider costs at least half as much.
We're sorry, but the requests coming from your IP address appear to be automated. For this reason, we are forced to temporarily block access to the site.
To continue, please enter the characters from the image in the input field and click "Submit".
Cookies are disabled in your browser
. We will not be able to remember you and correctly identify you in the future. To enable cookies, follow the tips on this page.
Removing the Lada Granta catalytic converter
Tools:
- Ratchet wrench
- Extension
- 8 mm head
- 13 mm head
- Open-end wrench 10 mm
- Open-end wrench 22 mm
- 13 mm straight box spanner
- Pliers
- Chisel
- Hammer medium
- Medium Phillips screwdriver
Parts and consumables:
- Aerosol lubricant such as WD-40 or similar
- Gasket of catalytic collector and inlet pipe
- A set of nuts securing the catalytic collector to the cylinder block
- Graphite grease
- Rags
Notes:
Carry out the work when replacing the gasket in the connection between the catalytic converter and the intake pipe with the cylinder head or when removing the cylinder head. The junction of the catalytic collector and the intake pipe with the mating plane of the cylinder head is sealed with a metal gasket. In the event that the gasket is burnt out or the nuts securing the catalytic converter and intake pipe are loose, exhaust gases can escape through this connection to the outside, which is accompanied by a characteristic sound. If tightening the nuts securing the intake pipe and catalytic collector cannot eliminate the defect, it is necessary to replace the gasket.
Carry out the work on an inspection hole or overpass. To avoid burns, it is recommended to start work after the exhaust system has cooled down.
1. Disconnect the manifold flange from the additional muffler pipe flange, as written here.
2. Remove the intake manifold/throttle assembly as described here.
3. Disconnect the oxygen concentration sensor (OC) wire connectors from the engine management system wiring harness connectors and remove these sensors as described here (control DC) and here (diagnostic DC).
4. Using a 13 mm socket, unscrew the two bolts securing the catalytic collector to the cylinder block bracket.
5. Using a 13 mm socket, unscrew the bolts securing the bracket to the cylinder block.
6. Using an 8 mm socket, unscrew the two bolts (see the first photo), and with a 10 mm wrench, unscrew the nut (see the second photo) securing the heat shield of the inner CV joint of the right wheel drive to the rear support bracket of the power unit.
7. Remove the heat shield along with the brackets.
8. Slide the collector along the studs of the cylinder head and lift it up.
9. Remove the metal gasket of the catalytic collector and inlet pipe.
10. Before installing the catalytic collector and intake pipe, clean the mating surfaces of the cylinder head, catalytic collector and intake pipe from carbon deposits with a rag and install a new gasket.
11. Before tightening new fastening nuts, apply graphite lubricant to the cylinder head studs.
12. Tighten the fastening nuts to the prescribed torque.
Notes:
Before installing the heat shield, it must be assembled with the collector brackets, but the nut securing the heat shield to the bracket must not be tightened, and the bolts connecting both brackets must not be tightened.
After installing the heat shield with brackets in its original place, you must check that all holes in the screen and brackets coincide with the holes for the fastening bolts. After the bolts are installed, it is necessary to check that the entire structure of these parts is in a free state. After this, you can gradually, step by step, evenly tighten the fastening bolts, while simultaneously checking that there is no distortion of the parts.
13. Install all removed parts in the reverse order of removal.
The article is missing:
- Photo of the instrument
- Photos of parts and consumables
Installing a spider in a 16-valve car
The sixteen-valve Kalina is equipped with a complex power supply and gas distribution system, so the work carried out will be more labor-intensive. The sequence of actions is as follows:
- removing the terminals from the battery, draining the coolant;
- loosening the clamps securing the air duct pipe and the throttle assembly to the filter;
- the pipe is removed;
- the chip is disconnected from the throttle assembly and oxygen sensor;
- the hose of the crankcase ventilation system is removed;
- the adsorber purge hose is disconnected;
- the receiver mounting bracket is unscrewed;
- the nuts are unscrewed and the receiver is removed;
- unscrew the upper and lower fastening nuts, remove the heat-insulating shield and eye;
- the fastenings of the spacer to the exhaust manifold are twisted;
- the heat shield is removed;
- the intake manifold is dismantled, for which you need to unscrew nine nuts near the block head and three at the exhaust pipe;
- “spider” is mounted;
- the lambda probe wire is extended, a mechanical or electronic snag is installed;
- The elements are assembled in the reverse order.
The catalyst prevents atmospheric pollution with carbon monoxide and other toxic substances. Its service life is not designed for more than 100,000 kilometers of vehicle mileage, so every owner will sooner or later be faced with the need to replace this element. You can replace the catalyst yourself or by contacting a service station.
It is important to remember that inept DIY repairs will aggravate the problem and cause additional costs in the future.
Maintenance instructions
Preventative washing of the catalyst with Hi-Gear and the like is done by emptying the bottle directly into the gas tank immediately before refueling the car. No further action is required on the part of the motorist - while driving, the ceramic honeycombs of the element are cleaned independently, and dirt flies out through the exhaust tract.
To clean or rinse a clogged neutralizer with your own hands, you will have to dismantle it. Drive the car into an inspection ditch, turn off the lambda probes in the car and unscrew the clamps holding the unit to the exhaust pipe or exhaust manifold. Then follow this algorithm:
- Thoroughly blow out the catalyst on both sides with a compressor, pumping up a pressure of 7–9 bar.
- Fill the ceramic honeycomb with ABRO carburetor spray foam. Pour the product through both pipes.
- Wrap the neutralizer with a rag and wait 20 minutes.
- Thoroughly rinse the internal mesh of the element under hot water pressure and blow it with a compressor.
- Repeat the operation again, dry the catalyst and make sure that the ceramic honeycomb is visible through. Reinstall the unit on the vehicle.
If you can't clean the catalytic converter with spray foam, you have nothing left to lose. Soak the element in kerosene or diesel fuel and leave for 12–24 hours. To be sure, diesel fuel can be diluted with a small amount of acetone or solvent 646 (ratio approximately 4:1). After a day, perform the cleaning procedure with an aerosol cleaner as described above.
Mechanical cleaning is carried out with fine sandpaper with periodic blowing with a compressor. The outer meshes are cleaned carefully, with slight pressure, so that the fragile ceramics do not crack. It will not be possible to remove carbon deposits from internal cavities using this method.
Often, instead of washing, car enthusiasts pierce contaminated honeycombs with a metal object to free the passage for flue gases. It is permissible to use such extreme measures only in one case - you have tried all flushing means and have not been successful.
Please note: driving with a broken catalyst not only harms the environment, but also costs you money: the lambda probe “sees” untreated exhaust gases, and the controller switches to emergency mode with increased fuel consumption. To solve the problem, you need to install a fake oxygen sensor, which leads to additional costs
https://youtube.com/watch?v=TOTqHFrimnI
Why do we need Spider?
“Spider” is the same manifold, but with separate removal of exhaust gases from the engine cylinders at the initial stage. The essence of the “Spider” is better purging and cleaning of the cylinders from exhaust gases due to pressure fluctuations in the exhaust system. To achieve the desired effect in the manufacture of the “Spider”, pipes of a certain length are used. Moreover, the pipes connected to the block head are installed in the order of engine operation.
There are two types of Spider currently sold on the market: 4-1 and 4-2-1. The difference between them comes down to the fact that in the first type, 4 pipes that are connected to the block head converge into one pipe, and it is already connected before the catalyst. The “spider” of the second type is different in that its 4 pipes first turn into 2 pipes, and those, in turn, into one, which is connected to the catalyst. In addition, the internal cavity of the “Spider” does not have the filling that is found in the standard manifold. This filling ensures compliance with the Euro-3 standard, and it also “presses” the VAZ 2114 engine.
The “Spider” type also influences the achievement of the desired effect. In order for pressure fluctuations in the exhaust system with type 4-1 to ensure good purging of the cylinders, the engine speed must be above 6500 rpm. That is, it is advisable to install such a “Spider” only on forced engines that provide high speeds.
Type 4-2-1 allows you to achieve the desired effect at low speeds, which makes it possible to use them on the VAZ-2114 even without modifications to the power plant.
It should be installed instead of a standard manifold, it will not particularly affect the operation of the engine; it will also require removing the catalyst and installing a resonator and a direct-flow exhaust system. In general, the entire exhaust system will have to be replaced. After such alterations, the VAZ-2114 will not meet any standards, but the car will become more playful. In addition, in the future there will be no need to replace a clogged catalyst, since it simply will not be in the system.
As for the disadvantages, the Spider provides a louder sound because the exhaust gases move through a direct-flow system. Many people like this sound, but when traveling long distances it can be very annoying. And the second drawback is that there can be no talk of any environmental friendliness.
But if you are tired of driving a VAZ-2114 with an engine that “drives” very calmly, then you should still install the “Spider”.
Pros and cons of deletion
I have prepared a small sign with the pros and cons of what will happen if you remove the catalyst
| MINUSES | PROS |
| Increase in harmful substances in the exhaust, decrease in the environmental component | There is no need to buy a new catalyst, because it is very expensive |
| The smell of the exhaust becomes much more toxic, sometimes this exhaust penetrates into the car (it smells unpleasant) | A small increase in power (really small in terms of error, about 3%) |
| Exhaust sound. After knocking out the catalyst honeycomb, it is advisable to install a flame arrester, otherwise there will be a ringing sound from the empty “can” (especially at high speeds) | You can install a 4-2-1 or 4-1 spider instead of an empty can, plus more power (which is said out of the blue) |
| You need to install either a fake or new firmware for EURO2 | Reduced fuel consumption (also about 3%) |
| Increasing the life of the power unit, because ceramic dust can get into the combustion chambers and wear it out prematurely |
As you can see, there are a few more advantages, the most significant is the price of this whole rework (removing it will cost several times, if not dozens of times, cheaper).
Now let's watch the video version.
In conclusion, I would like to say that removing the catalyst is NOT CORRECT AT ALL from an ECOLOGICAL point of view. After all, our planet is already polluted, and in this way you are making it even dirtier!
This is where I end, I think this material will help you make the right choice. Sincerely yours, AUTOBLOGGER.
Similar news
- How to unscrew a stuck bolt (nut). Let's disassemble the muffler, call...
- The catalyst is clogged. The main signs (symptoms), so what...
- Water in the muffler. Reasons, how to get rid of it and whether it can be drilled
Why knocking out is not the solution
About removing the catalyst , I already wrote an article and shot a video, it’s interesting to watch. There I said that, in principle, you can do this and “flash” it to EURO2 (remove the second lambda probe), install a flame arrester and drive.
BUT YOU KNOW , the car turns out to be downright “toxic”. Once again I will write my words from the upper paragraphs: - “exhaust gases can enter the car, through a window, or be sucked in by the stove (air conditioner). In the city, with traffic jams and low traffic, this is unpleasant to say the least, and if you are driving all day, it also has an adverse effect on your health. Dizziness and nausea are guaranteed"
BUT what to do? For example, some owners of KIA RIO or CEED write to me, especially from 2012 to 2014, when the warranty on catalysts was absurdly short (about 1000 km) and it could fail and “take down” the engine as a whole. And if the warranty has expired, the service life of the catalytic converter has also come to an end (and this could be for short runs) - WHAT TO DO THEN? Shouldn't we leave the engine to die?
Several of my readers wrote to me about the solution. Install a universal catalyst in the catcollector or simply weld it in front of the second lambda umbrella.
Moreover, now there are universal types, on a metal base, that is, much more reliable. And they don’t cost that much (you can get them for almost the price of a flame arrester, well, a little more). There are even options for EURO4, so the second oxygen sensor, which goes behind the catalyst, can show normal data (if not, you can screw up the snag, not even the firmware ).
By the way, someone even welded in converters from LADA PRIORA, and they worked fine.
The price tag that was announced to me is from 3 to 8,000 rubles, plus cooking work 2-3,000. As a result, for 5, maximum 11,000 you can get a normally working catalytic converter, and even on a metal base.
As a result, we remove the smell (harmful gases escape), do not pollute the atmosphere, and there is no ringing (empty) sound. Something like this. And the old one, which has served its service life, can be handed over, and even get money for it.
Now we are watching a useful video.
I’ll end here, I think my article was useful to you. Sincerely yours, AUTOBLOGGER
( 9 votes, average: 4.78 out of 5)
Similar news
How to unscrew a stuck bolt (nut). Let's disassemble the muffler, coll.
Removing the catalyst. Pros and cons, consumption, firmware - revealed.
It clogged and the catalyst fell apart. Signs and definition via ELM.
Add a comment Cancel reply
Good day everyone, I decided to write my review of the 2010 Toyota Avensis. Just want…
TOP articles for the month
I have many different articles and videos on various gearboxes, for example here...
I already have an article on the website about choosing memory cards (you can see it here), it’s very...
In the article - is it possible to open windows when the air conditioner is running (you can read it here), I was asked...
Technology for changing the catalytic converter to the 4-2-1 insert
To work, you need to prepare a set of keys for 13, 17, 19 and 22, you also need a socket head for 13 and a screwdriver with a flat blade. Parts you should purchase are two bolts with springs, a graphite connecting ring, an extension for the sensor, and a manifold gasket. Since the spider with tubes is longer than the standard neutralizer, it would not hurt to purchase a corrugation with double or triple braiding 200 mm long.
You must first remove the negative terminal from the battery. The further process of dismantling the standard part continues according to the following diagram:
- Remove the intake module using a 13mm socket, disconnect the injector wiring harness and the fuel supply hose.
- Unscrew the nuts securing the flanges of the intake pipe and catalytic converter, and then remove the pipe flange from the converter studs.
- Disconnect the oxygen sensor connectors and disconnect the wiring harness from the heat insulation shield.
- Unscrew the two nuts securing the catalytic converter bracket and remove the clamp.
- Unscrew the two bolts securing the fixing bracket to the BC and remove it.
- Unscrew the nut of the lower fastening of the rear pipe strut and remove the bolt of the front intake strut.
- Unscrew the nut of the upper fastening of the front strut and remove the wire tip, spacer and rubber bushing.
- Unscrew the upper nut of the rear spacer to the pipe and remove the spacer.
- Unscrew the nut of the cooling system pipe bracket and remove the bracket.
- Unscrew the two rear nuts securing the intake pipe and the converter to the cylinder head.
- Using a 13 socket socket in the front part of the engine, unscrew the two nuts securing the shield and the transport eye. Remove the insulating shield and eyelet.
- Using a 13mm socket, unscrew the two front nuts of the intake pipe and catalytic converter to the cylinder head.
- Unscrew the nuts securing the converter and the nuts securing the intake pipe, and then remove the pipe from the cylinder head studs.
To finally replace the standard catalyst on Kalina 8 valves with a modified spider, all that remains is to slide the flange off the studs and pull the assembly down. The head gasket seating areas should be cleaned.
The flange is cut off from the old catenary collector with a grinder and welded to a section of the pipe with corrugation. A snag is screwed into the sensor hole or the ECU is subsequently reflashed. These measures will get rid of the Check-Engine, and will also be cheaper than buying a new converter.
The insert is carefully inserted from above and placed on the cylinder head studs, after which the procedure for assembling the entire exhaust system is carried out. Corrugation can be excluded from the design, but its absence will significantly affect the vibration climate of the car.
Catalytic converter
A much more insidious defect is when ceramic particles begin to crumble from the surface of the honeycomb. The cause of destruction of ceramics is most often low-quality fuel, which burns out during the exhaust stroke. Moreover, crumbling begins in the hottest zone, on the edges of the honeycombs located closer to the engine.
When the engine operates at different modes, some of the exhaust gases may be thrown back into the engine cylinders. Ceramic dust, which is an abrasive and gets into the cylinder with the gas flow, will quickly damage the piston group and lead to scoring on the cylinder walls.
However, this phenomenon is not dangerous for all engines. We won’t even talk about models in which the neutralizer, contrary to global trends, is fixed under the bottom of the car, and therefore harmful particles would have to travel almost a meter “against the flow.” Some manufacturers, thanks to the use of correct design solutions, avoided these problems or managed to eliminate them in a timely manner.
How's the warranty?
Against the background of such an attitude towards the consumer, the position taken by the Kia concern causes a sharply negative attitude. Until the beginning of 2022, in the service book of cars of this brand there was an inscription that the warranty for the catalytic converter extends up to 1 (!) thousand kilometers. Roughly speaking, two refuelings, and then “bad Russian gasoline” can damage the catalytic converter, but the company is no longer responsible for this. True, from 2022 the warranty on the catalytic converter was extended to 150 thousand km.
In the author's opinion, the warranty on the catalytic converter should be at least as long as that on the car.
Now let’s take a closer look at what a car owner should and shouldn’t do to ensure that the neutralizer serves a long and happy life.
Causes of catalytic converter failure:
- Poor quality fuel - most often with a low octane number. The engine management system switches to late ignition. This causes the mixture to burn out at the outlet and an increase in the temperature of the exhaust gases.
- Incorrect operation of the ignition system (misfire). Fuel that is not burned in one cylinder is immediately ignited and burns in the neutralizer.
- Mechanical damage to the catalytic converter. Increased vibration of the power unit and impacts on the catalyst lead to crumbling of the ceramic block.
- Thermal shock. Instantaneous cooling of a hot neutralizer when overcoming a puddle, for example, can cause cracks in the ceramic element.
- Incorrect air-fuel mixture, caused, for example, by a faulty oxygen sensor. Leaky, leaking injectors will cause the same effect.
- Adding additives to gasoline. Cocktails from unverified manufacturers or a concentration imbalance may increase the exhaust combustion temperature.
- The newest engine designs with minimal toxicity are programmed to quickly warm up the converter. In cold conditions, to speed up warm-up, the engine control units initially over-enrich the mixture, which burns out on the surface of the converter.
- There have been blatant design defects in the neutralizer throughout history. For example, Suzuki carried out a recall campaign to completely replace converters on SX4 cars.
From personal experience
Second half of the nineties. I worked as a fleet manager for a commercial company. The boss calls and says: We will sell Karina (Toyota Carina E). Go to the car wash and let your engine shine like...
Toyota Carina E
In general, it burned and stopped. I returned to the car, opened the hood, opened the distributor cap, and there was a swamp. He wiped away the moisture, dried it and finally made it to the office. Now answer the question: where do you think the fuel burned?
What if it’s the end?
Not everyone can or will want to replace a failed catalytic converter on an out-of-warranty car with an original one. Before _
rogo it. What are the options for the development of events?
- Just knock the filling out of the neutralizer. This requires reflashing the control unit so that it “turns a blind eye” to the signal from the second oxygen sensor, or installing a mechanical or electronic switch. The mechanical one is a bushing in which a piece of the catalytic converter is fixed, and the electronic one simply simulates the correct signal from the oxygen sensor.
- Knock out the filling and install a flame arrester in its place. It consists of several chambers with holes that serve to reduce the temperature and pressure of gases. This somewhat reduces noise and facilitates the operation of other elements of the exhaust system. The “brains” of the car must be deceived, as described above.
- Install a universal repair catalytic converter instead of the ceramic block. Most often on a metal rather than ceramic base. The degree of cleaning will be slightly lower, but you will not feel like “pests”.
Tell us, how did you communicate with the “monster under the bottom” - the catalytic converter: does it work, was cut out, replaced?
You can get acquainted with the “illness histories” of cars of past generations by following the link.
Flame arrestor and catalyst. Advantages and disadvantages
A flame arrester is a kind of catalyst substitute. Both units have their pros and cons, but if we take into account the efficiency of the engine and the car, the flame arrester outperforms the catalyst on all fronts. The catalyst, due to its design, is a more complex device than a flame arrester; the materials used are rarer, which is very noticeable when you compare the prices of these parts.
The flame arrester costs significantly less and does not delay the exit of exhaust gases as much as the catalyst does. This in turn affects the power supplied by the engine to the drive. Due to certain factors, namely due to poor fuel quality or mixture formation in the combustion chamber of the cylinders, the catalyst tends to quickly fail (clog).
If the catalyst is not replaced in a timely manner, this will adversely affect the engine itself, because the exhaust process will not be carried out fully, and it can also harm people in the cabin, because the exhaust from the inability to find a way out through the muffler will smoke inside the car.
Also, when they want to achieve greater efficiency from the engine, they tune the exhaust system by replacing the catalyst with a flame arrester. This long-lasting exhaust “filter” will equalize the flow and pressure of gases leaving the engine manifold, thereby improving its technical characteristics.
The main disadvantage, which of course can cover up all the advantages of this unit, is that its filtration properties are not as good as those of the catalyst, simply put, they are not there. This means that significant harm is caused to the environment. In the Russian Federation, laws still allow the use of flame arresters as an alternative to catalysts, this is facilitated by established emission standards, but if you want to pull off such a scam in EU countries, you will not pass the scheduled technical inspection of the vehicle and will not be able to use the car.
Metal or ceramics?
Another important aspect is the metal or ceramic catalyst . The base of the honeycomb (on which noble metals are then sprayed) can be either metal or ceramic.
Now more and more manufacturers are switching to ceramic options and moving away from metal ones. This is also a big problem.
Metal neutralizer: There are many advantages - this option is much more reliable, it could last for a very, very long time. It is practically unafraid of physical shocks, temperature changes, exposure to water, the pressure of exhaust gases, and can more easily withstand a malfunction of the fuel supply system.
However, the disadvantages: - it does not clean the exhaust so effectively, and most likely it will not pass the EURO 6 standard, because the honeycombs cannot be made thin to increase the coverage area (heating is also slower, and the catalyst begins to work only at a temperature of about 300 degrees Celcius). Also, its production is more expensive than the ceramic version. Therefore, many manufacturers are now starting to abandon them
Ceramic base. Pros: – cheap, which is good for the manufacturer. It cleans the exhaust better (due to the fact that the honeycombs can be made smaller), warms up faster (starts working faster). This is where the positive aspects end.
Negative points: - more fragile design, it is more easily destroyed (service life may be minimal). And from the flow of exhaust gases (it happens that the exhaust manifold is made incorrectly), from temperature changes (when it cools sharply, for example, water gets in), from improper fuel supply, and even from the fuel itself. Another global disadvantage is that it crumbles and turns into ceramic sand, which can be sucked into the engine block (and most likely, scuffs will form).
In general, ceramics are better at cleaning waste (up to 98% of exhaust), but they are fragile and need ideal conditions.
BUT the scourge of modern cars is that ceramics are now used on many cars, from KIA, HYENDAI, TOYOTA, NISSAN to Chinese manufacturers.
Lada Kalina: catalyst replacement - final stages
The final phase of installing the spider on the Lada Kalina occurs as follows:
- We weld the standard mount for the oxygen sensor onto the spider.
- We install the new spider in its regular place and start it through the opening in the lower part of the engine.
- Next, the system is assembled from a corrugated intake pipe. We cut out the length we need in order to connect the spider and the resonator together. If you plan to completely replace the system, then forward flow will follow, without the remaining parts of the exhaust system.
- We connect the flange connections to each other.
- We connect the lambda probe with long wires to connect to the ECU.
We lower the car, screw on the manifold housing, and start the engine.
The final stage: we rewrite the data in the engine ECU about the firmware version. This will allow the computer to understand the new exhaust system as stock. There will be no error identification on the instrument panel.
Checking the lambda probe: method No. 1
The simplest diagnostic method is visual inspection. To make sure that the Kalina oxygen sensor is faulty, you need to inspect its tip. It should not have any traces of soot. If any are present at the tip, it means that an enriched fuel mixture has entered the cylinders. As a result, part of it did not burn and went directly into the collector.
Another sign of a malfunction is a shiny coating. This indicates a high concentration of lead in the fuel. It is worth noting that this metal severely damages the ceramic particles of the sensor and the latter is not able to work normally. Usually the presence of lead indicates poor fuel quality. You should not refuel at questionable gas stations.
Gray deposits also lead to sensor replacement. This indicates the presence of engine oil in the exhaust. This happens due to worn rings in the cylinder-piston group. But gray deposits also form when using third-party fuel additives.