A starter (from the English start) is an electric motor that rotates the internal combustion engine until it starts. This device is the largest current consumer in a car, since its only function is to create sufficient force to turn all the working elements of the engine.
In order for the electric motor to start, after turning the ignition key, the start relay closes the “plus” to the solenoid relay. The retractor relay closes the powerful positive wire to the electric motor itself, after which the mechanism begins to rotate and transmits force to the crankshaft through a gear transmission. In addition, the traction relay moves the drive gear under the driven gear. As soon as the ignition key is released, the gears are separated and the electric motor stops.
In this article we will study starters and their malfunctions in more detail, and also describe the algorithm for such an action as replacing the starter on a VAZ 2110.
Doesn't it turn?
If the starter on an injection VAZ 2110 does not turn, there may be several reasons for this.
- The culprit is the solenoid relay. If you insert the key, turn it, the instrument panel lights up, the fuel pump turns on, but when you turn it further, the panel goes out and the starter does not turn on, you should check the solenoid relay. Make sure there is voltage in it. Try closing the starter, turning off the alarm, which can also cause problems. If everything works separately, but in the end the starter does not turn on, then the reason is in the solenoid relay. It needs to be replaced with new ones and the problem will disappear.
- Overrunning clutch does not work. You started a cold engine, drove a couple of tens of kilometers, stopped to get out for a couple of minutes, returned, and the starter clicks, but does not turn on your VAZ 2110. Only when the car cools down, you manage to start the engine. First of all, the overrunning clutch, or popularly Bendix, is to blame. Replace it with a geared analogue. Additionally, check the wires that go from the Bendix to the battery.
- There are no contacts. The starter starts, but it is very difficult, making a lot of clicks. If the situation repeats regularly, be sure to check your contacts. The terminals are probably oxidized. Cleaning didn't work? Then check the ground contact with the car body and the starter contacts. For them, oxidation is a natural phenomenon. Another way is to ask a friend to turn the key in the ignition, and then hit the relay with a hard object a couple of times. If the car starts, then the closing contacts are simply stuck. But here it is better to completely replace all the relays than to repair and disassemble the unit.
- The problem is in the immobilizer. It is not uncommon for the starter activation circuit on the injection VAZ 2110 to be disrupted due to the immobilizer. The engine may suddenly stall, the starter stops turning, and it is not possible to start it even with a push. The terminals are clean and the battery is charged. If the immobilizer is turned on, this may be the cause. Due to the protection being triggered, the engine does not respond. You will no longer be able to start the car, so call a tow truck and go to the nearest service station.
- Problematic injector. We have examined almost all starter problems characteristic of a carburetor engine. But today the “tens” are injection ones. They don’t really like low-quality fuel, which VAZ 2110 owners so often like to refuel with. Therefore, the starter may not work for the simple reason that the injector is clogged or dirty. By performing a flush, you will eliminate the problem.
Instructions for repairing and replacing the starter on a VAZ 2110
All repairs to the device are carried out according to specific instructions:
- First of all, you need to disconnect the battery, disconnect the wire from the starter and remove it altogether.
- The starter is disconnected from the engine, and after that the nuts are unscrewed and secured.
- If an old device is replaced with a new one, then it is simply replaced.
- After the nut on the traction element is unscrewed, immediately remove the relay and unscrew all the fixing bolts.
- After this, it is necessary to dismantle the anchor, and to do this, you need to lift it up a little.
- Then the pins are removed and the starter cover can now be removed. First, it is removed along with the drive, and then the brushes are removed.
- Now you need to remove the gear from the anchor, and then remove the anchor itself, but this happens after removing the gearbox. And now you can see all the malfunctions of the device.
- After this, you can remove the gear mechanism and you can inspect all the necessary faults.
- To dismantle the restrictive ring, which is located above the locking ring, it is necessary to use a mandrel. All elements in the device can be replaced with new ones if necessary.
- When the brushes are removed from the device, they need to be checked. If there is wear on the unit, they should be replaced with new ones. Reassemble the device in the reverse order.
Where is
The VAZ 2110 starter is located on the gearbox housing and is mounted on two studs. It is easier to see the starter in detail on 8-valve engines, since there is more free space in the engine compartment with such an engine. In a 16-valve engine, to see the starter, you need to remove the air filter housing.
Removal
Dismantling and disassembly is carried out as follows:
- Disconnect the negative voltage from the battery;
- Remove the air filter;
- Disconnect the block of wires going to the traction relay;
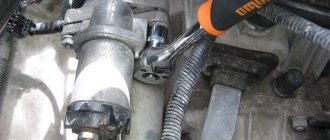
- Unscrew the nut securing the tip of the power drive (wrench 13);
- Unscrew the nuts securing the starter (key 15). The top nut twists easily, but the bottom one still needs to be approached;
- Remove the starter;
- Unscrew the nut from the lower terminal of the traction relay and disconnect the wires;
- Unscrew its mounting bolts (key 8) and remove.
Starter relay (retractor)
The starter retractor relay is located on the starter itself and serves to move the bendix to the flywheel, and then engage with it. This relay often fails due to poor workmanship. It is quite easy to understand that the solenoid relay has failed; with such a breakdown, the starter will spin at idle, but the engine will not rotate, since the moving part of the drive (bendix) will not engage with the flywheel.
How to replace the starter
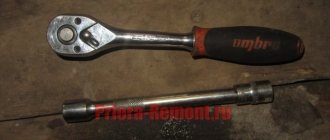
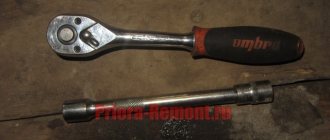
The simplest job is to replace the electric motor. For this you need to prepare the following tools:
- 13 mm and 15 mm socket heads;
- handle equipped with a “ratchet”;
- extension.
First of all, you will need to disconnect the negative terminal of the battery. This is necessary to ensure that no power is supplied to the electric motor. For ease of operation, the air filter housing should be removed. Next, follow the instructions:
- It is necessary to disconnect the power wires from the solenoid relay: remove the red chip and unscrew the retaining nut. Move the wires to the side to give yourself room to manipulate.
- Locate the nuts where the starter attaches to the transmission housing. Unscrew them to remove the electric motor. Most often, car enthusiasts miss the top nut, do not forget about it.
- Once you remove the last nut, the starter can be removed with bare hands.
If you do not want to repair this unit, you can replace the removed electric motor with a new one. However, in order not to waste extra money, we recommend that you first inspect the starter and repair it, if possible.
Possible starter failures
There can be a large number of starter breakdowns, but most often they are all of the same type. Below are all the most common starter failures.
Brush wear
Starter brushes are a copper-graphite part that conducts electric current. The brushes are in direct contact with the starter armature and rub against its commutator, conducting electric current. During long-term use, brushes become unusable due to friction and must be replaced. This breakdown is not expensive or complicated; you just need to remove the starter and replace the brushes.
Bendix wedge
The Bendix is directly connected to the flywheel and quite often, wear appears inside it or on its gears due to high load, which makes it impossible to start the car from the starter. By design, Bendix is an overrunning clutch that rotates freely in one direction and is locked when rotating in the other direction. This part is sold separately and can be replaced as soon as possible.
Gearbox failure
The VAZ 2110 starter is geared. This modification allows you to reduce the load on the battery and rotate the engine crankshaft much easier and faster due to the additional ratios. Quite often, wear appears on the gears, which can lead to jamming or even breakdown of the entire gearbox.
Winding break
Since large currents flow in the starter, the winding in it is quite powerful and can withstand large currents, but sometimes a large cross-section of wires is not able to preserve the winding and it burns out, rendering the starter unusable. Such a breakdown can be repaired by replacing the rotor.
Solenoid relay
The retractor is an electromagnetic part that is retracted under the action of an electromagnetic force, driving the bendix inward and engaging it with the flywheel. Inside the relay structure there is a regular coil, which quite often burns out and damages the starter.
Almost all starter failures can be repaired by replacing the broken part with a new one.
Replacement
In fact, it is theoretically possible to repair the relay. But in reality this is rarely justified in terms of financial and time costs.
A much simpler and more rational solution is replacement. The procedure will not take much time, but the unit will definitely work properly and reliably. It is unknown what the result of the repair will be.
If the relay is incorrectly repaired, this can lead to blocking the start of the power unit. The cost of repairing such a problem is much higher than buying a new high-quality relay.
Replacing and installing a new solenoid relay will not be a problem, since the procedure is performed in the reverse order of disassembly.
Proceed with caution, keeping an eye on each item you take apart and put back together. Clean some contacts, if necessary, tighten loose fasteners. Whatever one may say, as the car is used, it shakes violently and vibrates, which leads to the banal loosening of nuts and bolts. What's most interesting is that this often leads to a whole range of problems. Therefore, make sure that each individual fastener is securely fastened.
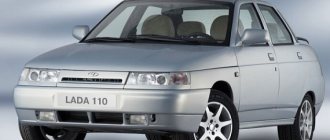
In 1995, a completely new model, the VAZ 2110, rolled off the assembly line of the Volzhsky Automobile Plant. During the production process, it, like all models of the plant, was subject to various modifications. The engine starting system has also undergone changes. In 2003, the so-called starter relay began to be installed on cars of this model. What is this relay for? Where is it installed, and is it possible to install such a device if it is not provided? The answers to these questions are outlined in the article below.
The starter doesn't turn over
There are many reasons why the starter does not work, but first of all you need to check the most common reasons why the engine will not start.
Checking contacts on the battery
Often the reason when the starter does not turn is due to loose terminals on the battery or their oxidation. It is enough just to clean the oxidized terminals from chemical reactions and tighten them with a force that will ensure reliable contact.
Battery discharge
Quite often, especially in winter, after a period of inactivity, the car’s battery may discharge, and thickened oil during parking will not allow the weak battery to rotate the crankshaft with the starter. You can check the battery with a regular multimeter; in winter its voltage should not be less than 12V, in summer not less than 11V. This voltage is not an indicator of the battery charge; at such values it is better to charge the battery.
Egnition lock
In some cases, the contact part of the ignition switch may fail. This is due to aging or poor quality parts. In this case, when turning the key, the contacts will not close to turn on the starter.
Winding break
If the winding on the stator or rotor of the starter breaks, the magnetic field that rotates the armature will not appear and the starter armature will not move.
Reasons for replacing the starter
The required node is located in such a place that it is not always possible to examine it immediately.
However, if you look from a certain angle, this element is quite easy to find. Every part in a car wears out over time, and the starter is no exception. The most common reason for replacement is the appearance of clicks when turning the key. This phenomenon does not allow the engine to start. Another reason could be poor scrolling. When trying to start the internal combustion engine, you can observe that the mechanism is turning, but very weakly. In this case, it would be useful to check the battery.
Unusual noises (such as crackling noises) may occur. Such situations are quite simply determined.
Main causes of malfunction
Minor or partial repairs will not always save the situation. But before removing the starter from the VAZ 2110, we recommend that you familiarize yourself with the main reasons for its failure, which serve as a reason for replacement.
- When turning the ignition key, a grinding noise occurs in the engine compartment. This is the cause of a faulty bendix or flywheel.
- Clicking noises are heard when turning the key. The reason is the solenoid relay, which needs to be replaced.
- The engine turns over with a friend. This indicates that the starter brushes are worn out.
Characteristic malfunctions of the mechanism
If the device stops working, the reasons may be:
- Low battery. Before repairing the VAZ 2110 starter, you need to make sure that the battery is fully charged and operational.
- The appearance of oxidation on the wires, as well as the terminals of the mechanism. As a result, the contacts can no longer transmit current, and therefore the operation of the starter device will be impossible. This malfunction also includes poor fastening of the wiring, in particular the lugs. In this case, in order to get rid of the malfunction, you will need to clean each contact, as well as the terminals. If during the diagnostics you notice that there are loose elements or clamps on the mechanism, then they should be secured as much as possible. In addition, the connecting components will need to be treated with Vaseline or grease, this will further prevent oxidation of the contacts.
- Failure of the traction relay. Due to the inoperability of this device, short circuits may occur in the unit, which will lead to a complete stop of the mechanism. A failed element will need to be replaced. The reason may lie in a broken electrical circuit.
- Failure of the traction winding - such a malfunction can also cause short circuits in the system.
- Failure of the contact part of the ignition switch. Such a malfunction, as a rule, cannot be repaired, therefore, when it occurs, the contact group must be replaced.
- Anchor failure. Its malfunction may manifest itself in the fact that this element cannot scroll as a result of complications during rotation. For more accurate diagnostics, this component should be dismantled and the efficiency of its rotation should be diagnosed. If the diagnostics confirm a faulty armature, then the device must be replaced (the author of the video is the stas di channel).
Replacing the unit
Now another question arises - how to disassemble it? There shouldn’t be any particular problems with this matter if you arm yourself with the instruction manual and also read our recommendations.
Arm yourself with a set of keys for 10, 13, 15 and 8 millimeters. Actually, you don’t really need anything else in terms of tools.
The sequence of dismantling and repair is as follows:
- Drive the car into the pit or lift it using a lift. You must have access to the underside of the car.
- If you have just arrived, give the engine some time to cool down. It is better to work with a cold engine.
- Remove the negative cables from the battery.
- First remove the protection and then the tin casing that protects your gearbox. To do this, you will need two keys - 8 and 10 millimeters.
- The power wire plug is removed from the starter. You just need to pull it towards yourself a little.
- Now take a 13 mm wrench and use it to unscrew the power wiring located on the solenoid relay.
- Place the loose wire aside and secure it with something temporarily so that it does not interfere with further repairs.
- The starter is attached to the gearbox housing with two nuts. They are easily loosened with a 15mm wrench. If you have problems unwinding, lubricate the fasteners with the almighty WD40.
- Dismantle.
- Now check the condition of the bushings on the gearbox housing.
- Make sure that the armature shaft is in good condition; when moving, there should be no play or jamming. If such defects occur, then it is recommended to immediately replace the bushings with new and high-quality ones.
- There are always two bushings. One is at the bottom of the starter, and the second is on the gearbox housing. The bushing on the starter can be changed without any problems, but difficulties may arise with the second one. To dismantle it, you need a special tool called a rubber. It is better to entrust the work to specialists from a service station.
- If the cause of the starter malfunction is the bendix or the solenoid relay, there is no need to call the experts for help.
- To remove the relay, unscrew the power wire, or rather its fastening, from the starter housing. You will need a key for 13.
- Using a size 8 wrench, remove the two bolts securing the relay to the starter housing. It is important to be careful here, because when removing the bolts, there is a spring in the relay that can spring back. Hold it with your hand when dismantling.
- Remove the relay piston from the rocker arm hook located on the bendix.
- Proceeding in reverse order, install a new relay.
- If you need to replace the bendix, then remove the solenoid relay, unscrew the two bolts with a 10mm wrench at the back of the starter. Now disconnect the starter housing from the front of the starter where the bendix, rotor and fork are located.
- Use a flathead screwdriver to pry up the plastic fork to remove it from the armature, and remove the armature itself and the bendix from the front of the body.
- Remove the retaining ring located on the tip of the armature and remove the desired bendix.
- The structure can be assembled in the reverse order, but the splines must first be lubricated with Litol.
- Test the new starter in place before beginning installation. To do this, connect the power terminals of the battery.
- The nuts responsible for fastening the terminals are tightened with a 13mm wrench. But it is not recommended to apply much force, since the terminals are made of copper. Clamping too hard will damage the threads, causing even more problems.
We figured out how to disassemble the starter on a VAZ 2110 and we can say that this procedure is not particularly simple, but it does not require mandatory execution by a professional auto mechanic.
The starter on the “ten” is somewhat capricious, but if you operate the car correctly, check the condition of the contacts, and also periodically flush the engine on the injection VAZ 2110, it can last a long time and reliably.
How to check the performance of the starter on a VAZ 2110
Of course, you will always have time to disassemble the device, but you should check why the device does not work.
And this check can be done:
- It is necessary to turn the gear in the same direction as the armature of the device turns, and try in the opposite direction, and this should not happen. And if it scrolls in the opposite direction, then this is already a malfunction.
- It is also worth checking the movement of the coupling along the shaft; use a screwdriver for this. If the device is functioning normally, the coupling should turn easily and without snagging.
- To check the serviceability of the starter, you need to connect the wires from the battery. If the device is working properly, then the clutch will have a characteristic click when it extends, and if it does not turn on at all, then you will need to disassemble the starter and find out the reason.
- If the starter stops turning at all, you need to check the armature, that is, remove the cable and connect it to the bolt with contacts. If the armature is working properly, then it will rotate very quickly, but there are cases when the movement is too small, in which case the armature is not working properly.
And now it’s worth talking about how to properly repair a starter on a VAZ 2110 with your own hands. And it’s immediately worth noting that without removing the starter from the car, it is impossible to check its performance and not even carry out repair work.
Step-by-step photo report on starter repair
I decided that it was the Bendix, but it turned out that it was not the problem, it was perfect.
removed the starter
Bendix is ideal
Just in case, I checked the flywheel ring, it is also in perfect condition.
To begin with, I sentenced the retractor. Although it worked, the contact of the supply pin was burnt. The pin got so hot that it melted the attachment point. It is clear that this is most likely not a cause, but a consequence.
burnt contact
I immediately bought a new retractor
New traction relay
Further disassembly of the starter revealed a broken planetary gear. It is plastic, burst and crumbled. Now it’s clear why the starter jammed.
The cost of a new metal gear is 150 rubles. The cost of the assembled gearbox is 750 rubles.
There is no point in taking it as a collection, because... All other parts of the gearbox are in excellent condition. I also purchased a tool to remove the retaining ring for RUR 170
I assembled the gearbox with a new metal gear. Lubricated it with CV joint.
I put the starter in place, and a miracle happened: the car started up normally.
Repair cost
Retractor - 620 RUR Gear - 150 RUR Pliers for retaining rings - 170 RUR Lubricant, wash total 1000 RUR
But it was too early to rejoice; after driving for a couple of days, the problem partially returned. The starter sometimes jammed and in general began to turn noticeably slower. I had to take it off again. This time, I was not lazy and disassembled it completely. It turned out that the magnets had fallen apart.
Most likely, this happened as a result of the starter jamming on an old, broken gear and its subsequent overheating.
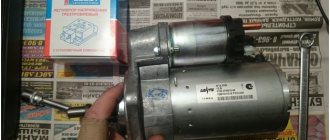
As a result, I didn’t bother with further repairs and bought a new, factory, KZATE gear starter for 3200 rubles.
Now it starts just fabulous. The new starter spins like a hurricane. I should have not been too lazy right away and disassembled the starter completely, it would have saved money and time. But there is also a plus: I gained interesting experience in repairing gear starters.
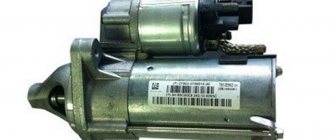
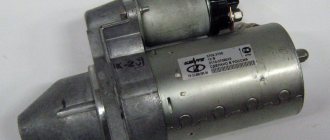
Tens starter device
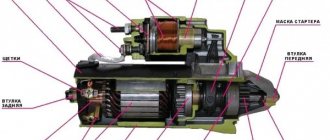
The VAZ 2110 is equipped with a mechanism model 5702.3708, which is a DC motor containing two main components: a traction two-winding relay; planetary reductor. This motor is excited by permanent magnets. They are attached from the inside of the starter housing, which is made of steel. The specified body is connected to the covers (fastening is done using two studs).
The starter design includes an armature and a stator. The armature shaft rotates in cermet liners, and from it the rotation goes through the planetary mechanism to the drive. When the starter starts, the car battery transmits voltage to the relay coils. The armature, experiencing the influence of a magnetic field, is retracted, after which the planetary gear gear engages with the flywheel, which causes the contact bolts in the device to close.
After this, the armature remains retracted, and its fastening is ensured solely by the holding winding. When the driver turns the key in the lock, de-energization of this winding is noted. This causes the anchor to take its initial position.
How to repair a VAZ 2110 starter yourself
As a rule, the starter on a car of any brand performs one of the most important functions. This is a real electric motor, without which the car engine will not fully start.
The word starter is English, which translated into Russian means start. How does a starter work? Immediately after current enters the device, it begins to work and supplies torque further to the engine. The principle of operation is simple, but it often happens that the starter fails. We will talk about this in this article.
Let's try to disassemble its circuit and fix it ourselves.
starter
Operation of the VAZ 2110 family starter, faults and solutions Autosite
Technical characteristics of the starter for cars of the VAZ 2110 family Rated power, kW…………………………………………………………………………………..1.55 Current consumption at maximum power, no more , A………….375 Consumed
Technical characteristics of the starter for cars of the VAZ 2110 family Rated power, kW…………………………………………………………………………………..1.55 Current consumption at maximum power, no more than, A ………….375Current consumption in a braked state, no more than, A…………..700Current consumption at idle, no more, A…………………………….80
Features of the starter device type 57.3708 The starter type 57.3708 installed on VAZ 2110, VAZ 2111, VAZ 2112 cars (Fig. 7-15) is a direct current electric motor with excitation from permanent magnets, with a planetary gearbox and an electromagnetic two-winding traction relay. Covers 2, 6 and stator housing 3 are tightened with two studs. The armature shaft 23 rotates in two metal-ceramic liners installed in the cover 2 and support 21. Four permanent magnets 22 are fixed in the stator housing.
Rotation from the armature shaft 23 is transmitted to the drive shaft 14 through a planetary gearbox, which consists of a central gear 20, three planetary gears 10, a carrier 19 and an internal gear 18. Planetary gears rotate on needle bearings. The starter connection diagram type 57.3708 for VAZ 2110, VAZ 2111, VAZ 2112 cars is shown in Fig. 7-16. When the starter is turned on, the voltage from the battery is supplied through the ignition switch to both windings of the starter traction relay (retractor II and retainer I).
How to recognize a starter malfunction
As you know, a new car can operate for about five years without breakdowns. Then any “spare part” can fail, including the starter.
Its malfunction is determined quite simply. You don't even have to take your car to a service center to understand this.
The car does not start, or the starter turns off spontaneously. Tapping or uncharacteristic sounds are often heard.
Many young and inexperienced motorists do not pay attention to these nuances and continue to drive. And this directly affects the starter, and even if it could have been saved, then after that it may become practically unusable.
Experienced drivers don't allow this to happen. They carefully monitor their car and when such symptoms are detected, they immediately take action.
Disassembly and repair of brushes, armatures, bushings and starter assembly dozens
The brush holder is removed from the commutator side by removing two screws. The pressure springs and the entire brush assembly should be inspected, paying special attention to its stoppers. All deformed elements are immediately replaced. Installing new brushes is a simple process, so there is no need to describe it in detail.
But you may have to “tinker” with the armature, since it is often the reason that the “ten” starter does not turn (and replacing the bushings can take a lot of time). It is advisable to lightly grind the armature commutator, and also turn it on a lathe if its roughness is high. The armature is replaced when the runout in relation to the axles of its core is more than 0.08 millimeters. It is also recommended to install a new anchor if there are large nicks and burrs on it.
It may be necessary to replace the bushings (the shafts rotate in them), which are located on the drive side in the cover of the trigger mechanism we are describing. Installation of new bushings is recommended if there are holes on them and if they are heavily worn. Reassembling the starter is done in reverse order.
Starter repair
Repair of the VAZ 2110 starter is carried out immediately after the problem is discovered. You need to arm yourself with patience, the necessary tools and first learn about its scheme.
VAZ 2110 starter diagram
The VAZ 2110 car starter is a small four-band electric motor. It, as mentioned above, ensures the primary rotation of the crankshaft.
On average, three kW of energy is enough to start the gasoline engine on a VAZ 2110. Repair of the starter is necessary when the device is not able to ensure the engine operates. The starter itself is a DC motor that is powered directly from the battery. The starter design has 4 brushes, thanks to which the electric motor increases its power by receiving power.
starter brushes
Other main parts and elements of the starter include:
- drive shaft;
- gear with the inner ring of the overrunning clutch;
- drive shaft support with liner;
- relay armature;
- winding;
- brush holder;
- permanent magnet;
- armature core and much more.
Types of starters
As a rule, starters come in two types: with and without a gearbox. Experts advise using the first option (this is exactly what is used on the VAZ 2110). Such a device will require less current for normal operation and will provide torque to the crankshaft when the battery is weak. But prolonged use of this type of starter leads to its rapid breakdown. The rotating gear fails. As for a starter without a gearbox, it directly sends forward motion to the gears. Devices of this type have some advantages over starters with gearboxes. They are simple in design and easy to repair.
Dismantling
In order to begin repairing the starter, it is necessary to remove it. Let's look at its connection diagram below:
starter connection diagram
It is advisable to lift a VAZ 2110, the starter repair of which is carried out by yourself, onto an overpass or pit. You can also put the car on a jack to make it more convenient to work.
According to the diagram, we see that the starter receives power from battery 1. In addition, the diagram shows generator 2, switch 4 and starter 3 itself.
So, let's start dismantling, but don't forget to remove the engine splash guard:
- Disconnect the negative wire from the battery;
- disconnect the control wire from the starter traction relay;
- Using a key set to “13”, unscrew the nut of the “plus” wire on the relay:
- remove it;
- using a wrench set to “15” (it is rare and you can use a socket head), unscrew the 2 nuts securing the starter to the clutch housing;
removing the starter
- removing the starter;
- Using a “10” head, unscrew the nut of the lower terminal of the traction relay;
- release the terminal of the wire tip;
- Using the “8” head, unscrew the two bolts on the traction relay;
- we remove it.
Design and principle of operation
The VAZ 2110 starter does not have a very complex design, but a person who wants to repair this mechanism should know that its elements include:
- Drive shaft;
- Hubs with ring;
- Cover sleeve;
- Gears equipped with teeth and a coupling ring;
- Carrier;
- Drive shaft supports equipped with a liner;
- Anchor core.
- Gear axles are of the planetary variety.
- Permanent magnet;
- Gaskets;
- Frame;
- Collector;
- Lever bracket;
- Drive lever;
- The back cover is equipped with a special sleeve;
- Anchor relay and shaft;
- Holding winding;
- Brush holder;
- Traction relay core;
- Contact plate and bolts;
- Staples.
The starter components described most often require replacement, diagnosis or repair when problems occur.
Four devices creating a magnetic field are mounted to the starter housing. On the inside they are secured with an aluminum sleeve. The lid is tightly attached to the body. Reliable fixation is ensured thanks to two studs. The anchor shaft rotates in special bearings.
The starter plays a major role in starting the car, as it rotates the crankshaft
Through a planetary type gearbox, the torque “goes” to the drive shaft. Its transmission is ensured by a special gear. After the vehicle starts moving, it ensures their separation in order to protect the gearbox from damage.
When starting the engine, voltage is transmitted to two windings of the traction relay. After closing the contacts it stops working. The voltage should not exceed 8 V. If its value is higher or lower, then this “indicates” that there is a problem in the system.
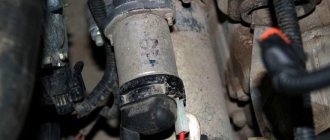
The starter on the VAZ 2110 is located to the left and slightly below the battery
Lada 2110 “AGRESSOR” › Logbook › Repair of solenoid relay contacts VAZ 2110
Hi all! I haven’t written anything in the logbook for a long time. And there were no breakdowns. But a week ago I drove up to the store and turned off the car. And after 10 minutes, when turning the ignition key, the car showed no signs of life. A minute of confusion, and I try again, again zero. I went through all the possible breakdowns in my head. I opened the hood, closed the two retractor bolts with a screwdriver, the result was zero. I immediately realized that the starter had come to an end. I had to push it to start it. I drove it into the garage. I removed the starter. I started to unscrew the nut from the 2nd retractor bolt, from which the + goes to the starter. And either the thread is Chinese or I’m a handyman :). As a result, the nut came off with a piece of the stud.
Then I removed the retractor and began disassembling it. I unscrewed 2 bolts. And he began to unsolder the ends from the coil. (When you unsolder, do not pull too hard)
This is the view, without the contact group.
But the contact group itself has become in poor condition over time.
I found contacts from other retractors and chose those marked with a rectangle.
I would like to note right away that if you don’t find the contacts from the retractor, you can buy copper bolts for 6 or 8 at any auto store. I decided to put the bolt at 8 instead of 6. I clamped the body of the contact group and drilled a hole at 8. (Drill with drills incrementally, and not immediately 
The next step was to make the shape of the contact, and grind it down a little on top since it was thicker.
He clamped it in a cleat and began to grind it down. I decided to also replace the second contact, since it was also in poor condition.
The finished look of the contacts sits in their places like a glove, I immediately secured them at the back with nuts.
I also decided to clean the contact plate.
I started putting it back together.
I decided to drill through the tin with a small drill so that the wires from the coil could simply be inserted into the holes and then soldered with tin.
Don't forget to put on the rubber seal.
Then I tightened the bolts of the contact group and soldered the coil contacts.
As you can see, everything can be done with minimal repair costs, rather than buying a new solenoid relay for 1000 rubles.
P/S. Please do not write that it is easier to buy a new retractor, etc. It’s more interesting for me to repair it myself than to immediately go and buy a new part!
How it works
Plus, when the contacts on the traction winding are closed, the starter motor is supplied with power from the battery. The contacts are washed out, the blocking is activated, due to which the retractor winding is “cut out”.
The retractor is controlled directly from the ignition switch. Plus it plays the role of starter protection. The fact that the relay will require an impressive amount of current leads to gradual wear of the contacts in the contact group.
This can be noticed by the unclear start of the power unit; periodically the starter may not operate or may rotate the engine slowly. You can solve this problem on your own.
How should VAZ 2112 retractors work?
Efficiently operating mechanisms that retract the VAZ 2112 are the key to a quick start in any weather conditions. That is why the driver needs to regularly carry out preventive inspections of the unit. A serviceable VAZ starter solenoid relay does not make any extraneous sounds.
If, when trying to turn the key in the ignition switch, the driver hears a series of clicks or creaks, this indicates that they need to start looking for a breakdown. The sooner this happens, the greater the likelihood of not being left without a vehicle for a long time.
Restoration of technical condition
Due to physical wear, external influences or manufacturing defects, the starter solenoid relay may need to be replaced. It is not recommended to delay this, otherwise the list of car components requiring repair will expand significantly. To carry out restoration work, an overpass or inspection hole will be required. The first is located in the GSK or at the service station, and the second is present in many garages.
Before you begin troubleshooting, you must remove the negative terminal. If the car has a mudguard or crankcase protection, then they must also be removed. The further procedure is as follows:
- Unscrew the nut located under the bottom of the starter;
- remove the terminals located on the VAZ 2110 starter solenoid relay;
- unscrew the starter mounting nut;
- disconnect the relay directly from the starter;
- when unscrewing the fastening nuts, it is necessary to hold the spring with utmost care;
- After removal, the core is checked - it must remain in the starter housing 2110.
Repair
You should start with the pull-out relay. You should remove it carefully, as you can easily pull out the contacts. They need to be inspected for oxidation. If there is a lot of rust, then clean the copper contacts - this applies not only to the lever, but also to the bolts.
You can check the relay using a tester:
- “Minus” should be applied to the housing, and “plus” to the flat contact coming from the ignition switch.
- There is an alternative method, where the “plus” goes to the flat contact, and the “minus” to the brushes that are installed in the housing. When working properly, you can hear a clicking sound.
If the problem is in the contacts, then you can “throw” tin on the washer. If the condition of the relay is very bad, then it is easier to replace it. The asking price is about 500 rubles. If the starter burned out recently, you may smell a burning smell. By removing the retaining ring, you can verify this. In this case, the unit needs to be replaced. It can be purchased for about 1,500 rubles.
Monitoring the technical condition of the mechanism
The driver must know how to check the starter solenoid relay himself. Attention should be paid to the appearance of a characteristic sound: when the key is turned, a click appears in the ignition switch. Further attempts to start the car end in a series of clicks and jerks. Signs such as these indicate the need for the following check:
- bridge the 2 copper contacts located on the back cover of the relay;
- the movement that appears will indicate a malfunction of the retractor mechanism;
- at the time of testing, it is necessary to exercise maximum caution, because the solenoid relays rotate at high speed;
- An additional method of control will be to connect the positive connector of the retractor mechanism to the “+” of the battery;
- the second wire connects the ground of the starter and the battery;
- If the retracting mechanisms are working properly, then at the moment the circuit closes, a sharp click is heard.
Further actions of the car owner depend on the nature of the detected malfunction.
If the device runs too fast or slow, we are talking about mechanical wear of its individual elements. Retractor mechanisms often fail due to a short circuit. Charred contacts are expressed in a series of clicks, complemented by slow operation of the mechanism. Planned or emergency replacement of the starter relay is associated with monitoring the technical condition of the starter itself. For preventive purposes, the bolts securing its rear wall are removed. If necessary, the device is freed from accumulated traces of contamination. At the next stage, the Bendix fork and brushes 2112 are checked for physical wear. If any are found, replacement is made.
There is no point in postponing this procedure until later. With further operation there is a high risk of damaging the traction relay. After this, all elements are returned to their place. The rear cover of the starter is closed, and the immediate repair of the starter solenoid relay begins.