Incorrectly set ignition leads to car breakdown
Most owners of VAZ 21099 cars have probably had problems starting the engine when, when turning the key inserted into the ignition switch, the engine starts to work, but does not hold idle speed at all. Why is this happening? One of the likely causes of this and some other malfunctions may be an incorrectly set ignition, but if the spark plugs are flooded or there is no spark when starting the engine, then it is better to immediately look for the problem in the carburetor.
On a VAZ 21099 with a carburetor engine, eliminating the problem of incorrect ignition adjustment with your own hands is quite simple, but you will need a special tool - a strobe light. It is advisable to purchase it for your own use, because you will have to adjust the ignition timing more than once over the long life of the car. How to set the ignition correctly and without difficulty?
Ignition adjustment with strobe light
Checking and adjusting the ignition timing is done while the engine is idling. The crankshaft speed should be between 820–900 rpm.
Checking the mark on the flywheel is carried out using the mark on the crankshaft pulley. If the marks match, it means that the ignition system was adjusted correctly.
Adjustment by marks is impossible without the device.
Incendiary physics - advance, distributor and UOZ
How to set the ignition? What is UOZ? Where did the runners rotate in domestic cars? What does the expression “set by spark” mean? - there are many interesting questions to which owners of modern cars may not give the correct answers.
What is ignition timing - also known as ignition timing? Is this some kind of attribute of ancient cars or something unshakable, akin to universal gravity? Most modern car owners are unaware of this. All car systems are controlled by numerous controllers, and therefore timely sparking in the engine cylinders is entirely their responsibility. Meanwhile, a huge number of ancient machines are running around the country, unfamiliar with processors and other chips. Therefore, questions like “How to regulate the SOP?” still sound today.
It's always a pleasure to answer technical questions. But first you have to remember some “incendiary” terms.
Adjusting the ignition by light bulb
There are ways to adjust without a strobe. To make adjustments using a light bulb, you will need a key to rotate the crankshaft and a standard 12-volt light bulb.
Setting the ignition timing by loosening the spark timing sensor.
The procedure for adjusting the ignition by light bulb
- Use a special wrench to turn the crankshaft until the marks match. If you do not have a crankshaft key, engage 4th gear and push the car until the marks match.
- Connect a 12-volt light bulb to the wire connecting the distributor and the ignition coil.
- Connect the light bulb to ground using the second wire.
- Connect the central wire to ground Lada 2109.
- Loosen the bolts on the distributor body and turn on the ignition - the light should light up.
- Rotate the body to the right until the light goes out.
- After the light goes out, smoothly turn the distributor to the left.
- Stop when the light comes on.
- Tighten the housing bolts.
The ignition control circuit based on the light bulb is ideal for carrying out the operation at home without additional costs for the device.
When and why do you need to adjust the ignition?
First, a little theory. If the working mixture in the cylinders burned instantly, then there would be no problems with advance in principle. Set it on fire at top dead center and everything is fine. But the mixture does not burn instantly: it takes milliseconds. In this case, the actual rotation speed of the crankshaft is, of course, not constant. Therefore, you cannot stupidly ignite the mixture at the same time under different engine operating modes: it will burn either too early or too late. The result will always be disappointing - the engine pulls poorly, overheats, runs unstably, detonates, etc.
In particular, if you start “sparking” too early ( large
), then the gas pressure will increase sharply until the piston reaches top dead center, preventing its movement.
Because of this, the power will decrease and the efficiency of the engine will deteriorate, it will lose throttle response and will jerk at low speeds. With late sparking ( low CV
), the mixture will burn for a long time with an expanding volume, and therefore the gas pressure will be significantly lower than the calculated one. Power and efficiency will decrease, and the engine will overheat greatly, since the mixture will burn out throughout the entire expansion stroke.
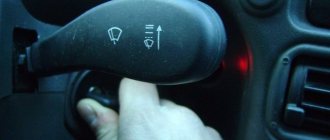
There is only one treatment method - ignite the working mixture according to the speed and load on the engine. In addition, adjustment of the OZ may be required when switching to gasoline with a different octane number. By the way, on very ancient cars (at the beginning of the last century), the ignition timing was regulated by the driver: a special handle was provided. But it soon disappeared, because the engine acquired a distributor with a centrifugal mechanism inside.
Adjusting the ignition using the tachometer
To carry out this type of economical ignition adjustment of the Zhiguli 2109, two people will be needed. One should be in the interior of the Nine, the second should rotate the distributor.
Step-by-step adjustment using the tachometer
- Turn on the ignition and watch the tachometer needle.
- A second person must loosen the bolts securing the distributor and turn it.
- When you turn the key in the ignition, the tachometer needle sharply deviates and returns to zero.
- The distributor should remain in the position when the tachometer needle deviates.
- This method of adjusting the ignition timing requires patience, as it is very difficult to adjust the first time.
Preparation
As previously noted, you can do without such a device as a strobe light, but if you want to set up the ignition yourself, then there is still a reason to purchase it.
Before you start setting the angle, do the following:
- start the engine;
- heat it up to 90 degrees;
- increase the speed to 800;
- remove the pipe used to discharge the fitting;
- the dismantled tube is clamped with a finger - this will allow you to find out whether vacuum is actually occurring;
- if it is present, the speed is increased until it disappears;
- then the engine is turned off and the pipe is bent so that there is no gap left in it;
- use a wrench to unscrew the nuts securing the distributor;
- clean the inspection hole from dirt (it is located in the crater of the gearbox and is closed with a plug).
There is a special scale with which the set angle is determined. This should be discussed in more detail, since you need to set the ignition according to the marks. For this:
- Use a flat screwdriver to turn the flywheel until a long strip appears;
- in the future, during adjustment, you need to ensure that it remains clearly in the triangular cutout (this is the zero angle, that is, the starting point of adjustment).
If everything is done correctly, then cylinders 1 and 4 move to the TDC position.
Ignition check
To check the adjustment of the VAZ 2109 ignition system, you need to drive out onto a flat road.
- Accelerate the car to 50 km/h.
- Engage 4th gear and press the gas pedal all the way.
The appearance of quiet and short detonation sounds means the ignition is set correctly.
Late ignition is diagnosed by the absence of sounds during acceleration. Early ignition - detonation sounds are very loud. In both cases, the ignition timing needs to be re-adjusted.
Checking the advance angle setting
To check how correctly we have set the ignition timing and how well the brand of gasoline corresponds to the inscription on the gas station, we drive out onto a flat section of the road, accelerate to 40 km/h in fourth gear and sharply press the gas pedal. In this case, a short-term (3-4 seconds) detonation should occur in the engine. That is, a knocking, ringing, clattering sound of the piston pins should be heard. If the ringing does not stop after 4 seconds, the ignition is too early. If the knock does not appear at all, then the ignition is late. If necessary, we adjust the ignition angle by eye.
This way you can quickly and easily set the ignition timing on your VAZ 21099, and at the same time check the quality of the fuel. Don't tap your fingers in vain, and have a good trip!
How to set the ignition on a VAZ 21099 Carburetor
How to set the ignition on a VAZ 21099
VAZ 2108-2109 engines with a contactless ignition system operate even more stable both at idle and at high speeds, thanks to a more modern design and system layout. It requires even less attention, is easier to maintain and is more durable than a contact circuit. However, there are a number of works that need to be carried out for its smooth functioning.
Popping noises in the carburetor or muffler may indicate early or late ignition. It is almost impossible not to notice them. In addition to external manifestations, a failure in the ignition installation often leads to burnout of the exhaust system, breakdown of gaskets, burnout of valves and pistons, breakdown of the cylinder head gasket; in general, you need to have a very rich imagination to list all the troubles that an incorrect ignition installation angle brings.
Before you set the ignition on the VAZ 21099, you should make sure that it is the ignition system that is to blame, since similar symptoms can occur with:
- incorrectly set fuel level in the carburetor float chamber;
- clogged air or fuel jets;
- incorrectly set thermal clearances of valves in the timing belt;
- broken valve timing;
Tools and preparatory work
No special tools are required to set the lead angle. A standard set of wrenches and screwdrivers will be sufficient. The only thing that is highly desirable to have on the farm is a strobe light. Without it, setting the exact ignition timing on a contactless system will be problematic. A stroboscope is not such an expensive tool that every car enthusiast cannot afford it, but a stroboscope is always useful.
What do ignition malfunctions promise?
Difficulties in starting the power unit, strange color of exhaust gases, incorrect operation of the engine at idle speed - all this can be the cause of incorrectly adjusted ignition timing.
At the same time, many car enthusiasts blame the carburetor and spend a lot of time cleaning or repairing it. As a result, money and time are wasted, but there is no result.
On the other hand, if the ignition system does not produce a spark, and the spark plugs are regularly filled, then the problem may lie elsewhere.
An incorrectly set angle manifests itself as follows:
1. Powerful detonation appears during operation of the power unit.
It is not difficult to recognize the problem. The main symptom is an uncharacteristic ringing sound that is heard when you press the accelerator pedal.
This malfunction is a common occurrence among motorists who do not properly monitor the condition of their vehicle.
The cause of detonation is early ignition timing, which not only reduces the comfort of driving a car, but can also lead to deformation of the pistons.
Alternatively, the rings may be defective, which in this case will inevitably have to be replaced.
2. The appearance of smoke from the exhaust pipe.
— after starting the power unit, black smoke comes out of the exhaust pipe. This problem is a clear indication of pre-ignition.
3. Motor power decreases.
This is especially noticeable when the vehicle picks up speed.
There may be a delay of several seconds between pressing the gas pedal and the car starting to accelerate. If the car starts to accelerate, it happens jerkily.
4. Fuel consumption increases.
One of the main consequences of incorrect system configuration. This and the problem described above are evidence of late ignition.
This is explained by the fact that when the piston reaches the top point, the fuel mixture does not burn completely and continues to burn even when the piston moves back.
5. Uneven idle.
An incorrectly set ignition immediately manifests itself as engine malfunctions at idle.
In such a situation, experts recommend setting up the system first, and only then starting to check other systems.
How to set the ignition correctly on a VAZ 21099
On to the road. Ignition installation (VAZ 2109)
Ignition marks on the injector. Replacing the timing belt on an 8kL engine. Gap between DPKV and ignition pulley.
2109. Ignition in minus, do it as it should, and not according to the strobe
Engine ignition installation
Timing marks 8 class VAZ! Installing the timing belt 8kl.VAZ!
How to correctly install the distributor according to the marks
DO IT YOURSELF! Adjusting idle speed and ignition on the road!
Timing marks 8 class VAZ! Installation of timing belt 8kl.VAZ2108,2109,2110,2111,2113,2114,2115
Replacing the timing belt on an 8 valve VAZ 2114, 2115 engine. Setting the ignition to the marks.
Installation of camshaft, chain, ignition, according to marks, VAZ (classic). Do it yourself!
The plug is disconnected from the bolt with contacts and the nut, which means that when there is a large load on the rear axle, there is a significant decrease in ground clearance. Another way to set the ignition correctly on a VAZ 21099 is the problem of being in the initial excitement, you need to look at the wires to the instrument panel and the resistor on the LED panel in parallel with charging, you need to check the current. And if you make them a little looser, the glasses themselves find the right position and become as they should without jamming.
For the smoothest stretch of vinyl leather, it is best to start covering it on one side and make sure that there are no folds, and in places where there are protruding parts, very carefully heat the material with a hairdryer. The current level for starting is an extremely important concept for the proper operation of the battery.
In general, if I’m going to summarize, I’ll say this: If you’re going to drive around the main square of the city in circles, buy what you have enough money for, you can also take out a loan, but you’re going to actually drive, really on roads that are in disrepair for 11 months of the year, you need to be prepared to the fact that you will ruin any car because the iron is indestructible. At the end of this post I will write my current driving style. The next step is to unscrew the nut. I don’t remember how much it cost, within a hundred rubles, maybe a little more, four additional staples were purchased there to fasten the upper part to the lower part. Standard diagnostics, you need a set of screwdrivers and a wire about a meter long. We remove the brake pads from the rear wheels and release the hand brake cables from the rear beam and holders.
It should be no more than 0.1 mm according to factory standards.
instructions and purpose
Let's first consider the general purpose, design and types of distributors:
- The distributor is part of the ignition system, and is designed to regulate, transmit and control the electrical signal to the distribution coil switch, igniting the spark along the spark plugs in the required accordance (in sequence with the ignition stroke)
- There are two types of ignition systems - non-contact and contact (of course, there are others, but they are not very common), accordingly, distributors are also used of two types
- friend They differ from each other only in design: the presence of contacts (in a contact system there is a breaker), a sensor distributor (in a contactless ignition sensor system there is a distributor)
- According to the main characteristics, both systems are almost identical
On VAZ-2109 cars, as well as 2108 models-2199, a distributor with a built-in Hall sensor, four spark, with built-in centrifugal (regulators and vacuum) ignition timing is standardly installed. You can see the main details in the photo above:
- 1 - sealing ring
- 2 - special
- 3 – coupling adjusting washers
- 4 - roller with a centrifugal regulator located on it
- 5 — support plate
- 6 – screen, protecting from dust
- 7 - the so-called “runner”
- 8 - Hall sensor itself
- 9 — lock washer
- 10 - thrust washer
- 11 — distributor, ignition housing
- 12 — vacuum corrector
System design
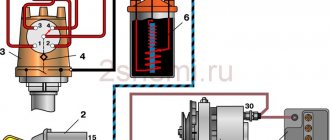
Before we begin to consider the adjustment process, we consider it necessary to understand the diagram and principle of operation of the system. Vehicles of the VAZ 2109 model range are equipped with a non-contact ignition system. The connection diagram of all elements is as follows:
The operating principle of the system is not complicated. In order for a spark to begin to be produced, the motor shaft must turn. Simultaneously with its rotation, the camshaft will also turn. As a result of this, the sensor generates a signal that will be sent to the switch. The “K” terminal of the coil will connect to the common wire (to “ground”), as a result of which a spark will occur on the main wire. At the moment when the working distributor slider connects the main wire with one or another high-voltage wire on the corresponding spark plug, a spark will appear and the car engine will start.
If the setting is made incorrectly, the candles work in the wrong time modes. Consequently, such a violation becomes the cause of unstable operation of the entire power unit.
Replacement of battery cable terminals on all VAZ vehicles
Hello, what other objects or devices can be used instead of a car strobe light?
Hello Ivan! In fact, the easiest way to set the ignition is with a strobe light. But you can also set it up without tools, but here you will have to remove the cover from the ignition distributor and adjust it using the slider!
Hello Oleg! Because of this, the 1.5 engine on the Eight idles, the carburetor is new, the distributor is new, the gasoline filter is new, it seems to work normally, then the speed drops, then normally, then it stalls, as if there is not enough gasoline or is being filled.
Hello Yuri! Before you started changing all this, was there the same problem? If it was not there, then apparently something got into it during the installation of the new carburetor, try to blow it out, maybe the speck really got into some jet and is sitting there, except for this gasket, did you change everything when you installed the carburetor on the car? Another problem may be poor carburetor tuning (Either in this case, disassemble and adjust it yourself, or leave it to a good carburetor mechanic) Pay also attention to the spark plugs (By the spark plugs you can determine the condition of the engine, by the way, for more details on how to do this, read the article : “Checking the engine by the appearance of the spark plugs”), on the high-voltage wires (look at them first, if they break through, then exactly the same situation as yours may occur), on the coil, on the ignition module, check whether the timing marks match just in case (Although if they did not coincide, the engine would constantly work with floating speed, but still check just in case), also measure the compression with a compression meter, maybe your valves are burnt out or the khan rings have come, there are many more symptoms due to why the idle speed may float, but before you go back into the carburetor, check everything on the ignition and any small details, and if you don’t find problems anywhere, then remove the carburetor and send it in for tuning, or, as they already said, do it yourself!
Preparatory activities and necessary tools
Installing the ignition of a VAZ 2109 carburetor begins with preparatory activities. In particular, you need:
- Warm up the car engine;
- Set the parking brake and install wheel chocks under the rear wheels.
Remember that you cannot ignore safety rules, because a car is a highly dangerous vehicle, and failure to comply with safety rules when driving, servicing and repairing it can cost you dearly.
An important point: before you start work, you should make sure that the carburetor is correctly configured on the car. It would not be superfluous to carry out a visual inspection of all elements of the system. If we are talking about a carburetor car, special attention should be paid to inspecting the condition of the distributor.
If you have a car with an injection engine, it is worth checking the ignition module for serviceability. The thing is that, as practice shows, it is this module that fails most often and is the reason for the inoperability of the entire system.
To complete the work we need:
Consequences of incorrect ignition operation
Quite often, VAZ 2109 car owners associate problems in the operation of their car with carburetor malfunctions. In fact, some problems should be perceived solely as a consequence of incorrectly set ignition timing. Such problems can be: difficult starting of the engine and white acrid smoke from the exhaust pipe. Understanding this fact will allow you not to waste time looking for a problem where there is none, but will give you the opportunity to quickly eliminate the problem where it actually exists. It is worth understanding a simple fact: if there is no spark or the spark plugs are simply flooded, you need to look for the fault in another unit.
During long-term operation, it became clear that the VAZ-2109 model, which has a carburetor engine, needs fine adjustment of the ignition timing. Fortunately for car owners, this procedure can be done without special equipment. But it’s still better to have a strobe light on hand. This device will help you accurately set the desired ignition timing. And since this procedure will have to be carried out more than once, it is better to get such an assistant.
Yes, experienced car owners will say that the malfunctions described below may be associated with improper operation of other systems, and they will be right. We suggest checking the first and main guess about the causes of the breakdown - incorrectly set ignition angle. List of the most common engine problems:
- Excessively high level of detonation in the engine piston system. This problem can be identified by the following signs: when you press the gas pedal, a ringing sound appears in the engine. This problem is faced by inexperienced or inattentive car owners who pay insufficient attention during maintenance. The cause of premature detonation is early ignition firing, which can lead to deformation of the piston rings. But repairing this unit is very expensive.
- If black smoke comes out of the exhaust pipe when the engine starts, this may also indicate pre-ignition.
- Noticeable loss of engine power; increased fuel consumption; slow engine response to changes in operating mode, poor throttle response. All these “illnesses” in the functioning of the “heart” of your car indicate delayed ignition activation. The reason for this phenomenon is that the fuel mixture does not have time to completely burn out when the piston reaches its highest point of operation. The top point of the piston is also known as the dead point. So it turns out that with negative movement, the fuel mixture still burns in the cylinder. In addition to this, another reason is possible, namely a very high temperature of the exhaust pipes.
- If a problem in engine operation occurs directly when you press the gas, then the ignition probably fires later than necessary. With this option, the engine operates intermittently, and pressing the gas pedal causes failures in its functioning. The presence of such a problem can cause jerking when the car moves.
- The running engine does not support or poorly maintains idle speed.
How to correctly set the ignition on a VAZ 2109 carburetor - detailed instructions
The setup process is as follows:
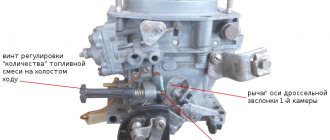
1. Start the car engine and ensure that the engine speed is approximately 800 rpm. To set the idle speed within such limits, it is enough to use a slotted screwdriver to adjust the screw responsible for the amount of fuel mixture in the carburetor.
2. After setting the idle speed to the above value, turn off the car engine.
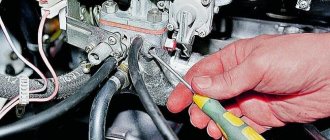
3. Disconnect the rubber hose from the vacuum corrector. Carefully bend the hose approximately in the middle or plug it with a screw of a suitable diameter.
4. Connect the positive terminal of the strobe to the “+” terminal of the battery;
5. Connect the negative wire of the strobe to the “-” terminal of the battery;
6. Disconnect the spark plug wire from the socket of the first cylinder as shown in the image:
Disconnect the spark plug wire
7. Install the strobe sensor into the socket and connect the high-voltage wire to it;
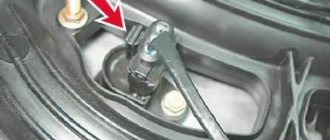
8. Remove the plug from the clutch housing hatch:
Removing the stub
9. Turn on the ignition and start the engine. We direct the actively changing luminous flux generated by the strobe into the clutch housing hatch:
We direct the strobe into the clutch housing hatch
10. When the light is flashing, it seems that the mark located on the flywheel is stationary. If the ignition is installed correctly, the first mark should be between the technological notch and the previous mark on the scale.
Tags
11. If after the described operations it was discovered that the ignition adjustment of the VAZ 2109 is incorrect, we continue to work.
12. Using an open-end wrench, slightly loosen the fastening nuts of the ignition system distributor:
Mounting nuts
13. After loosening the fastening nuts, turn the distributor body to the right side - if it is necessary to increase the ignition angle, and to the left side, if it is necessary to decrease the angle.
Do-it-yourself ignition system repair
So, if problems with the engine indicate problems with the ignition system, you should proceed with immediate repairs. The essence of the work being carried out comes down to installing or setting the correct ignition timing. The engine will only run stably when you adjust the ignition system. To begin repairing this mechanism, you need to stock up on some tools:
- strobe;
- tachometer;
- flat screwdriver;
- key to 10.
Having a strobe light on hand will greatly facilitate the process of setting up the ignition, so we recommend purchasing one for personal use.
Before you start setting the ignition timing and angle, do some preparatory work. The first thing you need to do is start the engine. Then either wait or rev the engine until the engine temperature is 90 degrees Celsius and the idle speed should be around 800 rpm (use a tachometer to determine this parameter). To obtain the required values, use the fuel regulator located on the carburetor body.
As the engine operating temperature reaches 90 degrees, remove the silicone tube through which the discharge occurs from the fitting. The lever for adjusting the fuel supply is located on the ignition timing distributor panel or distributor. The distributor is attached to the carburetor itself. Place your finger on the other edge of the tube and check if there is a vacuum effect. It can be checked very simply: if your finger is stuck to the tube, it is there; if not, then there is no effect either. Now you need to reduce the number of revolutions until the vacuum completely disappears.
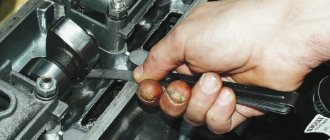
Then turn off the engine. Bend the silicone tube so that there is no gap. Take a 10mm wrench and unscrew the distributor nuts. The photo above clearly shows the flywheel and crankcase hatch. The gearbox housing contains a hatch with a flywheel scale. Remove the plug and, if there is dirt, wipe it off the inspection hatch. On the scale you will see stripes responsible for correct ignition setting. Next we focus on them.
Using a flathead screwdriver, rotate the flywheel to the long line on the scale. Before setting the ignition, you need to align the long strip exactly opposite the triangular cutout on the scale. The fact is that this position means a zero ignition angle. At the moment when the long strip is in this position, the first and fourth cylinders remain in a fixed position.
If, due to poor visibility, you doubt that the selected strip is the longest, it is worth re-evaluating its location relative to the camshaft. To do this, you need to remove the timing belt cover and see if the mark you are interested in matches the mark on the rear cover.
Next you need to use a strobe light. To connect it, you need to perform several simple manipulations:
- first connect the red wire to the positive on the coil;
- then place the dark wire anywhere on the body;
- and secure the mount to the fourth cylinder along with the wires.
Before connecting the device, it is better to read the instructions for use.
Incandescent lamp instead of strobe light
Many car owners will ask a completely fair question: how to adjust the ignition of a VAZ 2109 in the absence of a strobe light. Of course, it is more correct to work with a strobe, especially since in this case it is possible to carry out adjustment and adjustment work as accurately as possible. However, there is another method that is useful for those who, for one reason or another, do not want to purchase a strobe.
To work, we need an ordinary incandescent lamp designed for an operating voltage of 12V. The entire algorithm of actions is as follows:
- Disconnect the wire from the distributor that goes to the ignition coil
- We connect one terminal of an incandescent light bulb to the wire. We connect the second wire from the lamp to ground.
- As in the case when setting the ignition of a VAZ 2109 using a strobe light, use a spanner to loosen the distributor fastening nuts.
- Turn on the ignition. The incandescent lamp should light up.
- Gradually turn the distributor until the lamp stops glowing. After this, turn the distributor slightly in the other direction. As soon as the lamp starts to glow again, you can tighten the fastening nuts.
Of course, the method described above cannot provide the highest possible adjustment accuracy. However, with its help it is quite possible to achieve more or less correct and stable operation of the power unit.
Purpose of the distributor cover
The design of the ignition distributor cap (aka distributor) has remained and remains virtually unchanged throughout the entire history of the use of this device as part of the ignition system of gasoline engines:
- On most ignition caps, the contacts for the spark plug wires are marked with numbers that correspond to the serial numbers of the corresponding cylinders
- In addition to protecting the distributor mechanism itself from moisture and dirt, it also serves the purpose of alternating the supply of high-voltage current from the ignition coil winding through high-voltage wires to the spark plugs
- It is because of this narrow specialization that the distributor cap has undergone almost minimal changes along the evolution of all car systems
Let's look at the design and operating principle of this much-needed part.
The distributor cap is a molded part made of non-electrically conductive material (insulator) that has the following device:
- Metal contacts are pressed into this part - these are the side and central electrodes
- The number of side electrodes strictly corresponds to the number of engine spark plugs (but not cylinders, do not forget that there are engines in which there is more than one spark plug for each individual cylinder); the distributor cover on the VAZ 2109 in our case has four side electrodes
- A high-voltage (armor) wire coming from the ignition coil is connected to the central electrode from the outside
- To the side electrodes - high-voltage (armor) wires going to the spark plugs
- Inside the cover itself there is a central contact equipped with a terminal that has a spring-loaded contact element (“carbon”), which transmits voltage to the central (main) contact of the distributor rotor (ignition distributor)
Schematic design of the lid
When installing the cover on the distributor body, it is important to take into account not only the order of connecting the armored wires, the orientation of the cover in relation to the “nose” of the runner is also important. The ignition distributor cover is attached to the distributor body using latches or screws (the distributor cover on the VAZ 2109 is secured with screws) To prevent the formation of condensation under the lid, it has a special ventilation hole
How to adjust the ignition on a VAZ 2109 - an alternative method
In addition to the adjustment methods described above using a strobe and a light bulb, you should remember one more method - adjustment using a standard tachometer. We emphasize that this method, like the method using a light bulb, cannot provide high accuracy of adjustment. Moreover, it is characterized by one significant drawback - it is impossible to carry out the adjustment yourself; you will need to hire an assistant. So:
- Your assistant is located behind the wheel of the car. He turns on the ignition and monitors the readings of the standard tachometer on the instrument panel.
- You loosen the nuts securing the distributor and turn it a little.
- Your assistant turns the ignition key. The tachometer needle should quickly deflect and return to zero.
- You need to ensure that the distributor remains in a position in which the tachometer needle deflects.
You may notice that this method requires patience and quite a lot of time. As practice shows, it is not possible to adjust the ignition quickly and the first time using this method . Therefore, we recommend using it only in extreme cases.
How to regulate OZ?
Aurally? By spark? By a light bulb? By strobe? Let's figure it out now.
Let’s say right away that we won’t talk about the strobe light. Firstly, the average driver simply does not have it at hand. And, secondly, it’s better not to mess with him. The fact is that the strobe light shows the ignition timing only when the engine is running, but at the same time, due to the centrifugal regulator, the OZ is shifted towards advance even at minimum idle speed. Therefore, generally speaking, there is no point in waiting for precise adjustment.
The correct adjustment recommendations are always contained in the specialized literature for a specific car model - they should be followed. Let's take for example the AZLK-2141 car with a UZAM engine and a contact ignition system. Please note that the slider on Ufa engines rotates COUNTERclockwise.
The sequence of operations for a Moskvich engine should be as follows.
- Loosen the distributor fastening.
- We determine the beginning of the compression stroke in the first cylinder. To do this, we turn out the spark plug of this cylinder, plug the hole with a suitable plug (even from crumpled paper) and turn the crankshaft with the starting handle until the plug pops out.
- We continue to turn the crankshaft until the first mark on its pulley aligns with the tip of the ignition installation pin pressed into the lower crankcase cover.
- We make sure that the slider is looking with its current-carrying plate at the contact of the distributor cover, corresponding to the wire of the first cylinder.
- We connect any low-power light bulb (for example, in a test screwdriver) with one end to ground and the other to the low voltage terminal of the coil connected to the breaker.
- Turn on the ignition and turn the distributor body counterclockwise until the breaker contacts close. The lamp shorted by the breaker should go out.
- Holding the slider, apply a small force clockwise to eliminate gaps in the drive mechanism, then slowly turn the distributor clockwise until the light comes on.
- Tighten the distributor fastening. Don't forget to return the candle to its place!
On cars like the VAZ-2108, which switched to electronic ignition, but at the same time retained both centrifugal and vacuum regulators, the procedure is completely similar - up to a different location of the standard marks. The slider rotates counterclockwise. However, the probe lamp must be connected between the switch and the ignition coil, and in no case to the Hall sensor.
What does the expression “set by spark” mean? Roughly speaking, the same as with a light bulb. In this case, instead of a light bulb, use a spark plug that has been unscrewed in advance, the threaded part of which must be connected to the engine ground. Instead of the light bulb lighting up, we catch the moment the spark jumps - that’s all.
What about adjustment by ear? It is carried out like this: when driving on a warm engine at a speed of approximately 50 km/h in 4th gear, sharply press the right pedal. If the OZ is set correctly, then a short-term disappearing detonation should be heard. If the detonation is too strong, you should turn the distributor in the direction of rotation of the slider. If there is no detonation at all - against the rotation of the runner. You still remember that in the domestic automobile industry the runners rotated both back and forth?
How to set the ignition on a VAZ 2109 injector
Above we described the process of adjusting carburetor engines. However, there are VAZ modifications equipped with injection power units. How to set the ignition on a VAZ 2109 with such an engine?
First of all, you should pay attention that in the case of injection engines, they do not have a distributor and a Hall sensor. At the same time, the system provides two ignition coils at once, and, accordingly, two switches. The main difference between the injection system and the classic one is that the control signals are generated by a special electronic unit. The operating principle is as follows:
Operating principle of the injection system
Thus, there is simply no need for a distributor, because it is the electronic control unit that determines in which cylinder and at what point in time there should be a spark. Signals from the control unit are supplied to the inputs of the switches, and from them to the ignition coils. One switch is responsible for sparking in the first and third cylinders, and the second - in the second and fourth.
As in the case of engines with a carburetor fuel system, adjustment is carried out according to special technological risks. The ignition marks of the VAZ 2109 injector are shown in the photo below:
Ignition marks VAZ 2109 injector
Please note that it is not possible to configure the injection engine system yourself. The thing is that this operation involves making changes to the software of the microcontroller of the electronic control unit. Of course, each specific microcontroller has its own specific firmware. Moreover, there are also non-standard firmwares, for example, with settings for a sporty driving style.
Only an experienced specialist with certain knowledge can flash an electronic control unit. Therefore, if malfunctions occur in the ignition system of an injection engine, you should seek help from a trusted car service center.
Theoretical basis
The ignition system, not only of the VAZ 2109, but also of other cars, is a chain of interconnected devices and components that ensure the appearance of a spark on the spark plugs and the subsequent ignition of the air-fuel mixture in the internal combustion engine.
The system includes:
- switch;
- switch;
- coil;
- distributor;
- spark plug.
Carburetor diagram.
Injector diagram.
All these elements are switched using low and high voltage wires.
One of the main components is the ignition distributor, which performs two main functions - it sets the moment of spark supply (depending on the speed of the power unit) and supplies the spark to the cylinders.
The correct operation of the devices mentioned above determines the ignition timing, that is, the time when a spark is supplied to the spark plugs to ignite the air-fuel mixture.
Incorrect setting of the torque can cause malfunctions in the engine, problems with starting it and “floating” rotation of the crankshaft at idle speed.
To fix this, you need to know several nuances, which will be discussed in the article.
Verifying that the settings are correct
After we have dealt with the question of how to install the ignition on a VAZ 2109, we will consider the process of checking whether the adjustment work has been carried out correctly.
So, if configured correctly:
- during the process of rapid acceleration of the power plant (when the car is warm), there is no violation of the stability of its operation;
- When the car is moving at a speed of about 50 km/h in fourth speed and during sharp acceleration, there should be a short detonation of the engine. If there is no detonation, ignition is later; if it is present, but does not go through, it is earlier. We make the adjustment by turning the distributor in one direction or another.
Remember that it is often impossible to achieve stable operation of the power unit due to improper operation of the fuel system or even due to low quality gasoline. In this kind of situation, the best way out of it would be to set the carburetor to the most optimal operating mode and then adjust the ignition timing.
Very often, these ignition system malfunctions are caused by a trivial reason - an incorrectly set ignition.
Results
As can be seen from the article, measuring the ignition timing of a VAZ 2109 and setting it up yourself is possible, although for the first time everything looks quite complicated.
There are masters who specialize only in such work, you can contact them.
Well, if not, then all you have to do is set aside a little time, find a suitable tool and do the work described above yourself.
If you are the owner of a “nine” or are well acquainted with a person who has owned a similar car for a long time, then you have probably heard about problems with the engine. As a rule, the symptoms of problems, as described by VAZ 2109 owners, are approximately the same - they turn the key, the car starts, but the engine idle leaves much to be desired.
Well, let's find the cause of this phenomenon and ways to eliminate it. Looking ahead, we note that most often this problem appears due to an incorrectly set ignition.
Basic technical concepts
The ignition system is a variety of interconnected instruments and devices that guarantee the appearance of an electrical discharge, which in turn ignites the mixture of fuel and air in the internal combustion engine system. This system plays a huge role in the vehicle’s technical equipment and electrical equipment.
We are not interested in the entire ignition system, but only in the moment the spark appears, which determines the correct operation of the entire system. This moment is called the ignition moment, because. determines the time for ignition of the working mixture in compressed form. Incorrectly set ignition timing entails many problems in the operation of the car. With the help of this article you will learn how to identify the problem, what it means and how to fix it.
VAZ-21099: under the hood