A feature of modern electronic control systems (the so-called “brains”) is that, with all their functionality and power, they are nevertheless very sensitive to the quality of the gasoline being filled.
The working mixture is supplied to the combustion chambers of the engine through nozzles (injectors), which have an extremely small opening size. Even a small particle of dirt can completely clog one of the injectors - as a result, the quality of the fuel will decrease, and with it the engine power (usually with increasing fuel consumption). In other cases, it may even be necessary to replace the nozzle.
On cars of the Priora family (and not only on them), on the way to dirt and harmful substances there is a filtration system that prevents the penetration of dirt in three stages:
- Primary (coarse) filter, also known as a fuel pump filter (catcher mesh).
- Fine filter (sump).
- Mesh in the nozzle of the injection system.
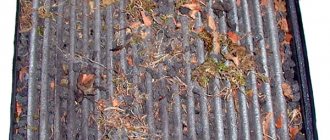
The last filter is installed directly in the nozzle. The sediment filter is located under the bottom of the car. Primary cleaning is carried out by an element, which, in fact, is a mesh made of a plastic body with a soft material of a lattice structure. This filter is fixed in a special support, and it, in turn, is fixed in the fuel tank. Fuel, passing through such a mesh, leaves most of the large contaminants, harmful substances and other dirt on it.
Replacing this mesh installed on the fuel pump will be discussed in our material. The manufacturer recommends changing this product along with the fine filter (every 50 thousand km). In the harsh Russian realities, replacement, as a rule, is carried out more often - about once every 30 thousand. More frequent replacement may be required - if small dips begin to be observed during engine operation, the motor behaves unstably during acceleration, and the engine stalls from time to time. First of all, you should check the injector filter, as well as the fine fuel filter - if they contain dirt, then the fuel pump mesh is also seriously dirty.
You can easily perform the replacement operation yourself - on an unofficial service you will be asked to pay 400 rubles or more for such an operation. Official service will cost you even more. Catcher nets for the Lada Priora fuel pump are sold in almost any car store, their cost starts from 30 rubles.
So, let's say you bought a new mesh.
We start by driving the car into a pit or putting it on a lift.
To work we will need the following tools:
- 10 mm wrench (tube or head).
- Slotted screwdriver.
- Phillips screwdriver.
- Pliers.
- Rag (rags).
Attention! All subsequent work is extremely fire hazardous due to the fact that the gas tank will be open and gasoline vapors will freely enter the air. Do not work near open flames and do not smoke!
The fuel pump is located in the fuel tank - but it is accessible from the passenger compartment itself. Open the rear door, then recline the rear seat by sliding the latch.
There is a hatch in which the fuel pump housing is installed. Unscrew the two screws that secure the hatch cover.
Now we see the fuel pump housing. As a rule, gasoline leaks form around it. We lay a rag or rags around the opening of the body so that the smudges are absorbed there - this is better than leaving them on the car’s paint.
Then you will need to disconnect the block with wires. The fuel pump is turned off.
Then you need to start the engine and let it run for a few minutes. This will relieve excess pressure from the supply circuit.
After this, you will need to disconnect the two plastic fittings from the fuel pump itself. To do this, you will need to press on the iron brackets holding them and move both tubes away from you.
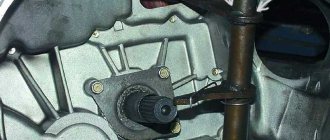
The housing itself is held in place by 8 bolts, which should be unscrewed with a size 10 tube or head.
Then you need to pull out the iron retaining ring into which the bolts were screwed from the studs.
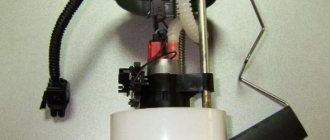
Next, carefully remove the plastic fittings and remove the fuel pump from its seat. Be careful not to damage the float contained in the pump.
Removed fuel pump housing.
Then the pump housing will need to be moved to some place where there is no risk of gasoline leaks - a metal table, etc. Next, you will need to disassemble the gasoline pump to get to the catch mesh. The pump body is made of plastic, so there is no need to apply excessive force during disassembly.
The first step is to bend the two metal wires that are responsible for fixing the level sensor, then pull the sensor up until it completely leaves the grooves. After this, using a slotted screwdriver, you need to disconnect the check valve fitting and move it to the side. The lower half of the housing is attached to the upper half using two iron pins, one of which contains a spring.
Place the housing vertically and, pressing on the top, remove the retaining rings using pliers, after which the top of the pump can be detached. Then you will need to press the latches (3 pieces), after which the pump itself can be pulled out along with the filter mesh. The catch mesh is fixed to the fuel pump pin using a simple washer. Using a slotted screwdriver, pry up the mesh and remove it.
Cleaning and replacing the fuel pump mesh on Lada Granta, Kalina, Priora
On Lada Granta, Kalina and Priora cars, a coarse fuel filter (mesh) is installed in the fuel module. During operation, dirt is retained in it, which interferes with the normal operation of the fuel system. Let's look at how to remove the fuel pump mesh yourself and clean it of dirt.
How to remove the fuel pump strainer
:
- Remove the float with the fuel level sensor (bend the antenna, move the housing down).
- Unfasten the tube from the fuel pump housing.
- Disconnect the lower part of the housing (press the three antennae).
- Remove the mesh (pry it off at the base with a flat screwdriver).
- clean from dirt;
- replace with a new one (price about 50 rubles), the shape of the mesh is different for 8 and 16 valve engines.
The process of replacing the fuel pump mesh is also shown in the video:
Let us remind you that in the fuel system of Lada Grant, Kalina and Priora cars there is also a fine fuel filter, which is located next to the fuel tank. It is changed every 30 thousand km. mileage (see instructions for Lada Priora and Granta/Kalina). By the way, Lada Vesta, XRAY and Largus cars do not have such a filter; owners of these models only change/clean the fuel pump mesh.
Source
Removing and disassembling the fuel pump
The fuel supply mechanism in the Priora is located in the gas tank, so to get it you need to:
- Remove the rear passenger seat. The latches holding it in place are on the sides.
- There is a hatch in the bottom of the car, secured with two self-tapping screws. Having removed it, we gain access to the fuel pump, which is fixed in the fuel tank with a flat metal ring.
- Remove the ring, which is held in place by nuts screwed onto eight threaded pins spaced evenly around the hole in the gas tank.
- We remove the two fuel hoses and remove the retaining ring.
- We disconnect the electrical connector through which power is supplied to the pump located in the plastic casing.
- We take out the housing; this must be done carefully so as not to damage the float, thanks to which the filling level of the gasoline tank is shown on the instrument panel.
- The next step is to pull out the pump itself, bend the four latches located on the body, and take out the fuel pump, at the bottom of which there is a coarse mesh.
As a rule, the entire mesh looks quite dirty, and its central part is literally clogged with various debris. To remove the old mesh, you just need to grab it on all sides with your fingers and pull it towards you, or pry it with a flat-head screwdriver.
Features of fuel filters for the Lada Priora car
VAZ 2170 fuel filters have their own characteristics.
- The coarse filter (FGO) is a fine mesh made of petrol-resistant plastic and capable of trapping solid impurities and dirt larger than 80 microns. It is made in the form of a flattened bag with a pipe in the middle, attached to the fuel pump using a clamp on the fitting.
Fine mesh filters gasoline before it enters the pump - A fine filter (FFO) consists of porous paper assembled into an “accordion” in a cylindrical body made of metal or polyamide. It traps impurity particles 50 microns in size and smaller. For connection to the fuel system, the filter housing has an inlet and outlet fitting with protrusions for clamps.
Fine filter traps small particles of impurities
It is noteworthy that these consumables are suitable for almost all injection VAZ models, from the “ten” to the “Kalina”. Only the latter use plastic clamps to secure the hoses (must be included in the kit), but for the Priora they are not needed.
It is quite difficult to make a mistake when purchasing a coarse filter - it is unified for the entire family of front-wheel drive VAZ models. The original product costs about 50 rubles.
You should not purchase mesh from dubious retail outlets. A fake can quickly fail, clogging the fine filter.
There are a number of things to consider when purchasing FTO.
- you need to make sure that the size of the filter matches the size of the housing and pipes - some foreign cars use very similar filters;
- the fittings must have protrusions for fixing the fuel hoses;
- preference should be given to familiar brands, avoiding Chinese manufacturers.
The size of the fine filter housing is unified for all injection VAZ vehicles
The cylindrical body of the part is held in place by a standard clamp designed for a diameter of 56 mm. The dimensions of the nozzles where the hoses with wire clamps are put on are 8 mm.
The FTO body can be made of metal or black plastic. The manufacturer installs both types of filters on VAZ cars - it doesn’t matter much.
Replacing the fuel pump, also known as the fuel pump on a Priora
Welcome! Fuel pump - this unit, as you already understand, has a second name, but it sounds very simple: “Fuel pump”, over time this unit becomes unusable, and since it is the main part that supplies fuel from the tank to the engine car, then the car, after the failure of this pump, begins to stall, but if it becomes unusable at all, or if it is simply not in the system, then the car most likely will not even start, and if it does start, it will work for 3 seconds and after that, until you install a working fuel pump, the car simply won’t start, so when you start to feel that gasoline is starting to flow poorly into the engine, then there is a possibility that the car’s fuel pump is to blame!
Note! In order to replace the fuel pump on a car, you will need to take with you some tools, namely: A screwdriver, an extension socket, as well as a set of regular wrenches, and you will also need to stock up on a pressure gauge, which is needed to check the pressure in the engine power system! (The pressure in the power system is checked only to make 100% sure that it is the fuel pump that has become unusable, but if you already know that it is the fuel pump that has become unusable, then accordingly you do not need any pressure gauge)
Regarding the pressure gauge, firstly, they come in different types, so in order to check the pressure in the system, you will need to stock up on a pressure gauge to check the pressure in the power system or simply to check the pressure in the fuel rail, while all these words may not be clear to you , but you read the article further and after reading you will understand everything, and if you don’t understand, write in the comments and we will answer you as soon as possible! (By the way, to check the pressure in the engine power supply system, you can also use a tire pressure gauge)
Summary:
Where is the fuel pump located? This unit on all fuel-injected cars of the VAZ family, including the Lada Priora, is by and large located in the rear of the car and in order to see it, you first have to remove the rear cushion on which the rear passengers sit from the car and then what you will see is a square-shaped hatch (it is also indicated by an arrow in the photo below), so under this hatch there is the fuel pump itself, but in the photo below it is not visible since it is covered by this very hatch from dirt getting on it.
When do you need to change the fuel pump? It needs to be changed only when it fails, but it can fail either completely or partially, for example, over time it becomes unusable only mostly partially, thereby it begins to poorly supply fuel from tank into the car engine and because of this, when driving, the car begins to stall, namely, it may twitch when you press the gas pedal, it may stall at idle, the idle speed itself may not be smooth due to a faulty fuel pump, that is, the tachometer needle It will rise and fall and as a result the car may also stall, and the most important feature when the fuel pump wears out is that the car will stop developing full power and will no longer drive as well as before.
Note! In order for you to understand the situation more, we will explain something to you, namely, a gas pump is needed only to take gasoline from the gas tank and thereby supply it under strong pressure to the car engine, as this pump wears out, the pressure with which gasoline is supplied drops and In connection with this, all of the above problems with the engine occur!
How to replace the fuel pump, also known as the fuel pump, on a VAZ 2170-VAZ 2172?
Note! As was said earlier, you will need to stock up on a pressure gauge in order to check the pressure in the engine power supply system, but the thing is that not every person has this device, and in a car store it doesn’t cost a very small amount, so if If you still don’t decide to buy this unit, then try to get to the nearest service station, which most likely has this unit and you can use it for the duration of the check (20-30 minutes) for not very much money! (You can learn how to check the engine power system and find out more accurately whether the fuel pump has really failed by going to another article entitled: “Checking the pressure in the fuel rail on a VAZ”)
Removal: 1) At the very beginning of the operation, you will need to relieve the pressure in the engine power system; for information on how to relieve pressure, see the article: “Reducing pressure in the engine power system.”
2) Then, when the pressure in the system is reduced, remove the rear seat cushion on which the rear passengers always sit when they get into your car. (For information on how to remove the cushion, see the article: “Interesting information about seats” in paragraph 2)
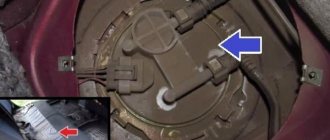
3) Next, when the airbag is removed, you will see the same hatch under which the pump itself is located, so take a screwdriver in your hands and use it to unscrew the two screws that hold this hatch (Indicated by arrows) and then completely remove it from the car.
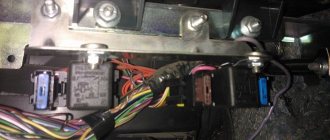
4) After you remove the hatch, you will see a picture like this, which is shown in the photo below, from this picture you can understand what is generally connected to the fuel pump, and connected to it: A block of wires, which is indicated by a blue arrow, and two fuel pipes which are already indicated by red arrows, so the block and these tubes will need to be disconnected, but start with the block first, to disconnect it, look for the latch that secures it and after finding it, simply press on it and thereby remove the block from the hole in the fuel pump.
Note! When the block is disconnected, you will also need to disconnect the two fuel pipes, to do this, simply press the latch (Indicated by an arrow in the photo below) which is located on this tube and which secures it, and when the latch is pressed, remove the fuel pipe from the fitting on which it is located! (In some cases, the fastenings may be slightly different for these tubes, namely, they will not consist of a wire as shown in the figure above, but of two plastic clamps, so in order to remove such a tube, you will also need to press both of these clamps with your fingers and only after pick up the phone)
What else, when you pull the tubes when removing them, be careful, because their ends are made of plastic and if you press them sideways with a little force, they can simply break!
5) Next, you will need to unscrew the eight nuts that secure the fuel pump to the car body, but when unscrewing, pay attention to the fact that under one of the nuts (the nut is indicated by a blue arrow) there is a wire that goes to ground (the wire is indicated by a green arrow), So, when the nut securing this wire is completely unscrewed, move this wire to the side so that it does not interfere with replacing the fuel pump, but just be more careful with it in the future, namely, make sure that water or gasoline does not get on this wire or that will drain from the fuel pump when you pull it out.
Note! When all the nuts are unscrewed, under them you will find a ring (Indicated by an arrow) that holds the fuel pump itself and prevents the system from depressurizing, so you will need to remove this ring and put it aside!
6) And at the end of the operation, you will need to grab the fuel pump itself and simply pull it out of the hole in which it is located, but only when you remove it will you need to tilt it to the side, because at the very end of the fuel pump there is a lever and it a float is installed, this float reads how much gasoline is left in the tank and if it is deformed, or the lever itself is deformed, the fuel level readings will no longer be correct, so be careful.
Note! When you remove the fuel pump from the hole in the gas tank, pay your attention to the o-ring that is located there, it is also indicated by an arrow, so this ring is rubber and it also needs to be removed and checked for defects, so if the ring is cracked or loses its elasticity, then replace it with a new ring!
One more thing, when you remove the pump itself, think about it, you will definitely need to replace it with a new one, there are simply such cases that the fuel pump does not pump fuel well only because of the clogged mesh that is installed on it, this mesh costs a penny in the auto shop and therefore it makes sense look at its condition (It is installed at the very end of the pump, and in the photo below it is indicated by an arrow), to check its condition, lift the mesh into the sun or somewhere else so that it shines through and then see whether it is heavily dirty or not, if will be too dirty, then the problem is most likely not in the pump itself, but in it, for how to change this mesh, see the article: “Repairing the fuel pump”!
Installation: Installation of a new fuel pump is carried out in the reverse order of removal, but only during installation you will need to know some nuances, namely, pay attention to the fuel pump cover, there is a large arrow on this very cover (It is also circled in the photo below ), so when installing the pump into the gas tank hole, this arrow should point strictly at the rear of the car.
Note! Also, pay attention to the small arrows that are located on the same cover, and these arrows indicate the direction of the fuel and they are located on both fittings of the fuel pump, so when connecting any fuel pipe to the fitting, be sure to pay attention to these same arrows which show in which direction the fuel should flow through them and in accordance with this, install both fuel pipes correctly on the fittings!
In fact, you don’t even have to look at these arrows, because not all people know the direction of the gasoline and therefore it will be difficult to determine from the small arrows which hose goes to this or that fitting, so you just need to, as was said a little earlier, unfold the fuel pump with a large arrow to the rear of the car and after that you will understand where which fuel pipe will be connected, because fuel pipes usually go in different places, that is, one pipe goes to the extreme right, and the other to the extreme left, so when installing the fuel pump how placed in the direction of the large arrow, connect the far right tube to the far right fitting, and the far left one, respectively, to the far left fitting!
Additional video: To clearly understand how the pump itself changes, then watch the video below, in which the process of replacing this unit is described in detail.
vaz-russia.com
Basic fuel pump malfunctions
The fuel pump in the Prior may operate intermittently due to low-quality fuel. This is due to the fact that a fine fuel filter is installed here after the fuel pump.
At the inlet there is only a filter mesh that performs rough cleaning. The gasoline at some of our gas stations is so dirty that the mesh gets clogged quite quickly. The engine does not start well or stalls during operation.
The car jerks along the way and slowly picks up speed. If the filter mesh is partially clogged with debris, the optimal supply of gasoline to the engine is disrupted in different operating modes. When the pump is unable to maintain the required pressure in the fuel system 3.7-4.0 atmospheres , improper mixing of air and fuel occurs. As a result, the car loses speed.
In addition, even a well-warmed-up engine after a short stop can then start only after prolonged operation of the starter.
Unstable operation of the power unit is most often a consequence of a faulty fuel pump. First of all, you need to check the pressure level in it.
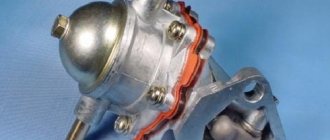
If after stopping the engine the pressure in the pump drops too quickly, then there is obviously damage to the diaphragm, as well as the sealing gasket. In this case, the gasket should be replaced, and the diaphragm should be reinforced with a special film.
There may also be foreign bodies in the fuel system, in which case the fuel pump must be disassembled and thoroughly washed. To do this, use the following tool:
- flat screwdriver;
- pliers;
- set of open-end wrenches;
- Phillips screwdriver;
- set of heads.
You can do this type of repair yourself in your own garage. Before you start, you should once again make sure that the fuel pump is not working as it should. To do this, you need to start the car and pay attention to the idle speed.
If it floats, then this is already one of the arguments in favor of carrying out repair work. In addition, you can go out onto the highway and sharply press the gas at about 3000 rpm. If the car starts to twitch while accelerating, then there is a second argument for making repairs.
How to remove and change the fuel pump on a Priora
To remove the fuel pump on a Priora car, you will have to do a lot of preparation. Since the system is quite complex, when dismantling it you will have to interact with many parts of the machine. You should start by disconnecting the negative terminal from the battery. Replacing the device for supplying fuel to the engine is carried out as part of dismantling the fuel module:
- Open the back door. Look under the sofa cushion for plastic plugs. Remove them by pressing lightly. You will see the sofa fasteners.
- Unscrew the nut with a “10” socket wrench.
- Pull the fastener towards you. Do the same action on the other side.
- Pull out the sofa cushion.
- If necessary, remove the backrests, although they will not interfere much.
- Place a basin or other container on the floor of the body.
- Find a black square metal hatch that is covered with sound insulation. Fold back the fabric and begin dismantling the hatch.
- Use a Phillips screwdriver to unscrew the screws. Remove the hatch.
- You will see the top of the fuel module and some wires on top of it. Press the latch that holds the harness and disconnect the wires from the module. There are also two small hoses connected to the fuel supply system cover. One is responsible for supplying gasoline, the other for shipping.
- Hold the hose directly near the place where it is attached to the module, and then turn it until you see the green inserts on top - these are the clamps. Clamping them, pull the hose towards you. Drain the fuel into a container.
- Unscrew the fastening nuts that hold the pressure plate using a “10” socket wrench. Remove the pressure plate.
- Now comes the careful process of dismantling the module. Please note that in the immediate vicinity there is a part of the fuel sensor that should not be touched. Therefore, when removing the fuel supply system assembly, try to make your movements as smooth as possible.
- Immediately point the module over the container - gasoline will drain from it.
Next, in order to release the fuel module, do the following:
- Disconnect the negative wire from the fuel pressure regulator. Disconnect the harness by pressing the latch.
- Disconnect the wires from the pump.
- Press out the clamps that hold the fuel sensor in one position.
- Slide the flammable substance sensor along the grooves and then remove it.
Before replacing, you should check the fuel supply system assembly.
How to check the fuel pump on a Priora car
According to AvtoVAZ, a standard pump for a VAZ-2170 should pump 60 liters of gasoline per hour. To check it on your car, do the following:
- Turn the key in the lock, turning on the ignition.
- Remove the fuel pump relay using a gentle movement.
- Place a jumper between pins 30 and 87.
- Listen for the familiar sound of fuel pumping. If you hear that pumping is proceeding normally, you can turn the key back. To “fix” the car, change the fuse.
If the engine fuel supply does not stop, do the following:
When to change the fuel filter on Priora
As experts advise, you should not wait for the moment when various malfunctions begin to appear in the operation of the Lada Priora with 16 valves, which will certainly lead to the replacement of the cleaning element. It should be taken into account that the filter itself is not expensive at all, and replacing the fuel filter is quite possible even for a person who has no experience in this matter, the main thing is to know where this element is located and follow the replacement instructions. It is best for yourself to set the interval between filter replacements at around 10 thousand km. This is the best option. However, we list the signs that already indicate that it is time to change the filter element:
- The electric fuel pump begins to make a lot of noise. While driving, you are unlikely to hear this noise, but if the 16 valve engine is idling, you may notice a high-pitched buzzing noise. This indicates that the pump is working under increased load.
- So-called failures sometimes occur in the operation of the engine, this is especially felt when acceleration occurs. The reason for this is a clogged cleaning element. Due to a clogged filter, it also happens that the engine stalls, and then it becomes difficult to start.
If you identify such signs, then your Lada Priora needs to replace the fuel filter. A clogged filter always resists the flow of fuel, plus it allows particles of debris to pass through it directly into the injector nozzles. Already there, all this debris settles on the surface and a film is formed from the dirt.
If you clean the injector, the injectors will begin to leak. Most likely, many car owners of the domestic Lada Priora with a 16-valve power unit noticed that after ultrasonic cleaning, the “engine” begins to work worse. And all this is a consequence of the fact that the fuel filter element was not replaced in a timely manner.
Tank volume of Priora 2
Replacing the Priora cabin filter
Resetting pressure in the Priora fuel system
A device such as the fuel pump in LADA Priora always maintains the required pressure in the system. When the car is already in the pit, this very pressure needs to be released, otherwise fuel will spill.
Replacing the filter with a new one in Lada Priora
- So, you know where the element that needs replacement is located, first place a container under it.
- On one side, squeeze the plastic clamp, and on the other hand, press the spring clamp and remove the tubes from the fittings. Handle the plastic retainer carefully; this product is very fragile.
- If fuel does not flow, then the container can be removed.
- Using a wrench, loosen the clamp bolt holding the filter to the bracket and remove the contaminated element.
- Look at the condition of the rubber O-rings located at the tips of the fuel pipes. If the rubber is torn or cracked, the rings must also be replaced. The ring itself is located quite deep in the tip. When removing the ring, the plastic of the retainer may break. In this case, you will need to replace the entire fuel pipe.
- Install the filter in the reverse order of removal. It is important to make sure that the arrow on the body coincides with the direction of movement of the fuel.
- Carefully tighten the clamp nut.
- Place the fuel hoses on the filter fittings, making sure that the clamps on the protrusions snap into place. Functionality check
- Place the container under the new filter again.
- At this stage, turn on the ignition of the LADA Priora and wait for the electric gasoline pump to raise the pressure in the system.
- Start the power unit.
- Inspect everything carefully for tightness of connections. If fuel drips anywhere, it is solely due to the O-rings. Still, it is extremely difficult to determine the defect of these rubber seals by eye.
- Under no circumstances should fuel leak. And if it appears, then everything needs to be disassembled and the rings replaced, and if necessary, then the fuel pipes along with the tips too.
Main faults of the fuel pump on Priora
Often, the device for supplying fuel to the engine does not work on a car, due to the fact that the mesh is clogged, or the fuel filter is clogged - they block the path of flammable substances along the highways, so that the engine actually has nothing to work with. In such cases, it will be enough to change the filter. But malfunctions of the fuel pump of a Priora car can manifest themselves in different ways:
- After the key in the ignition switch is turned until the ignition is turned on, there is no characteristic pumping sound. Under ideal conditions, you should always wait until the pump pumps fuel and then start the engine. Simply put: the car’s fuel pump does not work and does not pump fuel. Fuel pump electrical circuit malfunction.
- When you turn on the ignition, you can hear the pump pumping fuel to the car, and the engine starts. But as soon as the driver tries to drive just a little bit, the car stalls. When the car is stationary (idling), it consumes less fuel in each cycle. And when it starts moving (even without pressing the gas pedal), a larger volume of liquid is required, but it does not flow to the injectors. The pump does not have time to pump up gasoline.
- When driving, the car “nods” and then stalls. To maintain a stable speed when driving, as well as for acceleration, the gas pump must periodically supply a larger volume of flammable substance. If he cannot do this, the engine “chokes” on air - it needs gasoline.
To remove the tube from the fitting, you need to slightly bend the clamp. After draining the fuel, the operation is repeated on the supply hose. As a result, 150-300 ml of gasoline should drain out. The nut of the fastening clamp is loosened and the filter housing is pulled out. In this case, you need to remember the direction of the arrow on the filter. To remove the FTO, you need to loosen the fastening clamp.