Reasons for replacement
Replacing the VAZ-2107 stove motor occurs for several reasons. Let's look at the most common cases when a new VAZ-2107 heater fan is needed.
- A terrible sound with a characteristic screeching sound. If such a squeal appears when the car is warming up, it is better not to lubricate the engine, as many do, but to replace the VAZ-2107 heater fan.
- The air does not flow and the interior does not warm up - there is nothing left to do but remove and change the heater motor on the VAZ-2107.
- The air flow is very weak.
- The interior warms up extremely slowly.
Remember that a well-functioning system will be almost inaudible, since insulation and other materials ideally muffle sound very well. However, if something is broken, you can easily fix it.
How to get to the heater
First of all, to make it more convenient to work, you need to think about additional lighting for the place where you will be replacing the VAZ-2107 heater motor. Unscrew the negative wire from the heater motor. It is screwed on with a nut and it will take some effort to unscrew it.
If the nut is rusty, it is better to first lubricate it with penetrating lubricant. We unscrew it first with a key, and then by hand, trying not to drop the consumables. If there is another nut, unscrew it with a deep head; if not, remove the wire. Remove the clamp from the self-tapping screw. We are looking for another positive wire and disconnect it from the plug.
Now it is most convenient to use a short screwdriver to unscrew the screws securing the heating system box and remove the 4 spring brackets. The bolts in the middle are the longest, so set them aside to screw them into place later.
Important points
In order for the stove repair to proceed as quickly as possible, and its results not to disappoint the car owner, you should adhere to the rules below:
- When removing the old motor, be sure to turn it. If this is not done, part of its fastening may break and get stuck in the torpedo, or more precisely, in the mounting bracket. And getting to the stuck fragment will not be so easy.
- When tightening the mounting screws with a Phillips screwdriver, you should not use too much force: they are small, so the threads in their sockets can easily be stripped.
As practice shows, replacing an engine is not particularly difficult even for a novice car enthusiast if he has held a wrench and a screwdriver in his hands at least once in his life. The whole procedure takes 40–50 minutes maximum. The main thing is not to overdo it with tightening the fasteners, and everything will be fine.
Do-it-yourself replacement of the VAZ-2114 stove motor
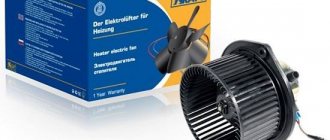
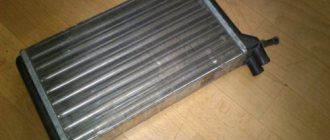
To force the air flow in the interior heating system, a fan driven by an electric motor is used. Thanks to this fan, the heater's operating efficiency increases.
Of the entire stove design, the fan is the most complex element, since it uses an electric motor. The electric motor itself is a direct current motor with excitation from permanent magnets. Despite its structural simplicity, the motor gradually wears out and stops working or functions incorrectly, which affects the performance of the interior heater.
Causes of malfunction
Note that the reason that the fan does not turn on is problems with the power circuit. Oxidation of wiring contacts, blown fuse, faulty resistor - all this leads to the cessation of operation of the electric motor.
Therefore, if it does not turn on, you should first check the power circuit components.
Common problems with the fan motor are the occurrence of extraneous sounds during operation - squeals, rattling, interruptions in operation - spontaneous stopping, difficult starting, etc.
The reason for the appearance of third-party sounds:
- Deterioration in the landing bushings into which the electric motor rotor is installed, lack of lubrication in them. Because of this, the rotor becomes loose during operation, which creates increased vibrations and rattling, and “dry” friction is accompanied by squealing.
- Interruptions in operation are caused by critical wear of the graphite brushes and contact plates of the rotor. Because of this, the brushes and plates cannot make normal contact with each other, which leads to problems in the operation of the fan motor - it does not spin up when turned on and may stop spontaneously.
Troubleshooting the electric motor of the stove is a problematic process and not always advisable; it is easier to purchase a new fan and replace it.
How to replace a heater motor
Due to the fact that the fan is fixed on the heater housing and is accessible from the engine compartment, replacing the VAZ-2114 heater motor is a simple process and does not require disassembling the interior heating system and draining the coolant. Therefore, you can replace the fan yourself, without seeking help from a service station.
To replace the motor, the tools you will need are screwdrivers and a 8-10 wrench. The algorithm for dismantling the heater fan on a VAZ-2114 is as follows: 1. Turn off the power to the on-board network by removing the “positive” terminal from the battery.
2. In the passenger compartment, on the driver’s side, behind the pedal unit, we find the fan power wires – black (“ground”, pressed with a nut to one of the bolts) and blue (“plus”).
3. Unscrew the ground nut, find the blue wire connector and disconnect it. 4. Open the hood.
5. Remove the fan casing with the filter installed in it. To do this, unscrew the 4 fastening screws.
6. Unscrew the fastening screws of the air intake grille installed near the glass. We remove the grille. 7. Unscrew the 2 bolts securing the fan housing.
8. Using a “pull” motion, remove the body from the support. 9. Rotate the body 90 degrees. and remove it from the niche.
Further actions depend on what exactly was purchased for replacement - the assembly with the housing or just the electric motor with the impeller. If a fully assembled structure is available, we install a new element using the technology reverse to that described above.
Fan disassembly
In the case where there is a motor with an impeller, we disassemble the fan housing. To do this, remove the foam seal from the outlet socket, then remove the housing clamps, after which it will split into two halves.
We extract the email. motor, for which we unfasten the spring clamps of the motor cover, remove this cover and remove the electric motor. the engine together with the impeller from half the housing.
The electric motor is replaced only as an assembly with the impeller, and it is not recommended to disconnect them so as not to disturb the alignment.
When assembling, be sure to stick a foam seal around the perimeter of the outlet socket, otherwise the air flow will dissipate due to the cracks, which will reduce the efficiency of the stove.
If the electric motor of the stove made a strong squeal during operation, you don’t have to change the electric motor, just disassemble the fan and put grease in the bushings. But these measures will help eliminate the squealing for a short period of time and ultimately the stove motor will have to be replaced.
How to disassemble a fan motor
If the stove fan does not work and you do not want to buy a new one, but prefer to deal with the problem yourself, you will need to disassemble the motor itself.
- Unscrew the 2 fan mounting screws.
- Unhook the fan itself; to do this, disengage its support.
- Tear off the foam seal on the right side of the casing.
- Remove the fan shroud support.
- Using a screwdriver, release the plastic latches of the casing.
- Using a screwdriver, pry up the 2 spring latches and unhook them.
- Now you can remove the cover from the motor.
- Pull out the motor, and the heater motor impeller will also come out with it; do not remove it so that the balancing is not disturbed.
- Unscrew both screws that hold the brush holder.
- Remove the 2 cage nuts.
- Remove the brush holder.
- Perform a visual inspection of the collector. If there are scratches or burns, it needs to be cleaned with fine-grained sandpaper. If there is more serious damage that cannot be repaired, replace the motor.
- Reassemble everything in reverse order.
If you already have experience in repairing electric motors, then it will not be difficult for you to cope with this, however, sometimes it is easier to replace a broken motor with a new one than to suffer from repairing the old one and extending its life for a very short time.
Replace without removing the panel
But no matter what method is used, you will first have to drain the coolant from the system. Therefore, you will have to stock up on antifreeze in the required quantity in advance.
First, let's look at the replacement method without removing the panel. As already mentioned, this will require making cuts in some places.
To complete the work you will need:
- Set of screwdrivers of different lengths;
- Hacksaw blade for metal;
- Flat container for draining residual coolant from the radiator;
- Rags.
Having prepared everything and drained the coolant from the cooling system, you can begin work:
- We remove the storage box (glove compartment) from the panel, for which it is necessary to unscrew 6 screws securing it;
- Remove the side trims on the center console;
- Using a metal blade, we make the necessary cuts: The first cut is vertical
, we make it on the inner wall of the panel near the center console (behind the metal strip of the glove compartment).
Moreover, here you will have to make two cuts. The second cut is horizontal
, running in the upper part along the rear wall of the opening under the glove compartment.
The third is also vertical
, but not end-to-end. It is done on the right on the rear wall of the lower storage shelf of the panel; - After all the cuts, part of the panel together with the wall can be bent down, which will provide access to the radiator. We bend this part and fix it;
- Unscrew the near bracket for fastening the heating system flap control cable and move the cable to the side;
- Loosen the clamps of the coolant supply pipes to the radiator. In this case, you should place a prepared container under the connection points, since liquid will flow out of the heat exchanger. Remove the pipes;
- We unscrew the three screws securing the radiator, remove it and immediately inspect it.
Afterwards we replace the heat exchanger, fix it in the seat, connect the pipes to it and clamp it with clamps. To make the pipes fit easily, lubricate them with soap.
At this stage of work, you should fill the cooling system with liquid and run it to remove air pockets.
Next, it remains to make sure that the connections between the pipes and the radiator are not leaking, and that the damper and faucet are connected without errors.
After this, all that remains is to return the cut part of the panel to its place and fix it. To do this, you can use screws and plates.
The main thing is to fix it in several places so that in the future the cut off part does not rattle when moving. Use sealant or silicone.
This method is convenient because if you replace the radiator again (which is quite possible), all the work will be very simple - you just need to remove the storage box and unscrew a few screws.
In addition, all cuts are made in such places that after assembling the panel and installing the glove compartment they will not be noticeable.
Work to replace the fan in the cabin
Replacing the heater motor of a VAZ 2110
The subsequent change of the heater motor will be done directly from inside the car:
Under the dashboard you need to find the block that goes to the electric motor. She disconnects. After this, you will need to unfasten the ground wiring of the electric motor. As a rule, it is pressed to the body by the front mounting nut of the heater. The trim and lining of the windshield frame are dismantled, and you cannot do without unscrewing the mounting screws. The right upholstery is removed from the interior heater, and the fastening nuts and screws should also be unscrewed. Heating hoses are disconnected
At this stage of work, extreme caution must be taken, since antifreeze residues may leak from these hoses and the heater radiator. To prevent the smell of coolant in the car interior, you need to lay a material that absorbs moisture well. The wiring is disconnected from the electric motor, from the micro-reducer, and also from the pneumatic valve. After these steps, remove the front housing with the stove casing. These elements are fixed with brackets and screws. It is worth noting that the engine and motor are located on the casing. The latches are removed, and the engine and motor are removed.
Recommendations for replacing the motor
Replacing the heater motor of a VAZ 2110
You can disassemble the electric motor yourself only to evaluate the collector and clean it. If the cause of the breakdown lies in another situation, then it is not advisable for a non-specialist in working with such parts to disassemble it. It is better to buy a new electric motor.
Note! It is also not recommended to dismantle the engine impeller on your own, since when it is installed in its place, the balancing, which plays an important role, will be disrupted. Naturally, the electric motor will function, but not smoothly, which can lead to breakage of the bearings and noise when the stove is turned on.
Since the stove is in a disassembled state, it becomes possible to calmly view the other components of the cabin heater. So:
- In order for more heat to come from the radiator, you need to dismantle it and wash it. It is fixed on the rear casing of the heater, which is removed by unscrewing the mounting screws. After this, the radiator can be easily removed and washed under the pressure of water flowing from a hose that is connected to the radiator inlet or outlet tube. The same pressure washes away dirt from the surfaces of the removed radiator.
- To disassemble the air ducts and heater control mechanisms, you will need to remove the instrument panel on which the main air ducts are located.
Note! Usually the panel with the main air ducts is made as one piece, so it must be handled with the utmost care so that it does not have to be replaced later. After this, you need to remove the interior air ducts, which are secured with special screws, and the decorative lining of the floor tunnel
After this, you need to remove the interior air ducts, which are secured with special screws, and the decorative lining of the floor tunnel.
Note! Under this trim there are air ducts for heating the feet, which are attached to the body with screws and latches.
- The air distributor is removed from the dashboard by unscrewing the mounting screws and disconnecting the damper control rod.
- Reassembly must be done in the reverse order of disassembly. If necessary, fix the damper seals with glue. You can also seal the attachment points of the hoses with the radiator with sealant.
- When all the parts are assembled and installed in their places, the functioning of all components is checked and antifreeze or antifreeze is added. It all depends on personal preference.
- At the final stage, they check the tightness of the attachment of the hoses to the radiator and the actual operation of the assembled stove.
For those who perceive information visually, it is recommended to watch a video with a detailed description of the actions and several photos that will help you do everything correctly.
Repair work can be carried out with your own hands, but subject to clear instructions. This will help you save a lot of money, because the price for services of this kind in car services is not cheap.
The heater blows poorly into the legs and side windows
The heating system of the VAZ-2114 is not reliable. Over time, the stove stops heating the legs and side windows normally. Moreover, the problem is not in the temperature of the air (on the contrary, it can be hot), but in the strength of the flow with which it comes from the nozzles. In this case, you will have to modify the air flow channels. To do this, remove the front panel so that there is access to the nozzles.
Next, a new corrugated hose is installed (just plastic tubes come from the factory). Additionally, we treat the joints with the heat-insulating material “Spleen”. All cracks between the top and bottom of the panel are also covered with it. Next, you should modify the stove damper, which directs the flow to the desired area. Often it does not fit well against the body. Because of this, a large percentage of hot air is simply lost in the panel and “walks” in the cracks. So, we remove the damper and remove the old yellow factory seal. We seal all the cracks with modelin. Instead of a sponge, we glue “Bitoplast”. It is advisable to apply it in several layers.
Replacing the stove fan
Interior plastic, washer reservoir (third one already!), heater fan (has been humming and groaning for a long time), arch protection, additional brake light (mine is broken), seat belt clamps, and floor mats in the interior - the top one on the tidy, and in the floor tunnel , and yes, I also took something like a glove compartment into the route PC compartment.
Upon arrival home, without eating or drinking, I ran to install it all)) Having installed all the new plastic and tank, I set to work on the stove fan
Everything went well: I unscrewed the casing, unscrewed the fan mounts, and pulled the wires out of the interior. Well, I think it’s written in the book - “turn, pull and there it is in your hands” - so let’s repeat it now... But that’s not the case...
Taking different poses, running back and forth, crying and laughing like a normal person, the right position was finally found...
Here's what we have...
Carefully, without peeling off the foam (it’s better to replace it, of course), without breaking the latch, open the casing,
Change the filling and assemble everything in reverse order.
What about the prices:
- Rack cover 2109 middle bottom (set) - 120 rub.
- Front top strut trim (set) — 80 rub.
- Dashboard mat — 85 RUR.
- Tunnel mat 2108 — 60 rub.
- Heater motor 2108 — 910 rub.
- Washer reservoir 21083(eng) - 130 rub.
- Miniblock console 21083 — 170 rub.
- Additional stop 2109 - 290 rub.
- Wing arch 2108 (set) — 30 rub.
- Seat belt retainer (set) - 50 rub.
Replacing the heater switch on a VAZ 2114
Replacing the heater switch
It should be immediately noted that replacing the VAZ 2114 heater switch is not a difficult job, but very inconvenient and painstaking. For greater convenience, you can also remove the dashboard and completely drain the coolant, but you can do everything without this. In order to replace the heater valve we will need:
- Key for 10
- Rags
- Coolant
- Worm clamp with a diameter of 16-23 mm
- New heater tap
- Empty containers with a volume of 5 liters or more
- Crosshead screwdriver.
How to replace the heater valve on a VAZ 2114
The first step is to unscrew the side wall on the passenger side of the central instrument panel or remove the panel completely - at your discretion. So:
- We place rags under the passenger’s feet and under the faucet to absorb spilled drops of liquid.
- Open the hood and unscrew the clamps of the heater outlet and inlet hoses, remove the pipes from the faucet and drain the liquid into an empty container.
- Then, inside the car, using a Phillips screwdriver, unscrew the fastening clamps securing the heater pipes to the faucet and disconnect them. Place a container to drain the coolant.
- Using pliers, remove the bracket from the faucet lever rod and remove it from the lever hole.
- Then we return to the engine compartment again and, using a 10mm wrench, unscrew the 2 valve fasteners of the heater to the panel.
- And again we return to the salon and pull out the faucet.
Install the new faucet in reverse order:
- We install a new faucet in its place.
- We secure it from the engine compartment with two nuts (it is recommended to pre-lubricate them with anticorrosive.
- Fully open the faucet from the interior side and tighten the bracket.
- Then we put the pipes on the engine compartment side and the interior side and secure them well.
- If you have drained it completely, then fill it with coolant, or unscrew the pipe on the throttle assembly and pour liquid into the tube until it is full.
- We install the pipe in place, start the car, warm it up, tighten the clamps on the tap pipes and turn on the heater.
If cold air is blowing from the heater, then there is most likely air left in the heater radiator. To fix this problem, you will need to remove the air. This completes the procedure for replacing the heater tap, screw the instrument panel into place and you can ride.
Basic malfunctions and ways to eliminate them
The most typical malfunctions of the VAZ 2107 stove include:
- Air entering the cooling system. This usually happens after the system has been filled with antifreeze. Removing the airlock normalizes the heating process of the interior.
- When the heater tap is open, coolant does not flow into the radiator. This most often occurs when water is used as antifreeze. Scale forms in the system, clogging the faucet and impeding the passage of coolant. The problem is eliminated by dismantling the tap and then cleaning or replacing it.
- Poorly functioning or failed water pump. If the pump does not pump coolant, this can lead not only to a lack of heating of the interior, but also to more serious problems, such as engine overheating. The water pump does not work, as a rule, when the generator belt breaks, as well as when it jams as a result of wear on the bearings.
- Clogged stove radiator honeycomb. In this case, the supply pipe will be warm and the outgoing pipe will be cold. The radiator often becomes clogged when water is used as a coolant, as well as when oil or additive particles enter the system to eliminate leaks. Cleaning or replacing the radiator will help restore normal operation of the stove.
- Displacement of the partition in the radiator. If both radiator hoses are hot, but warm air does not enter the cabin, then most likely the partition in the radiator has shifted. The only solution to the problem is to replace the radiator with a new one.
More information about the VAZ 2107 pump: https://bumper.guru/klassicheskie-modeli-vaz/sistema-ohdazhdeniya/pompa-vaz-2107.html
If an oily residue appears on the floor or glass, you should look for an antifreeze leak, which may be:
- on tap;
- on pipes;
- on the radiator.
If a faucet or pipe is leaking, it should be replaced. A leaking radiator can be temporarily sealed, but it will still need to be replaced soon.
The list of possible stove malfunctions is not limited to this.
It can be quite difficult to get to some elements of the VAZ 2107 heating system
The stove does not turn off in the summer
Sometimes during the warm season it is impossible to turn off the stove by setting the upper handle of the control unit to the extreme left position. If you cannot turn off the tap, the tap itself or its drive cable is faulty. The tap can be found under the instrument panel on the passenger side. If you also cannot close it manually, you should not apply much effort. The faucet may break and antifreeze may leak into the cabin.
You can replace the faucet after purchasing a new one at any car service center. However, you can try to do this yourself. It should be noted that changing the faucet with your own hands is quite inconvenient due to its location. First, open the hood and disconnect the pipe going to the tap. Since coolant will flow from the pipe, it is necessary to place a previously prepared container under it. After this, you need to remove the storage shelf and, using a 10mm wrench, unscrew the two nuts securing the faucet to the heater body from the passenger seat. Then the tap is removed from the studs, removed and replaced with a new tap in the reverse order.
The reason for the inability to turn off the heater is usually a faulty heater valve.
Heater radiator clogged
You can clean a clogged stove radiator yourself. To do this you will need:
- two new rubber gaskets;
- two worm clamps;
- a set of keys;
- coolant;
- container for collecting coolant.
You can clean a clogged stove radiator yourself.
Flushing the radiator is performed on a cold engine in the following sequence:
- Rags are placed under the pipes that will be removed.
- The clamps securing the radiator pipes and faucet are loosened.
- The pipes are removed. The coolant from them is drained into a pre-prepared container.
- Use a key number 7 to remove the seal fastening from the partition of the engine compartment.
- The heater valve drive is disassembled.
- The fan casing is removed.
- The heater pipes are pulled out through the hole. The radiator is removed.
- Using a 10mm wrench, unscrew the bolts securing the radiator outlet pipe.
- The old gasket is replaced with a new one.
- The heater valve is disconnected and cleaned.
- The radiator is cleaned from the outside of leaves and dirt.
- The pipe is cleaned from the inside using a brush.
- The radiator is washed with Karcher under a pressure of 5.5 atm until clear water comes out of it. This will require about 160 liters of water.
- If you don’t have Karcher, you can use caustic soda for washing. The soda solution is poured into the radiator and left for one hour. The solution is then drained and its color is compared with the color of the fresh solution. The procedure is repeated until the color of the drained and filled liquids becomes the same.
- After washing with caustic soda, the radiator is purged with a compressor.
Installing the radiator is done in the reverse order. It is recommended to replace all clamps and gaskets with new ones.
The removed radiator can be disassembled by unsoldering its top and bottom using a gas torch, and cleaning its insides with a metal mesh mounted on a drill. In this case, you can use a special washing liquid, alkali or citric acid. The radiator is then sealed and returned to its place. This procedure is quite labor-intensive, so it is often more advisable to replace the radiator with a new one.
Video: replacing the radiator of a VAZ 2107 stove
Replacing the heater motor on a VAZ 2114
- Examination
- Replacement
- Price issue
When a car's heater fails, the fan motor is often the cause. You can detect such a malfunction by the characteristic sounds that occur when you try to turn on the heater.
Examination
To make sure that the motor is the cause of the heating system malfunction, you should carry out a simple but indicative procedure:
- Start the car;
- Turn on the first, second and third speeds of the stove alternately;
- If there are no sounds indicating the start of the fan operation, the motor has failed;
- If the fan did not turn on at speeds 1 and 2, but started working at speed 3, then the cause of the problem may be a switch or an additional resistor.
Causes of failure
The motor may not work for several reasons. Each of them requires separate consideration. Therefore, we invite you to familiarize yourself with the possible causes of fan failure in our table.
Cause
It is important to know
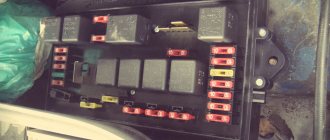
Fuse blown
The fuse F7 with a voltage of 30A is responsible for the stove. Replacing it is not difficult, but the main problem lies in the possible occurrence of a short circuit
This fuse is responsible for the lighting in the glove compartment, headlight washers, cigarette lighter, and heated mirrors. If it malfunctions, all specified devices will stop working.
There is no contact in the mounting block
This is a common problem in cars and occurs as a result of contact oxidation or loss of connection strength.
Ignition relay sticks
The heater turns on only after the car has warmed up. Therefore, it is recommended to check the condition of the ignition relay if the fan is not working. Replace relay if necessary
The heater only turns on at speed 3
Speeds 1 and 2 are activated by an additional resistor, and in mode 3 the current goes directly to the motor. In this situation, you should replace the additional resistor or check its contacts
The heater switch is broken
Here we are talking about problems with the electrical target or fuse. To check their condition, you can use a test lamp
Problems in motor design
If everything is fine with the switch and current, but the fan does not respond, you should check the level of overheating of the motor, its ground contacts or brushes for sticking
Depending on the problems encountered, you may need to replace the fan. Changing the motor is not difficult, although to do this you must have some skill or at least minimal experience in working with the electrical equipment of your car.
The first step when replacing the heater motor is to disconnect the battery.
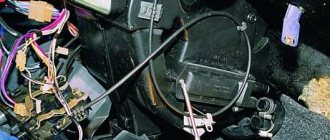
Motor location
Replacement
Replacing a failed unit is not difficult. Follow certain rules and sequence of your actions to achieve the desired result.
- Disconnect the negative terminal from the battery.
- Lift the hood and in the engine compartment, remove all the mounting bolts that hold the plastic trim.
- For now, the overlay can be moved to the side so that it does not interfere with work.
- Remove the rubber seal, which also has its place in the engine compartment.
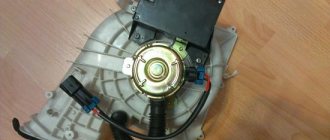
- Remove the protective cover from your heater motor. So you have reached the desired object and can begin replacing.
- On the sides of the motor are two bolts that hold your fan in place.
- Now go into the interior and remove the driver's side panel. There is a positive plug located there, which must be disconnected.
- Next, look for the negative wire. It is held on by one nut, which must be unscrewed.
- The disconnected wires are inserted into the hole in the body of your car, passing through the rubber seal.
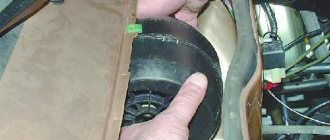
- Remove the damaged motor. To do this, you need to turn it and pull it out through the right side.
Dismantling the fan motor
Follow the reassembly sequence strictly to avoid mistakes that could lead to even more serious problems.
As you can see, removing the device is not difficult. Having studied the condition of the fan motor, we can draw a conclusion regarding the need to replace it. Sometimes car owners get by with simply repairing brushes or replacing fuses.
Price issue
We advise you to choose a high-quality motor for replacement so that later there are no problems with its performance.
The price depends on whether you buy the motor complete with housing or separately.
The motor itself will cost you about 500 rubles, and for the assembled device you will have to pay about 1000 rubles. Which option is preferable for you, decide for yourself.
Loading …
No Comments Yet! You can be first to comment this post!
Close Window
Preparation
Preparatory activities do not include many complex operations. You will need to do the following:
- Remove the negative terminal from the battery to de-energize the car and protect the car from possible short circuits;
- Drain the coolant from the system. To do this, open the cap of the expansion tank to relieve excess pressure, and then unscrew the drain. The liquid must be drained into a special prepared container.
When draining the cooling liquid, one important rule must be observed - the procedure is carried out only when the engine has cooled down. If in the future you are going to use the same antifreeze or antifreeze, then choose a clean container for draining
If in the future you are going to use the same antifreeze or antifreeze, then choose a clean container for draining.
How to independently remove and replace the stove on a VAZ-2115
20.02.2017
Heater malfunctions in any car cause a lot of trouble. It is especially difficult to correct the situation when the problem has already started and coolant has leaked.
Replacing a heater on a car is not an easy task, since in order to get to it, you will have to disassemble half the car and it will take a lot of time. Unfortunately, not everyone knows how to remove and replace the stove on a VAZ-2115, and therefore they turn to a car service center.
But you shouldn’t rush to give your car into the wrong hands because of this procedure alone, because:
- Work to replace components costs about 1500–2000 rubles.
- It’s not a fact that they will do everything efficiently.
- Very often, car service workers treat their work anyhow and can break something when dismantling the panel.
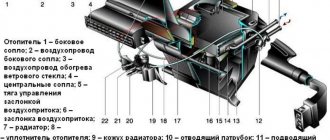
The device of the VAZ-2115 stove
The VAZ-2115 and VAZ-2114 have the same heating systems; using the diagram below you can clearly see its structure.
44 — fan motor; 45 - additional resistance resistor; 46 - speed switch.
How to diagnose the performance of the VAZ-2115 heater
- Turn on switch 1 first, then second and third speeds.
- Using levers 2 and 4, you can adjust the desired direction of the air flow, and the latter also makes it possible to select the desired temperature.
The reasons for the breakdown may be different:
- A faulty fan means the stove does not work at all.
- If the radiator still shows signs of life, then the breakdown may be a failure of the additional resistor or the interior heater does not respond to switch commands.
- But the stove tap can also leak or become stuck, in which case it must be urgently replaced.
- When the fan is running at full power and the temperature is at maximum, and the engine is warm, then perhaps the heater radiator is clogged. To clean or replace it, you will need to disassemble it.
Replacing the radiator of the VAZ-2115 stove
Replacement is necessary when the heater radiator leaks or is clogged. If the radiator is clogged, you can blow it out with a Karcher, but keep in mind that it can deteriorate under high pressure.
How to disassemble the stove and remove the radiator
In order to remove the radiator, you must first drain the coolant and disassemble the dashboard. If the coolant is still good, it can be refilled again after replacing the failed elements.
To save time, you don’t have to remove the panel completely, but just do partial disassembly.
Improvement of the heating system
The design of the VAZ 2107 stove is far from perfect. Therefore, car owners modify it in a variety of ways. First of all, attempts are being made to improve the tightness of air ducts, especially at joints. This allows you to slightly increase the efficiency of heating the interior.
VAZ 2107 owners modify the heating system in a variety of ways
Fan replacement
Often, to improve the operation of the stove, car enthusiasts replace their original fan with a more powerful one, used in other VAZ models (for example, VAZ 2108). The factory fan motor is mounted on plastic bushings, which wear out quickly. As a result, shaft play appears, and a whistling noise becomes audible in the cabin when the fan is operating. Repair and lubrication of bushings in this case, as a rule, do not bring the expected effect. The VAZ 2108 fan electric motor is mounted on bearings. Therefore, installing it in the VAZ 2107 stove will not only increase the efficiency of heating the interior, but will also make the operation of the fan more reliable.
Usually, along with the fan electric motor, a number of other elements of the stove control unit are also changed . The rotation speed of the VAZ 2107 factory fan at a current of 4.5A is 3000 rpm. The VAZ 2108 electric motor consumes 14A at a frequency of 4100 rpm. Therefore, when replacing, you should install the appropriate fuse, resistor (usually from a Niva) and speed switch (for example, from a Kalina).
Video: modification of the VAZ 2107 stove
To dismantle the fan you will need:
- flat and Phillips screwdrivers;
- keys for 7 and 10;
- round nose pliers.
The fan is removed in the following order.
- The instrument panel, shelf and glove box are dismantled.
- Use a 7 key to loosen the casing of the air damper control cable. The cable loop is removed from the lever.
- Use a 10mm wrench to unscrew the nut securing the heater housing.
- Use a flat screwdriver to remove the left and right air ducts from the heater body.
- Use a flat-head screwdriver to remove the latches that secure the fan to the stove.
- The wire terminals are disconnected.
- The fan is removed from the stove body.
- The impeller is removed. If necessary, use pliers.
The size of the new fan (from VAZ 2108) is slightly larger. Therefore, its installation will require some changes in the design of the stove. If only the motor is changed, it will be necessary to make an additional hole in the grille through which warm air enters the lower part of the cabin. If this is not done, the motor housing will rest against the grille.
Replacing the stove body
When installing a fan from a VAZ 2108, you will need to make a new frame, usually from plexiglass. This is quite labor-intensive and will require certain skills.
The material for a homemade frame when modifying the stove can be plexiglass
When making a new frame, all dimensions must be strictly observed. The slightest inaccuracies can lead to vibration or failure of the new fan. Having assembled the structure, you should lubricate the joints with sealant and install the new housing in place. After this, the noise level in the cabin usually decreases, and the stove begins to heat the air better.
The air intake should ALWAYS be from the street, especially in winter, otherwise the windows will sweat (and freeze in winter). Air intake from the cabin is done only when the air conditioning is turned on (in the seven this issue does not arise). The fact that one “sleeve” is not blowing is possible: a) when tampering with the stove, the sleeve did not fit into the right place and the stove is blowing somewhere under the panel, b) some kind of crap got into the nozzle (foam rubber or something like that ).
Anakin
https://forums.drom.ru/russian/t1151720023.html
When making a new frame for the motor, all dimensions must be strictly observed.
Other stove tuning options
Sometimes the design of the air ducts is modified. Additional holes are made in the stove body into which plumbing hoses are inserted. Through these hoses, connected to the side and bottom air ducts, when the engine is running, an additional flow of warm air is created onto the windows and into the legs.
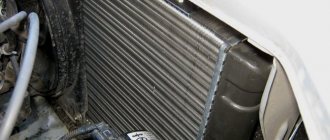
Often the cause of poor interior heating is a clogged heater radiator. The coolant begins to circulate more slowly or completely stops circulating through the heating system, and the efficiency of air heating decreases noticeably. Usually in these cases the radiator is replaced with a new one.
A clogged heater radiator leads to a decrease in the efficiency of heating the interior.
Replacing the heating fan on a VAZ 2107
Before starting work, you should select everything you need. Here's what we need:
- screwdrivers (phillips and flat);
- wrenches (set of open-end and socket wrenches);
- new stove fan for VAZ 2107.
Sequencing
First you need to carry out one preparatory operation: remove the gear shift lever. In the VAZ 2107 it creates serious problems when dismantling the furnace fan. Then you should remove the radio from its niche. It is attached with two self-tapping screws. When removing the radio, do not forget about the wires that are located behind it. The device carefully slides out of the niche so that you can stick your hand into the gap formed between the radio and the front panel and remove all the connectors with wires located on the back cover of the radio.
- Now, using a Phillips screwdriver, unscrew the shelf located in front of the passenger. It is attached with four self-tapping screws.
- Next, remove the console with the cigarette lighter. It is carefully pryed up in the lower left corner with a flat screwdriver and bent towards itself until it clicks. The same is done with other corners, after which the panel is removed from the niche.
- Behind it are wires that are manually disconnected from the panel. Before disconnecting the wires, it is strongly recommended to put some marks on them so that nothing gets mixed up when reassembling. At the top of the niche there are two 10mm fastening nuts. It is most convenient to unscrew them with a socket head.
- Above the panel with the cigarette lighter there is another panel with buttons. It is pryed from below with a flat screwdriver and bent upward. Underneath there are two screws with washers that can be unscrewed with a Phillips screwdriver.
- Now the cigarette lighter panel is completely freed from its fasteners, and it can be removed and placed on the floor of the cabin.
- The next step is to disconnect the air ducts. They are held on by flat plastic latches that can be easily bent with a flat screwdriver.
- After removing the air ducts, access to the VAZ 2107 heater itself, or rather, to its lower part, opens. It has four steel latches: two on the left, two on the right. If you have certain skills, the latches can be bent with your fingers. If that doesn’t work, then you’ll have to use a flat-head screwdriver again (it should be noted here that you need to use the screwdriver as carefully as possible, since when bent, the latches pop out of their sockets and fly away to God knows where).
- Access to the electric motor and fan is open. The motor with the fan attached to it is held in place by two steel latches located at the top and bottom. It is impossible to bend them by hand, so you cannot do without a screwdriver (and the blade of the screwdriver must be very thin and narrow, since another blade simply will not fit into the slot of the latch).
- The motor with the fan, free from fasteners, is removed and replaced with a new one. After this, the VAZ 2107 heating system is reassembled.
Causes and signs of heating fan failure
The list of reasons why a VAZ 2107 stove fan may break is small. Here he is:
- breakage of the blade in the impeller. As mentioned above, the furnace fan impeller on the VAZ 2107 is unreliable because it is made of very fragile plastic. To make matters worse, the fragility of this material increases in the cold. Therefore, you should not be surprised that the impeller breaks in the most severe frost;
As a rule, the plastic blades in the impeller of the VAZ 2107 break at the root
If the brushes in the VAZ 2107 motor are worn out, the fan will not rotate
The signs by which you can recognize a breakdown of a heating fan are also well known. Let's list them:
- After turning on the heater the fan does not make noise. This means that either the motor is broken, or it is working properly, but the current supply to it is interrupted. This usually occurs due to a blown fuse responsible for this section of the vehicle’s on-board electrical network;
- The rotation of the heating fan is accompanied by a loud grinding or crackling noise. This means that a piece of the blade has broken off from the impeller and is hitting the inside of the furnace casing;
- The furnace fan rotates with a loud, continuous squeaking noise that gets louder as the speed increases. The source of the squeak is the bushing in the fan. Over time, it wears out, and play appears on the fan, which causes a characteristic creaking sound.
About lubrication of the heating fan VAZ 2107
In short, lubricating the fan on a VAZ 2107 is a pointless task. Now more details. All heating fans on the VAZ 2107, regardless of the year of manufacture of the car, are equipped only with bushing bearings. As mentioned above, the bushing wears out over time and begins to creak piercingly. If the play resulting from wear of the bushing is small, then the creaking can be eliminated with the help of lubricant. But this is only a temporary measure that will lead to nothing, because very soon the lubricant will run out, the play will increase, and the fan will creak again. Therefore, the only rational option in this situation is to replace the furnace fan with a new one. Moreover, it is desirable that the new fan be equipped not with a bushing, but with a ball bearing, which will last twice as long.
By the way, about fans with ball bearings. Lately it has become extremely difficult to find them on sale. It is difficult to say what causes this. Perhaps this is due to the venerable age of the machine itself, which was discontinued a long time ago. So car owners, in search of the necessary spare parts, increasingly have to resort to a wide variety of tricks. For example, one driver I know thought of ordering a stove fan... on Aliexpress! When I heard about it, I didn't believe it. In response, the man took out his smartphone and showed me auction lots with fans. Where the VAZ fans came from at the Chinese online auction is a big mystery. But the fact remains a fact. By the way, they cost only a third more than domestic ones. This is likely an additional charge for delivery (even though the website proudly states that delivery is free). The parcel takes an average of one and a half months to reach our country.
Equipment operation mechanism
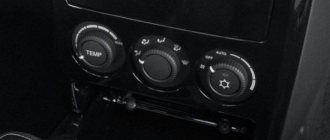
The fan regulates the flow of air that will circulate inside the car. It has several damper positions, which can be directed towards heating the feet, glass or the passenger part of the cabin.
- 1. To supply heat to the interior of the car, it is necessary to adjust the supply of thermal air by closing and opening the tap.
- 2. Through these actions, coolant enters the radiator, which contributes to the formation of heat. The stove operates at the maximum coolant level with a fully heated motor, which is about one hundred degrees.
- 3. When the stove switches to different speed modes, the fan speed is regulated.
- 4. In the car interior there are special partitions with the help of which you can determine the main root causes of failure of the VAZ 2114 stove.
In case of malfunctions, the cause should be sought in the following:
The fuse has failed;
The most pressing reason. A faulty fuse does not work properly, which can be the main reason for the breakdown of the entire heating system of the vehicle. Often the cause of a blown fuse is a short circuit. To determine this deficiency, you will have to fully understand the operation of the safety chain.
Poor contact in the inside of the mounting block;
Poor contact of the mounting block
The main cause of this malfunction is considered to be oxidized wiring. There is a solution to the problem: just reconsider the wires connected in front of the mounting block and replacement may be required.
The ignition relay has failed;
Occurs as a result of a stuck ignition relay. The trouble is revealed simply. In this case, the fan does not work properly and is noisy; its effectiveness is expressed only when the engine is fully warmed up. To eliminate this failure, it is necessary to replace the relay.
Inoperability of the stove speed modes;
It is detected when the fan is operating at maximum mode, which makes noise. In this case, it is necessary to evaluate the performance of the heating resistor. If it becomes unusable, replacement will help. This is the design of the heating system. In modes 1-2, the equipment operates using an additional resistor, and only mode 3 is switched on directly from the battery.
Repair of stove fan VAZ 21132115
Why does the heater motor stop working? There are reasons for this, and there are several of them. However, most often the cause of malfunction is clogging. Dust gets everywhere, including inside the mechanism.
Cleaning the stove fan in some cases helps to improve the operation of the mechanism
Causes and signs of heater motor failure
With the onset of cold weather, correct and uninterrupted operation of the heater becomes more important. But according to the law of meanness, it is precisely at this time that frequent problems are observed that have their own reasons:
- The safety element fails, designed to monitor not only the heater along with its components, but also the glove compartment lighting, the optics washer motor, etc. This 30-amp fuse is located in a special block and is marked with the number F7. As a rule, the reason for its burnout is a short circuit. A burnt out element simply needs to be replaced.
- The ignition relay is located under the instrument panel. It can also cause problems with the stove motor, as it is connected to the electrical circuit. You can make sure that it is a relay by the following sign: the fan does not work only when the engine is warm (more details about the relay are written at the end).
- The stove radiator deteriorates and scale forms in it over time. The element can be removed and washed with “Mole” or other liquids.
- Air enters the system, forming plugs. This negatively affects the overall operation of the stove, including the motor. Proper airing of the entire system will help.
- The additional resistor is faulty. If this part is the “culprit”, electricity will begin to flow to the motor only in the third position of the heater operation. Accordingly, in the first and second modes the fan will not turn on, since the current in this case flows through the resistor. The problem is solved by replacing the resistor.
- The contacts of the wiring terminals connecting the fan to the car's electrical system have become loose. You need to re-tighten them, and if they have oxidized, clean them.
How to remove the fan
The VAZ 2113-2115 heater motor is removed as follows:
- First remove the side cover of the dashboard from the pedal side.
- Then the electrical contact is disconnected from under the dashboard - a transition device between the car's electrical system and the motor.
- The “ground” located on the bolt under the head “10” is also unscrewed.
After this, you need to transfer the work to the engine compartment:
- Unscrew the protective cover hiding the motor.
- Then remove the screws holding it in place.
- Wires disconnected inside the car should be pulled up.
- After this, you need to remove the top cover of the motor to make it easier to remove.
- Pull by hand to remove the fan.
Video: how to dismantle the heater motor on a VAZ 2115
How is the replacement carried out?
Before direct replacement, it is recommended to check the motor, because it may not work:
- Place the fan on a flat surface.
- Connect the wires to the battery terminals.
A faulty element will not rotate at all or will do so intermittently, weakly and noisily. Before work, you must also remember to thoroughly clean all debris from the niche where the new motor will be installed. The replacement procedure does not take more than 40 minutes for an experienced motorist. All you need is a screwdriver, wrenches and a new fan. The activity is performed in reverse to the withdrawal process. The wiring terminals must be securely secured so that they do not loosen while the machine is moving.
Where is the VAZ 2113-2115 heater relay located?
Not all motorists who decide to carry out repairs and replacements themselves can quickly find a faulty stove. The relay is responsible for sufficient heating of the interior, so a motor malfunction may be associated with it.
Often this element simply wears out. This is not a repairable part, it only requires replacement
Therefore, it is important to know where the relay is located in order to replace it yourself in a timely manner. The element is located on the center console under the instrument panel, often in the mounting block, next to the fuse
The VAZ 2113-2115 heater relay is located near the fuses
The heater motor is an important and indispensable element of the car heating system. Periodic maintenance and timely replacement of faulty parts will always help keep the car interior warm.
Causes of malfunction
Replacing the heater motor of a VAZ 2110
As a rule, there are many reasons for such a malfunction, these include:
- clogging with slag from the stove radiator;
- stove motor failure.
If the stove motor is not functioning, or some of its speeds are not working properly, then it is first recommended to check the resistor, which in other words can be called the stove rheostat. This element is responsible for the speed of the fan. You can purchase such a part in a specialized store that sells auto parts. As for replacement, this can be done with the help of a specialist or on your own, which is not so difficult even for an inexperienced specialist.
Note! In the case of repairing or replacing the heater radiator, it is recommended to contact a car service center, since it is difficult to remove the radiator yourself. To replace the stove motor, you will need minimal knowledge and detailed instructions.
There are heater malfunctions that can be easily fixed by any car enthusiast. For example, a situation may occur when cold air is blowing through the side deflectors and the windshield heating duct of the heating system, while a hot air flow comes from the lower and central air ducts. Most likely, the reason will be the unsatisfactory operation of the heater damper, which is designed to cut off cold air. In some cases, it prevents the normal passage of cold air. Such faults are most easily identified in the cold season
When bending the damper drive rod, special care must be taken so as not to damage the plastic parts. Please note that in winter the plastic becomes more fragile
Replacing the motor for the stove on a VAZ 2110
Of course, a non-functioning stove causes many problems in winter.
If this is not so important in the summer, then in the winter the windows will fog up. You can figure out what the reason is when disassembling the heating system of the car
Other actions
Owners of VAZ-2107 cars are well aware of most of the intricacies of repairing their iron horse with their own hands. Anyone who does not disdain such an activity understands perfectly well that replacing a part in a given car can be much easier than getting to it. Therefore, if you have disassembled almost half of the torpedo, you should take the opportunity and carefully inspect all those spare parts that are in your public domain.
It is necessary to pay attention to possible malfunctions that are visible to the naked eye, a violation of the tightness of the same stove, as well as signs of a possible imminent failure of some other spare part
How to replace the heater fan VAZ 2101 – 2107
Replacing the electric motor is easiest in VAZ 2101, 2103, 2106 cars. It is a little more difficult to replace the heater electric motor in the VAZ 2107, 2105. This is due to a more extensive ventilation system, the placement of buttons on the beard, etc. Therefore, we will consider replacing it with a VAZ 2107.
- First of all, you need to move the lever (lower) to the right extreme position, this is necessary in order for the side air duct dampers to close.
- The instrument panel must be removed.
- Next, we move to the opposite side, remove the tank body and the shelf for things.
- Carefully, having outlined the wires, we remove the beard, do not pull, and look at what was there and where.
- Now, using a 7 mm wrench, you need to loosen the cable fastening and disconnect the rod.
- Remove the end of the damper cable
- Using a key set to “10”, you need to unscrew the nut that secures the heater radiator casing. You can find it behind the central air duct.
- Remove the ground wire from the stud
- Next, you need to unscrew the fasteners of the right air duct.
- You need to do the same with the left air duct.
- Using a screwdriver, remove the side air ducts from the heater body.
- Remove the entire assembled casing.
- We remove the fan from the case, passing the wires inside, disconnect the terminal from the resistor
- Remove the impeller and pay attention to the adjusting washers.
- Disconnect the spring brackets and remove the heater heater motor.
How to replace the VAZ-2114 stove motor with your own hands
A warm interior is the key to good and comfortable travel by car. A non-working stove can not only cause discomfort, but also become an argument against further travel by car at all. It’s one thing when you came to the garage, noticed a non-working heater and refused to move further in the car during the breakdown, but if this breakdown caught you on the road, the nearest service center is far away, and it is not possible to drive a car with a non-working interior heater, because the windshield becomes covered with frost and further movement becomes dangerous. Then the only option left is to either transport the car using a tow truck, or try to fix it yourself.