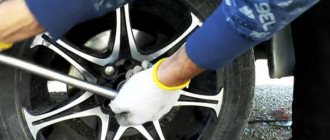
Imagine the situation: when you turn the steering wheel again, suddenly a frightening metallic crunch is heard and the car does not move - the inner part of the outer CV joint has been destroyed due to the ingress of water and sand. And the culprit is a ruptured boot of the constant velocity joint. Ask yourself, when was the last time you inspected it for integrity? But automakers recommend periodic inspections of protective covers to prevent expensive repairs.
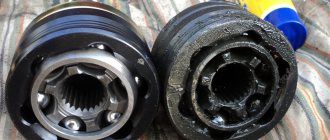
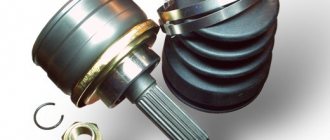
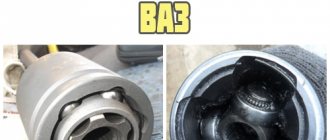
The CV joint boot is an inexpensive, quickly replaced in a car service and very important part, which, if damaged, can lead to expensive repairs and immobilization of the car. You just need to tear it slightly, and dust, salt, dirt and water immediately get inside, onto the rubbing pairs of the constant velocity joint, which lead to very rapid destruction of the moving parts. Usually the separator is destroyed, and scuffing also occurs on the cage and balls.
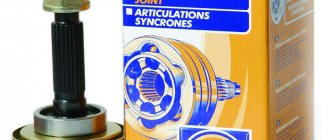
We decided to conduct a small test, for which we purchased 16 outer CV joint boots for front-wheel drive VAZ 2108-2170 models - two of each brand. And also, for comparison, we purchased a set of boots from a world manufacturer for a fairly common foreign car Nissan Pathfinder/Navara, similar in size to boots for Lada cars.
When purchasing, by the way, I had to deal with the peculiarities of business in Russian: almost all products do not have packaging, some manufacturers do not bother assigning company numbers or providing at least some information about the product and its manufacturer. Added to all this are incomprehensible storage conditions and transportation of these components in potato bags. And this is not a metaphor! Apparently, one of the factors in this attitude towards spare parts is their waste price. In our case, prices for outer CV joint covers for most Lada cars range from 150 to 300 rubles.
Tests
Anthers of all brands, one piece at a time, were placed in a freezer at a temperature of –40 ºС and kept for 24 hours. The anthers were then tested for fragility. All presented CV joint covers were able to pass this stage.
The second stage was lowering the temperature to –50 ºС and repeating the exposure of the products for one day. Then the anthers were taken out again and checked for fragility by attempting a sharp compression.
The corrugations of the Weber and ATP anthers crumbled at this temperature into small rubber fragments like glass. The Hofer and Trek cases, although they became very hard, did not receive any damage. The remaining samples passed the tests without consequences.
The second stage was checking the samples we purchased for resource.
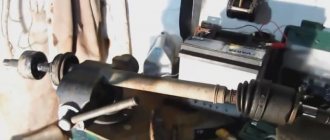
The boots were lubricated with CV joint grease and installed on a special stand for accelerated life tests. The main parameter of the boot life is, in fact, the number of compression-extension cycles sustained. Therefore, the installation consists of two shafts rotating on bearings, one of which is driven by electric motors located at an angle of 45º relative to each other (requirement GOST R52924-2008). The rotation speed of the drive shaft is 1500 rpm, and knowing the wheel size for the VAZ 2108 (185/60R14), it is quite easy to calculate the expected speed of the car.
The linear speed of the wheel is determined by the formula:
ϑ=ωR, where ω – angular velocity,
which is determined by ω=2πν, where ν is the rotation frequency.
The wheel diameter size is easily calculated:
185/60R14=0.185x0.6x2+14x2.54/100=0.5776 m
The speed of linear motion will be equal to:
ϑ=3.14x1500x0.5776=45.34 m/s (163.2 km/h)
Thus, the warranty mileage of 50 thousand km on the boot stand is completed in 306 hours.
Only the BRT, ATR, Trek, Trialli anthers, as well as the NTN-SNR case, withstood the endurance tests without consequences. The rest exploded in the area of the upper corrugation.
The TSN dust bag lasted only 5 hours. Weber lasted a day. "Horse" - two. The Hofer ruptured after 91 hours of testing.
Rating of CV joint boot manufacturers
When compiling the review, experts studied products from well-known brands. Technical characteristics, assortment, and availability on the market were compared. Feedback from car owners and the opinions of service station specialists were taken into account. The main attention was paid to the following parameters:
- Material – silicone, neoprene, polyurethane, thermoplastic are used;
- Dimensions – geometric accuracy ensures a tight fit and easy installation;
- Equipment - branded clamps and lubricant simplify the replacement work;
- Service life – affects operating costs.
Mismatch of geometric dimensions, presence of microcracks, low strength – suppliers of products with such defects were excluded from our rating.
The best flushing oils
Types of CV joints
Before you begin repairs, you need to find out exactly how the unit is designed.
The pair of drives on the VAZ 2109 is equipped with a total of 4 CV joints.
| CV joint type | Peculiarities |
| Interior | There are 2 of them. They transmit torque to the axle shaft from the gearbox |
| Outer | There are also two of them. Installed on the ends of the axle shafts and transmit torque directly to the wheels |
External
This arrangement of grenades ensures the possibility of wheel rotation during turns and constant operation of the suspension system. To put it simply, the outer CV joints are responsible for transmitting torque when cornering, and the inner ones are responsible for the vertical movement of the wheels. These are collisions with bumps, holes, roll in turns, etc.
Interior
This is interesting: How much does 1 liter of gasoline 92 weigh?
How often should the element be changed?
Many manufacturers recommend replacing the outer grenade boot approximately every 30 thousand km. Of course, this is an average. Much depends on the intensity and operating conditions.
If the car is used irregularly, this can lead to premature deformation of the boot. It is also negatively affected by operating the machine on poor-quality road surfaces or in conditions of high humidity. All these factors negatively affect the protection properties. As a result, it has to be changed more often than specified by the manufacturer.
How to choose a CV boot
Despite its simple design, the boot protects the assembly from moisture, dust, dirt, and keeps lubricants clean. The part must ensure tightness, for this you need to carefully select components. The car owner must take into account the characteristics of the material, type, size, and operating conditions. This will allow you to install reliable internal and external CV joint boots, which will provide the necessary level of safety.
Material
They produce parts from rubber, polyurethane, silicone, and thermoplastic elastomer. Rubber has the smallest safety margin: spare parts quickly fail and break under high loads. The best characteristics are found in silicone cases, which are characterized by elasticity, easy replacement, and low price.
The disadvantage of this product is low wear resistance. Products made from thermoplastic elastomer have increased strength, resistance to abrasive wear, and a long service life. If the supplier uses low-quality polymers, then sudden temperature changes may cause cracks to appear on the surface. The best characteristics are found in polyurethane and neoprene covers, which have a high price.
Dimensions
They are selected by VIN code or removed from a part removed from the car. The external and internal diameter and length are taken into account. The dimensions must exactly correspond to the manufacturer's standards. Otherwise, installation problems will arise, and increased stretching will lead to rapid failure. A loose protective cover should not sit on the hinge: a lack of tightness will cause sand, dust, and water to get inside and jam the joints.
Other characteristics
It is recommended that the buyer purchases anthers from a well-known brand, making sure to check for the presence of protective holograms on the packaging. For Ford or BMW, you need to take components manufactured according to the automaker's standards. This will cause fewer problems when replacing. In the regions of the Far North, one of the main criteria is the frost resistance of the material. There are parts on sale that can withstand 50-60 degrees of frost. The strength of the product is influenced by the number of stiffeners: models with 5 reinforcing elements have an advantage.
Who has more choice of engines and gearboxes?
Starting from 2011, the models are almost identical in terms of power units. Both are equipped with 1.6 liter engines with capacities of 87, 98, 106 horsepower. The difference in the number of “horses” under the hood is achieved by modifying the engines and timing belt. But the Granta in the Sport package has a special 16-valve unit with 118 hp. With.
As for gearboxes, the brainchild of AvtoVAZ has two of them - 5 manual transmissions (modernized, cable) and 4 automatic transmissions from Jatco. True, in 2018, Granta also received a robotic 5th gearbox. And a little later, “Kalina 2” also inherited the “robot”.
Signs of boot failure
As mentioned in one of the previous sections, the boot has become something of a consumable item for car enthusiasts. If he “walks” for at least a year, this can already be called an excellent result. It is very easy to identify a defect in the boot - just inspect the boot properly. A sign of product failure is:
Although it is recommended to inspect the boot every 10-15 thousand kilometers (and even more often in the case of a cheap consumable), often the car owner receives a signal about the need to replace it without a visual inspection - when a grinding and crunching sound begins to be heard in the lower part of the car.
VAZ cars: repair, maintenance, tuning
Depending on the manufacturer and quality of the CV joint, its service life ranges from 30 to 60 thousand kilometers. Replacement of the external grenade is usually done more often, especially on the right side. It is more susceptible to stress from bad roads. How to replace the outer CV joint in Grante and which one is better to buy, we will figure it out now.
Rugs as a stand-alone option
In budget models of cars, the interior is decorated with materials of neutral colors, the floor is covered with car carpet. To attract buyers, car dealers come up with a variety of “gifts”, options to choose from, etc. Car dealership managers can “donate” mats with logos. They may ask for additional money for them.
It is easier to find ready-made mats in a car store for a standard car. They will cost less than those that are sometimes offered at car dealerships. They can be bought in any major city. There is more choice than in Moscow.
The sizes of car mats will fit the model indicated in the catalog according to the year of manufacture. No adjustment required.
Asia-Pacific
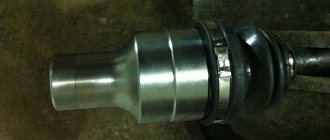
Country of origin: Russia
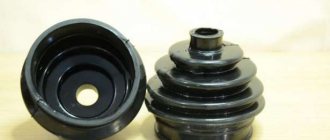
The boot has a brand name and marking 2110-2215030-01. Material specified >GR CR CR TE (PEEST) 9998
CV joint on VAZ 2114: replacement without problems
Replacing the CV joint on a VAZ 2114 is done after diagnosing its malfunction. Typically, this unit reliably serves for 100 thousand kilometers. The CV joint can fail earlier if the owner of the car does not look after the integrity of its boots and does not change them in time. Then, through cracks or breaks, a lot of dirt gets into the hinge mechanism, as a result of which the unit very quickly becomes unusable. Signs of a faulty part are a knocking and crunching sound when the front wheels turn in any direction.
An operation such as replacing a CV joint on a VAZ 2110-14 does not take much time. To perform this, you need to install the car on an inspection hole or overpass. You need to place boots under the rear wheel, located at an angle from the one being removed. If there is poor lighting in the inspection ditch, then an LED flashlight, which can be attached to the head using a strap, will not hurt. This will free up both hands for work. Here is a list of other tools for performing substitution:
- a set of spanners or sockets;
- pliers;
- hammer;
- puller for pressing out the ball stud;
- vice;
- wheel wrench and jack;
- screwdriver;
- thick lubricant “CV joint-4”;
- rags.
The extractor for extrusion is an iron cup with a side groove and a threaded rod for extrusion. A fairly common device, it can be found on many car owners.
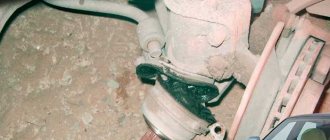
Why do ball joints break?
There are three main reasons why a ball joint fails during operation:
— critical shock load; — lack of lubrication in the hinge; — dirt getting into the hinge joint.
There are three main reasons why a ball joint fails during operation:
— critical shock load; — lack of lubrication in the hinge; — dirt getting into the hinge joint.
If the first point is quite predictable (for example, when hitting an obstacle or operating a car in extreme conditions), then the remaining two occur due to damage to the rubber boot. It is worth considering that rubber boots are susceptible to the effects of road reagents, in addition, they are corroded by grease and lose elasticity at low temperatures. As a result of the boot rupture, dirt with lubricant residues will create an abrasive that can damage the ball joint.
Which manufacturer's CV boots are better?
Before replacing parts in a personal car, the owner rightly tries to find out which CV joint boot is better. All the companies presented in the review produce products worthy of the attention of a demanding client. Quality is confirmed by international certificates. There is no universal supplier; the VyborExperta.ru team recommends the following factories:
- Avantech – combination of price and quality;
- Maruichi - for those who care about frost resistance and lubricant quality;
- Lemforder – for owners of prestigious European brands;
- The track is the choice of domestic car enthusiasts.
All the brands presented in the review are worthy of attention, but only factories with an impeccable reputation are worthy of the title of the best in their price categories.
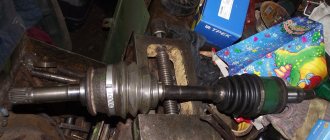
The drive is removed, what next?
The drive surface is cleaned with a metal brush and rags.
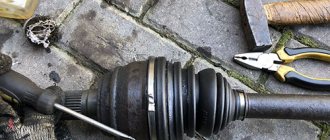
Then the clamps securing the boot are removed, and it is cut or removed using a screwdriver.
The CV joint is wiped clean of grease and then becomes loose.
To do this, it can be clamped in a vice or held suspended with the outer “grenade” down, and an assistant knocks it down with a drift and hammer.
After this, you need to check the condition of the retaining ring at the end of the shaft and replace it if necessary.
The removed hinge is thoroughly wiped and placed in a container with gasoline for washing.
The new boot is placed on the shaft.
The washed CV joint sits on the shaft splines and is then driven onto the last one.
It needs to be hammered through a wooden spacer.
Don't forget about lubrication.
Before pulling the boot onto the CV joint, CV joint-4 lubricant is placed inside it, as well as inside the hinge. After this, the boot is put on the “grenade” and secured with clamps.
Then all that remains is to put everything back in place.
The drive is driven into the gearbox using a hammer and a wooden spacer.
The hub is put on the splines of the outer CV joint and the nut securing it is tightened.
The lower ball joint is screwed into place. The wheel is installed.
After this, you need to check the tightness of all the bolts and nuts that were unscrewed.
The crankcase protection is screwed on, the car is removed from the stands, and oil is poured into the gearbox.
The same sequence of work applies to the drive of the other side.
Ball joint boot
This type of anther differs from the models described above in that their design resembles a mushroom, where the narrow part fits tightly to the finger, and the wider part is located on the body of the support itself. A retaining ring is used to secure the boot.
Replacing a damaged ball joint boot is quite easy. You just need to disconnect the hub and support, and then carefully pry up the retaining ring with a screwdriver. After you have done this, you can safely remove the boot from the support. Before installing a new boot, it is necessary to wash all surfaces as thoroughly as possible and also lubricate them.
The same boots are used for tie rod ends - they are absolutely identical (both the design itself and the method of replacement). Size is the only thing that makes them different.
What's good about Lada Kalina and Lada Granta
Both models have an average ground clearance of 160 mm. This is enough to avoid getting caught in snow tracks in winter, but when parking near the curb you have to be careful: you can get caught in the overhang of the front bumper.
The suspension in both cases is energy-intensive, does not break through on bumps, but also does not allow excessive swaying during maneuvers. Both models handle simply, without any frills, but not in the same way as the “classic” car when cornering.
Spare parts for both cars are cheap and available in auto stores. A generator, for example, costs 4,000 rubles, and a complete set of improved silent blocks and bushings for the entire suspension will cost 3,500 rubles. The simple design of the cars allows repairs to be made at any service center without special unique tools.
The engines of both cars are quite economical. Fuel consumption for the engine is 87 l. With. and manual transmission - about 7 liters in mixed mode. Therefore, if the driver plans to travel frequently, but does not want to overpay for fuel, purchasing any of the AvtoVAZ models will be a practical option.
Car enthusiasts also characterize the automatic robotic gearbox as reliable and easy to maintain.
Both Lada Kalina and Lada Granta have a very warm stove in winter. AvtoVAZ’s many years of experience in producing cars for the Russian climate is telling.
But if you need a car for frequent transportation of goods, then the Kalina station wagon will be a more suitable choice. Its luggage compartment volume is 670 liters versus 520 liters for the Granta.
What's wrong with Lada Kalina and Lada Granta
No matter how hard the domestic tried, it didn’t happen. Both cars have their drawbacks, which apply equally to both models.
The quality of the interior trim leaves much to be desired. The plastic creaks and scratches easily. But the updated Kalina 2 received a number of improvements, based on the experience of Grants. There are fewer creaks in the cabin, and the sound insulation is better.
The lack of anti-corrosion treatment of the metal is also not long in coming. Rust appears in places where stones and gravel are chipped if these areas are not touched up.
Separately, in Kalina 1, drivers noted the uncomfortable front seats. Due to the lack of lumbar support, drivers' backs became tired on long trips. This problem has been fixed in the updated second version. And although the design of the suspension and steering of the cars is almost the same, the steering rack of the Kalina 2 often breaks.
What to do if the ball joint fails?
It is quite easy to determine that the ball joint is faulty: if there is a creaking when driving on a flat surface, knocking when turning the steering wheel, as well as clanging and vibration in the front suspension, then it’s time for a lift. When the first signs of ball joint failure appear, the boots should be checked for damage, and if the boot is torn, the ball joint will have to be replaced. By the way, experienced auto mechanics advise immediately replacing the support on the opposite side.
Source
What is a silent block and how does it work?
For a comparative assessment of rubber and PU, it is important to understand the principle of operation of the element. The silent block used in car suspension is a “dry” hinge consisting of 3 parts:
- internal steel sleeve with thick walls;
- outer metal shell;
- the space between them is filled with elastic material (elastomer).
Note: The joint is called dry because it functions without the use of lubricant.
The front and sometimes the rear wheels of the car are attached to the body using a strut-lever system. To absorb vibrations from unevenness, the latter must rotate on its axis, which is what silent blocks provide. Their outer shell is pressed into the body of the lever, and the inner bushing is put on the axle and clamped on both sides with nuts. That is, the metal parts of the hinge are tightly fixed and do not rotate while the car is moving.
Thanks to this method of fastening, the part performs 2 tasks:
- The main thing is to ensure the movement of the lever on the axis without friction and any lubrication. This is the principle of operation of the silent block - the outer and inner bushings are able to rotate relative to each other only due to the elasticity of the material inserted between them.
- Secondary - to soften and reflect small impacts on the suspension so that they are not transmitted to the steering wheel. Here, too, the properties of the elastomer play a major role.
At the moment, polyurethane or rubber made from synthetic rubber is used to make the middle part of the hinge. The latter is reliably welded to the metal parts of the element using vulcanization. The elastomer, made of PU, is pressed and pinched between steel shells, which prevents it from turning on the bushing.
The answer is no, it’s not necessary. During the pressing process, lubrication with a solution of water and liquid soap is allowed. No oil lubricant or aerosol. Among the “would-be masters” there is an opinion that when pressing, you need to apply a little lithol to the surface to “make it work better.” It is not advisable to do this, since the lubricant remaining inside the lever will negatively affect the polyurethane. Which will lead to the destruction of its molecular structure.
Let’s summarize the results in order to improve maneuverability and adjust the suspension to suit your driving style - then polyurethane ones are better suited. If you ride at a relaxed pace, give preference to rubber bushings.
Find a CV joint for a Honda Honda
Selection of a cheap CV joint (grenade) from another car
Unique replacement of CV joint boots.mp4
Installing a universal CV joint boot on HONDA CRV and RENAULT LOGAN
CV joint (grenade) RUVILLE reviews
How to make an outer CV joint puller with your own hands / CV joint puller
Replacement and restoration of the CV joint, as well as the intermediate shaft on the Cherie Tigo
(Replacing internal CV joint)):)) Tripoid
CV joint washing and lubrication in one motion.mp4
Why rubber is being used less and less for the production of safety footwear
If the decision is which boots are better: EVA or PVC,
does not cause any particular difficulties, you just need to take into account the threat of damage and temperature conditions, then the choice between rubber and polyvinyl chloride puts many in some confusion.
For consumers, the label “ PVC boots” means that these are
rubber safety shoes. But this is far from the truth; it is not worth equating these varieties.
The difference lies not only in the composition and structure of the material, but also in the method of making shoes from them. Choosing between PVC or rubber boots
always falls towards polyvinyl chloride due to the fact that such products are more airtight. They are cast entirely, but the rubber is glued together from individual parts, which means the seams do not provide reliable protection from moisture.
We change the outer CV joint of the Lada Granta with our own hands
There shouldn’t be any difficulties when replacing the CV joint yourself if you use simple instructions and have a basic set of tools. It’s also a good idea to have a puller on hand for side dishes of equal angular velocities. It doesn't seem to have an article number, but that's what it looks like.
Alternatively, you can use a simple impact puller with a welded hub nut, but any extra shock loads on the transmission will not be very useful for it.
- While the car is on the ground, unscrew the hub nut using a 30mm socket with a long wrench.
- Raise the car, remove the wheel and unscrew the hub nut.
- We unscrew the caliper without disassembling it.
- Unscrew the ball joint bolts.
- We remove the hub from the CV joint and at the same time from the ball joint, and move it to the side.
- We loosen the clamps and move the boot further along the drive, closer to the gearbox.
- Using a puller or hammer, we ask the CV joint to leave its location.
- Remove the retaining ring.
- We fill the internal cavity of the CV joint with the lubricant that comes with the kit.
- We put the remaining grease into a new boot and put it in place.
- Screw the nut onto the new CV joint and install it in place.
- With light blows of a hammer on the nut, we move the hinge all the way until the stopper snaps into place.
- We install the boot, check that it is without distortions and tighten the clamps.
We put everything back together in reverse order, core the hub nut and do a test drive.