The ignition module on the VAZ 2114 8-valve injector and on other VAZ models is designed to supply high voltage through the PVN to the spark plugs. Some car owners call the ignition module a coil, which is not entirely correct.
Ignition coils were installed in carburetor vases. The VAZ 2110-15 uses the ignition module. Let's look at the functions of the ignition module, operating principles, circuits, and signs of malfunction.
Ignition module 2114 - causes of malfunction
The main point that you should pay attention to when the ignition module breaks down is unstable floating engine speed, jerking when driving, indicating that the engine is running rough, difficult starting of the engine or it refuses to start at all, the “Check Engine” light on the dashboard comes on, the description of which We have done this more than once on the website provaz2114.ru, these are the main signs of failure of the ignition module.
Causes of malfunction
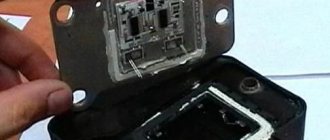
Carrying out diagnostics yourself is quite difficult, because the ignition module of the VAZ 2114 8 valves includes several devices, despite the fact that it is made of one plastic case. It is simply impossible to check all devices separately without special equipment. But this does not stop experienced car enthusiasts. At least, if not repaired, then it is quite possible to detect signs of a malfunction in the ignition module on a VAZ 2114 using improvised means.
Checking contacts
- Firstly, before you start repairing the most important part in the ignition system of your iron horse, you need to find out what exactly is not working there.
- Immediately check the quality of the contacts of all blocks of the low voltage circuit, and also look at the contacts of each high voltage wire.
Checking the power supply to the ignition module
How to check the ignition module of a VAZ 2114 injector 8 valves?
- To do this, we determine whether there is power supply to it.
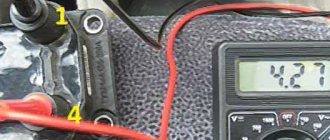
- To do this, you need to take the connector in the block and find the contact marked with the letter A.
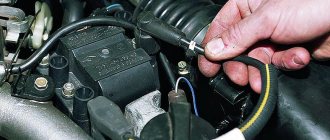
- To measure the module's power supply, take a micromultimeter, select the AC measurement mode up to 20 V, apply the negative probe to the engine ground and turn on the car's ignition.
- We apply another probe to contact A on the block.
- If the electrical equipment is fully operational, the micromultimeter will show 12 V, this means that power is supplied to the module, we look further for the cause of the malfunction.
Checking the connector contacts
Using this test, we were able to verify that power was supplied to the ignition module. This means you need to check each contact separately.
- Turn on the ignition, take the test lamp and connect it to two contacts at once: contact A and contact B.
- The control indicator can be made from a 12-volt low-power lamp with pre-soldered contact wires, or you can use a 12-volt automotive test probe with a voltage indication.
How to check the ignition module with a lamp on a VAZ 2114?
- We apply the contacts of the test lamp or probe to outputs A and B, then turn the engine starter.
- If the light flashes, the ignition module breaks the contacts as if it were a contact breaker. This means that contacts A and B are in perfect order.
- If the light never blinks when the starter starts, the ignition module is faulty.
Signs of breakdown
Disassembled
In fact, the symptoms of a malfunction in the VAZ 2114 ignition module are in many ways similar to the breakdown of other units. For example, you may observe the following phenomena:
- The engine is tripping;
- The car stalls at idle;
- There are problems when trying to start the car, etc.
That is, in fact, it may not be a module at all. Therefore, the only correct solution is to check the ignition module on your VAZ 2114.
Checking module 2114 using improvised methods
- There is a reliable way to determine that the ignition module is faulty. You need to take a working module and try to start the engine on it. Not every module may be suitable. If you are lucky and the engine is working, this means we send our module to the trash heap and install a new one. In addition, there is a fairly high probability that there is damage in the high-voltage wires and this will not only prevent us from testing our hypothesis, but may also damage the donor ignition module. This means that before checking the module itself, you need to make sure that the high-voltage wires are not damaged, do not break through to ground, and hold the current well.
- Checking the high-voltage circuit of the module for an open circuit. To do this, you need to take a micromultimeter and set it to resistance measurement mode. In the ignition module, the ignition coils are connected in parallel - the first with the fourth, the second with the third. To check, take a micromultimeter and install the probes into the connectors for high-voltage wires on the module when the ignition is turned off. First the 1st and 4th, then the 2nd and 3rd cylinders. The resistance between parallel coils should be 5.0-5.6 Ohms. If the resistance is infinite, then the network is broken and the module must be replaced.
- There is also an old-fashioned way of checking - to hit it well. This may help wake him up for a while, oddly enough. And it will give you time to pick up a new part at an auto parts store.
Operating principle and location
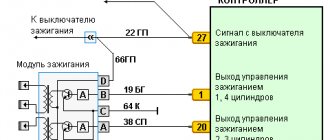
The ignition unit is controlled by a controller, which in turn receives information about the state of the vehicle from various sensors (IAC, DMRV and others). The controller also sets the sequence of operation of the ignition coils or, in other words, regulates the supply of current to the spark plugs. The ignition module operates at temperatures from -40° to +130°.
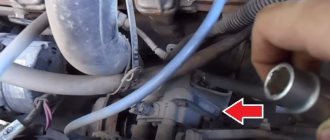
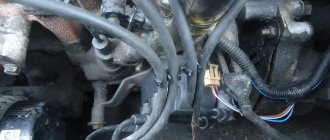
Finding its location is not difficult; high-voltage wires (HV) go from the module to the spark plugs; along them you can find it.
Replacing ignition module 2114
How to check
The resistance between contacts 1 and 4, 2 and 3 should not exceed 5.8 kOhm
, Having found a multimeter at home
Multimeter
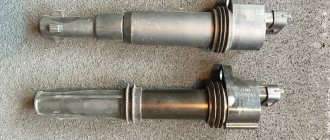
I went to the car, removed the ignition module by unscrewing 3 bolts and began to measure the resistance... and then it turned out that the module was long overdue for replacement...
Resistance between 1 and 4
Resistance between 2 and 3
Horrified, having installed the module, the store went back. Upon arrival at the store, they offered a choice of 2 reels, one of them was made in Russia and the other was made by Bosch Germany, the difference in price was a little more than 1000 rubles... At that time there were problems with finances, so I had to buy something cheaper
Having put the new module in place, the car simply whispered (I made 3 laps around the area with pleasure)
How to replace
Loss of dynamics
The VAZ 2114 model has never been distinguished by high dynamics, so even the slightest decrease in engine efficiency affects the use of the car. Loss of dynamics is a clear sign of improper operation of the ignition system or fuel supply system. When considering the signs of problems with the motor, one cannot fail to mention the loss of engine power as one of the key symptoms of its breakdown. If the module malfunctions, leaks in the paired cylinders are clearly observed, which manifests itself in low engine efficiency. It is clear that cylinder failure, even for a short period of time, does not allow the engine to operate at its full capacity. Operating a vehicle with reduced power is fraught with increased fuel consumption and uneven wear of the piston group.
Important ! If there is a sudden loss of power, you should stop driving the vehicle and begin repairs immediately.
The MZ cannot be quickly repaired, so if it malfunctions, a new unit should be installed on the machine. For reliability, you should “throw” a known working element of the ignition system into the car, and then check for changes in the operation of the unit.
conclusions
As a rule, the ignition module is not restored and is simply replaced with a new one. There is no guarantee that he won't start bucking again. This will save a lot of gray brain cells and save a lot of personal time, which can be spent on something more necessary. It's better to buy a new one and not worry.
However, as children, we all loved to take toys apart to find out what was inside and how everything worked. It’s not a pity to try to disassemble a broken unit, but still throw it away if nothing works. But if you repair it, you will get so much pleasure and pride in yourself!
Design
The design of the ignition module is quite complex, since it combines technology and electrics. The device serves to create high voltage transmitted to the spark plugs. It is this supplied current that is the basis for ignition.
The operation of the module ensures fuel combustion and, accordingly, engine operation. In very simple terms, the car won’t go anywhere without the module.
For VAZ models, the use of two types of ignition modules is provided:
- Separate;
- Block.
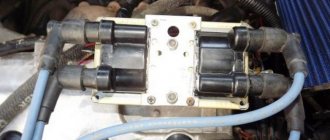
Block ones differ in that the coils operate one per pair of spark plugs. These are the devices that are installed on the “fourteenth” model of the domestic automaker.
The coil distributes power to two candles at once, and its design includes the following elements:
- High voltage wires;
- Low voltage terminals;
- Secondary and primary winding;
- Core.
Separate modules, where the coils supply a separate circuit to each of the 4 sections, are distinguished by the output of high-voltage wires through a spring contact. Block ones are easier to check, they are easy to remove and return to their place.
It is noteworthy that with a size of 11x11x7 centimeters, this block weighs about 1.5 kilograms.
Pinout, connection diagram and check of the VAZ ignition coil
Today we will look at the design and diagrams of ignition systems for VAZ cars of all major models. Since carburetor versions of VAZ are practically history, we will dwell in detail on the ignition systems of injection cars. Their ignition system is based on an electronic ignition module. We also recommend that you carefully consider the choice of spark plugs and the quality of high-voltage wires, because the quality of the spark and, accordingly, the operation of the ignition system as a whole will depend on them. The information is intended as a reference guide for self-repairing a car.
Repair or replacement?
As the practice and experience of car repair technicians shows, most often it is not possible to repair this device. The module can only be replaced. If you follow the principle, it is possible to carry out repairs, but it will take a lot of time, effort and even money.
Installing the module
The best option is to purchase a new device. It costs around 2-4 thousand rubles. It all depends on the manufacturer and condition. You can buy a brand new one, although many people prefer used devices. Here the choice is yours.
System replacement
If repairs fail to restore the device’s functionality, you will need to replace the module with a new one. At the same stage, you can move the module to another location, but we do not recommend doing this. When replacing, experts usually recommend using GM devices - these modules have proven themselves to be reliable devices. As for the price, it may vary depending on the country and region of residence, but on average it varies around 30-35 dollars or about two thousand rubles. More detailed and visual instructions for replacing the ignition coil along with high-voltage wires are shown in the video below (the author of the video is the STO TONN channel).
The replacement procedure can be done with your own hands; usually this task does not cause difficulties for motorists, and no specific tool is needed for this. All you need is a new block, a set of wrenches and rags. In general, the replacement procedure can be carried out in the garage or directly on the street.
If you do not know how to remove the ignition module and change it taking into account the pinout, then follow these steps:
- First you need to open the hood and turn off the power to the on-board network; to do this, disconnect the battery. It is not necessary to remove it, you can simply disconnect the negative terminal.
- Next, dismantle the high-voltage cables from the installation site, while marking their location separately on the sheet so as not to confuse them later, or put marks. Please note that you cannot change the seat wires, as this may lead to breakdown of the new module that will be installed in place of the old one.
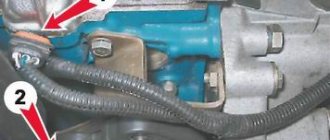
- Then disconnect the wiring connector from the unit itself; for this you will need a 13mm wrench. Using the wrench, you need to unscrew the nuts securing the device to the engine.
- After unscrewing the nuts, the module can be dismantled. Using a rag, wipe down the installation area and the area around it. Check the new unit for damage, after which you can install it. The installation procedure is generally similar to the removal process, only done in reverse order. When installing, do not forget to connect the high-voltage cables correctly. If you have any difficulties at this stage, look at the module cover - the wire numbers should be marked on it.
Sorry, there are no surveys available at this time.
How to check the malfunction of the VAZ 2114 ignition module on your own?
The easiest way to check the device without removing it is to diagnose it at the moment the power unit is tripped. When the motor begins to operate unstably, it is necessary to disconnect the connector elements from each component of the module one by one. If the connector is disconnected from a functioning device, the operation of the engine will change. Dips will appear, and the unstable operation of the unit will increase. When the non-working element of the MH is disconnected, the motor will operate in the same way.
There is another simple diagnostic method, its principle is as follows:
- You will need an assistant to check. The spark plug is removed from the seat. The high-voltage cable is disconnected from the device.
- Then the disconnected wire is connected to a spark plug, which is applied to the body of the power unit.
- The machine motor is starting, you need to make sure that a spark hits the spark plug. If it passes, a blue light will appear between the device and the surface of the power unit, its formation is accompanied by a crackling sound. If there is no spark, then the spark plugs, high-voltage cable and module must be diagnosed.
In the absence of special equipment, diagnostics of the MH can be performed using a control light indicator designed for 12 volts. One conductor from the lamp is connected to the pin of connector A, and the second is connected to ground for grounding. An assistant must start the power unit or rotate the starter mechanism. If the light flickers when performing these steps, then the device is working. Similar actions must be done with another contact.
The channel “Diary of an Auto Electrician” spoke about self-diagnosis of ignition modules, as well as other elements of the system.
Checking the ignition unit with a multimeter
Diagnostics is carried out in the following order:
- The car engine is started.
- The tester switch must be set to DC measurement mode, the limit should be up to tens of volts.
- One of the contacts of the multimeter is connected to connector D on the coil, and the other goes to ground. You can use a car body or a cylinder block as a mass. If there is power, the diagnostic tool display will show 12 volts.
- Then the tester switches to the ohmmeter operating mode, the range of values is up to tens of ohms.
- One contact of the diagnostic tool is connected to output C, and the second goes to ground. If the device is operational, the test will show a value of less than 1 Ohm.
- At the next stage, the tester must be switched to voltmeter mode. The range of values is up to tens of volts.
- One of the contacts goes to the output marked B, and the second is connected to ground.
- If the diagnostics show that the voltage is less than 0.3 volts, then the device is working. This indicates a clear signal passage from the Hall controller. Finally, you can perform a similar test, only with connector A. The results should be identical.
Direct check of secondary coils for breakdown
To diagnose secondary elements of the MH for breakdown, you will also need a tester:
- All connected conductors must be disconnected from the device connectors.
- Diagnostic equipment is set to ohmmeter mode, the range of values is up to tens of ohms.
- The contact probes of the tester must be connected in turn to the paired connectors of the module. For example, in the second and third, as well as in the first and fourth.
- If the diagnostics showed the same results, then all windings are operational. The resistance parameter should be about 5.4 kOhm. If the values obtained are higher, this indicates an internal break in the device. With lower parameters, we can conclude that there is a breakdown.
Connecting and replacing VAZ short circuit
The procedure for removing and installing the ignition coil on old VAZ models:
- First, disconnect the central high-voltage wire leading to the distributor (ignition distributor).
- Disconnect all power wires from the coil contacts. Since they are fastened with nuts, you will need an 8 wrench for this.
- If you don’t know which wires to connect to which connector later, it’s better to immediately remember or mark them somehow, so that later during installation you can connect them correctly.
- Unscrew the coil housing. It is attached to a clamp (clamp), which is pressed to the car body with two nuts.
- After the work has been done, you can remove the ignition coil and replace it if necessary.
For new type VAZ cars:
- We remove the “minus terminal” from the battery.
- Remove the top protective cover of the engine. If the engine volume is 1.5 liters, then this part is missing and this step is skipped.
- We remove the high-voltage wires from the coil.
- Now, using a 13mm wrench, unscrew the two fasteners.
- Using a 17mm wrench, loosen one bolt securing the coil.
- We take out the module.
- Use a hexagon to unscrew the coil from the holder.
- Assembly is carried out in reverse order.
Particular attention should be paid to the connection, since high-voltage wires must be located in the strict order provided for by the design. If this is not done, the car will stall or the engine may not start at all.
Replacing the ignition coil on a VAZ is quite simple. Even a novice motorist can do this in his garage, and if everything seems too complicated, contact a car service center. Particular attention should be paid to the choice of product, since this will determine how well the engine and ignition system will work.
What should I do if the problem remains after replacing the module?
If, after performing the repair, problems in the operation of the MH remain, then there is a possibility that the cause of the problem was not in the module. It is necessary to diagnose the remaining elements of the ignition system.
Spark plugs and ignition system
Features of checking spark plugs and other components:
- Before dismantling the devices, it is necessary to disconnect the ends of the high-voltage cables. Their condition is checked for damage. Defects in the tips often lead to malfunctions in the spark plugs. If there is damage, the wires are replaced. It is also necessary to assess the condition of the “high-voltage workers” themselves. They are not allowed to have any defects or damage to the insulation.
- After disconnecting the tips, the spark plugs are dismantled and a special spark plug wrench is used to unscrew them.
- After dismantling, the condition of the devices is assessed. The color of the parts must be brown; carbon deposits and soot on the electrodes are not allowed. If there are uncharacteristic marks, the devices are cleaned using a metal brush or fine-grained sandpaper. For a better effect, the electrodes of the candles can be heated on the stove.
- The condition of the gap between the part and the electrode element is checked. If it is too large, this indicates that the device is not working correctly. The spark plugs will need to be replaced.
Installation
The module is installed strictly in the reverse order of dismantling. It is important to take into account three rules.
- After installing the module, look at the surface of the device. It shows numbers from 1 to 4. These are the designations of cylinder numbers.
- At the ends of the high-voltage bars there are similar numbers - from 1 to 4. They serve as a guide to determine which high-voltage wire is connected to which socket on the module.
- No experiments. Everything is connected strictly in accordance with the marks - 1 to 1, 2 to 2, and so on.
In fact, replacing the ignition module on a VAZ 2114 is quite easy. You don't need to be a professional auto mechanic to do this. Just follow the basic rules for dismantling and installation, and check the device before spending money and replacing it with a new one. It is not a fact that the culprit of problems with your car will be the module you are sinning with.
This table will allow you to check whether the wires from the ignition module to the cylinders are connected correctly.
| Cylinder no. | Connection |
| 1 cylinder | Central lower exit |
| 2 cylinder | Left exit |
| 3 cylinder | Top exit |
| 4 cylinder | Right exit |
System diagnostics
If signs of damage are detected, there is no need to immediately remove and repair the MH. First, the spark plugs must be checked; to do this, they are removed from their sockets, and the high-voltage wires are first disconnected from the spark plugs. The spark plugs should be carefully inspected, cleaned of carbon and deposits, and then checked again.
Brown color is acceptable on these devices, but soot and carbon deposits are undesirable. If necessary, you also need to adjust the gap between the element itself and the electrodes. More detailed instructions for diagnosing the module yourself are given in the video below (the author of the video is Alexey Romanov).
How to quickly check the performance of the coil at home:
- Of course, the fastest and easiest way would be to install a unit that is known to work, but it is unlikely that anyone will carry a working spare device with them.
- While the engine is running, try tapping the coil. If you notice changes in the operation of the motor, this indicates that there is poor contact inside the device.
- The most accurate results can be obtained from diagnostics with a multimeter. You need to measure the resistance of the paired terminals of the coils, in particular the first and fourth, as well as the second and third. The parameter should be 5.4 kOhm; if the values differ, the device needs to be repaired or replaced.