On the VAZ 10th family, which includes the VAZ 2110-2112 models, the designers used an electronically controlled interior heating system, thanks to which the temperature set by the driver is maintained automatically.
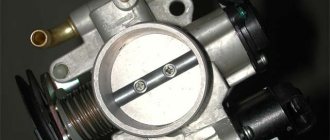
On the VAZ-2110, instead of a manual heater control mechanism with a cable drive of the main elements - the coolant shut-off valve and dampers, an automatic heater control system (AHC) controller with a temperature sensor and a gearmotor that regulates the position of the dampers are used.
In such a stove, the valve for shutting off the antifreeze supply is no longer used, and the adjustment of the heater operating mode - “heating” or “ventilation” - is carried out by a central damper, which directs the air flow through the radiator or bypassing it.
How malfunctions manifest themselves
The automatic temperature maintenance system used on the VAZ-2110 is more convenient in terms of control, since the automatic control system does everything independently, but is less reliable than a mechanical cable drive. Moreover, problems are caused by the electronic and electrical components of the stove - the controller, temperature sensor and micromotor gearbox, the central damper, which regulates the air supply to the cabin from the outside.
Problems with the operation of the VAZ-2110 heater related to the damper:
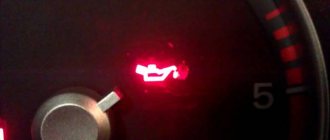
- lack of temperature control (only hot or cold air comes from the stove) regardless of the position of the handle on the controller;
- insufficient air heating (even when setting the handle to the maximum temperature);
- squeaks, knocks and extraneous noises after setting the temperature.
The cause of such problems is the central damper of the VAZ-2110 stove, which is adjusted by the controller through a gearbox. The design of the stove includes another damper - air distribution into zones. It is controlled using a handle mounted on the central air supply deflector into the cabin, so malfunctions with this part are rare.
Application
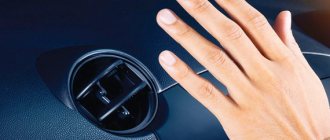
Quick warming up of the car, protection from harmful gases, pollen and burning, in the VAZ 2110 is carried out by the recirculation button.
In a VAZ car, two different methods of air intake are used: VAZ 2110 recirculation button
In the article we will consider in detail the second item on the list. Recirculation was installed selectively on VAZ 2110 cars; cars of 2001 were equipped with it, but since 2002 only the button remained. In such cars, the recirculation system required additional installation and was installed independently, at the request of car enthusiasts.
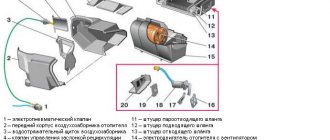
Features of the design of the VAZ - 2110 stove damper
Note that VAZ-2110 of different years of manufacture uses heaters that differ in design:
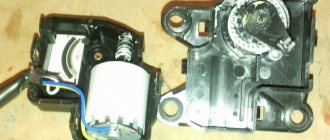
1. Old-style stove damper
Old heaters use two central dampers, one of which blocks the flow of air into the cabin from the outside, and the second one redirects the air flow to the heater radiator or bypasses it. They are interconnected by drives and opened by a micromotor gearbox.
2. New sample
In the new type of stove there is only one central damper and it is connected by a drive to the gear motor directly, and not through a lever.
3. Under the “Euro” panel
Structurally, such a stove does not differ from the new type of heater, but in it the damper for distributing the air flow into zones is controlled by another micromotor gearbox.
It is easy to visually distinguish the stoves by the location of the heater fan. In the old-style interior heater, the fan is located horizontally, while in the new model, it is positioned vertically. Their gearmotors are also different.
Afterword.
Sea trials were successful. The air recirculation system is actively and quite often used by me. When warming up the interior in winter, on dusty/dirty/smoky sections of the road, when there is a smelly anti-freeze. It also (I recently discovered) successfully helps disperse snow that gets into the air intake.
PS All these “why is this necessary..., nonsense..., well, you should also...” are not accepted. Information and other people's experience are given to us equally; we only decide whether to use them or not.
Issue price: 300 ₽
Didn't find the information you are looking for? on our forum.
Causes of malfunctions
Depending on the design of the stove, the damper may cause a disruption in the efficient operation of the heater for the following reasons:
- deformation;
- wear of seals;
- deterioration or damage to control levers and rods;
- skew.
Deformation is a problem with old-style heaters. The first dampers of the VAZ-2110 stove were equipped with plastic elements that bent under the influence of temperature. Because of this, even when completely closed, cold air from outside leaks in and mixes with the heated air, and the efficiency of the stove decreases. Subsequently, the designers replaced the plastic flaps with aluminum ones and the problem with deformation disappeared.
To ensure tightness, the dampers have seals that reduce air leakage. Initially, foam rubber seals were used, which quickly wore out and became damaged. Later, foam rubber was replaced with rubber, but this only extended the service life of the seal; over time, the rubber ages, cracks and collapses.
On old-style stoves, rods and levers may break. On new heaters, there is another problem - wear on the edges of the square end of the gearbox, with which it is inserted into the groove made in the damper axis. As a result, the limit switch bypasses the groove, and the heater damper jams, although the gearmotor operates. The misalignment occurs due to the displacement of the damper axis in the mounting holes of the housing. Because of this, the damper warps and jams when opening.
Mechanism of operation
When the recirculation button is in the pressed (on) position, the electro-pneumatic valve opens, then a flap in the area of the intake pipe extends and blocks the access of outside air to the vehicle interior.
The circulation system starts only when the engine is running and functions due to the coordinated operation of the valve-flap complex. Circulation in the car will continue as long as the fan is turned on, in which case the air flow passes through the heater ducts.
To determine the presence of this device in the car, first of all, there must be chips and a button in the cabin. When the ignition and recirculation button are turned on, there should be voltage on the chips.
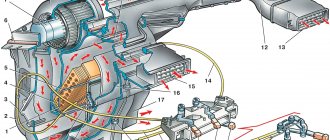
Air conditioning system diagram
Then, it is worth checking whether the damper control valve and the electro-pneumatic valve are present. If this system is absent, you can block exhaust gases and smoke using a fan, but the damper isolates the car from the outside air much more effectively.
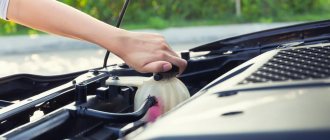
To regulate the level of humidity in the car and solve the problem of glass fogging, it is recommended to have an air conditioner in the VAZ model 2110.
Diagnosis of the problem
If the reason why the VAZ-2110 stove does not work is the damper, it is not difficult to identify it. To do this, disassemble the central deflector, turn on the ignition and rotate the temperature setting knob to its extreme positions. In a working stove, the central damper will not knock and will completely open and close the air supply channel.
If the heater damper does not move or stops in a position that does not completely block the air passage, it may be stuck. You can verify this by pushing the valve with your hand or a long rod. If after this the damper returns to its normal position, then this is the reason why it is jammed. Through the mounting hole of the deflector, you can assess the condition of the damper and its seals. If the damper is deformed, its bend is clearly visible.
Advantages
The recirculation mode allows you to quickly reduce the temperature in the VAZ 2110, due to the coordinated operation of the mechanisms (valve-electric drive). This is realized through long-term air flow through the climate control complex, the temperature of which is much lower than outside the car.
Cooling in the VAZ model 2110 due to recirculation is economically beneficial, because energy consumption to start the compressor drive is less than when air is taken from outside.
By activating recirculation, the possibility of pollen, unpleasant odors and gases entering the VAZ 2110 interior is eliminated.
Source
Repair and restoration of the stove damper
The deformed heater damper of the VAZ-2110 cannot be repaired; it only needs to be replaced. In this case, it is better to purchase a replacement metal part that is not so susceptible to temperature effects.
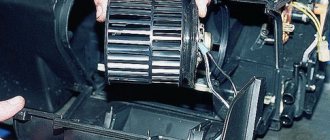
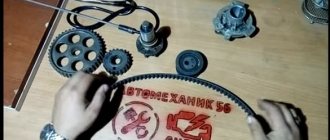
Whatever heater is installed on the VAZ-2110, to carry out repair work, the heater must be completely disassembled. In this case, the process of dismantling and disassembling depends on the design of the stove.
A positive aspect of the heater design on the VAZ - 2101 is its location - to get to it and the dampers you can from the engine compartment and you don’t have to remove the front panel.
Disassembling an old-style stove
For example, let's look at how to disassemble an old-style heater:
- Remove the terminal from the battery.
- We remove the windshield wipers, the seal, remove the air intake near the windshield (“jabot”) from the car, in the process you will need to disconnect the windshield washer nozzle tubes.
- We dismantle the insulation that separates the stove body from the engine compartment.
- We remove the gear motor.
- We divide the housing of the stove and air filter into two halves. To do this, unscrew the coupling bolts around the perimeter of the housings and remove the mounting brackets.
- Disconnect the fan power wires.
- Remove the outer half of the air filter and heater housing (along with the fan).
- We dismantle the inner part of the fan housing.
After this you will have access to the dampers. If you are only planning to repair or replace the heater dampers, there is no need to drain the antifreeze, since the heater radiator will remain in place and will not be removed.
Before removing the dampers, carefully inspect and remember their position and the way they are engaged. Further actions depend on the nature of the damage. Deformed damper parts cannot be repaired and only need to be replaced. As for damaged rods and levers, try to repair them or simply replace them. The damaged seal is replaced.
When assembling the stove, pay special attention to the engagement of the dampers. Do it as it was before disassembly, otherwise the dampers will not work correctly, which will affect the performance of the heater.
Disassembly and repair of a new type heater
The new model stoves are disassembled differently:
- disconnect the battery terminal, drain the antifreeze;
- dismantle the frill and insulation;
- disconnect the power wires of the fan and micromotor gearbox;
- unscrew the fasteners that secure the stove body to the body;
- disconnect the coolant supply pipes to the heater radiator;
- We remove the heater from the car along with the filter housing.
After this, we disassemble the stove body, dividing it into two halves, after first disconnecting the air filter housing and removing the mounting brackets. Next, we change or repair the damper, assemble the heater and install it on the car.
Note that the general algorithms of work are indicated above, but in reality, dismantling the stove is not so easy, since many fasteners are located in hard-to-reach places, sometimes you have to disconnect or remove elements that make it difficult or interfering with the removal of the unit.
Stories from our readers
“Fucking basin. "
Hi all! My name is Mikhail, now I’ll tell you a story about how I managed to exchange my two-wheeler for a 2010 Camry. It all started with the fact that I began to be wildly irritated by the breakdowns of the two-wheeler, it seemed like nothing serious was broken, but damn it, there were so many little things that really started to irritate me. This is where the idea arose that it was time to change the car to a foreign car. The choice fell on the melting Camry of the tenth years.
Yes, I had matured morally, but financially I just couldn’t handle it. I’ll say right away that I am against loans and taking a car, especially not a new one, on credit is unreasonable. My salary is 24k a month, so collecting 600-700 thousand is almost impossible for me. I started looking for different ways to make money on the Internet. You can’t imagine how many scams there are, what I haven’t tried: sports betting, network marketing, and even the volcano casino, where I successfully lost about 10 thousand ((The only direction in which it seemed to me that I could make money was currency trading on the stock exchange, they call it Forex. But when I started delving into it, I realized that it was very difficult for me. I continued to dig further and came across binary options. The essence is the same as in Forex, but it’s much easier to understand. I started reading forums, studying trading strategies. I tried it on a demo account, then opened a real account. To be honest, I didn’t manage to start earning money right away, until I understood all the mechanics of options, I lost about 3,000 rubles, but as it turned out, it was a precious experience. Now I earn 5-7 thousand rubles a day. I managed to get the car buy after half a year, but in my opinion this is a good result, and it’s not about the car, my life has changed, I naturally quit my job, I have more free time for myself and my family. You’ll laugh, but I work directly on the phone)) If If you want to change your life like me, then here’s what I advise you to do right now: 1. Register on the site 2. Practice on a Demo account (it’s free). 3. As soon as you get something on the Demo account, top up your REAL ACCOUNT and go to REAL MONEY! I also advise you to download the application to your phone, it’s much more convenient to work from your phone. Download here.
Cabin air recirculation system
Reference information from the Operation Manual:
To speed up the heating of the cabin and prevent the entry of outside air into the cabin (when crossing gas-filled, smoky, dusty sections of the road), an air recirculation system is used. When the recirculation button is pressed down (on the instrument panel), the electro-pneumatic valve opens, and under the influence of vacuum in the intake manifold, the recirculation system flap blocks the access of outside air to the car interior. Thus, the recirculation system can only operate when the engine is running. At the same time, if the fan is turned on, the air in the cabin continues to circulate, passing through the heater air ducts.
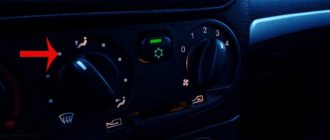
Air recirculation button
From the very moment I got into the cabin, this very button haunted me. I think many or some (of course, those who have a VAZ2110) have it, and even if they do, it works for only a very few, and for even fewer people it has any effect on the car. Finding out which category I belonged to, I realized that I belonged to the first. This is wrong, I decided. I'll do it.
As an additional information used an article from the website lada2111.rf (Installation of air recirculation VAZ 2110)
Many people before me found out at what period the air recirculation system (hereinafter referred to as ARR) on the VAZ2110 was introduced, installed completely (damper, pneumatic valve, electro-pneumatic valve, hoses, wiring, button), partially (some of the above, most often only the pneumatic valve and button), or was not mounted at all. My (our) situation was further complicated by the fact that we do not have an ordinary car. But let's not talk about that now.
Recirculation system. Clearly.
The SRV of this car contained: an old-style stove, without a filter, with a damper and a pneumatic valve, a button in the cabin and a wire from it connected to the connection block with the underhood electrical wiring harness. I’ll say right away that this happened at the beginning of autumn, and I might have already forgotten something, and lied somewhere, but not much.
To implement my plan I needed:
- electro-pneumatic (electromagnetic) valve 2105-1127010-02 _1 piece,
- hose (silicone, white) for pneumatic systems (used in almost every domestic car) _ 2 pieces (usually 50 cm long),
- wire 2x0.5 _
4-5m,
- check valve 2110-8119110 (or any valve at all, I used the valve used in air supply systems to the aquarium - it is much smaller in size) _1 pc.
- Provide access to the stove. Remove the front casing from it. We clean everything we see and where we can reach. We install the old-style filter in its place, which was never there. We clean and knock out the (recirculation) damper, which was previously attached to the (pneumatic) recirculation valve stem and was in the open state. Let's put it back the way it was.
Stove without front cover.
Stove without front cover. The damper is in the closed position - air is taken from the car interior.
At this point it is convenient to make a small modification by making a small drain hole in the front cover of the stove.
Pneumatic valve stem. Disconnected from the throttle lever. The damper dropped to the closed position under its own weight. Remember this! A broken rod may be the reason for the lack (full or partial) of supply (from the street) ventilation.
Pneumatic recirculation valve (damper drive) on the reverse side.
Filter installation.
- We are looking for a convenient place to mount the solenoid valve. Normally it is attached to the sound insulation mounting bolt of the front end. It seemed to me that this was not entirely convenient - in the event of a filter change/leaking pipes or heater radiator, it will need to be removed. It’s already inconvenient to climb there, but here he’ll show up. No. Next to the adsorber, perhaps. It’s close to the pneumatic valve and not far from the receiver. We make a small bracket for mounting the valve, or take a 5-hole strip from a children's construction kit, drill out the outer holes to D8.5mm, and bend the outer ends to 90 degrees. relative to each other in the longitudinal axis of the plank (i.e. somehow to attach).
Standard location of the solenoid valve.
Installation of solenoid valve.
By the way, it’s better to make the bracket more rigid, because in my case it happens that the valve attached to the “liquid” bracket, due to the shaking of the car, gets into resonance, which is why a rattling sound arises from under the hood. For a long time I could not understand where it came from...
- We connect the hoses. One hose connects the recirculation pneumatic valve (heater damper drive) with the side (distanced relative to the central one at 45 degrees) output of the solenoid valve. The second is the central input of the solenoid valve, through a check valve, with the engine receiver (all engine models have an additional output: if not used, then there is a plug, usually from the same silicone hose; if already used, then connect through a tee).
The designations “input” and “output” are of course arbitrary and are associated only with this description. In fact, these are just tubes from one cavity. In the context of this topic: how did I decide/find out where the inlet and outlet of the solenoid valve are? - I answer: Experienced. Because it is impossible to understand this from any of the catalogs. You can, of course, look at its installation on 2105-2107 or Volga (I don’t know where it is). This matters because... in a free state (not under voltage), the valve connects the outlet to the pneumatic valve with the atmosphere (in fact, only a very small flow through the felt seal-filter), when voltage is applied, it connects the input and output of the valve, while locking the connection with the atmosphere. This connection prevents air from leaking through the disconnected solenoid valve when the engine is running.
In general, a check valve can be placed in the cut of any of the hoses, only in such a way that air passes to the receiver. It is installed to ensure that the damper is in an open position when the engine is stopped, if voltage has been previously applied to the valve.
- We connect the wiring. Without going into details, I will say that according to the electrical diagram of the VAZ2110, the solenoid valve is controlled by the “minus” from the recirculation button. “Plus” comes from the constant “plus” from the Fuse and Relay Block (“Black Box” - CHY). For this reason, I didn’t look for a plus in the CY, and simply slyly took the standard “minus” from the button, and the “plus” from its backlight. He pulled out the button, crashed into the wires with terminals, dragged the 2x0.5 wires behind the panel, then towards the ChYa, there through the rubber plug (behind the Shumka behind the sadness of the clutch) into the engine compartment, then behind the battery towards the left headlight, from there towards the right one above radiator, and here it is - at the adsorber. I put a fuse on the “plus” (like 2A - I don’t remember). I'm connecting.
- Tests. Started it up. Turned on the airflow. Pressed the button. Immediately the sound of blowing into the cabin became quieter and muffled. Works? Looking into the visible part of the stove - yes, the damper is stuck to the “street” hole, the air intake comes from the passenger compartment. We pressed the button - something behind the boarding made a dull slam. We inspect again - the damper has returned to the open position. Yes, everything works properly!
- Only one “but”. It dawned on me a little later. In about two months. Air is taken from the cabin. This is wonderful. But where? From where the open stove damper adjoins. Exactly between the back wall of the stove and the glove compartment, right in the engine panel. Those. behind the glove compartment on the passenger compartment side in the front Shumka there should be some kind of ventilation hole, which of course I don’t have. In this case, the air sucked from the passenger compartment is simply taken in through certain cracks and leaks in the noise and damper. I tapped the Shumka and there was a hint of a hole. When I get around to it, I’ll cut out a small one.
Stove from the cabin side. The air intake hole from the passenger compartment is highlighted.
The hole in the engine shield is highlighted.