Lada 4×4 3D Adventure time ⌚ › Logbook › Installation of a vibration damper and the third support of the vehicle
After installing the transfer case supports of the new model, incomprehensible knocking noises appeared, which seemed to have gotten rid of, but they came out again.
I assumed that due to the “softer” supports, the transfer case sways more and this causes shocks in the transmission. This did not happen with the old supports. Reading the next entry in the BZ on the drive, I saw that a person had installed a subframe and was giving away for a nominal fee (500 rubles) a traverse with a vibration damper and a third support of the RK. I bought it for an experiment, although delivery cost the same 500 rubles. But in general, it is several times cheaper than buying the same spare parts new in a store. =)
The vibration damper was slightly bent, or rather its mounting. I straightened everything out, assembled it, and installed the traverse. There were no problems.
I also installed the third support. I had to tinker a little, of course. I didn’t remove the plastic cover of the tunnel, although I removed the driver’s seat for ease of work. I bent the casing up a little and installed the bolts, and to prevent them from turning, I made a fixing frame.
After installing the third support, I did not center the transfer case, I set it up quickly. The vibration that was previously at 1800 rpm has shifted to approximately 2200-2300 rpm. That's okay, we need to set the transfer case to normal.
Now the transfer case should no longer nod, but, nevertheless, the shocks when changing gears remain. And everything gives off somewhere in the area of the right foot, under the heel. I started to figure it out. It turned out that there was a large gap in the flange in the rear cover of the control valve. Those. If you move the cardan up and down with your hand, you hear a good knock. If this is the reason, then how is the knocking transmitted to the legs? I don't understand. There is some play in the flange of the front cover of the RC, but not much, there is no knocking. But at the same time, the cardan rotates relative to the axis at a large angle.
Did the transfer case “nod” more strongly on the softer cushion and the bearings were broken? Let me remind you that the cardans are CV joints and there seem to be no problems.
In any case, it will be necessary to change the bearings in the transfer case covers, or better yet, change the covers to new ones with double-row bearings. But there are no funds for this yet. In the garage there is a second transfer case, removed from the same car, which was very noisy. You can try to sort it out, replace the covers and bearings. I’ve never done this myself, but I think I can do anything.
I'm going like this for now. If you try to release the clutch more smoothly and choose the right moment, then there are no shocks.
I did not check the operation of the vibration damper. You need to center the transfer case, remove vibrations from it, and only then check the car on the track.
Source
Replacing transfer case cushions Niva 21214
Good day, dear readers!
1)
I didn’t tighten it and wait for the RC to fall off, the studs were bald, I had to make 2 nuts everywhere. I already did this at the checkpoint, I liked it.
Having previously disassembled the interior and removed the seats, we cut off the studs and drill holes:
One hole, which is closer to the engine, goes directly under the seat mount, cut a thread there and screw in a stud from the bottom, choose the thickness of the studs yourself. I installed the studs M8
Access to the second hole is absolutely free from the interior, so I installed an M10 bolt and secured it by welding. I anointed it with mastic on all sides:
2)
It came to the third support and pillows 21214. The studs for the third support were made in the same way as above, the support itself and pillows 21214 were installed without problems, fortunately the kit came with long studs.
I poured two tubes of additive into the RK:
Installed it all, centered it well together with the Niva master
And I thought I’d be happy to drive now, but not entirely.
—
The third support of the transfer case is not an unambiguous thing, and the levers have stopped chattering, but it does not eliminate vibrations as many expect. I wanted to get rid of minor vibrations in neutral in the region of 80-90, in the end I just increased their range, they became 60-90. Well, what I didn’t like most of all was a howl, when you drive for the third 20-30 km/h hour and press the gas pedal a little, everyone’s RK howls, this howl became even louder, it was very depressing.
However, if you don’t have an ear for music and the car is rarely used in the city, then the support will be very useful, the rk sits very stable, no vibrations under load. But for myself, I decided that I didn’t need it and decided to take it off.
Here I was even more surprised, I removed the support, and the handles still didn’t dangle as much as before. The merit of pillows 21214? Or was the RK simply better displayed? I don’t know what, but I solved my problem without a third support.
If you decide to install it, you need to make oval holes in the mount so that the RK can be positioned more accurately. And I would advise you to think again whether it is necessary. There are many reviews that on a regular Niva the transfer case dampens these vibrations with its vibrations; if you hold it, the vibrations will be felt by the driver and everyone in the cabin. Yes, and driving without it didn’t bother me much, but now with the 21214 pillows and more precise alignment it’s even better.
Now I’m ready to sell the third support, mileage 100 km, but only KMV or pick-up. Details in PM.
Methodology for determining the causes of vibration of the transfer case and body floor in the area of the front seats
First, note at what speed the transfer case vibration occurs, then begin to determine the causes of the vibration.
Test 1
Place the transfer case and gearbox levers in neutral and start the engine.
Set the engine speed equal to the vehicle speed at which the vibration occurred.
If vibration persists when the vehicle is stationary, you should check the fastening and condition of the engine mounts, as they are the cause of the vibration.
Test 2
If vibration is not detected during test No. 1, then set the transfer case levers to the neutral position, start the engine, engage direct gear in the gearbox and set the engine speed corresponding to the vehicle speed at which the transfer case vibration occurred.
If vibration is observed with a stationary car at this crankshaft rotation speed, then its cause is a malfunction of the intermediate driveshaft (imbalance, bending of the fastening bolts or elastic coupling flange, jamming in the universal joint).
Test 3
If no vibration is detected in tests 1 and 2, proceed to test 3.
Accelerate the vehicle to a speed where vibration occurs and place the transfer case and gearbox levers in neutral.
If the vibration persists, it is caused by a malfunction of the front or rear driveshafts, imbalance, jamming of the universal joints or imbalance of the center differential.
Before centering the transfer case, we check the condition of the power unit supports and the correct installation (the centering washers of the engine mounts must fit into the corresponding holes in the side brackets).
We install the transfer case on the car without fully tightening the nuts securing the brackets for its suspension.
By moving the transfer case in the longitudinal, transverse and vertical directions (tightening or loosening the nuts of its fastening), we achieve a minimum and uniform gap between the flanges of the intermediate shaft and the drive shaft of the transfer case (the flanges must be at the same level and parallel to each other).
We fill the gap between the body floor and the supports with adjusting shims and align the centering belts of the flanges, slightly moving the transfer case forward (by the amount of the gap between the flanges).
Finally tighten the nuts securing the transfer case supports.
When replacing a transfer case or changing a four-speed gearbox to a five-speed one and vice versa, as well as when the rear engine mount settles, causing vibration of the transfer case, it is necessary to select and install a new thickness of gaskets 3 (Fig. 1).
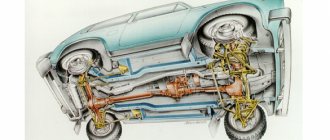
The Niva family of cars differs from VAZ passenger cars in permanent all-wheel drive - they have two drive axles. In total, the VAZ SUV has three differentials in its transmission - one for each axle and another center differential.
The Niva transfer case is designed to distribute traction forces between axles, and operates on the principle of a 2-speed gearbox.
Additional transfer case support
In the classic version, the transfer case is attached to the floor of the car body using a pair of rubber-metal brackets. To adjust it in relation to the shaft flange, oval-shaped holes in the brackets are used. Regulating gaskets are sometimes placed between them and the body.
Many people know the Niva as a car with a high level of vibrations, which annoy a number of drivers. Therefore, many car owners install a third support, which allows them to reduce vibrations of the transfer case in longitudinal planes, which can relieve the load on the shaft with an elastic coupling. This design, welded by hand or bought for a small amount in a store (you’ll have to look), when moving on any roads at any speeds, should reduce vibration from the Niva transfer case levers to zero.
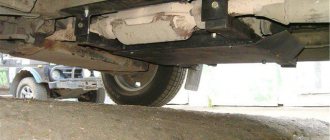
Installing a “device” purchased in a store is quite simple. It is necessary to replace three studs on the rear cover of the transfer case with longer ones from the kit. After this, you can screw the transfer case, center it and drill holes in the floor, onto which you can attach the box using washers, nuts, and bolts. That's it, the third support is ready. The mount is located somewhere behind the handbrake.
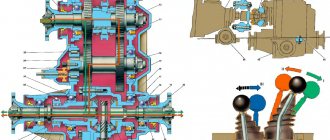
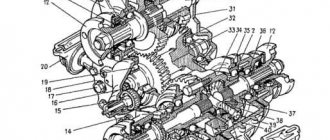
The device of the VAZ Niva transfer case
The transfer case is not present in all VAZ passenger cars, but only on cars with two drive axles. In the transmission, the transfer case (TC) is installed at the rear of the gearbox; a rear driveshaft is attached to its shank, which connects the transfer case to the rear axle. The front axle is also driven by the steering wheel; it is connected to the transfer case by a front driveshaft.
The reduction gear in the Republic of Kazakhstan is designed to obtain high torque, it is used to overcome difficult sections of the road, and helps to cope with off-road conditions. The VAZ Niva transfer case contains the following main parts:
Transfer case Niva 21213
Model VAZ-21213 is an all-terrain passenger car with permanent all-wheel drive and differential lock. Brand 21213 is a restyled version of the first VAZ SUV, VAZ-2121. RK Niva 21213 has three gears:
21213 is equipped with 4-speed and 5-speed gearboxes, and when the first speed of the transfer case is turned on, the car operates in standard mode, the gear ratios in the transmission are from 5-speed. The checkpoints are as follows:
When you turn on the second position of the transfer case lever (reverse position), the gear ratios change (lower):
On ordinary roads, the transfer case is always in first gear, the transfer case control lever (reduction gear) is pushed forward. The neutral gear of the RK disconnects the transmission, and in this position the car does not drive; there is also a neutral in the gearbox.
Operating principles of the node system
Torque is supplied to the transfer case from the gearbox via the drive shaft. After this, the moment passes to the center differential, which can be either without a locking mechanism or with a hard lock or automatic lock. If there is no lock on the differential, then the axles can rotate at different speeds, while the presence of such an element allows you to distribute torque depending on the type of track.
Self-locking differentials can be a viscous clutch (the most widely used option), a Torsen differential (has a wide torque range, but does not have the high strength required for SUVs) or a friction clutch (the differential can be locked automatically or manually, the clutch works based on frictional force).
The transfer case can have several operating modes: from connecting only the rear axle to connecting both axles with automatic differential locking between them. The transfer case is controlled manually using a mechanical lever drive. It uses the rear lever to change gears, and the front lever to engage the differential lock. The lever moves longitudinally along an axis that stands on lugs from the bracket in front of the transfer case.
Vibration
Vibration in the body is the main “disease” of the Niva; it often occurs due to improper alignment of the transfer case. Most often, vibration occurs on VAZ 21213/21214 cars, since the transfer case is mounted only on two supports on the sides of the body; on the Chevrolet Niva, the transfer case is already installed on three supports. But before you start adjusting the position of the transfer case, you should check the condition of other parts of the chassis - vibration can occur for other reasons:
Vibration when starting off on a Niva can also occur for the following reasons:
Eliminate vibration with additional fasteners
Installing the third support of the transfer case on VAZ 21213/21214 vehicles allows you to reduce the level of vibration of the transfer case; with this support it is easier to center the transfer case. The part can be purchased at auto stores or made yourself. The finished product comes with three long studs (for model 2121); to install the third support on this machine, you will need to unscrew the short studs from the transfer case housing and install new studs from the kit. We carry out repairs as follows:
Vibration is eliminated more effectively by installing a subframe under the transfer case. You can also make such a device yourself or buy a finished product at a car store.
In order to install the subframe, the transfer case must be removed. It is more convenient to carry out such work in a pit; we carry out repairs as follows:
It should be noted that installing an additional support or subframe on the steering wheel does not always lead to the desired effect; in some cases, vibration only increases.
How to remove a transfer case in a field
Layout of RK supports
Removing the transfer case so that a third support can be installed later is not so easy. To do this, you will need a Phillips and flat-head screwdriver, 13mm wrenches (ratchet, open-end, socket). The procedure is as follows:
- Remove the cover on the floor tunnel in the area of the control levers (unscrew the 4 screws).
- We unscrew the screws securing the trim under the levers (3 pcs.).
- We unscrew the levers at the fastening points and remove the cover with rubber bands.
- We disconnect the two wires visible in the resulting hole.
- We put the car on a hole, jack it up or climb under it.
- We disconnect the cardan shafts from the transfer case (using a 13 key, the cardan can be turned by hand).
- We remove the cable from the speedometer by unscrewing the locknut by hand.
- Disconnect the gearbox drive from the transfer case.
- We remove the transfer case from the suspension ones by unscrewing the nuts (it is better to remove it onto the support; installation is done in the reverse order, after the third support is prepared).
In the future, reduced vibrations should extend the service life of transmission elements, such as the dip, transfer case bearing and cardan. However, experts believe that the third support of a transfer case for a cornfield can give such an effect if it is properly balanced, the blower shaft works well, and the cardan shafts, bearings and output shafts do not play.
Balancing the transfer case on a Niva is an art, since the box, as a rule, is offset by a distance of three to eight millimeters. To make adjustments, cut off a piece of the overhang of one bracket and put it on the other axle. In this case, it is better not to tighten the axle nuts immediately, since you need to check for minimal gaps (add washers). It is better to do the work in a pit.
An additional support for the transfer case can improve the quality of the trip only if it is placed on a strong bottom. And “Nivas,” like other products of the domestic automobile industry, are known for their tendency to corrosion in all sorts of places (maybe AvtoVAZ is taking care of the environment in this way: the remains of the car will quickly and independently rot, returning iron to nature). Therefore, a subframe (monolithic frame) is often placed at the bottom of the car, which in itself somewhat reduces vibrations, helps relieve the floor and increases adjustments along the axes. In addition, it protects the transfer case naturally.
Replacing Niva transfer case cushions
Transfer case installation diagram
1. Make sure that the engine mount mounts are correctly installed in the brackets (the centering washers of the front engine mount mounts must fit into the corresponding holes in the side brackets) and that the transfer case supports fit snugly to the bottom of the body. If necessary, straighten the surface of the body under the supports. 2. Install the transfer case on the vehicle without fully tightening bolts 4 and 5 of the transfer case suspension brackets (see Fig. Transfer case installation diagram). 3. Moving the transfer case lengthwise and crosswise, as well as in the vertical direction, find a position in which the flanges of the transfer case drive shaft and the intermediate driveshaft are at the same level, parallel, and the gap between them is minimal. The transfer case shafts must be located parallel to the bottom of the body. 4. Having installed the previously removed adjusting shims under the suspension brackets (supports), fully tighten the nuts securing the transfer case suspension brackets. 5. Attach the front and rear propeller shafts to the transfer case shafts; Connect the flexible shaft to the speedometer drive and the wires to the differential lock warning lamp sensor. 6. When replacing the transfer case, as well as when the rear engine mount “settles”, causing vibration of the transfer case, it is necessary to select and install a new thickness of gaskets 5 (see figure from paragraph 8).
Procedure for selecting shims
1. Make sure that the engine mounts are installed correctly in the brackets (see subsection 2.2). 2. Separate the flanges of the transfer case drive shaft and the driveshaft intermediate shaft. 3. Loosen the nuts securing the transfer case supports to the body, remove the adjusting shims and, moving the transfer case along and across the body, as well as in the vertical direction, find its position in which the disconnected flanges are at the same level, parallel and the gap between them is minimal , and the transfer case shafts are located parallel to the bottom of the body. 4. Fill the resulting gap between the body floor and the supports with the required number of gaskets. 5. Align the centering flanges without creating tension in the transfer case and engine supports and, holding the transfer case in this position, tighten the previously loosened nuts securing the transfer case supports. 6. Insert and secure the transfer case and intermediate shaft flange bolts; if the bolts pass freely into the flange holes, then the alignment is carried out correctly, otherwise repeat the operations to align the flanges.
Nothing unusual, just replaced tired transfer case cushions. They waited for their time for a couple of months and now it has come) Recently, vibrations on the transfer case lever have been much greater than usual. As the replacement showed, it also replaced the rear cardan with a new one, because the lower crosspiece got tired and began to play a little. As it turned out, the grease nipple or grease fitting was lost from the crosspiece, with all the leakage, grease and dirt. I'll go over it at my leisure)
As for replacing the cushions itself, everything is simple, the main thing is to clean the nuts and studs, and moisten them with a bucket in advance, or with kerosene, vinegar, or in general, whatever seasoning you like) wait a little and you can turn it. We remove the pillow and the transfer case traverse on one side, replace it with new pillows, and put it back. Then on the other side.
Vibrations in the field, prologue
Introduction to history. In the team of people with whom I work, there are quite a lot of people with different characters, education and astrology)) What I mean is that “Virgo” is “VIRGO”. And either you understand this, or kill him right away. For example: when this person had problems with the gearbox and he decided to bring it “to mind” and go through it, he did it FIVE TIMES. Sometimes during disassembly, changing one bearing that he didn’t like, for one reason known to him))) And this person suggested that I look for vibrations, because the box had been rebuilt 5 times, the transfer case 10, and even the “hammer and sickle” CV joint driveshafts were taken for additional balancing.
I won’t tell you what it looked like sometimes. But Gaidai could have made another one of his brilliant comedies. We didn’t get too clever, but simply used the experience of the farmers to confirm or refute this knowledge.
