The design of the VAZ 2109 friction clutch and its purpose
Any self-respecting motorist will study the design of the unit before adjusting the clutch on a VAZ 2109. This will help you approach the issue wisely and avoid mistakes.
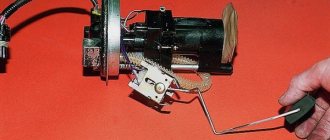
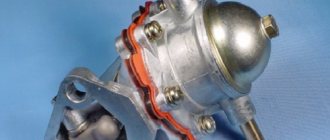
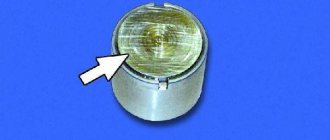
In the photo: The process of tightening the clutch cable on a VAZ 2109 car
The mechanical drive design is simple and reliable. Compared to hydraulics, the cable requires minimal maintenance, and changing it is not labor-intensive. The mechanical drive consists of the following elements:
- Adjustable sheathed cable.
- Control pedal.
- Clutch release fork lever.
- Bracket for fastening the end of the cable sheath.
- Brake and clutch pedal bracket.
The mechanism serves to transmit force from the pedal to the release fork, which, in turn, removes the friction disc from the flywheel. Using a cable drive avoids major problems such as fluid leaks and periodic bleeding of air from the clutch control system. The weakest link in this chain is the cable, the quality of which at times leaves much to be desired. Therefore, replacing a cable on a Samara is a fairly common occurrence.
Meanwhile, the question of how to adjust the clutch on a VAZ 2109 car remains relevant for the cable mechanism. Setting standard values guarantees optimal tightness of the driven disk to the plane of the flywheel and basket when the clutch is engaged. The design also ensures complete separation (switching off) of the above parts from the passenger compartment through the pedal.
How to choose the right one
Competent selection in 2022 begins with studying manufacturers’ offers. Knowing several factors will help determine which clutch is best installed on a VAZ.
- Precise car modification. The configuration of the clutch kit and its physical parameters depend on the type of car.
- Estimated price range. Depending on the desired cost, the user can navigate by company. The final price tag is considered an important factor - you shouldn’t count on the cheapest model.
- Method of operating the machine. With moderate driving under normal conditions, even simple modifications to the disc and drives will last quite a long time. If the car is used in racing mode or under critical overloads with frequent switching (this also includes training cars), you should buy high-quality products with a large margin of safety.
When the clutch needs adjustment
Adjusting the VAZ 2114 clutch may be required in the following situations: The clutch has been completely replaced. The clutch was repaired and its individual elements were replaced. The clutch travel is too large or, conversely, insufficient.
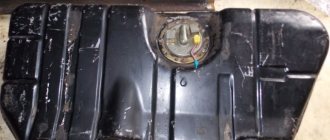
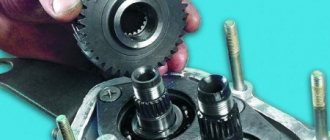
Photo: Clutch cable VAZ 2109
If everything is clear with the first two reasons, then in the latter case simple measurements should be performed. To do this, you need to measure the distance between the minimum and maximum positions of the pedal (that is, in situations when the pedal is pressed to the floor and when the pedal is freely released). The optimal value of this distance is in the range from 12 to 13.5 cm. If in fact it turns out to be larger or smaller than the specified dimensions, it is recommended to make an adjustment.
If the clutch travel exceeds 16 cm, then you should immediately stop all driving and make adjustments as soon as possible. In addition, in some cases, too much stroke may indicate severe wear of the friction linings located on the driven disk, as well as the need to replace them.
Bleeding the clutch
Bleeding the clutch
Every time the fluid in the system is replaced, it is necessary to bleed the clutch. Otherwise, air may enter here, which will lead to rapid failure of the system. The pumping happens like this:
- A hose is placed on the cylinder fitting.
- Its other end should be lowered into a container with liquid.
- Turn the fitting ¾ turn.
- Press the clutch until no more air bubbles come out of the hose.
Note: if the pedal is completely lowered and the release of air has not stopped, then the fitting should be tightened. It is very important that the liquid level in the tank is normal (at least half of the tank).
Adjusting and repairing the clutch is a completely simple process. Therefore, there is no point in going to a car service center, where the price even for such trivial work will be high. It is much better to diagnose and repair the car yourself and at home. But first you need to review a bunch of photos and videos so as not to damage the car. Any instructions will help you get the job done quickly and efficiently.
Clutch diagnostics VAZ 2109
Diagnostics must be carried out on all cars without exception. Regular implementation of this procedure allows you to minimize the likelihood of breakdowns of all kinds. It makes it possible to detect failures and problems at an early stage.
Thanks to this, repair work is carried out with minimal time and financial costs. Certain diagnostic procedures require special equipment. It can be found at any car service center.
It is not recommended to buy them yourself due to the fairly high price of these devices. Below are operations that you can perform independently without special technical devices.
Diagnostics of the VAZ-2109 clutch is carried out in several stages:
- Turn off the engine, depress the clutch pedal several times, while doing this, listen carefully to see if any extraneous sounds appear during these operations: clicks, friction, squeaks, etc.
- You also need to pay attention to the pedal travel. It should not be accompanied by any jerks or interruptions. The lowering and raising of the lever should be smooth. If the pedal jerks or sticks, you need to check the clutch adjustment
- Using a ruler, check the distance from the car floor to the outside of the pedal. The exact required value is indicated in the technical documentation of the VAZ-2114.
- Press the pedal all the way, then release it and measure the distance; if it does not correspond to the stated distance, it is necessary to adjust the pedal.
How to understand that the clutch needs adjustment
Signs that the clutch needs adjustment are:
- Jerking or vibration when pressing the clutch.
- Slight clutch slipping when pressed for a long time.
- The clutch drives.
In this case, adjusting the clutch cannot be avoided. To carry out this process, you should perform the following steps:
- Place the transmission in neutral.
- Remove the clutch housing.
- Remove the bearing.
Note: this must be done smoothly and slowly, otherwise you may slightly damage the bearing.
- Turn the adjusting nuts until the pedal travel is adjusted.
- You also need to check whether the clutch is too oily, as this can also cause the clutch to slip.
Note: in this case, to resolve it, it will be enough to just wash it with gasoline.
Step-by-step instructions for adjusting the clutch on a VAZ 2109 with your own hands.
In order to correctly configure (adjust the clutch) on a VAZ 2109 car, you must perform the following steps:
- Pull the handbrake and turn off the power to the car - for safety.
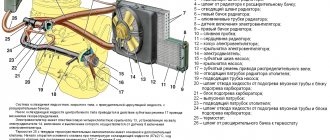
- In the engine compartment below, find the metal clutch cable. In the photo there are 3 red arrows pointing to it.
- Using 2 wrenches, loosen the cable end mounting nuts, and then, tightening or loosening them, until the clutch pedal travel becomes 125-135 mm.
- Get back into the car and press the adjustable pedal all the way down several times (at least 3 times). Then measure its progress again and adjust if necessary. If no adjustments are needed, then you did everything right.
If the nuts you are going to work with are rusty and therefore cannot be unscrewed, treat them with VD, machine oil or any other lubricant. This will save your energy and time.
Before starting work
Almost every car owner is interested in the question: is it possible to perform a replacement without dismantling the gearbox? You are unlikely to find a definite answer, but the procedure is quite feasible.
First of all, find several large stumps up to 40 cm high, and also get a few additional bars. To prevent the car from simply falling during the work, take care to install a pair of regular wheels under the car.
Whether to remove the gearbox or not - you will have to answer this question specifically. Because if you act carelessly, the gearbox may simply fall to the ground, and lifting it from under the car will be very problematic.
Initially, disconnect the battery so that the machine's electrical system is de-energized. You can then proceed to the process shown in the following list:
- Remove the wheels and move them away from the car.
- Remove the steering ends and free the racks.
- Unscrew the ball joint mounting bolts.
- Remove the engine protection using the cable.
- The next step is to drain the oil from the box.
- Loosen the rocker nut and remove it.
- Unscrew the nuts on the two pillows.
- Place a jack or other support under the engine.
- Disable the reverse sensor.
- Disconnect the wires from the starter, unscrew the nuts and dismantle it.
- Unscrew the nuts on the flywheel guard and fork.
- In this step, remove the CV joint on the right side. The left side should not be dismantled.
- Unscrew the fixing bolts to the gearbox block.
- In the last step, unscrew the nuts that are located above the right CV joint.
Functionality check
After you have completed this work, you need to check the correctness of the work performed.
- First, measure the travel of the clutch pedal.
- With the engine turned off, depress the clutch pedal several times and return it to its place.
- Next, we take a new measurement and clarify the received readings.
- If they have not changed compared to the first measurements, then the work has been completed, correctly, and the first stage of verification can be considered completed.
- And if they differ from the first indicators, it means that the locking nut was not tightened tightly, and the adjustment process must be carried out again.
There is one rule among car enthusiasts! A properly adjusted clutch should begin to engage approximately halfway through the pedal stroke.