In our article we will talk about how to replace the oil pump on a VAZ-2106, and also talk about its design, operation and repair features. “Sixes” have been produced at AvtoVAZ since 1976. And the design of the car has undergone significant changes over the years of production. But as for the engine, suspension and body, these parts remained unchanged; they initially proved themselves to be quite good, so modernization was not required for them.
The lubrication system in an internal combustion engine plays a huge role. The design is driven by a chain; today AvtoVAZ does not practice the use of such circuits. Therefore, we will talk about the features in more detail.
Oil pump
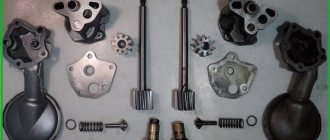
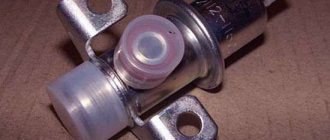
On VAZ 2106 cars, a gear pump is installed, on the cover of which there is already an oil receiver and a pressure-reducing valve mechanism.
The housing design is a cylinder with gears installed on it. One of them is leading (main), the other moves due to inertial forces and is called driven. The design of the pump itself is a series connection of a number of units:
- metal case;
- oil receiver (the part through which oil enters the pump);
- two gears (driver and driven);
- pressure reducing valve;
- stuffing box;
- various gaskets.
The design of the oil pump allows it to be considered one of the most reliable and durable mechanisms in a car.
The only function of the oil pump is to supply oil to all engine components. We can say that both the functioning of the motor and its service life depend on the performance of the pump.
Therefore, it is important to monitor what kind of oil is poured into the engine and in what mode the oil pump operates
Principle of operation
On the “six” the oil pump is started using a chain drive. This is a rather complex starting system, and therefore repairing and replacing the pump can cause some difficulties.
The operating principle is based on the following stages of pump startup:
- After turning on the ignition, the first gear of the pump starts.
- From its rotation, the second (driven) gear begins to rotate.
- As the gear blades rotate, they begin to draw oil through the pressure reducing valve into the pump housing.
- By inertia, the oil leaves the pump and enters the engine through the lines under the required pressure.
One gear pushes the other, causing oil to circulate through the lubrication system.
Thus, oil circulation is carried out through two rotating gears
In this case, it is very important that the entire pump device is completely sealed, since the slightest oil leak can significantly reduce the operating pressure in the system and deteriorate the quality of engine lubrication
Bypass (reducing) valve
The drive and driven gears rarely break because they have a simple design. In addition to oil seals and gaskets, there is another component in the pump design that can fail, which will have disastrous consequences for the engine.
The pressure reduction (bypass) valve on the VAZ 2106 is responsible for controlling the oil pressure in the system. If necessary, it is this valve that can reduce or increase the pressure so that it corresponds to the norm.
Increasing or reducing the existing pressure is carried out by simple actions: either the valve closes or opens. Closing or opening of the valve is possible due to the bolt, which presses on the spring, which, in turn, closes the valve or opens it (if there is no pressure from the bolt).
The bypass valve mechanism consists of four parts:
- small body;
- a valve in the form of a ball (this ball closes the passage for oil supply, if necessary);
- spring;
- stop bolt.
On the VAZ 2106, the bypass valve is mounted directly on the oil pump housing.
The pressure reducing valve mechanism controls the required level of pressure in the system
Pressure reducing valve
The design of the gears is very simple, which is why they rarely break. As a rule, the gap between the teeth simply increases and the oil is pumped worse. But much more often, the bypass valve breaks, which is necessary to control the pressure in the system. If necessary, this element increases or decreases pressure. And this is done very simply - the valve opens at high pressure and closes at low pressure.
Bypass valve design:
- The case is small in size.
- Valve (small ball that closes the oil passage).
- Spring.
- Bolt for stop.
The element is placed inside the housing of the VAZ-2106 oil pump. The price of the valve is no more than 200 rubles. And if the cause of the breakdown lies precisely in it, then it is easier to change only the valve. After all, the cost of the entire pump is about 1,500 rubles.
Low oil pressure VAZ-2106
April 3, 2012, 12:39 #1
Hello. The problem is with the six, as the engine heats up, the oil pressure decreases and as a result, the oil pressure light begins to blink on a warm engine. several times I changed the oil to a thicker oil filter, bored the crankshaft, replaced the main and connecting rod bearings, sorted it out and replaced it with a new oil pump, replaced the pig and the bearings, removed the fungus, it didn’t touch it, it’s fine, all the plugs on the shaft and on the block are in place, they don’t allow the camshaft to pass through either I flushed the oil system properly. I sinned on the pressure sensor, inserted it and tried it on a mechanical sensor, everything was the same, everything was the same, no changes. Can anyone tell me what else I missed, I don’t know what else to think about
Why do you need oil at all?
I often hear that oil is the lifeblood of the engine. This is not entirely true, of course, the comparison is very rough, but still, the engine will not function without oil (or it will, but not for a very long time).
Modern motor oils lubricate and protect all rubbing parts, and these are pistons (with their rings), shafts, bearings, etc. Let's just say that good oil extends the life of the engine by many thousands of kilometers.
BUT oil must flow through the system, just like blood itself through human vessels, if the oil is simply poured in a pan and does not go to the rubbing parts - IT IS USELESS!
This is interesting: How to unscrew the crankshaft pulley bolt - not a complicated procedure at all
Symptoms of a faulty oil pump
The main signs of problems in the lubrication system are sounds uncharacteristic of engine operation and the oil pressure light coming on. In this situation, you should stop, turn off the car and after a while check the oil level in the engine with a dipstick (you need to wait a little until the oil drains into the sump). If the level is below the minimum, add oil and check the level again (it should be between the min and max marks). If the light goes out when starting the engine, the reason it came on was precisely the low oil level.
A burning oil pressure light indicates a problem with the lubrication system.
If, after adding oil, the extraneous sounds do not disappear and the light continues to light, you should not continue driving. Most likely, there is a problem with the oil pump and will require replacement or repair. You can get to the garage or car service using a tow truck or tow. However, the light may also be on due to a failure of the oil pressure sensor. Therefore, until an accurate diagnosis is made, you should not rush to repair the oil pump and start disassembling the engine.
How to adjust the pressure?
In order to regulate the pressure created by the pump in the lines, it is necessary to perform the following manipulations:
- Make sure that the engine oil is of high quality and the level is normal.
- Make sure the drain plug is tight and no oil is leaking through it.
- Check the VAZ-2106 oil pump drive.
- Check the pump operation. Please note that the gasket often fails, but it is easy to replace.
- Check the tightness of all pump bolts.
- It is recommended to install a new filter every time you change the oil. And pay attention to the degree of contamination of the old one.
Now you can configure the pressure relief valve so that it operates at a certain pressure. The hoses through which oil enters the system must be sealed.
Step-by-step instruction
Before starting troubleshooting, check that all timing components are free of mechanical defects. To do this, you need to remove the protective cover of the drive and perform a visual inspection of the parts: sprockets, damper, tensioner and shoe. If defects are found, these components should be replaced.
Tools
Before you start work, you need to prepare the necessary tools:
- keys to “13” and “38”;
- flat screwdriver;
- pliers.
To carry out work, the car should be placed on a convenient platform and supports should be placed under the wheels so that it does not roll. The gear shift lever must be set to neutral.
Engine compartment of VAZ 2101
Stages
- First you need to find the tensioning device; it is located under the pipes near the pump. Use the key to “13” to release the tensioner. Once the chain is loosened, the shoe should pop off.
- Next, you should take the key at “38” and throw it on the crankshaft pulley nut. Then you need to turn the crankshaft a couple of turns in a clockwise direction.
- Rotate the shaft until the marks on the camshaft sprocket and on the camshaft bearing housing coincide. In this case, the spring located inside the tensioning device, acting on the shoe, will automatically perform the necessary tension.
- It is advisable to additionally check the tension using a screwdriver. If everything is normal, then we return to the tensioner and tighten its head with a wrench.
Checking tension with a screwdriver
After tightening the chain drive, you should start the engine and check its operation. It should work without extraneous noise. If the noise remains after tensioning, then the reason may be in the damper. Then you need to check its serviceability and replace it if necessary. It may not be possible to tension the chain drive the first time, so this procedure will have to be repeated several times.
This operation should be carried out every time after any repair work. In addition, a preventive check should be performed after the 10 thousand kilometers mark. If you learn how to check and tension yourself, this will make it possible to extend its service life and save on car service costs.
Removal
- First of all, disconnect the “-“ (minus) wire from the battery, as with any other repair.
- Drain the oil (through the plug on the oil pan) from the engine
- We take out the camshaft drive belt
Attention: After removing the timing belt (timing belt), do not turn the crankshaft or camshaft, otherwise the pistons will bend the valves, and you will have more repair work and the PRICE will increase.
- We take out the crankshaft toothed pulley, then its key, using two flat-head screwdrivers.
- Now remove the oil pan
- Unscrew the oil intake fastener
Unscrew the oil intake fasteners and remove it
- Using a 10mm socket with an extension and a ratchet, unscrew the six bolts securing the oil pump to the cylinder block.
Unscrew the mounting bolts using a ratchet socket
- Remove the unit from the engine.
Note: There is a gasket between the oil pump and the cylinder block.
- Be sure to wash the new oil pump with gasoline to wash off the preservation lubricant.
- We fill it with oil before installation so that it does not rotate dry when starting.
- It is also important to rotate the drive gear to install the pump on the crankshaft: so that the protrusions on the gear coincide with the groove on the crankshaft
- Lubricate the lip of the oil seal before putting the pump back
- Carefully tuck the seal lip onto the shaft journal using a wooden stick.
- When tightening bolts, be careful and careful not to strip the threads.
- Install the remaining parts in reverse order.
Disassembly
- We clamp the pump body in a vice, placing soft pads on the jaws and, using a 8-mm hexagon, unscrew the bypass valve plug.
Unscrew the valve plug
- We remove the piston and spring of the bypass valve.
- We check the seat of the bypass valve - the presence of burrs and scratches is unacceptable
- Using a 5mm hexagon, unscrew the six bolts securing the pump housing to its cover.
Unscrew the bolts securing the housing to the cover
- We take out the pump housing.
- We take out its drive gear from the cover.
- Behind it, we remove the driven gear.
- We wash all pump parts with gasoline, diesel fuel or kerosene, wipe the gears dry, and lubricate them with clean oil before installing them back.
- We carefully inspect the body for cracks, chips, and severe burrs, and if found, replace it.
Note: We check that the driven gear seat located in the pump housing does not exceed 75.10 millimeters in diameter. And the permissible minimum thickness of the partition between the driven and driving gears was no less than 3.4 millimeters. The permissible axial play at the drive gear should not exceed 0.12 millimeters, and at the driven gear - 0.15 millimeters
Permissible seat diameter and permissible partition thickness
- The same goes for pump gears; scuffing, chips, and cracks are not acceptable.
- We check the condition of the pressure reducing valve spring; if it is broken, cracked, or very short (compressed and does not match the dimensions), we replace it.
Acceptable dimensions of the pressure reducing valve spring
Assembly
We assemble the pump in the reverse order of disassembly. The driven gear inside the pump is positioned so that its side with chamfers and a mark is attached to the housing.
The mark with which the driven gear is applied to the housing
Theme Options
Search by topic
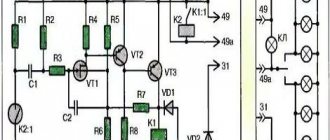
Checking the electrical oil pressure sensor
Checking the sensor with a multimeter
Electronic oil pressure sensors, used both on foreign and domestic cars, in particular on VAZ-2114 cars and other modern Ladas, are easy to check. Their design is similar to that of a rheostat, but they simply open the circuit at a certain pressure. Accordingly, its verification is even simpler. To do this you need:
- Set the multimeter to the “continuity” (break) mode of the electrical circuit.
- Ensure a tight connection between the air pump and the inlet (sensitive) hole where air is supplied. Here, similarly, it is necessary to ensure high-quality sealing, since the result of the experiment directly depends on this.
- Place one multimeter probe on the central output contact of the sensor, and the second on its body, “ground”.
- At the same time, use a pump to apply air pressure of about 1...1.5 atmospheres to the sensor. There is no need to blow hard so as not to damage the membrane. If the sensor is working properly, the electrical circuit will open almost immediately, under the mechanical action of the rod, which is in rigid connection with the bending sensitive membrane of the oil pressure sensor.
As is clear from the operating diagram of the sensor, if the circuit is open (detected with a multimeter), then the sensor is working. Otherwise, no. In rare cases, instead of the sensor, the problem why the oil light is on must be looked for in faulty (broken or damaged insulation) wiring.
You can also check the performance of the oil pressure sensor using another method. So, you need to remove the power wire from the sensor and short it to ground. If the sensor is working properly, the warning light on the dashboard should not light up. Otherwise the sensor is faulty.
Checking two sensors
On some modern machines, two pressure sensors of the same type (“new”) are installed. The first is designed for an absolute pressure value in the range of about 0.15...0.45 atmospheres, and is designed to open the warning lamp after starting the engine. Its verification is similar and follows the procedure described above. That is, the connection is the same. Its circuit should open when pressure is pumped into it in the specified range.
The second sensor is designed to monitor oil pressure while the engine is running. It is similar in type to the first, but its difference is to control the upper limit of the oil (in order to prevent it from increasing to a critical value). The upper value may vary and differs for specific car models. However, in most cases it is around 1.8 atmospheres. When this pressure level is reached or higher, the contact circuit should close and the engine oil pressure warning light should be activated on the instrument panel.
Checking the pressure sensor using a light bulb
To check the electric (new) oil pressure sensor, instead of a multimeter, you can use a light bulb designed to operate under 12 V DC voltage, as well as a power supply (battery) and a compressor (preferably with a pressure gauge). The verification algorithm is as follows:
- Two wires must be connected to the contacts of the light bulb.
- Connect one end of the wire going to the light bulb to the output contact of the pressure sensor.
- Connect the ground from the power supply (or minus from the battery) to the housing (ground) of the sensor.
- Connect the plus from the power supply or battery to the other wire on the light bulb.
- If the sensor is working properly, then after turning on the power supply (or simply when contact is made from the battery), the light should light up. Otherwise, the sensor can immediately be considered faulty.
- Next, to check, you need to apply a pressure of about 0.5 atmospheres to the sensitive element of the sensor using a compressor or pump. The pressure value can be different, and it depends on what pressure the sensor is designed for. Usually it is around the already mentioned 0.5 atmosphere.
- When the pressure increases to the specified value (critical for the sensor), the light should go out, since this will open the control electrical circuit in the sensor body. If this does not happen, then the sensor can also be considered unusable.
Instead of a compressor, you can easily get by with a regular car or even bicycle pump, which will easily produce the required half-atmosphere air pressure.
Purpose and types of automobile oil pumps
The purpose of the oil pump is to create the necessary pressure in the engine lubrication system. Under high pressure, oil flows through special channels to all rubbing parts of the engine, intensively reducing their friction against each other, thereby preventing premature wear.
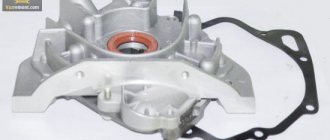
Oil pump for VAZ car, adjustable, with pressure reducing valve
Types of Oil Pumps
Various types of pumps were used on VAZ cars at different times. Let's list them:
- pumps are unregulated. There is no pressure reducing valve in their design, so the pressure in the lubrication system always remains constant;
- adjustable pumps. They are equipped with a pressure reducing valve, so that the pressure in the car’s lubrication system can vary depending on engine speed;
- rotary pumps. The main element of this design is a rotor with small metal blades, which pumps oil. In variable pumps of this type, in addition to the rotor, there is always a stator with a spring. This device ensures constant pressure in the lubrication system regardless of the crankshaft speed;
- gear pumps. Pumps of this type do not have a rotor with blades. Its function is performed by a pair of gears with long teeth. These teeth act as blades when pumping oil.
Advantages of adjustable rotary oil pumps
Almost all modern VAZ cars (starting from VAZ 2114 and higher) are equipped with adjustable rotary-type oil pumps.
Main design elements of the VAZ adjustable rotary oil pump
Here are the main advantages of these devices:
- When using an adjustable oil pump, engine power increases by 30%. This occurs due to a decrease in the power factor taken from the motor by third-party devices;
- with an adjustable oil pump, the oil has to be changed less frequently, since the crankshaft speed decreases, which means the number of revolutions decreases;
- The adjustable oil pump practically does not foam the oil. The problem that is relevant for unregulated gear pumps has been successfully solved in rotary pumps.
Replacing the pig
“Piglet”, or as it is correctly called - the intermediate shaft of auxiliary mechanisms in the engine timing drive, despite its modest size, performs a very important function and when it wears out, the piglet is replaced
. Let's analyze its work using the example of engines of classic VAZ cars.
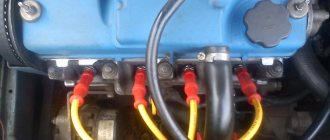
The intermediate shaft in the VAZ engine drives the oil pump, fuel pump and sensor - ignition distributor (distributor). The shaft is installed at the front end of the engine cylinder block and is driven either by a chain or by a timing belt through a sprocket or pulley in the timing drive, depending on the type of engine drive.
The “piglet” is a shaft, the front end and journal of which are absolutely similar to the end and journals of the camshaft of the VAZ, where the drive pulley or sprocket is put on. This is where the related features end, and then oblique teeth, an eccentric and a rear (smaller) journal are cast on the auxiliary shaft. The shaft has only two journals, a large front one and a small rear one, with which it rests on bushings pressed into holes in the engine cylinder block.
When worn, the bushings are replaced and passed through with a two-way reamer under two bushings at once
Cast oblique teeth on the shaft body drive the oil pump and distributor drive through the so-called “fungus”.
Thus, as soon as the engine crankshaft begins to rotate, the pig from contact with the timing chain or belt also begins to move and causes the fungus to rotate, which in turn begins to rotate the drive shafts of the oil pump and distributor. As a result, a spark appears on the spark plugs and the pressure in the oil line rises, ensuring the supply of oil to the rubbing vapors in the engine.
The sudden lighting of the oil pressure lamp in VAZ 2101-07 engines, in most cases, indicates the “licking” of the splined part in the fungus, when it can no longer rotate the drive shaft of the oil pump. Treated by replacing the fungus.
In addition, on the pig, as mentioned above, an eccentric is also cast, which serves to drive the fuel pump. The fuel pump is mounted on studs to the body of the cylinder block through a textolite heat-dissipating spacer, into the hollow part into which a steel pump drive rod is inserted, one end resting against the eccentric of the pig, and the other against the foot of the fuel pump drive. The piglet, having begun to rotate, runs into the drive rod with an eccentric, pushing it; the rod, in turn, transmits force to the foot of the fuel pump, setting the gas pump valves in motion.
A straight hole from the oil channel approaches the front neck of the piglet, and if slack (workout) appears between the liner and the neck of the piglet, this affects the overall pressure drop in the oil line.
As we can see, the piglet, despite the not entirely flattering name, is entrusted with a very responsible mission and the general condition of the engine as a whole and its reliability depend on its technical condition. Therefore, if you suspect its serviceability, it is best to replace it. This is necessary in the following cases: • Wear of the teeth on the piglet’s body for contact with the fungus • Development of an eccentric on the body, which leads first to a decrease in performance and then to failure of the fuel pump (clearly visible in the first photo)
Source
Overhaul of VAZ 2107
In some cases, major repairs of the VAZ 2107 power unit can be partially carried out without dismantling it. Before starting work, thoroughly rinse the engine and engine compartment with running water and dry. Without removing the motor you can replace:
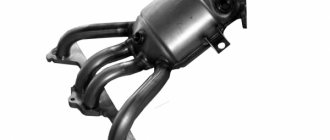
- crankcase seal;
- cuffs of both collectors;
- crankshaft oil seals;
- pump;
- generator;
- gasoline pump;
- carburetor.
The cylinder head is also easily removed from the engine without dismantling.
A major overhaul involves the restoration of engine elements, as a result of which the technical parameters will correspond to the parameters of the new engine. For this:
- the entire piston group is changed;
- cylinders are bored;
- the crankshaft is ground;
- liners are changed.
I remember how I got into the first major engine overhaul due to my own stupidity. I went out onto the field. There was a ravine ahead, so I drove in my “seven”. I couldn’t go further up the hill, and I couldn’t go back either. Basically, the car is stuck and skidding. Then an acquaintance came up, he was collecting something there - flowers or plants of some kind. He says: “You’re doing it wrong, you need to give it back, and then sharply forward. Let me sit down, and you push me when he moves forward.” Well, I agreed like a fool. The car skidded for about half an hour, no use. I called a tractor, which I wanted to do before. They pulled out the car. I sat down and drove back home. A few meters later the check flashed. It turns out, as I later found out, all the oil leaked while the car was slipping. It’s good that the tractor didn’t go far. I had to take the car for a major overhaul, replacing the piston and boring the shaft.
The need for major repairs is determined by the condition of the cylinder block and piston group. If most of the elements are well preserved, you can limit yourself to replacing individual parts. If even slight block wear is detected, cylinder honing will be required.
Sometimes VAZ 2107 owners buy a repair kit, which includes a reground crankshaft and a piston set. It is also recommended to purchase an incomplete cylinder block for major repairs. Since in this case the gaps are not misaligned, replacing the block will be quite simple. However, most often you have to buy a complete cylinder block, including an oil pump, pan, cylinder head, etc.
It is recommended to disassemble the internal combustion engine on a professional stand, after first removing the flywheel and clutch assembly. If there is no such stand, the dismantled engine is firmly fixed and only then its repair begins.
Typically, a major overhaul of a VAZ-2107 engine involves:
- disassembling the cylinder head, followed by cleaning and checking;
- inspection of rocker arms and valves;
- valve repair or grinding;
- dismantling pistons and connecting rods;
- dismantling the crankshaft;
- checking the condition of the cylinder block and cleaning it;
- checking the camshaft;
- inspection of bearings and checking them for play;
- removal and installation of rings;
- checking clearances;
- inspection of seals and their replacement.
Thus, almost any repair of the VAZ-2107 can be carried out independently. To do this, you need to have certain skills and a set of repair tools, as well as follow step-by-step instructions from specialists.
Changing the oil and oil filter VAZ “classic”
So, let's look at the oil change procedure using the VAZ 2106 as an example. First of all, the volume of oil in the VAZ 2106 engine for replacement is 3.75 liters. You also need to purchase a new oil filter that will be completely suitable for this type of engine.
- First of all, before changing the lubricant, the engine must be warmed up to operating temperatures. This will maximize the fluidity of the oil, which liquefies with heat. End of form
- Then the car needs to be lifted on a lift and driven onto an overpass or inspection hole. The main task is to gain free access to the drain hole, which is made in the oil pan.
- Next (in the case of an inspection hole or overpass), the car is fixed using the handbrake and engaging first gear. You can also additionally install wheel chocks, etc.
- If there is an installed engine crankcase protection, it is recommended to remove such protection, even taking into account the fact that a special hole may be made in the protection itself for draining the oil. This will make the procedure easier if you lack practical skills in changing the oil.
Now let's move on to the necessary tools. For example, on the popular VAZ “six” you will need:
- Allen key for 12 or cue ball with a wrench;
- Container for draining waste from the engine (volume 5 l.)
- Puller key for removing the oil filter;
- Funnel for pouring fresh oil;
- Rags, protective gloves, brush with metal bristles;
If the car has a crankcase protection, other keys may be required for dismantling (depending on the mounting features of the protection itself). After the engine has warmed up, the engine should be turned off. Then the protection is removed (if any). It is better to carry out all work wearing protective gloves.
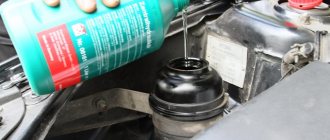
Now you can lift the hood and unscrew the oil filler cap. If you plan to flush the engine and use a composition known as “five-minute solution,” then this product is poured directly into the exhaust, and the neck cap is screwed back on.
Next is a quick flush of the engine. When finished, you need to unscrew the neck cap again, go down under the car, placing a container under the place where the drain plug is installed in the pan.
Now the drain plug is cleaned with a brush with metal bristles, after which the drain plug is carefully unscrewed with a hex key. At the same time, if necessary, place a pre-prepared container to drain the oil.
Gradually and as the lubricant flows out, the plug is completely unscrewed. Next, the oil will flow out of the drain hole for about 15 minutes. This time is enough to wipe the drain plug with a clean rag.
When the oil stops dripping, the drain plug is screwed back in. If it is necessary to flush the engine before changing the oil using full-volume flushing fluids, then flushing oil is poured in, the oil filler cap is screwed back on and the internal combustion engine is flushed according to the instructions indicated on the package.
Having completed flushing the engine oil system, the procedure for changing the oil itself can be continued. The flushing is drained from the engine in the manner described above, the drain plug is screwed in.
How to replace a VAZ oil filter
Now, that is, immediately before adding fresh oil, you can proceed to replacing the oil filter. By the way, in some cases, especially if you need to wash the engine with full-volume flushing oil, it is recommended to replace the filter twice.
This means you must first remove the old one before washing, install a clean one (the cheapest one will do), then perform the washing itself. After washing, you will need to remove the recently installed cheap filter again and install a high-quality new one.
Let's get back to the withdrawal. The oil filter can be removed quickly and easily using a special wrench puller. However, not everyone has such a key. For this reason, you need to familiarize yourself with how to unscrew the oil filter with a screwdriver or using other methods.
Now you need to pour a little clean engine oil into the new filter, filling it halfway. This will allow the lubricant to saturate the filter elements in the housing. The rubber o-ring on the oil filter is also lubricated with oil.
Before installation, wipe the area where the filter is installed with a clean cloth, and then tighten the new filter by hand. Next, insert a funnel into the oil filler neck and pour in fresh oil.
https://youtube.com/watch?v=NXnmP23NhaA
DIY oil pump repair
The oil pump is considered a mechanism that can be repaired even by an inexperienced driver. It's all about the simplicity of the design and the minimum number of components. To repair the pump you will need:
- open-end wrenches "10" - 2 pcs.;
- ruler - 1 pc.;
- probes - set;
- vice.
To repair the oil pump, you need to remove it from the car and disassemble it. It is best to disassemble the part in order:
- Disconnect the oil supply pipe from the pump housing.
- Remove the three mounting bolts.
- Disconnect the pressure reducing valve.
- Remove the spring from the valve.
- Remove the cover from the pump.
- Remove the main gear and shaft from the housing.
- Next, remove the second gear.
Photo: main stages of repair work
At this point, disassembling the oil pump is considered complete. All seized parts must be washed in gasoline (kerosene or ordinary solvent), dried and inspected. If a part has a crack or signs of wear, it must be replaced.
The next stage of repair work is to adjust the gaps:
- between the axle and the second gear the gap should be no more than 0.1 mm (measure with a ruler), if the gap is larger, then the second gear must be replaced;
- between the teeth of two gears there should be no more than 0.25 mm;
- the gap between the top of the gears and the cover is no more than 0.2 mm;
- the gap between the pump casing and the outer part of any gear is no more than 0.25 mm.
After checking the parameters, you can proceed to the final stage of repair - checking the spring on the valve. You need to measure the length of the spring in the free position - it should be no more than 3.8 cm in length. If the spring is very worn, it is recommended to replace it.
Video: how to measure gaps correctly
It is mandatory to change the oil seal and gaskets during repairs, even if they are in satisfactory condition.
After replacing all worn elements, the oil pump must be reassembled in the reverse order.
Video: installing an oil pump on a VAZ 2106
Flushing the engine oil system: when needed
So, antifreeze or antifreeze can get into the lubrication system for various reasons, but the most common culprit is damage. Rarely formed. In any case, the result of mixing oil and coolant is an emulsion.
This phenomenon is very dangerous for the motor, since the lubricant loses its properties, wear and tear of other elements and components in the engine increases significantly. Moreover, water and ethylene glycol, mixed in certain proportions and, in fact, representing coolant, after entering the oil, cause coagulation of various contaminants.
Simply put, dirt in the lubrication system literally sticks together. Additives in oil and antifreeze react after mixing and quickly decompose, the oil immediately oxidizes, etc. Large “lumps” consisting of deposits can even clog the oil receiver mesh filter, as a result it begins.
It is important to take into account that, for example, after replacing the cylinder head gasket, it will not be possible to completely drain the waste from the engine. This means that by pouring a new portion of fresh lubricant, the lubricant will also be mixed with the remaining emulsion, and unwanted deposits will still form in the oil channels and on the internal surfaces of the engine
If the engine is not additionally flushed, this situation will repeat for at least 2-3 more replacements. We also note that similar recommendations also apply when, for some reason, the oil change interval was violated (for example, the lubricant was replaced not after 10 thousand km, but after 15 thousand). Also, flushing is recommended if necessary, adding oil from a third-party manufacturer, when necessary, etc.
At the same time, flushing the engine may be necessary if the owner purchased a used car, and the service history of a particular car is unknown or questioned. It often happens that after changing the oil on such a car (literally after 50-100 km).
Finally, it is also worth highlighting the possible filling of low-grade oil into the engine. Among motor oils, unfortunately, . Naturally, after discovering this fact, you need to remove the surrogate from the internal combustion engine, then the engine must be flushed.
A counterfeit product is usually indicated by strong and rapid blackening of the lubricant, an unpleasant pungent odor, the appearance of a black coating under the valve covers, cloudiness of the oil, a significant change in its viscosity for no obvious reason, an increase in lubricant consumption, etc.
Basic data
The VAZ 2110, 2112 oil pump is designed to uninterruptedly supply oil to the engine to lubricate its rubbing parts, which effectively extends their service life. On these cars, this product is connected to the crankshaft and directly receives energy from it for operation (rotation), which is traditional for all front-wheel drive VAZs. The product is located in the engine oil sump.
Signs of pump failure:
- 1. Increased or decreased oil pressure at idle speed;
- 2. There is no oil pressure at idle, under load;
- 3. Continuous lighting of a red light signal with an image of an oil can, indicating a lack of oil pressure in the system.
You need to know that the burning of a lamp with an image of an oil can, without confirmation, is not grounds for immediate replacement of the unit. First you need to make sure that the wiring of the oil pressure sensor is in good condition; if everything is in order with it, then you definitely need to check the sensor itself. To do this, it is dismantled and inspected - if there are no traces of lubricant on it (no circulation), the pump will need to be replaced; when the sensor is lubricated, the sensor should be replaced.
The most common pump failures include:
- 1. Oil leakage through the oil seal;
- 2. Breakdown of the oil reservoir, which most often occurs due to the driver’s fault, namely the use of low-quality oil, too thick, or untimely oil changes. Oil that is too thin simply will not be pumped through the pump, which will be immediately signaled by a lamp with an oiler;
- 3. Clogged oil receiver grid, which leads to difficulty in oil circulation through the engine. In this case, oil starvation occurs with increased wear of parts and assemblies of the VAZ 212 engine and other models.
- 4. Damage to the pressure reducing (bypass) valve. It can stop in different positions: if it “hangs” in the open position, the oil pressure will drop, but if it stops in the closed position, then the bypass will not occur, this will be evidenced by oil leakage through the oil seal.
The manufacturer AvtoVAZ recommends changing the oil every 10 thousand km, but operating experience shows that it is better to reduce the mileage between changes. You need to buy oil only from reputable manufacturers, and you also need to be wary of counterfeits.
Engine lubrication
Zhiguli cars have been produced for a long time and have earned popularity among the population due to their unpretentiousness. The reliability of all components is excellent, in particular, the lubrication system is highly efficient.
It is combined, all rubbing elements are lubricated in the following ways:
- Through pressure.
- Spraying oil.
If the engine temperature is 85-90 degrees, then the pressure in the lubrication system should be in the range of 3.5-4.5 kgf/sq.m. cm. In total, there should be 3.75 liters of lubricant in the system.
https://youtube.com/watch?v=ZSR-r4FF5mQ
Stages of replacing lubricant VAZ 2106
On classic Lada cars or the more familiar Zhiguli, a convenient drainage of used oil from the engine is provided. The oil filter is also easily accessible and can be reached from the engine compartment.
During the production of the VAZ 2106, a large number of modifications were produced, which were equipped with various engines. Experienced drivers note good maintainability, unpretentiousness in maintenance, as well as consumables.
Before starting to replace the lubricant, precautions should be taken. Please note that the drained waste will be at a high temperature.
Since the replacement is carried out on a warm engine.
Draining waste fluid
Before starting the draining procedure, you should prepare tools, empty containers, as well as new liquids for subsequent filling. If additional protection is installed under the engine, it can also be removed for convenience.
Next, we perform the procedure for draining the liquid from the VAZ 2106:
- We lift the hood, under it we find the filler neck on the engine and unscrew the plug (Fig. 1).
- Now we go down under the car and place a waste container in the drainage area. You can use a cut canister or an old bucket.
- Unscrew the drain plug using a 12mm hex key (Fig. 2).
- The drain plug is not always located at the lowest point, so about 100-200 milliliters of waste may remain in the pan. To remove them, you can use a rubber bulb or a syringe with a hose attached to it (Fig. 3).
- Now you need to unscrew the old oil filter, which is located on the right side of the engine under the hood (Fig. 4).
To unscrew the filter element, it is advisable to have a special puller. If it is not available, you can try to unscrew the filter using improvised means. In this case, you can use, for example, an old alternator belt, a regular belt, a bicycle chain or a simple screwdriver.
Unscrewing the oil filter using improvised means
Using this method, you can drain the maximum amount of used oil, after which you can proceed to further actions. The main thing is not to forget, everything that we unscrewed must be put back in place.
Flushing the lubrication system
Flushing the engine on a VAZ 2106 should be carried out only in exceptional cases, which include:
- Purchasing a used car when you cannot know about the quality, as well as the regularity of lubricant replacements.
- During operation, the service replacement interval was repeatedly exceeded.
- Engine operation with constant frequent overheating, which contributes to coking and other deposits.
- In cases of switching to another type, for example from synthetics to semi-synthetics.
There are several types of flushes for the VAZ 2106 engine:
- Five- or seven-minute, capable of cleaning even the most difficult deposits. They must be used very carefully and strictly follow the instructions printed on the packaging. It is recommended to use them only when absolutely necessary. Since there is a high probability of causing premature wear of the sealing seals. And also clog the oil channels with particles of washed away carbon deposits.
- Special compounds that are added to the oil several hundred kilometers before the expected change. They are more gentle, but there is also a possibility of clogging of the oil channels.
- Flushing oil is the most gentle method of cleaning the engine from the inside. This composition is poured after draining the waste, the engine runs for 15-20 minutes, after which the liquid with deposits is drained. The absence of aggressive additives in the wash composition gently cleans the engine, but is not able to remove heavy contaminants.
- Regular oil that you are going to use when changing. This method is not so popular due to its high price.
Installing a filter, filling in new engine fluid
If the VAZ 2106 lubrication system is sealed and does not require repair work to eliminate leaks, you can proceed to filling in fresh engine oil. In addition to the oil itself, we may need a new drain plug, its part number 14325301. As well as the original oil filter 2101-1012005.
Consumables
When everything is ready, let's move on to the bay:
- Replace the drain plug and replace it with a new one if necessary.
- We tighten and put the oil filter in place. Pre-lubricate the rubber sealing ring with fresh oil.
- Pour new oil into the filler neck.
- We check the level on the dipstick; it should be between the MIN and MAX marks.
- We start the engine, let it run for 10-15 seconds, then turn it off.
- After 5 minutes, check the level with a dipstick and top up if necessary.
How to change engine oil
The procedure is as follows:
- warm up the engine, turn it off;
- place a container for old oil under the oil plug;
- Unscrew the oil plug using a 12mm hex key;
Tip: To make the oil flow out faster, you must first remove the oil filler cap.
- wait until all the old oil drains out;
- place a container for used oil under the oil filter;
- unscrew the oil filter using a special wrench;
- After removing the filter and completely draining the oil from the engine, tighten the plug on the pan;
- wipe the oil filter installation area with a rag;
- fill the new filter with engine oil and lubricate the sealing ring with it;
- screw in the new filter (tighten it only by hand, without using a wrench);
- pour engine oil into the engine through the oil filler neck using a funnel;
Note: above we answered the question of how much oil to pour into the VAZ 2107 engine. It should be noted that this volume (3.75 l) is calculated taking into account the oil in the filter. Therefore, after installing a new filter, approximately 3.5 liters of oil are poured into the engine.
- let the oil drain into the pan and check its level on the dipstick;
- add oil if necessary;
- start the engine and let it idle until the oil pressure light goes out;
- turn off the engine;
- Check the oil level and the tightening points of the filter and oil plug again.
This completes the oil change procedure and the machine can be operated.