This type of maintenance of the VAZ 2107 car, such as adjusting the angles of the wheels, is called wheel alignment and is performed at intervals recommended by the manufacturer. In addition, any defect in the suspension guide elements may cause a change in the wheel alignment geometry. This means that after replacing, for example, silent blocks or ball joints, you need to check whether the angles of inclination of the front or rear wheels of your “seven” are off.
- What does this adjustment provide?
Wheel camber conceptCamber angle values
- The value of toe angles
- Road instability
- Table: air pressure in VAZ 2107 tires for different seasons and wheel sizes, kg/cm3
Video: one way to adjust wheel alignment
- Camber
Adjusting the wheel alignment angles of a VAZ-2107 car
You need to check and adjust the angles of the front wheels on special stands.
You can make the adjustment yourself.
To do this, you need a flat horizontal platform.
If it is not there, you can align the car wheels in a horizontal plane using chocks under them.
Before adjusting, check:
— air pressure in tires;
— play in the bearings and ball joints of the suspension;
— free movement of the steering wheel. We eliminate detected faults. The vehicle must have wheels and tires of the same size, without radial and axial runout.
You can check the absence of beats visually by rotating the suspended wheels by hand. Monitoring and adjustment can be carried out both on a loaded and unloaded vehicle. It is recommended to install the corners on a loaded car - 70 kg on four seat cushions and 40 kg in the middle of the trunk.
We place the steering wheel in a position corresponding to the linear movement of the car. Before checking, we compress the car suspension 2-3 times, applying a vertical force of 40-50 kg to the bumpers. We check and adjust the angles in the following sequence:
— angle of longitudinal inclination of the axis of rotation;
— wheel camber angle;
For a new car (up to TO-1), the wheel alignment angles have the following values:
— wheel camber angle: 0°30′ +40′ -30′
— pitch angle of the turning axis: 4° +1° -1°30′
— toe 1–7 mm.
After maintenance-1 (after 2–3 thousand km) and during further operation of the vehicle, the wheel alignment angles should be:
— wheel camber angle 0°30'±20′ (0°5'±20′)*,
— longitudinal inclination angle of the turning axis 4°±30′ (3°±30′)*,
— toe-in 2–4 mm (3–5 mm)*.
* Values of angles without load are given in parentheses, without brackets - with load
Prerequisites
The most accurate verification is possible only in workshops at stands. But in the absence of such attributes, you can use the proven “old-fashioned” method. It is advisable to install the car on an inspection hole, since you will have to unscrew the nuts and bolts of the suspension, and without it it will be problematic to do this.
When carrying out work, carefully inspect the entire suspension, the condition of the silent blocks and ball joints, and the tie rod ends. If there is play in them, then setting the wheel angles will not bring any result, and all the work will be done in vain, the car will change its trajectory spontaneously.
Adjusting the caster angle of the steering axis
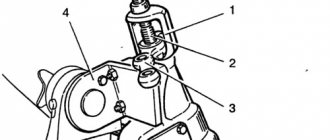
The angle is adjusted by changing the number of adjusting washers on the bolts securing the lower arm axle.
Thus, moving one washer 0.5 mm thick from the front package to the rear one increases the caster angle by 36–40′, while the “camber” of the wheel decreases by 7–9′, and vice versa.
Adjusting U-shaped washers with a thickness of 0.5 and 0.8 mm are available for sale.
These washers must be installed with the slot facing down.
You can measure the longitudinal inclination of the rotation axis using a homemade template with a plumb line.
The template has a sector marked in which, if adjusted correctly, the plumb line should be located.
We tighten the nuts on the ball joint pins so that their edges become perpendicular to the longitudinal plane of the car, and apply a template to them
You can measure the longitudinal inclination of the rotation axis using a homemade template with a plumb line.
The template has a sector marked in which, if adjusted correctly, the plumb line should be located.
How is it regulated?
The camber and longitudinal inclination of the king pin on a Zhiguli are changed by installing special adjusting washers under the lower arm of the front suspension. To achieve the required wheel alignment angles, a combination of the required number of washers and their thickness is selected. It is completely different for each car.
The wheel master loosens the lower lever, and then adds or removes the required number of adjusting washers, after which he tightens the lever and looks at the bench readings. The operation can be repeated several times until the desired values are achieved.
After adjusting the camber and caster, the technician moves on to adjusting the toe-in of the front wheels. Toe-in on classics is adjusted by steering rods. By loosening the two clamps on the coupling and rotating it, the desired value is achieved. At the end of the work, the clamps are tightened again.
How to adjust wheel toe on a VAZ 2107
If the chassis or steering of the VAZ 2107 was repaired, then after that it is necessary to perform a wheel alignment. Also, this action needs to be carried out with some frequency, since driving on bad roads also leads to disruption of the exact settings. So, how to adjust wheel toe on a VAZ 2107 on your own?
When adjustment is necessary
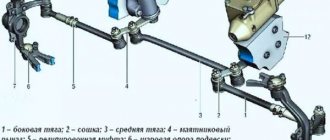
Adjusting steering rods VAZ 2107
Adjustment may be necessary if:
- the car pulls to the side on a flat road;
- deviations of wheel angles on the VAZ 2107 became visible;
- premature or uneven tire wear occurs;
- the increase in fuel consumption was higher;
- the suspension was damaged.
If the alignment does not correspond to the norm, then the car will constantly be “pulled” to one side. To determine this, just remove your hands from the steering wheel. If the adjustment is performed poorly, the car tires will wear out very quickly, and some suspension parts may also fail.
To perform a VAZ 2107 wheel alignment without the help of specialists with your own hands, you must have:
- thread with hooks at both ends;
- ordinary thread;
- bars 6 mm and 22 mm thick;
- Cobra type pliers;
- set of wrenches;
- calipers.
Theoretical part
First, let’s get a little grounded in theory in order to accurately understand all the actions that will be described. Let's look at the definitions:
Wheel angle
Or in other words – wheel alignment. These are design parameters that determine the current position of the wheels when the car is moving in a straight line and when cornering. Ideally, a car on a flat surface should always move in a given steering position.
If this parameter deviates, directional instability appears; the driver constantly has to pull the steering wheel to the side in order to maintain the desired direction.
Interesting! Due to driving with such wheel alignment settings, tires begin to wear out faster, suspension parts suffer, and fuel consumption increases significantly, since a moving car constantly experiences some kind of resistance.
Angle of longitudinal inclination of the axis of rotation
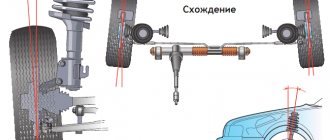
It is also called caster - a given angle between the axis of rotation of the wheels and the vertical level, when viewed from the side. This angle is set using adjustment washers, which are placed on the bolts securing the lower arm axle. This ensures stabilization of the wheel position when the car moves in a straight line.
Camber angle
The deviation of the plane of rotation of the wheel from the vertical line, which passes exactly through the center of the contact area of the tire with the road surface. This angle is also set by adjusting washers on both bolts of the lower arm axle.
The number of washers should always be the same, as should their thickness. This allows you to achieve the correct position of the wheels when the suspension is operating.
Wheel alignment
This is the difference in distance between the points in front and behind the inner parts of the wheel rims.
Adjustment and checking of wheel angles should be carried out in workshops where everything necessary for this is available. You can also correct a lot of things manually, not counting the caster angle of the steering axis.
Interesting! The most accurate data when setting the wheel angle can be obtained when working with a loaded car of 320 kg - this is the approximate weight of four people in the cabin, 50 kg of cargo in the luggage compartment. In this case, the fuel tank must be filled to full.
Ideally, the value of all the listed angles after undergoing maintenance should correspond to the following values (the value for an unloaded vehicle is indicated in brackets):
- Pitch angle – 4°±30′ (3°±30′);
- Wheel camber - 4°30'+20' (0°5'+20');
- Toe - 2 - 4 (3 - 5) mm.
It is these values that we will focus on when working.
Cost of work
| List of works | Prices |
| Checking wheel alignment angles | 800rub |
| Toe adjustment only | 1200rub |
| Full adjustment (toe, camber and caster) | 2000rub |
| Adjusting washers are included in the cost of work | washers are always in stock |
Skeptics who believe that 2000 rubles for a wheel alignment on a classic would like to note that it takes 2-3 times more time to adjust this car than a foreign-made car of the same class, as well as the fact that today Not many services in Moscow take on this car, and if they do, they really do it with the same quality as us.
How to understand that you need to set a wheel alignment
The following may make you think about the need for such a procedure:
- While driving, the car pulls to the side and you constantly have to correct the course. Make no mistake, a similar effect can occur when driving on uneven or inclined roads. Ride in different places and in different directions on a flat road so as not to be deceived.
- There is rapid and uneven wear of tires and suspension parts. The car began to react more harshly to bumps. Fuel consumption has increased unjustifiably.
- If the car is involved in an accident, even not a very serious one, it is recommended to at least check the toe angle of the wheels, since the shock impulse, even when hitting a hole, can throw off the suspension settings.
- Checking is also recommended after traveling 15,000 km.
The process of setting angles
To work at home you will need the following tools and equipment:
- Set of spanner wrenches;
- Calipers;
- A strong thread or fishing line with hooks at the end - if there are none, then you will need to figure out how to tie it to the wheel;
- Two bars - the first is 6 mm thick, and the second is 22 mm.
You may also need a special or regular ruler - there is such an adjustment method too.
Before you begin setting the wheel angles, you need to check the tire pressure, make sure that there is no radial and axial runout of the tires, play in the hub bearings, play on the upper ball joints and free play in the steering wheel.
If we find any of the above, we fix the problem. Next we proceed in the following order.
We drive the car onto a flat area, set the steering wheel position to straight-line driving mode - for this you need to drive forward and backward a couple of times to understand that the car is not moving anywhere, and press the suspension, putting 50 kgf pressure on the front and rear bumpers several times in a row.
Checking the angle using a thread and caliper
Checking the wheel alignment angles. To do this, attach a plumb line next to the wheel so that it runs exactly in its center, as shown in the photo above. Stop it rolling and measure the distance from the top and bottom edges of the rim to the thread. The resulting difference will be an indicator of camber.
Advice! If you don't have a caliper, use a regular ruler.
VAZ 2107 is a rear-wheel drive car. For such, the maximum difference can be 4 mm, for front-wheel drive - 1 mm.
It is worth considering that the upper distance cannot be less than the lower one - it’s better if it’s the other way around. Ideally, the camber should be zero for cars with any drive.
If adjustment is required, loosen all the nuts on the steering knuckle, move the part in the desired direction and tighten everything as it was.
To make sure everything is done correctly, repeat the measurements, and also take it with the wheels turned to the right and left.
Let's move on to adjusting the toe.
Beam 22 mm
We carry out the same preparatory measures as when adjusting the camber.
Next, we stretch the thread between the front and rear wheels so that it passes through their center. If the thread clings to the fender liners, then they need to be temporarily removed.
The track of the rear wheels on the VAZ 2107 is slightly narrower than that of the front wheels, so you need to make a lining from a block or two folded matchboxes.
Then we turn the steering wheel so that the thread touches the front wheel tire on both sides. If everything works out, then you will not need any adjustment.
Now move the block to the back of the rear wheel and add another 6 mm insert to it - you can put a third box of matches. The thread should still touch the tire at two points. It turned out great, no, it needs adjustment.
You can adjust the alignment using wrenches 13. To do this, loosen the outer tie rod coupling.
Cobra pliers
Next, using Cobra-type pliers, you need to grab the clutch and turn it, thereby adjusting the length of the pull. We achieve such a position so that the thread touches the tire as required.
Finally, tighten the clamps and repeat all manipulations with the second wheel. We strive for a joint convergence of 2 mm.
Article: 2101-2904225, additional articles: 21010290422500
Order code: 007736
- Buy with this product
- show more
- Passenger cars / VAZ / VAZ-212131 drawing
- » href=»/catalog/vaz-3/legkovye_avtomobili-30/vaz_21213-731/rychagi_verhnie-155/#part2010843″>Adjusting washer 0.5 mm Suspension / Upper arms
- Passenger cars / Chevrolet / Chevrolet Niva 1.71 drawing
- » href=»/catalog/chevrolet-125/legkovye_avtomobili-30/chevrolet_niva_1_7-1233/rychagi_verhnie-177/#part2974778″>Adjusting washer 0.5 weFront suspension / Upper arms
- Passenger cars / VAZ / Lada 4×4 Urban1 drawing
- » href=»/catalog/vaz-3/legkovye_avtomobili-30/lada_4x4_urban-1885/d200__poperechina_peredneiy_podveski_v_sbore-165/#part4207968″>Adjusting washer 0.5 mm Front suspension / D200. Front suspension cross member assembly
- Passenger cars / VAZ / VAZ-21021 drawing
- » href=»/catalog/vaz-3/legkovye_avtomobili-30/vaz_2102-4/podveska_perednyaya-144/#part7727″>Adjusting washer 0.5 mm Suspension / Front suspension
- Passenger cars / VAZ / VAZ-21041 drawing
- » href=»/catalog/vaz-3/legkovye_avtomobili-30/vaz_2104-5/podveska_perednyaya-115/#part14710″>Adjusting washer 0.5 mm Suspension / Front suspension
- Passenger cars / VAZ / VAZ-21061 drawing
- » href=»/catalog/vaz-3/legkovye_avtomobili-30/vaz_2106-7/podveska_perednyaya-124/#part21019″>Adjusting washer 0.5 mm Suspension / Front suspension
- Passenger cars / VAZ / VAZ-2120 “Nadezhda”1 drawing
- » href=»/catalog/vaz-3/legkovye_avtomobili-30/vaz_2120__nadejda_-245/rychagi_verhnie-127/#part56765″>Adjusting washer 0.5 mm Suspension / Upper arms
- Passenger cars / VAZ / VAZ-21311 drawing
- » href=»/catalog/vaz-3/legkovye_avtomobili-30/vaz_2131-73/rychagi_verhnie-203/#part64733″>Adjusting washer 0.5 mm Suspension / Upper arms
- Passenger cars / VAZ / VAZ-21213-214i1 drawing
- » href=»/catalog/vaz-3/legkovye_avtomobili-30/vaz_21213_214i-1240/rychagi_verhnie-228/#part2990672″>Adjusting washer 0.5 mmSteering / Upper levers
- Passenger cars / VAZ / LADA 4×4 M1 drawing
- » href=»/catalog/vaz-3/legkovye_avtomobili-30/lada_4x4_m-1456/poperechina_peredneiy_podveski_v_sbore-173/#part3241684″>Adjusting washer 0.5 mm Suspension / Front suspension cross member assembly
- Passenger cars / VAZ / LADA 4×42 drawings
- » href=»/catalog/vaz-3/legkovye_avtomobili-30/lada_4x4-1887/d200__poperechina_peredneiy_podveski_v_sbore-190/#part4215372″>Adjusting washer 0.5 mm Front suspension / D200. Front suspension cross member assembly
- » href=»/catalog/vaz-3/legkovye_avtomobili-30/lada_4x4-1887/d201__poperechina_peredneiy_podveski_v_sbore-191/#part4215387″>Adjusting washer 0.5 mm Front suspension / D201. Front suspension cross member assembly
- Passenger cars / VAZ / VAZ-21011 drawing
- » href=»/catalog/vaz-3/legkovye_avtomobili-30/vaz_2101-3/podveska_perednyaya-144/#part3243″>Adjusting washer 0.5 mm Suspension / Front suspension
- Passenger cars / VAZ / VAZ-21031 drawing
- » href=»/catalog/vaz-3/legkovye_avtomobili-30/vaz_2103-106/podveska_perednyaya-110/#part11282″>Adjusting washer 0.5 mm Suspension / Front suspension
- Passenger cars / VAZ / VAZ-21051 drawing
- » href=»/catalog/vaz-3/legkovye_avtomobili-30/vaz_2105-6/podveska_perednyaya-115/#part17816″>Adjusting washer 0.5 mm Suspension / Front suspension
- Passenger cars / VAZ / VAZ-21071 drawing
- » href=»/catalog/vaz-3/legkovye_avtomobili-30/vaz_2107-8/podveska_perednyaya-163/#part25255″>Adjusting washer 0.5 mm Suspension / Front suspension
- Passenger cars / VAZ / VAZ-21211 drawing
- » href=»/catalog/vaz-3/legkovye_avtomobili-30/vaz_2121-13/rychagi_verhnie-115/#part59845″>Adjusting washer 0.5 mm Suspension / Upper arms
- Passenger cars / VAZ / VAZ-21231 drawing
- » href=»/catalog/vaz-3/legkovye_avtomobili-30/vaz_2123-315/rychagi_verhnie-175/#part978633″>Adjusting washer 0.5 mm Suspension / Upper arms
There are no reviews for this product yet.
Today, the next article in the series “Crystal VAZs or typical breakdowns of domestic cars” is dedicated to the “classics”: VAZ-2101, 2103, 2104, 2104, 2105, 2106 and 2107. These cars have been driving along our roads for decades and, despite Despite all the shortcomings that we will talk about, their popularity is still high.
Adjusting camber and toe on VAZ 2101-VAZ 2107
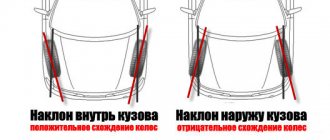
Welcome! Camber - this term refers to how the car’s wheel will stand relative to the vertical. If the upper edge of the wheel is brought outward, then this means that the camber is positive, and if the same upper edge of the wheel is located in the inside of the car, then this camber will already be considered negative and indicated by the value “-”.
Note! If the camber is incorrectly adjusted, namely when the camber of only one front wheel is adjusted, the car may drift to the side when driving - this can be very easily determined by removing your hands from the steering wheel while driving!
Toe-in - this term means how the wheels will converge with each other relative to the road. For example, on rear-wheel drive cars the wheels are at a positive angle, and on front-wheel drive cars they are at a negative angle, as shown in the photo. And all this was done so that when starting off and during further driving, the wheels are aligned and become completely level.
How to adjust camber and toe, aka wheel alignment angles on a VAZ 2101-VAZ 2107?
Note! A more accurate check of wheel installation must be checked in a specialized workshop on a special stand. But if you don’t have the money for this, then you can almost as well adjust the wheel angles without using a stand!
And also when adjusting, pay special attention to the suspension elements, because if the suspension is faulty or if play is detected in most of its parts, adjusting the wheel angles will lead to nothing!
Preparation for adjustment:
1) At the beginning, for more precise adjustment of the wheel angles, it is recommended to load the car with an additional weight of “320 kg”. For example, you can put “4” people in a car and a load of about “50 kg”.
2) Now check how much fuel is in the fuel tank, if it’s not enough, bring it up to normal, because the tank must be completely filled.
3) Next, check the tire pressure, it should also be normal.
Checking and at the same time adjusting the camber and toe of the car:
Note! Unfortunately, setting the camber angle is very difficult to do yourself, because it is unlikely that it will be possible to adjust it properly. But you can check whether the camber angle is ok or not yourself, which is what we will do!
1) To check the camber, first sit in the car and turn the steering wheel so that it is pointing straight ahead.
2) Next, get out of the car and squeeze the car’s suspension, to do this, carefully use the trunk or, best of all, press the bumper with a force of “40-50 kg”, “2-3” times. Do the same operation with the front bumper of the car.
3) Then take the thread and a caliper and then pull it vertically as shown in the figure. And after the thread is tensioned, apply a caliper first from below, and then from above, and as a result you will find out the camber of the wheel.
Note! If you get a difference between the top and bottom points of the wheel, say, “3 mm”, then this will mean that the camber angle is approximately “30'”. The camber angle should be within “4°30'+20'” - this is when the car is loaded and provided that there are “4” people in the car. And when the car is unloaded, the camber angle should be “0°5'+20'”!
4) Now, in order to check the alignment, you need to do almost the same thing as when checking the camber, namely, align the wheels, if possible properly load the car, and only after that you need to start checking.
5) To check, take in your hand an unusual thread with hooks tied at both ends. And then hook one side of the thread to the beginning of the front wheel, and the other side to the end of the rear one, but hook it so that everything is on the same level, that is, so that the thread runs smoothly and does not bend.
Note! The track of the rear wheels is slightly narrower than that of the front wheels, approximately 44 mm, so for more precise adjustment, apply a block with a thickness of about 22 mm to the rear wheel and thereby draw the thread over this block!
6) Next, sit behind the wheel and turn the steering wheel so that the thread touches both sides of the front tire.
7) Then fasten the thread on the opposite side, but only this time place two bars under the back of the wheel, one of which will be “6 mm” thick and the other “22 mm”. Thus, if we add these two values, then the sum we get is “22 + 6 = 28 mm” the thickness of the bar.
Note! After the entire operation, check that the thread lightly touches “1-2 mm” for one front wheel at both points of the tire; if it does not touch, then adjust the toe-in of the front wheels!
 To adjust toe using two wrenches, loosen the outer tie rod coupling clamps.
9) And after that, using Cobra-type pliers, rotate the clutch itself and, as a result, adjust the length of the tie rod until the gap between the thread and the front wheel tire returns to normal.
Controlling the camber angle on the front wheels
It should be noted that it is quite problematic to set the camber angles yourself, since there are many difficulties. But you can check how much the angle deviates from the normal position without much difficulty. To do this, you need to follow the following algorithm:
- Place the car on a level surface and secure its position by placing chocks under the rear wheels.
- Sit in the car and turn the steering wheel until it is level. The wheels must be parallel to the car body.
- Press the shock absorbers 2-3 times until the car's suspension is in its normal position. The force should be approximately 40-50 kg. The operation is carried out on all four shock absorbers.
- Take the thread and fix it on the top of the car's fender so that it passes clearly through the center of the wheel. To achieve a vertical position, tie a weight to the lower end. Measure from the top and bottom edges of the wheel to the thread. The difference in values is the wheel camber.
For example, the difference is 2 mm. This means the camber angle is 20 minutes (not degrees). Normally, the angle should be 4 degrees and 30 minutes. An upward deviation of no more than 20 minutes is permissible. But this is the case when the car is loaded with a mass of 320 kg. If there is no load, the angle should not deviate by more than 20 minutes. from 0 degrees and 5 minutes.
Adjusting the VAZ 2107 chassis: adjusting caster, camber and toe
vaz2107 Both the natural wear of suspension elements and repeated impacts on uneven road surfaces can disrupt the architecture of geometric connections.
However, manipulations with steering elements or front suspension components also entail the need to adjust the geometry. A qualified do-it-yourself camber adjustment on 2107 ensures the correct relative position of the wheels, guaranteeing:
- safe behavior on the road (no pulling to the side or “yaw”);
- uniform tire wear;
- optimal operating conditions for suspension elements.
Preparatory procedures
In order for the adjustment to be more accurate, it is necessary:
- check wheel runout;
- eliminate gaps in hub bearings;
- find out how much fuel is in the fuel compartment; if it is not enough, then the volume should be brought to normal, because the tank must be fully filled with fuel.
- check the tire pressure, the indicator must correspond to the norm;
- check that the steering wheel is adjusted correctly, i.e. Is it necessary to make the same number of turns of the steering wheel to turn in one direction and the other?
Many people have one question: whether it is necessary to load the car before adjusting the wheel alignment. Some manufacturers, such as BMW, explicitly indicate the need to load the car. At stations, wheel alignment is adjusted with the vehicle equipped, i.e. without passengers, with a filled fuel tank, a set of tools and a spare tire.
Preparation and procedure for adjusting wheel alignment angles of VAZ 2107
Having a level area, balanced equal-sized wheels and tires with the required pressure are far from the only requirements. It is equally important to remove the decorative caps before starting the adjustment and ensure:
- lack of free movement in “running” units;
- permissible play in the steering;
- proper tightening of all connections in the chassis;
- serviceability of the depreciation system.
It is advisable to check and adjust the chassis by first placing 70 kg on each seat and 40 kg in the trunk. However, adjustments can also be made on an empty car. With the steering wheel in the direction of straight-line motion, you should remove all the play in the suspension by shaking each of the four bumpers several times.
The geometry specified by the manufacturer should be installed according to a strictly defined relationship: castor-wheel-alignment.
Causes of wheel misalignment
Camber adjustment may be required not only over time, but also for a number of reasons, these may include:
- forcing high curbs when parking;
- replacing racks;
- driving over bumps and holes;
- replacing tires.
In fact, any technical intervention in the chassis will require adjustment in the future. Manufacturers of the VAZ 2107 recommend adjusting the camber twice a year, when seasonal shoes are changed. Timely adjustment of the wheel alignment will save money and time.
Castor angle: measurement and adjustment
angle The angle between the vertical and the axis of rotation of the wheel when turning the steering wheel, which ensures automatic alignment of the tires due to movement, is 4º±30′ for a loaded car and 3º±30′ for an unloaded car. The angle is measured using specialized templates.
- any adjustment of the caster angle on a VAZ 2107 with your own hands affects the camber and does not actually change the toe-in of the wheels;
- the error in the caster angle between the right and left sides is no more than 30′;
- U-shaped washers must be mounted with the groove down.
The parameter is adjusted by rearranging the washers on the bolts that fix the lower arm relative to its axis (located at the ends of the axis). The angle is increased by installing the washer on the bolt located closer to the interior.
Let's sum it up
You need to set the correct front suspension geometry on a level surface using the following tools:
- Template for determining the castor angle.
- Plumb line and string with hooks.
- Caliper or ruler.
- Bar 28 mm thick.
- Set of keys.
Having adjusted the caster by rearranging the washers, you can begin adjusting the angles of the front wheels in the following sequence: adjusting the camber by adding/removing washers and adjusting the toe by rotating the steering linkages.