Lada 4×4 2121 Niva 1983
- Greetings dear Dromovites. While it was freezing, I decided to tackle a topic that is relevant for winter - the heater))). I decided to radically change everything. After reading the relevant topics on the Nivovod forums, I began to turn my plans into reality. I did everything in a warm basement, it’s warm and light, there is electricity))) So I decided to dismantle the standard heater motor, which I consider ineffective and noisy, and install a “chisel” heater motor in the boot (under the hood). I bought a motor 08 from a disassembly shop for 250 rubles and gave it a revision. I cut the motor into the boot, slightly deforming its upper part. with a hairdryer to close the hood. I removed the damper, it is not really needed. I had in stock the lower heater box (the one where the standard motor is located), I also redid it thoroughly, namely, I cut in bends for heating the legs using plumbing bends with a diameter of 40 at an angle of 30 degrees and inserted them tightly through the adapter cuff 50/40. I fixed the lower part tightly, it will no longer open and heat the radio and panel. I cut central deflectors from a VAZ 2107 into the front part of the box; they can overlap, thereby increasing the flow into the legs and onto the glass. I inserted resistance from the same 8 into the box, now there are three positions (speeds). In the redesigned box, I glued foil insulation so that it warms the interior of the car, and not the plastic.
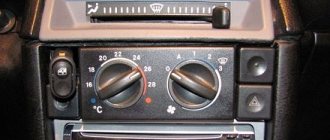
To control the heater, I installed a three-mode switch from a VAZ 2110 on the center console, securing it with a glue gun, a handle from a VAZ 2115 light corrector, cutting out a small triangle in it and installing an LED. I bought a socket for the VAZ 2109 heater damper modes, cut off the excess from it, cut it into the console, and made a backlight. It has become very convenient, and you can see everything, otherwise you used to feel like a mole looking for the button to turn on the stove. Well, today at -12 degrees outside I checked the converted heater. It has become noticeably quieter, the air flow has become stronger, in the first position it blows about the same as in the second with the old motor. It blows where it needs to, the glass, legs, windows are all clean. I can’t say that it has become warmer (you need to make an air flow divider, because the 08 volute blows about 40% of the heater radiator, and with a divider the flow will blow through 90 percent, but I will do this at above-zero temperatures), I didn’t freeze even with the old one. Three of us drove at -30, no one was frozen, and the windows were clean. But still, I’m satisfied with the modernization done, even though it took a long time (many adjustments, especially with the joining of the seven-foot blowers and the motor in the boot). Sorry for the quality of the photos, they are all from the same phone.
Happy New Year, everyone. Health to all of you, your loved ones and your iron friends)))…
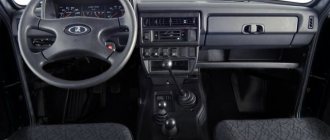
If you are the owner of a Niva-21213 and are in love with this vehicle, then you are unlikely to give it up if you find some technical defects in it. In principle, this is absolutely correct; you can remain faithful to your “iron horse”, and if defects are identified, try to eliminate them yourself.
Niva-21213, indeed, needs some of your intervention; tuning the Niva stove will not be superfluous at all.
In the summer, you won’t be able to notice any inconvenience, but with the onset of cold weather, you definitely won’t be able to do without enhanced wardrobe equipment in the form of cotton pants and a jacket.
The process of refining the heating system
It is useful to note that modification of the VAZ-2121 stove is not accompanied by high problems. Even a car enthusiast who does not have special technical and repair skills can eliminate such technical defects.
In addition, modification of the Niva-2121 stove may involve performing a variety of actions, including the most basic ones.
Heating in your car can be improved by even just slightly upgrading the air ducts. If you want to radically improve the heating system and increase comfort, then, of course, you will have to tinker a little more.
Coordinating the operation of the foot-glass dampers
If you want to coordinate the operation of the two dampers so that the air blows evenly into your head and legs, then you will have to modify the shape of the plastic strip under the upper damper lever. It is necessary to change the shape of the hole to obtain a new trajectory of movement of the leg-front flap. This can be done in various ways:
1.
Using a lighter and a file (photo author):
2.
Using a plastic card (author of the photo):
3.
Using wire:
Both methods of modifying the stove are described in this video:
Will you be modifying the stove on the Chevy Niva? Which method did you choose?
Key words: stove Niva
Share on social networks:
Found an error? Select it and press Ctrl+Enter..
Air duct modernization
Unfortunately, if you carefully examine the air ducts that your Niva is equipped with, you will be horrified at how it was possible to install so many cracks in it. Is it possible to expect good heating with such a design?
The answer, of course, is simple, since all the heated air is dispersed under the dashboard, and the interior is heated according to the residual principle.
However, it’s good when a problem is so easily identified, then solving it is much easier. Upgrading the air duct involves applying silicone glue to all joints.
Be prepared for the fact that performing such actions is sometimes quite difficult, since not all places have unobstructed access. You still have to get used to it and apply silicone glue to all the joints.
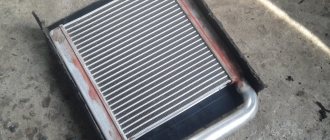
Typical radiator malfunctions
There are two main radiator malfunctions:
- Clogged grille and radiator tubes.
- Radiator leakage.
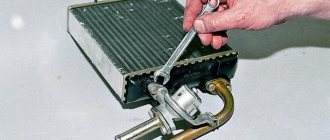
Since the Niva is often operated in difficult road conditions, the likelihood of contamination of the grille from dusty outside air is very high. Clogging of the cells reduces the heat transfer area of the radiator, and as a result leads to a decrease in the heat released from the air ducts into the passenger compartment. In such cases, the stove radiator is dismantled and washed under high pressure.
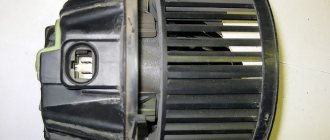
Fan replacement
Experienced car owners recommend not stopping there and continuing to modify the stove by tuning the fan.
Some people suggest getting rid of the fan installed by the manufacturer and installing a figure eight fan instead.
If you also decide to carry out such a replacement, you need to additionally decide whether you will leave the original control of the stove or also replace it with a “eight” analogue.
Having decided on the second option, take care of purchasing the following additional items:
So, after you have completely prepared all the necessary components, you can proceed directly to the process of modifying the fan.
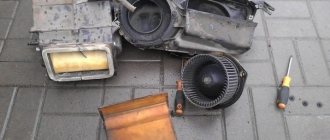
Initially, you should dismantle the old air supply box. Unfortunately, despite the fact that this requires unscrewing only four nuts, it will not be possible to do this without outside help. Your partner will need to hold the screws under the hood while you unscrew them using a wrench.
After this, you can easily remove the air intake. Clean it if it needs it, and then cut away a small amount of the plastic to provide enough space for the new fan to operate.
Install the fan and carefully inspect for anything that may interfere with the operation of the installed fan. If you find such obstacles, carefully cut them off.
Once you are sure that there is nothing else that can prevent the fan from working, secure it with sealant. There are small gaps around the fan nozzle; it is important to eliminate them by covering them with any material. This will prevent warm air from escaping.
Now the assembled fan is being introduced back into the space in which its old counterpart previously “lived”. Everything is securely fastened and the closing and opening of the hood is checked. In some cases, after the introduction of a “foreign” fan, it is not possible to close the hood normally.
If everything is fine, reconnect all wires and install new controls. Upon completion of the work, be sure to check your results in action.
The stove should work perfectly, and warm air should spread very quickly inside the car.
Lada 4×4 3D › Logbook › Minor changes in ventilation and heating of the cabin.
I’ve been meaning to write about the changes that have taken place for a long time, but now the hunting season is closed and I have free time to do it. The first autumn operation in damp conditions immediately revealed shortcomings in the interior ventilation - it simply does not exist. Therefore, after making notes on this matter, the first thing to do was remove the heater and tap all the joints of the air ducts and seal the radiator gaps. By the way, the heater radiator was clean; a cabin filter made of gauze or tights helps. Because There was enough heat in the car and it was enough, it was decided to leave the radiator the same. The central air ducts were completely eliminated as unnecessary; the hole in the air duct under them was sealed with a damper going to them. Subsequent trips showed a slight improvement, but the side windows were still sagging. Then I remembered the UAZ-31519 I had from 2001 to 2006, and so a similar issue was solved on it by installing air outflow valves from the passenger Gazelle. Having disassembled the rear struts in the field, I saw that the valve rubbers were wrapped inside the cabin and did not move, I decided that they were wrapped inward by the external pressure of the air flow. Therefore, it was decided to cover the side holes of the valves with linings. I found the website www.aps163.ru on the Internet and ordered from them with the beautiful name “Interior ventilation linings LADA 4×4 Aero-Effect”, by the way, the website describes them even more beautifully. After installing them, no improvement in ventilation was found, but they are worth the money, the plastic is good quality and made neatly, and another big plus from them is that they come with a nostril on the hood so now it does not clog the heater air intake with snow. By the way, after traveling with the linings already installed, I discovered that the rubber valves were still wrapped inward. Having corrected it and left it overnight in the morning, I discovered that on one side the elastic was treacherously wrapped inward - the valves were not calculated even for wind pressure. He spat on the valve and started asking questions to “Uncle Google” again, etc. and filter responses. But almost everything comes down to installing a heater motor with a snail from a VAZ 2108 in the air intake boot, and after installing it, many experienced a cold snap in the cabin (the old radiator cannot cope with heating many times more air with the new engine), but I love warmth. Moreover, I deeply like the option with a snail from the “eight”, but it requires an integrated approach - this means replacing it with a Shniv radiator, installing a throttle in a small cooling circle and a three-way valve on the heater, or installing an additional pump on the stove; it is recommended to install a Shniv thermostat. With the advent of the crisis, there is not enough finance for a global rework, so I do what is not financially expensive. When I was gluing the air ducts, I was surprised by the size of the air ducts supplying air to the side windows, so it was decided to fix this issue. I ordered side deflectors from grants (unfortunately, they were not useful), I decided to organize the air supply to them from the air distribution zone of the heater to the feet, for this, two pieces of corrugated channel for cables with a diameter of 50 mm were asked from the guys running the Internet in their houses. Because After the New Year, the car was abandoned in the village (so as not to drive it on every hunting trip from the city, and it’s not the main car), there was plenty of time to think about it. The exit from the heater was going to be made from plumbing pipes, then the air was supplied with corrugations to the “Grant” deflectors embedded in place of the original ones. But when I brought the car, the “Grant” deflectors turned out to be too big for the “Nivov” panel, I decided to supply air through the channels for now, and then I’ll pick up a smaller deflector from some car. I removed the lower housing of the heater where the motor is, marked two holes in it near the rear wall for 50-ton plastic outlets (plumbing for sewerage) and cut them out.
Improvement No. 1. We take air from the cabin
The main disadvantage of the Niva heater is that all the air into the heater radiator comes from the street, and when the air intake flap is closed, air circulation and heating stop completely. To eliminate this drawback, I disassembled the heater (I had to drain some of the antifreeze and disconnect the heater radiator pipes), and in the side wall of the heater housing, opposite the wall where the radiator tubes exit, I made a hole in the shape of a rectangular trapezoid. I did it in such a way that there was 1.5-2 mm of the body wall left to the boundaries of the plane in which I made the hole, and 6-8 mm from the side of the stiffener for attaching the petal valve. I made the hole using a drill, marked it, drilled along the contour of the small diameter holes, then connected the holes using a knife, then filed the edges of the resulting hole, giving it its final shape. The area of the resulting hole was approximately 25 square centimeters. It is through this hole, when the heater air intake flap is closed, that air is drawn from the passenger compartment.
spbdc4u.ru
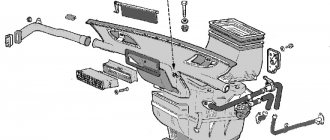
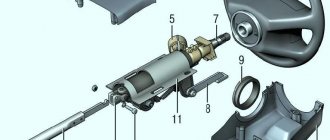
1. Washer jet.2. Tailgate glass washer reservoir.3. Windshield and headlight washer reservoir.4. Sealing gasket.5. Sprayer.6. Jet body.7. Electric motor of the tailgate glass washer pump.8. Electric motor of the windshield washer pump.9. Electric motor of the headlight washer pump.10.
Side nozzle.11. Side nozzle air duct.12. Windshield heating air duct.13. Air supply cover.14. Heater seal.15. Inlet and outlet pipes.16. Crane.17. Radiator.18. Fan impeller.19. Air distribution cover.20. Electric motor mounting.21. Spring fan holder.22.
Crane control rod.23. Control rod for the windshield heating flap.24. control lever bracket.25. Air supply damper control handle.26. Windshield heating flap control handle.27. Crane control handle.28. Air supply cover control rod.29. Central nozzles.30.
Fan motor.31. Rubber valve.32. Air supply box.33. Central nozzle flap.I. Layout of glass washers. II. Windshield and tailgate washer nozzle. III. Reservoir with rear door glass washer pump.IV. Reservoir with windshield and headlight washer pumps.V.
Diagram of the heating system operation.
VI. Car interior heater.
Heating of the interior is provided by air heated in the heater radiator 17, which is included in the engine cooling system parallel to the main radiator.
Outside air enters through the car hood grille into the air supply box 32, located under the hood in the rear part of the front end of the body. Separated from the water by a reflector, the air enters the heater radiator, located in a plastic casing, which is attached with nuts from below to the front panel reinforcement through a sealing gasket.
In the upper part of the casing there is an air supply cover 13, which regulates the amount of air entering the radiator 17. On the right radiator tank, divided inside into two parts by a rubber partition, an outlet pipe 15 and a valve 16 with a supply pipe are bolted. The ends of these pipes are connected by rubber hoses to the engine cooling system.
The air passing through the heater core enters the plastic fan casing, which is attached to the radiator casing with spring clips.
An electric motor 30 with an impeller 18 is installed in the center of the fan casing on two elastic cushions 20.
An additional resistance is attached to the inner wall of the fan casing, which ensures low rotation speed of the electric motor shaft.
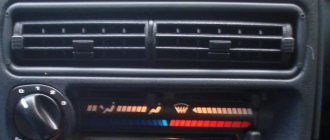
From the fan casing, the air rises through air duct 12 to heat the windshield, through air ducts 11 through nozzles 10 located on the left and right sides of the instrument panel, to heated the windows of the front doors, as well as to the central nozzles 29. An air distribution cover 19 is installed at the bottom of the fan casing, when opened, air is directed to the feet of the driver and passengers.
The heater is controlled by handles 25, 26 and 27 on the instrument panel, levers on the side and central nozzles, the air distribution cover lever and the fan motor switch.
The control handle levers are located on an axis installed in bracket 24, which is secured with two bolts to the cross member of the instrument panel.
Improvement No. 2. Increasing fan performance
I also slightly increased the efficiency of the standard heater fan. The fact is that the gap between the fan blades and the diffuser is about 3 mm, and the width of the diffuser is no more than 15 mm, while the width of the fan blades is more than 30 mm. Therefore, some of the air leaks back between the blades and the diffuser, preventing a large pressure difference from being created between the suction area and the discharge area.
To eliminate these shortcomings, I reduced the gap between the diffuser blades and lengthened the diffuser. I solved these problems by cutting out a strip 30 mm wide and equal to the circumference of the diffuser from an old plastic fender liner 1 mm thick. I inserted the bent end-to-end ring from this strip tightly into the diffuser and “sewed” it to the diffuser with a thin wire through the drilled holes, so that the fan blades did not cling to the strip or wire. Against the blowing windows, the width of the strip is trimmed to 20-25 mm.
According to my estimates, the efficiency of the fan increases by 10-15%, so you don’t have to bother with this problem.
Comprehensive modification of the stove/heater of Niva 4x4 (VAZ 2121, 2131)
Having set out to increase the efficiency of my car's heater, I re-read the available methods on the forums, and realized that these methods have some drawbacks that did not suit me. For example, installing a fan from a VAZ 2108 allows you to increase the air flow through the heater and blower nozzles, but this air is taken from the street, it is icy, and therefore the interior begins to warm up only after the engine has completely warmed up. In addition, this method requires significant modifications to the design of the heater, as well as the cost of purchasing a fan. Next, I’ll tell you how to modify the stove on the Niva with your own hands without investment and in a short time.
Improvement No. 3. Installing the grille on the air intake
When disassembling the heater, a large number of tree leaves and insect remains were found in the air intake casing and in the honeycombs of the heater radiator grille, which also reduced the efficiency of the heater. Therefore, after cleaning and flushing the heater core, I took measures to prevent the radiator from clogging.
To do this, I bent a wire frame to the size of the air intake inlet, covered it with a nylon mesh with a 1x1 mm cell, and installed it at the bottom of the rubber seal of the air intake inlet. It was perfectly fixed there in the fold, like an accordion, without additional fastening.
All work to modify the heater took me about 4 hours of time and did not cost a penny of additional costs. Unfortunately, during work I didn’t think to take a photo, but from the attached drawing and picture everything should be clear. I'm happy with the result, now the stove heats better.