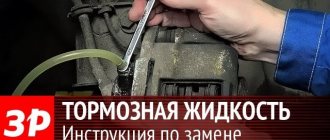
Mono: how to change car brake fluid for one person without assistance
How do you usually change the brake fluid in the brake system?
One gets into the car and presses and releases the brake pedal, then presses it down. The second one at this time unscrews the fitting and releases the emulsion, while releasing air. A person passing by the garage will immediately know what procedure is taking place. It’s not for nothing that the phrases “Hold”, “Download” are heard from there. Is it necessary to look for an assistant if the goal is not to displace air bubbles, but to completely saturate the system with a new working fluid. The answer is no. There is only one way to solve the question of how to replace brake fluid for one person. His goal is to update the composition in the tank and lines without using the help of a partner. The features of this method are similar to bleeding the brakes:
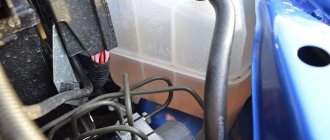
- To speed up the process, it is recommended to immediately remove the working emulsion from the expansion tank using a bulb or a syringe with a tube attached.
- The preparatory stage consists of purchasing 1 liter of brake fluid and a 1 meter long tube, suitable in diameter to the outlet fittings on the brake cylinders. You will also need a cut-off bottle with a certain amount of working fluid so that air does not pass through the fitting into the system.
- During the process of replacement/pumping, the composition gradually leaves the tank. The level must be replenished regularly, otherwise the system will become airy.
Process technology
The essence of the replacement is the flow of the working fluid under the influence of gravity. After all, the tank is at the highest point. In fact, the operation is no more difficult than checking the injectors of a diesel or gasoline engine. As a result, the set of actions is as follows:
- Empty the expansion tank and fill it with new fluid up to the MAX limit mark.
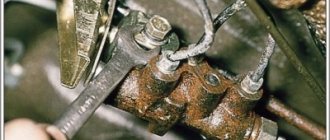
- Clean all 4 drain fittings and install tubes on them. Place the latter in plastic containers with “brake fluid”.
- Unscrew all the drain fitting nuts one by one: right rear;
- left rear;
- right front;
- left front.
- front left;
Leveling up
The method is relevant if there is no air in the deceleration system. If there are air bubbles in the unit, the emulsion will not drain under the influence of gravity. Excessive pressure is required to bleed it off - just like in production. In this case, replacing the composition comes down to bleeding the brakes:
- Clean the fitting and put a tube on it, lowered into the brake fluid.
- Create pressure in the retarding system.
- Unscrew the union nut and wait until the liquid pressure decreases to low.
- Close the fitting.
- Repeat until liquid comes out without bubbles.
Excessive pressure in the system can be created in several ways:
- Find an assistant or pump the brake pedal yourself and press it with a gas stop from the hood/trunk installed between it and the seat.
- Insert the syringe with the emulsion into the lid of the tank and seal it. Having opened the fitting, press the syringe pusher.
- Install the car nipple into the cover. Seal with sealant or superglue. Remove the nipple and install the tube. Install the opposite end of the hose onto the quick-release tip of the pump. Take excess pressure from the spare tire. You can do it even simpler - apply pressure from the compressor to the spool.
The procedure is repeated until the result is achieved, as indicated by the absence of air in the system. You can bleed the system yourself according to the following scheme:
- Right rear.
- Front left.
- Rear left.
- Front right.
Clutch hose repair method
Experts say one of the common reasons why clutch brake fluid has leaked is a damaged hose through which fluid circulates from the reservoir to the clutch.
Effective replacement tips:
- You need to remove the tank itself by removing the clamp from below.
- You should purchase a new hose, preferably red.
- You need to pull out the damaged hose carefully so as not to accidentally break off the plastic fitting.
It is important not to allow fluid to leak onto the fender or paint. After removing the tank, you should rinse it with water; it is also recommended to replace the clamps. We install the hose and tighten it without much effort. Don't forget to tighten the nuts as well.
Experts say that the hose often wears out. It must be checked periodically and, if damage is detected, replaced with a new one.
Where to dig: the brake pedal on a car fails and the brake fluid does not leave the reservoir
The fear of a sunken pedal often occurs among beginners. After all, they don’t really know the design of this unit. Meanwhile, there is nothing to be afraid of if the vacuum amplifier comes into operation. Usually he does this after starting the engine. If you press on the lever at this moment, it will fail when you start the engine, and it will instantly become easier to operate.
It's worth sounding the alarm when a running power plant exhibits a malfunction in the form of the brake pedal sinking and the brake fluid not leaving the reservoir anywhere. If she had left, the diagnosis would have been made immediately - a leak in the system.
However, the problem posed is known to all mechanics. Its essence is that there is air in the system. It is not recommended to ignore the symptom. It is better to immediately stop using the car or, if this happened in the garage, not to leave. In this case, you should take into account the rules. According to them, towing a car with an automatic transmission or robot, and in this case with a manual transmission is also prohibited - it is impossible to slow down. A tow truck with a full or partial load is the only option to get to the service station or home.
For your information. Another sign of the presence of air bubbles in the line is that the pedal sinks, but after several presses the tight motion is restored. This means that the node has been temporarily rehabilitated and is ready to complete this cycle in good order.
The way to solve the problem is to bleed the system. The process has already been described and is quite feasible at home. In technology, it is important to follow the schematic. It wouldn’t hurt to repeat the pumping scheme 3-5 times.
Often, when a pedal fails, the ABS system is blamed. However, this is erroneous - it does not affect the initial operation of the deceleration unit. You can simply check this yourself by deactivating the ABS and driving in a safe area. The conclusion of the test drive will be negative - the problem will not go away.
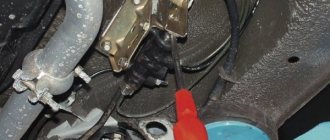
Brake cylinder leak
A common cause of brake fluid loss is a leaking cylinder. The occurrence of a problem is judged by the stain left under the vehicle. Finding out the reason is easy.
- You will have to remove the wheel and carefully inspect the brake disc.
- The calipers should be checked for leaks.
If you have a brake drum system, there is an urgent need to remove the drums. The problem involves wear of the rubber seals. Especially often, such troubles await residents of regions with severe frosts.
Problem: after replacing the brake fluid on the car, the pedal became soft and uninformative
By changing the brake fluid, the car enthusiast fulfills one of the requirements of routine maintenance on the car. Namely, replace the fluid after two to three years. The manufacturer confidently states that if this is not done, it will be bad. In fact, the emulsion is hygroscopic and can “grab” moisture from the air during this time. Of course, this will negatively affect the functioning of the system as a whole.
Safety comes first - we change. We fueled everything up, tightened it up, started it up and drove off. And then we notice that after replacing the brake fluid, the pedal became soft and uninformative. What to do? There are several reasons for this problem floating around the web:
- The system is filled with low-quality components.
- The replaced elements of the assembly did not get used.
- The system is poorly pumped.
The first feature is more often a myth than a reality. The second one can appear when replacing the pads due to the fact that they have not gotten used to the disk and are pressed into the grooves of the groove. There are two ways out - wait 900-1,000 km until everything breaks in or sharpen the discs to get an instant effect. However, most often the problem of a soft pedal is associated with other problems:
- The main brake cylinder is not bled.
- The brake force distributor between the rear and the front is not pumped (sorcerer) - this does not apply to all cars.
- One of the components of the assembly is leaking (fuel fluid will leave the tank).
- One of the rubber hoses is inflated.
First aid when a crack is detected
The reasons why brake fluid leaves the reservoir can be different. This may occur as a result of the machine hitting an obstacle. The car service is far away - what should I do? Repairing a crack in the path is only possible to continue moving. Upon arrival at your destination, you will have to purchase a new tank. Glue doesn't help in most cases. Craftsmen recommend using a regular 40-watt soldering iron, slightly extending the rod and slightly loosening the top screw. A piece of plastic tape similar to the body of the tank is cut off. It is unsoldered and used as a patch. First you need to go over the crack with a soldering iron, then use a strip of prepared plastic.
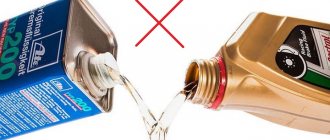
Is it possible to add brake fluid from another manufacturer or brand to the reservoir?
Going to buy 1 liter of TJ – it would seem that there’s nothing special about it. I came to the store, ordered, paid and went to the garage with a satisfied look. This was the case before, when out of all the auto chemical enterprises there was only one in the news - the Dzerzhinsky plant. Nowadays, you can not only easily confuse diesel and gasoline oil, but also the composition of the braking system. After all, in the market, even experts sometimes get their eyes wide open. Here you have Rosdot, and Sintec, and a bunch of other similar names.
What will an unscrupulous driver do? He’ll take any one and go with the idea of quickly resolving the issue. Motorists are rushing to warn against such indifference. The mixing operation is, of course, permissible, and the manufacturer even indicates with what compounds his product can be used. The question is whether it is possible to add brake fluid of another brand when the consumer is not aware of the origin of the emulsion already filled.
Undoubtedly, the code for the current composition can be found in the instruction manual. What if it is lost, or the car is bought secondhand? In general, if the situation is unclear, it is recommended to completely change the working fluid. What you definitely shouldn’t do is pour in TF with a low boiling point. Dangerous.
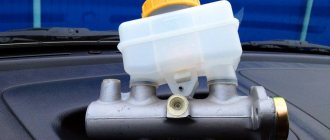
How to check the fuel fluid level?
By looking under the hood, where a special tank is located, you can check the level. The tank is made of translucent plastic, so it is easy to determine by the minimum and maximum value marks whether the brake fluid has left or remains in the original amount. In case of topping up, it is better to familiarize yourself with the car's instructions in detail: in some brands that have ABS, bleeding of the brakes is required.
If you do lose brake fluid, you should first understand the reasons. Under no circumstances should you continue driving.
Verdict
- A sagging brake pedal with a constant fluid level is a clear sign of an airy system.
- It is possible to replace the brake compound yourself. It is enough to open all drain fittings and monitor the levels in the bottles and expansion tank. After draining 200 ml of emulsion from the front left caliper, the drain fittings are closed and the change process is considered complete. However, there are subtleties of the process.
- If after replacing the TJ the pedal becomes soft, it means the system is poorly pumped or the pads are not ground in. There may be minor leaks or problems in the hoses.
- Mixing different mixtures is allowed if they are compatible, as indicated on the packaging. If there is no information about what is poured, it is not recommended to interfere.
About the consequences
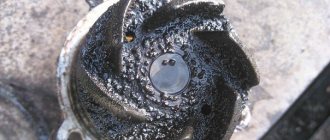
There can be many answers to the question of where the brake fluid goes from the reservoir. It can go into the vacuum muffler. This indicates a high percentage of wear on the master cylinder piston cuff. For simple rubber there is nothing terrible about this. Another issue is the accumulation of the product in the form of a dangling layer. This will result in an increase in resistance at high diaphragm speeds. There is an opinion that such a situation simply kills the diaphragm. By changing the cuff, movement will become safe. Sometimes you have to install a repair kit while disassembling the vacuum unit.
Oil in the pan and vacuum brake booster (VUT)
Oil in the pan and vacuum brake booster (VUT)
Post by aal » 09 Sep 2010, 13:13
It is proposed to discuss the following design problem of the VAZ-21213 and ways to eliminate it.
It is clear that VAZ engines have a bad, very simple oil separator in the crankcase ventilation path. It is enough to compare it with the labyrinth structures in other motors. Therefore, oil appears in the intake tract quite early, when the engine and rings are in completely solid condition. https://www.niva4x4.ru/viewtopic.php?t=12037
Countless vacuum booster failures have been known. Usually associated with poor quality of VUT. https://www.niva4x4.ru/viewtopic.php?t=2499
It is clear that when faced with dilemmas with VUT, not many people waste time opening it and accurately diagnosing it. The unit is considered non-separable; usually it is completely replaced.
Assumption: the usual prerequisite for failure of the VUT is the gradual accumulation of oil from the intake tract in it. This oil accumulates in the lower part of the housing, causing the non-oil-resistant rubber membrane to swell, a fold to appear on the perimeter of the membrane, and air leakage begins. Yes, naturally, I was not too lazy to open the faulty amplifier.
The amount of oil doesn't really matter. It is enough to accumulate a couple of teaspoons over a year so that during this period of time the shape of the edge of the membrane is disrupted.
The essence of the matter, as I understand it, lies in the combination of two design flaws in the punishment. Firstly, the already mentioned ineffective oil separator in the engine. Secondly, the critical part in the brake system unit, directly connected to the intake tract, is made of ordinary non-oil-resistant rubber.
We cannot change materials at VUT. But there must be ways to reliably protect VUT from oil. It is proposed to discuss them. There are only three places of protection.
1. The most reliable: an additional oil separator directly in the VUT hose. From what? Option: an ordinary transparent plastic filter for narrow fuel cleaning, with constant inspection and replacement.
2. Installing an oil separator in a narrow crankcase ventilation tube. At the moment, as I understand it, there is absolutely no oil separator in this channel. In addition, oil is supplied to the intake tract through it without visible traces in the carburetor.
3. Improvement of the standard “glass” and installation of an additional can in a thick ventilation tube. There is nothing to discuss here, the recipes are known.
Source: www.niva-club.net
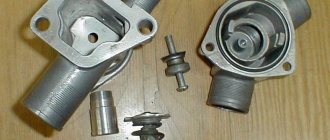
Signs of a faulty vacuum brake booster
The main factor in the malfunction of the vacuum brake booster is considered to be its complete or partial inability to create a vacuum in the working chamber. A possible source of difficulty is a break or depressurization of the connection of the hose connecting the engine intake manifold and the amplifier.
Interference in the operation of the unit is also caused by deficiencies located inside the amplifier - due to a violation of the integrity of the working surface of the diaphragm or loss of elasticity by the valve. In order to find faults in the vacuum brake booster, certain tests are carried out.
When does the need arise?
The brakes need bleeding if there is interference with the system design, namely:
- Tubes and hoses are being replaced.
- The brake fluid is changed.
- New calipers are installed on the front wheels.
- New cylinders are mounted on the rear axle.
- The master cylinder is being replaced.
In other words, bleeding is necessary if there has been a leak in the system. Before bleeding the brakes on the Niva, you should prepare the car for this procedure. First you need to loosen all the bleeder fittings. To do this, you need to use a special key at “8”. It is best to carry out all work on an overpass or inspection pit.
Main device malfunctions
There are not so many types of vacuum seal failures, but specifically:
- Loss of density of the pipeline through which the vacuum is supplied, or its connection points;
- Failure of the check valve;
- Depressurization of the working chambers of the amplifier.
The first two faults are the main ones, but the third occurs very rarely.
It should also be noted that in most cars the vacuum pump operates from the vacuum created in the intake manifold (they are connected by a pipeline).
But on some models, the amplifier is additionally equipped with a vacuum pump to increase operating efficiency. Moreover, this element can be either mechanical (driven by a camshaft) or electronic, with its own electric motor.
But these pumps are only an auxiliary element that increases the efficiency of the amplifier. With all this, the main vacuum is still taken from the intake manifold.
In cars equipped with this unit, the pump is another component that may become unusable. With all this, the amplifier will continue to work, although in certain driving modes the force on the pedal will increase.