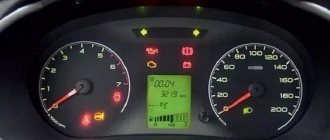
Indication symbols
As you know, all the lights on the control panel come on when the ignition is turned on, and then, when the engine is already running, most of them go out. But when one remains on or blinks, this cannot but be alarming, because not everyone can immediately figure out what malfunctions this indicates, which of the systems needs urgent repairs.
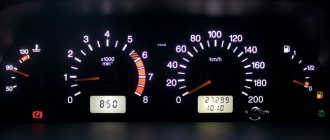
Let's look at the designations of the instrument panel of the VAZ 2110. You should know that regardless of whether the panel is new or old on your car, the designations are almost the same, but the indicators may be located slightly differently.
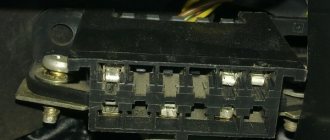
Before deciding to upgrade the instrument panel, it is recommended to understand its pinout. Details:
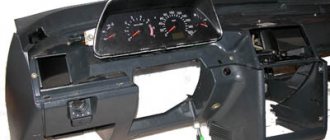
Instrument panel VAZ 2110
INSTALLATION OF READY TUNING DEVICES ON A VAZ-2107
As mentioned earlier, specialized stores and service centers sell a large number of ready-made kits for tuning the VAZ-2107 panel. The configuration, dimensions and connectors of finished electrical appliances intended for modernization are practically no different from the analogues installed on the standard version.
The work is not a particularly complicated process: it is almost impossible to mix up the connection points, all connectors differ in shape and simply do not fit into places not intended for them.
The only nuance regarding tuning the tidy using a ready-made kit is the procedure for installing the speedometer cable. The standard device provides for its free installation with a certain amount of play - the braid allows you to freely remove the element, moving it towards the car's interior. During dismantling, the cable may come out of the coupling with the speedometer drive on the gearbox, as a result of which the latter element simply will not function. Before fastening the nut, you should carefully inspect the position of the cable and make sure it is in good condition.
Top part
So let's start from left to right. First, the top part of the control panel:
- Side scale from 50 to 130 and arrow. Shows the temperature of antifreeze (antifreeze) in the engine cooling system;
- Almost round scale (0 – 80) and arrow. Tachometer showing engine speed;
- Two arrows at the top, almost in the middle of the control panel - turn signals (right, left);
- Speedometer. Well, this device, probably everyone knows, shows the speed at which the car is moving;
- A side scale with an arrow and, most often, two images of a filling column (white and red). Instead of a red column there may be a yellow light. This is an indicator of the fuel level in the tank. If the red column (yellow light) lights up, it means that there is very little fuel left in the tank - no more than 7 liters, urgent refueling is required.
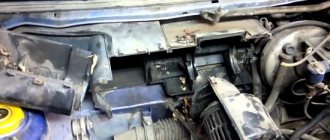
Dismantling instructions
Let's briefly consider the process of dismantling the dashboard using the example of a car of the ninth model:
- First of all, the hood opens and the battery is disconnected.
- Next, there are two screws on the top of the shield trim; they should be unscrewed.
- Then the lining itself is dismantled.
- Now work is being done on the shield. The device is removed from the seat, all wires leading to it are disconnected.
- The device is removed from the installation site, diagnostic equipment is used to check it, and if necessary, repairs are carried out. Further installation is carried out in the reverse order (the author of the video about removing the tidy is the In the Garage channel).
Bottom part
Let's look at the indicators at the bottom of the control panel. If they don’t light up, it means the machine is working normally, and when any of them lights up, this indicates a malfunction in certain components. Most often, this is a signal that repairs are needed, and the sooner the better. From left to right:
- The indicator on the far left at the bottom is the air damper light (if you have a carburetor engine);
- Icon in the form of an oil can. If this light comes on, it means there is insufficient oil pressure in the engine. An alarming signal. You need to stop, find the reason;
- A round icon with the letter P inside on the control panel indicates that you have the parking brake on, which, as you know, should be turned off when moving away;
- Indicator of a fault related to the generator or battery (a symbolic image of the battery is shown on the indicator). Perhaps the battery is not charging from the generator, there is an open circuit, or the generator belt is loose or broken. In any case, your intervention and repairs are needed, otherwise troubles cannot be avoided;
- If the engine is running and the Check Engine indicator is on on the control panel, this is the most unpleasant thing for the driver, since it indicates serious malfunctions in the engine. In general, when this indicator lights up, it is recommended to stop driving and turn off the engine. Most likely it needs repairs;
- Typically there is a red triangle above the Check Engine. It lights up when the “hazard light” is on - an emergency signal sign;
- The headlight light indicates that the high beam is on. Designed to control headlights: when an oncoming car appears, do not forget to switch to low beam;
- A very important indication icon on the front panel (in a red circle) is a signal that there is not enough brake fluid. Perhaps it is leaking somewhere, which it is advisable to find out as soon as possible and, if necessary, carry out urgent repairs and replenish the level;
- The icon of a burning light is a control for turning on the dimensions;
- In addition to the indicated lights, the front control panel has time indicators (and a button for setting hours and minutes) as well as a display that shows the total and daily mileage. On the new panel, this display may be narrow.
Decoding of car error codes is presented in this material:
Tuning ideas
There are several tuning options for the dashboard of VAZ cars:
- Installation of a new, modernized dashboard. The range of such devices on the modern market is quite large - consumers are offered many different options for control panels, differing in price and characteristics. As a rule, these are digital devices. The difficulty of this method is that the car owner will have to redo the connectors for connecting the dashboard, and it is also possible that changes will have to be made to the firmware of the control unit.
- Using overlays. One of the most popular and simple types of tuning. In this case, the overlays are mounted on top of the existing instrument scale - instead of the standard scales of the speedometer, tachometer, temperature sensor, gasoline level, etc. Installing the trim involves dismantling the tidy, as well as removing the arrows from the scale. You can purchase such overlays without any problems on the Internet, and if necessary, you can even download them from the Internet.
- Using LEDs. This option is one of the simplest in terms of execution. Its essence lies in removing factory lamps and installing brighter and more beautiful LED light sources instead. Such a simple upgrade will significantly improve the appearance of the control panel, as well as increase its illumination. But you need to understand that there should be enough light, since bright tidy can distract the attention of the motorist. There should be no problems with replacing lamps; they are simply dismantled and new ones are installed in their place. But if you decide to use an LED strip, then you need to take into account that it will have to be soldered to the board, in this case you need to be more careful and attentive.
- Shield trim. This type of tuning can be classified as external, since it will only affect the appearance of the instrument shell. Its implementation is relevant if the shield is worn out or has damage.
Loading …
Additional panel
The additional front panel of the new-style BSK control has indicators:
- An oil can is shown. If the light works, check the oil level;
- An icon lights up, which, with some imagination, can be “identified” as working wipers. This indicates that there is not enough windshield washer fluid in the tank;
- Conventional image of a thermometer over a container with liquid - high temperature of antifreeze;
- A crossed out light, which the arrow points to, is a sign that the brake light or parking lights are not working;
- If the light with the image of a wheel with brake pads lights up, it is quite possible that the pads are worn out and require replacement;
- The sign of a man with a seat belt indicates that the seat belt should be fastened.
Panel BSK VAZ 2110
Radio tape recorder
No upgrade of the “six” is complete without installing a speaker system or at least a simple radio. A standard place for a radio receiver in the beard of a small-sized “six”. It should be trimmed to standard 1DIN. This can be done with a metal file. Then sand the edges with sandpaper.
Installing a radio
The radio tape recorder is attached to the beard using a metal case. Radio installation steps:
- Having bent all the tabs, use special spatulas to remove the radio from the case.
- The metal base is inserted into the prepared hole.
- We fix it using special tongues.
- Then carefully insert the radio unit itself, which should snap into place.
Cables are included to connect the player. The most commonly used are:
- black - “earth”;
- red and yellow (often wound together) - ignition “+”;
- blue - power for the active antenna;
- white - front left (FL) speaker;
- gray - front right (FR) speaker;
- green - rear left (RL) speaker;
- purple - right rear (RR) speaker.
You can connect the radio to the ignition switch to the free INT terminal. Then it will only work when the engine is running and the ignition is on. This connection scheme will protect forgetful car owners from completely draining the battery.
If you twist the red and yellow wires together, the radio will no longer depend on the ignition. You can listen to music with the ignition off too.
The standard connection diagram is usually glued to the cassette player
Typically, a connection manual comes with the audio system. Following the instructions and color scheme, installing audio equipment in the “classic” will not be difficult.
Speaker installation
A good place to place the speakers would be the front door panels. If you choose the right size speakers, they will fit here very well. To install, perform the following steps:
- Remove the trim from the doors.
- On the casing we cut a hole for the speaker. A hole of the required size can be made using a template. To do this, trace the speaker on paper. You need to work carefully so as not to miss the size.
- We attach the column and screw it to the casing using the fastening that comes with the kit.
- We carefully lay the wires in the cavity of the doors so that they do not sag or fall out.
- We install the casing in place.
To give a finished look, the door cards are covered with leatherette, and a protective grille is installed on the speaker.
Additional speakers are placed on the dashboard or on the side pillars of the windshield.
For better sound distribution, high-frequency speakers are installed at the head level of the driver and passenger
If the car owner changes the entire beard, creating it himself to his own size, then he can place a 2DIN radio in it. A player with a large screen will add charm to the appearance of the car.
If the car has a 2DIN radio, then you can connect the rear view camera to it
Some craftsmen insert speakers instead of air ducts. But from personal experience I know that the standard “six” torpedo does not have side window blowing. In humid and cold weather, windows fog up and freeze. If you remove the air ducts for the windshield, the airflow will worsen even more. Therefore, I do not recommend this installation of speakers.