It is a fairly common saying that a car is the world of its owner. Therefore, as soon as they buy a car, everyone tries to change it. Some strive to improve, others to make individual. But these changes will immediately show who is the boss. Moreover, by the appearance of the car you can tell a lot about the owner. More precisely about his interests, preferences, etc.
There are many ways to accomplish your plans. Today, VAZ-2112 tuning is actively used. It is mainly carried out by specialists. To do this, they have everything they need: tools, equipment, and, of course, skills and experience. But, as practice shows, you can do tuning yourself. This procedure is not the most difficult. Before you start work, you need to prepare. As a result, the result of the work will be in no way inferior to professionals, and will be more valuable, since you will put a piece of your soul into your car.
Improved dashboard lighting
The VAZ 2112 dashboards have always had one problem: dim lighting. This was especially noticeable at night. So the first thing tuning enthusiasts do is change the light bulbs in the instrument panel. Initially, there are simple and extremely weak incandescent lamps. They are being replaced by white LEDs, which have two advantages: some are durable and economical. Here's what you'll need to get started:
- 8 white LEDs;
- medium sized flathead screwdriver.
Sequence of operations
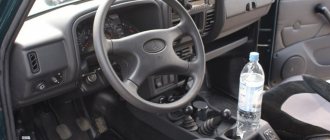
To remove incandescent lamps from the VAZ 2112 instrument unit, you will have to unscrew it and pull it out.
- The steering wheel moves down all the way.
- Above the dashboard there is a visor into which a pair of screws are screwed. They are removed using a screwdriver.
The location of the screws holding the panel is shown by arrows - The visor is pulled out from the panel. To do this, you need to slightly push it towards you, and then pull it forward and up.
- Under the visor there are 2 more screws, which are unscrewed with the same screwdriver.
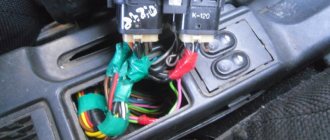
- The block with instruments is removed from the niche. The wires located on the rear wall of the unit are disconnected. There are also light bulbs there. They are unscrewed and previously prepared LEDs are installed in their place.
Light bulbs are unscrewed from the printed circuit board by hand, their location is shown by arrows - The wires are connected to the block, it is installed in a niche and screwed together with a decorative visor.
Video: removing the instrument panel on a VAZ 2112
Engine
There are many modifications to the VAZ 2110 engine to improve its performance. A list of engine changes that tuning enthusiasts can do with their own hands:
- A zero resistance filter is installed in the engine.
- Changes are being made to the fuel supply system to the engine. For example, jets are installed - dispensers that control the amount of incoming fuel.
- A larger diameter throttle valve is installed in the intake system to increase the volume of air supplied.
- The receiver is being modified.
- Direct-flow exhaust is installed. This procedure is considered one of the most common modifications performed by car tuning enthusiasts.
- Various manipulations are performed with the cylinder block. For example, new camshafts are installed.
- The engine cooling system is tuned to obtain a cold intake effect.
Panel modernization
The appearance of the dashboard on the very first Twelves was very far from ideal. In 2006, AvtoVAZ engineers tried to correct this situation and began installing “European”-style panels on these cars. And today, owners of old cars are modernizing their cars by installing Europanels on them.
Europanels began to be installed on the VAZ 2112 only in 2006
Sequence of work
To remove the panel you only need a couple of tools: a knife and a Phillips screwdriver.
- The instrument unit is removed along with the decorative visor as described above.
- The car glove compartment opens. There are 3 self-tapping screws inside; they are unscrewed with a Phillips screwdriver.
To remove the VAZ 2112 panel, you only need a knife and a screwdriver - There are 4 plugs located near the central control unit. They are pryed with a knife and removed. The screws located under them are unscrewed.
- The safety block opens. Inside there are 2 self-tapping screws. They also get out.
- The old dashboard trim has been removed from its fasteners. All that remains is to remove it by pulling it towards you and up.
- The removed trim is replaced with a new europanel, the fastening screws are returned to their places (all the mounting holes for the old and new trims match, so there will be no problems).
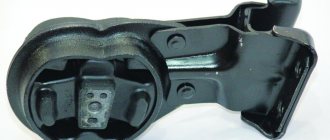
An exhaust manifold
This system is designed to improve the release of exhaust gases. People call this system “spider”, and there can be mainly two options: “4-1”, “4-2-1”.
Three types of collectors
It is advisable to install the exhaust system after working with the gas distribution mechanism, pistons, “nulevik” or chip tuning. Single-purpose installation of this system will not bring the desired results.
Ceiling covering
The material from which the ceiling covering in the VAZ 2112 is made gets dirty very quickly. Over time, a dark spot appears on the ceiling, directly above the driver's seat. Similar spots appear above the heads of passengers (but, as a rule, later). Re-upholstering the ceiling covering on your own is not an easy task. But finding a reupholstery specialist is not easy, plus his services are not cheap. So VAZ 2112 owners do it simpler and simply paint the ceilings of their cars using universal paint in spray cans (to paint the ceiling of a “two-wheeler” you need 6 of them).
Sequence of work
Painting the ceiling directly in the salon is not an option. First, the coating must be dismantled.
- The ceiling covering in the VAZ 2112 is held on by 10 screws and 13 plastic latches located around the perimeter. To remove the screws, use a Phillips screwdriver. The latches are opened manually.
The material of the ceiling covering on the VAZ 2112 gets dirty very quickly - The removed covering is removed from the passenger compartment through one of the rear doors (to do this, the covering will have to be slightly bent).
- The selected paint is sprayed from a can onto the ceiling covering (no preliminary primer is required - the universal paint is well absorbed into the material).
- After painting, the ceiling needs to be dried. It takes 6-8 days for the smell to completely disappear. Drying is carried out only in the open air.
The coating needs to be dried in the open air for 6–7 days. - The dried coating is installed back into the interior.
External tuning of the twelfth
Dealing with the rounded shapes of VAZs, starting with the tenth model, is much more pleasant than with chopped “chisels”. But on the other hand, this is a higher level, since working with a “curved ruler” is much more difficult than with straight edges and planes. However, today it is possible to delegate all this complex drawing to developers who work for numerous tuning companies.
So, today the following are available for tuning the VAZ 2112:
- aerodynamic bumpers;
- aerodynamic thresholds;
- window deflectors;
- alternative optics;
- spoilers;
- door trims and moldings.
The VAZ 2112's aerodynamics are better than previous models. This is a fairly streamlined car, but there is still a large flow of air under the bottom, which at high speeds is capable of generating lift. For those who like to drive fast, it is better to install an aerodynamic spoiler that will cut off oncoming air masses, but it will no longer be possible to take high curbs.
The tuning bumper makes the “face” of the 12th Lada more fashionable and interesting. But without support from the sills and rear body kit, it will look lonely and ridiculous. It is better if the entire body kit in a circle is from one set. Preference should be given to products not lower than the average price.
Like all front-wheel drive Ladas, the model in question (112) could use a spoiler. Moreover, in this case it performs its direct function - it presses the rear of the car to the road at high speeds. And this is very useful, because the rear axle of the twelfth model is underloaded, since, in fact, there is no rear axle.
As for various fake air intakes, they worsen aerodynamics, increasing windage. If, of course, sports styling is performed on the twelfth, then you can’t live without them, but their number should be minimized. Truly sports cars are equipped with functioning air intakes, and their placement is determined not by aesthetics, but by technical feasibility.
The VAZ factory palette is as modest as the price tag. Tolyatti cars are literally transformed after being painted with metallic and other spectacular paints. When performing tuning, you can use two colors or a color transition (a very effective painting option). Or you can apply airbrushing that suits the style of this car.
Noise insulation
The interior of the VAZ 2112 has always been characterized by a high noise level. Here's what is used to improve sound insulation:
- vibroplast. From the name of the material it is clear that its main purpose is vibration damping. It looks like thick rubber. Used to insulate metal surfaces;
- isolon. Another material that is always used in combination with vibroplast (the thickness of the isolon sheets should be at least 7 mm, and it is better to buy it in construction stores, not in automobile stores);
- foam rubber 2 cm thick;
- can of construction mastic;
- bottle of white spirit.
Sequencing
First, the interior of the VAZ 2112 is completely disassembled. Almost everything can be removed: seats, dashboard, steering wheel. Then all surfaces are cleaned of dirt and dust.
Before installing sound insulation, you will have to remove almost everything from the interior
- Glue is prepared using construction mastic. White spirit is added to the mastic with constant stirring. The composition should be viscous and resemble honey in consistency.
- All metal surfaces of the interior are covered with vibroplast (it is most convenient to apply mastic to this material with a small paint brush). First, the space under the instrument panel is covered with material, then the doors are covered, and only after that the floor is covered.
- The second stage is laying the isolon, which is secured with the same mastic-based glue.
- After the isolon there is a layer of foam rubber. For it, either universal glue or “liquid nails” are used (the latter option is preferable because it is cheaper). Foam rubber is used to cover the area under the dashboard and doors. This material cannot be laid on the floor, as passengers will quickly crush it under their feet. It will become thinner and will not interfere with the passage of sound.
Replacing the steering wheel
Here's what's required to replace the steering wheel on a VAZ 2112:
- large flat screwdriver;
- socket head 22;
- new steering wheel.
Sequence of work
The first step is to get rid of the decorative trim on the steering wheel. It is most convenient to pry it off with a thin knife.
- The horn switch is attached to three self-tapping screws. They should be unscrewed using a large screwdriver.
- There is a 22 nut under the panel. It is most convenient to unscrew it with a socket head on a long wrench.
It is convenient to unscrew the nut 22 using a socket head on a long wrench - The steering wheel can now be removed and replaced with a new one.
After unscrewing the central nut, the steering wheel can be easily removed
Suspension
Often the object of tuning on the VAZ 2110 and related cars is the suspension. The following manipulations are performed with this VAZ design element:
- Lowering the car. Despite the possibility of purchasing new lowered springs, many owners of the “ten” prefer to limit themselves to shortening the factory units, sawing off several turns from them.
- Installation of helical suspension and adjustable shock absorbers - coilovers. Such a suspension has a high price, however, making coilovers with your own hands is difficult if you lack experience.
- To increase the stiffness of the springs and increase the ground clearance of the car, interturn spacers - buffers - are installed.
- To give the “ten” an extravagant look, wheels with a negative camber angle are installed.
- Manufacturing of independent rear or front suspension.
Despite the ban on most of these modifications, tuning enthusiasts make the following changes to the car’s braking system:
- installation of rear disc brakes;
- installation of multi-colored pads on the caliper;
- installation of brake pads with a modified appearance.
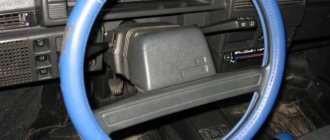
Replacing the braid on the steering wheel
The standard braid on the VAZ 2112 is made of leatherette, the surface of which seems too smooth to many. The steering wheel simply slips out of your hands, which is very dangerous when driving. Therefore, almost all owners of “dvenashki” change the standard braids for something more suitable. There is now a huge selection of braids in spare parts stores. The steering wheel of the VAZ 2112 requires a braid of size “M”. It is put on the steering wheel and sewn along the edges with ordinary nylon thread.
Clamp needles and nylon threads are used to sew the braid together.
About replacing seats
The seats on the VAZ 2112 cannot be called comfortable. This is especially noticeable on long trips. So, at the first opportunity, drivers put seats from other cars on the “two-wheeler.” As a rule, Skoda Octavia acts as a “seat donor”.
Skoda Octavia is the most popular “seat donor” for the VAZ 2112
It is impossible to install the seats from this car on a VAZ 2112 in the garage, since serious adjustment of the fasteners and welding are required. There is only one option: use the services of specialists with the appropriate equipment.
Photo gallery: tuned VAZ 2112 salons
Interior tuning is done in contrasting red and black colors
The red braid of the steering wheel and the red seats are clearly from another car.
The steering wheel on this “two-wheeler” is small, and the interior is trimmed with leatherette
The white trim of the seats looks interesting, but the practical benefits of such a solution are very doubtful
The dashboard of the VAZ 2112 is trimmed with brown leatherette, the steering wheel is sporty
A very successful combination of two colors and a non-standard steering wheel shape
This VAZ 2112 car owner decided not to skimp on the interior and trimmed the seats in leather
Floor lighting in the VAZ 2112 is a rather rare occurrence
The owner of this “twin” is clearly partial to the color blue
This car has a new europanel installed in combination with a non-standard leather-wrapped steering wheel.
The car owner is quite capable of making the interior of the VAZ 2121 a little more comfortable and reducing the noise level in it. But any improvement is good in moderation. Otherwise, the car may turn into a laughing stock.
Do-it-yourself tuning VAZ 2111 photo and video examples
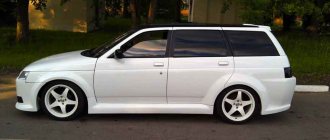
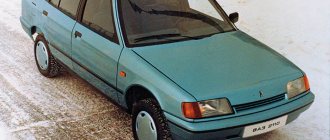
VAZ 2111, created on the basis of the popular sedan VAZ 2110 #8212, is a front-wheel drive station wagon, which has become widespread mainly due to its practicality. Buyers of such a car are primarily concerned with its performance characteristics, and not its appearance, so a Lada 111 in tuning is a rather rare sight. All the better for the owners of the 11th model, because their efforts to modernize the car will not go unnoticed.
The technical side of tuning the VAZ 2111 has been worked out quite well, because in this matter you can fully use the modernization techniques of the same “tens”. You can easily select suspension parts to reduce or increase ground clearance, buy everything you need to increase engine power, improve the exhaust system, etc.
Not everything is so simple with changing the appearance of the car, however, the range of industrially produced aerodynamic kits for this station wagon includes about ten options. In addition, you can add the desired touches to the appearance of the car by purchasing individual parts. You can try on individual tuning elements or ready-made kits for your car using programs specializing in virtual 3D tuning.
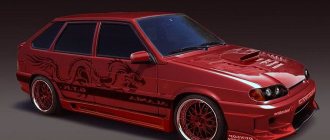
To facilitate your creative process and direct your thoughts in a creative direction, we have created a selection of photographs with examples of VAZ 2111 tuning posted on the Internet (see below the article). Obviously, you can decorate a station wagon with your own hands using a lot of factory-made and home-made attachments, replace standard optics with modernized ones, organize an additional lighting system and implement many other original solutions.
The first and mandatory step to improving the appearance of a car with your own hands is to tint the windows and install cast or forged wheels. Replacing the usual “stamping” not only makes the car look modern and aesthetic, but is also useful for the chassis, especially if the latter is also modified or even larger wheels are simply installed than the original ones.
The large trunk of the eleventh model is a real find for lovers of high-quality sound. Even a very large subwoofer can easily fit here, causing the envy of owners of smaller interiors. There will also be room for payload.