A constant velocity joint (CV joint, “grenade”) is a device that transmits torque from the car engine to the wheels. It was invented in the 20s of the XX century. Before the advent of the CV joint, cars with front-wheel drive, which were distinguished by high cross-country ability and maneuverability, lost power when cornering, vibration occurred, and torque was distributed unevenly.
Created for a special purpose, CV joints have high strength. There is an opinion that the CV joint mechanism - with proper care and proper handling, of course - can even outlive the car itself. Unfortunately, problems can arise with the grenade. Read on to learn about the characteristic signs of problems and how to replace a CV joint with your own hands.
Drive Features
Making a car with driving front wheels allows constant velocity joints (CV joints), which are used in the drive design. The peculiarity of this type of hinge is the ability to transmit torque without loss when rotating one component of the drive relative to another at an angle of up to 70 degrees.
Car front wheel drive shaft
The drive shaft of a vehicle with a front drive axle must perform several functions, and simultaneously. It must transmit torque to the wheel hub from the gearbox, provide the ability for the wheel to move relative to the body (when driving over uneven surfaces), and also allow changing the angle of the wheel, that is, making turns (which is accompanied by the need to change the length of the shaft). And all this is done thanks to constant velocity joints.
In general, the design of the drive shaft of a front-wheel drive car consists of three elements:
External CV joint
Inner CV joint
- shaft (with splines at the ends for connection with hinges);
- internal CV joint (which connects the drive to the gearbox);
- external CV joint (for connection to the wheel hub).
There are two such drive shafts in a front-wheel drive car, one for each drive wheel.
CV joint structure
A complete DIY CV joint replacement solves many parts problems, but is it really worth replacing? First you need to perform diagnostics and check the degree of wear using indirect signs. Each car is equipped with two types of CV joints: internal and external. They work in pairs and the internal one is connected to the gearbox. It transmits torque to the outside or outside. They are connected to each other by an axle shaft through hinges. External is a unit inserted into the wheel hub. Through a splined connection to the shaft, rotation is transmitted from the engine to the wheel.
Structurally, the part consists of several elements:
- external CV joint axle with thread for securing the wheel hub;
- external CV joint under the boot;
- drive shaft axis;
- internal CV joint;
- the mechanism pin, which is located inside the gearbox.
Both axles have slots for joining with gearbox elements and the hub. The rotating parts are covered with rubber corrugated anthers, clamped on both sides with clamps. It is important to regularly monitor their condition, because any dirt that gets into the mechanism will cause it to break. The CV joint is filled with grease, which ensures its operation for a long time. On the gearbox side, the CV joint is attached to the drive with long screws or pushed into place and held in place by a retaining ring inside the gearbox mechanism. It is secured on the wheel side with a hub nut.
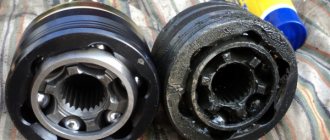
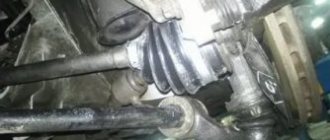
It may seem that the service life of the outer and inner CV joints is the same. Actually there is a difference. It lies in the loads created on the mechanisms. In the part that is attached to the gearbox, vibration is less pronounced. The moving mechanism breaks less and serves longer. An outer or outer CV joint works in tandem with a wheel, which is subject to constant impacts while driving on rough roads. In addition, the inner CV joint is located deep and is protected from road dirt, so even if the boot is damaged, it continues to serve properly.
The external mechanism is subject not only to shock and vibration, but also to constant splashes. Over time, the boot inevitably tears and dirt gets under it, which disables it. Even a small hole will become a serious problem for the entire mechanism.
Types of CV joints, their design and operating principle
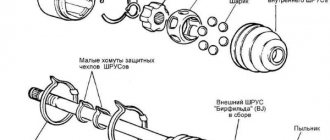
CV joint device: 1. Right front wheel drive; 2. Gearbox; 3. Left front wheel drive; 4. External joint housing; 5. Retaining ring of the hinge cage; 6. 18. Hinge cage; 7. 19. Hinge separator; 8. 17. Hinge ball; 9. Outer clamp of the cover; 10. 15. Protective cover for the hinge; 11. Thrust ring; 12. 14. Left wheel drive shaft; 13. Inner clamp of the cover; 14. Internal hinge lock; 15. 20. Retaining ring of the inner joint cage; 16. 21. Shaft buffer; 17. 22. Internal hinge housing; 18. 23. Axle gear retaining ring.
There are several types of CV joints, but only two are widespread in passenger cars:
- Ball.
- Tripoid.
The design of a ball CV joint includes two cages - an internal one, in the form of a spherical fist (fitted onto the shaft), and an external one (made integral with the shaft end, which is inserted into the hub or gearbox). Between them there are balls placed in special grooves, which are kept from falling out of the hinge by a separator. It is the balls and the grooves along which they move that are the main working elements of the CV joint, since they transmit rotation and allow you to change the angle of one race relative to the other.
To prevent the inner race from coming off the shaft, it is secured with a retaining spring ring located in a special groove on the shaft. The locking ring is also used on the shaft ends of the outer race of the internal joint.
The tripoid joint does not have an internal race; instead, a three-pin fork mounted on the shaft is used. Each cleat on this fork has spherical rollers on needle bearings. Thanks to these rollers, rotation is transmitted, the shaft with the fork can change the angle relative to the cage, and also move longitudinally relative to the outer cage (enter into it), which makes it possible to change the length of the drive.
The connection between the fork and the shaft is splined, but at the same time it fits onto the shaft quite tightly. Additionally, the fork is secured with a retaining ring to prevent it from jumping off.
It is noteworthy that tripoidal CV joints are used only on the gearbox side, but they are not used on the hub side.
Ball joints can be located on both sides. That is, you can find drive shafts on cars with two ball joints, internal tripoid joints and external ball joints, but never with two tripoid CV joints. This is due to the peculiarities of the operation of each of these types of hinges.
It is interesting that some cars (for example, Volkswagen Golf 2) use an internal ball joint of an interesting design - the outer race with the shaft end is not made at the same time, but they are connected to each other by bolts. We'll touch on them a little later.
Types of CV joints
Throughout its use, the design of both the front internal and external CV joints has changed several times. Today we can talk about four main varieties. This:
- Cam (cracker) ones, the design of which contains two shaped disks and two forks . The large traction area allows you to cope with intense loads. However, these hinges also have serious disadvantages. In particular, equipping a car with cam front joints does not allow the driver to develop high speed, since this is fraught with overheating and failure of the unit. This type of CV joint is used in trucks.
- Tripods consisting of three rollers placed in a special glass . Angular momentum is transferred when the rollers move. Such front CV joints are equipped with small passenger cars that do not carry heavy loads.
- Twin cardan shafts, in the design of which there are two cardan joints, the speed of the latter being equalized by mutual rotation . Such hinges were widely used in the production of cars in America in the 20s of the twentieth century. Today the design can be found in construction equipment and tractors.
- Ball bearings, the design of which includes a housing, a separator, a cage and six balls that move inside oblique grooves located on the inner surface of the outer cage . It is due to their movement that torque is transmitted. Ball front CV joints are the most common today.
In addition to those listed, you can also find four-ball hard tripods. However, due to low reliability, these front hinges are little used in modern automotive production.
Basic hinge malfunctions and their symptoms
The comparative simplicity of the design and the small number of components makes this unit quite reliable and capable of working for a very long time without any intervention. But this hinge also has a drawback - it is very sensitive to contamination.
The working elements of the unit - balls, rollers, grooves along which they move, and needle bearings - have a high degree of surface treatment. And sand and dust have a fairly strong abrasive effect, so when they get inside, they lead to intense wear of the surfaces, which ultimately causes the destruction of the unit.
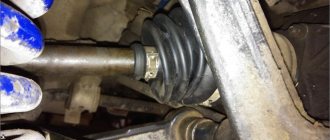
Rubber boots are used to prevent contamination from entering. So they are the “weak point” of the angular velocity hinge. During the operation of the car, the rubber, constantly in contact with the environment, gradually “ages”, and cracks appear in the boot, through which sand gets into the joint.
In general, this is the only reason why these nodes can break. And since they cannot be repaired, they are replaced.
There is also one sign of CV joint failure - a distinct crunching sound when turning. Moreover, at an early stage, this crunch appears only when the wheels are turned completely, but as the unit wears out, it will be heard even during small turns.
Note that the appearance of a crunch indicates that the hinge has already received damage that cannot be repaired. There are some measures you can take early on. First of all, you should wash the hinge, apply new grease and replace the boot. Then you can change the sides of the installation (that is, for example, swap the left inner hinge with the right one). Another option is to add small shavings of soft plastic to the lubricant.
But since the component parts have already been damaged, all of the above measures only slightly extend the service life and ultimately the unit will have to be replaced, and it is better to do this before it completely collapses, which usually happens along the way.
From the above, it can be understood that the only way to preserve the hinge is to periodically check the condition of the boot and, if even the slightest damage is detected, immediately replace it. After all, a rubber element will cost much less than a CV joint.
Replacing a CV joint is a relatively simple operation to perform, but there are a number of nuances when carrying out an operation with an external and internal unit. Also, the specifics of the work depend on the design of the hinge.
Next, let's look at how to replace external and internal CV joints using the example of several cars that use different types of drive shafts.
Signs of CV joint failure
A constant acceleration joint is an element of a car's chassis that is capable of transmitting torque from the engine to the wheels at an angle due to two articulated joints. Any problems with them will be clearly felt when moving. They are expressed by several signs:
- When turning the steering wheel and directly moving the car to the right or left, a distinct crunching sound is heard. It is created by friction of the hinge elements against grains of sand and small pebbles. They leave behind noticeable grooves on the rubbing surface, due to which backlash occurs and the hinge falls apart with a strong push. This is the most unpleasant situation that occurs while driving.
- An unpleasant crunching sound can also occur at the beginning of movement, when the wheels are just beginning to rotate. The sunken balls get stuck in the grenade clip. At this moment, its destruction may occur.
- A knocking sound in the wheel area that gets louder or is clearly audible when turning. In this position, the greatest load is applied to the hinge, and the risk of destruction of the grenade increases.
If the hinges are bypassed, then jerking is felt when accelerating. It is dangerous to continue driving in such a car.
Replacement of external CV joint
Since the external CV joint on all cars is a ball joint, the further sequence of work is almost the same for any model, with the exception of some minor nuances. We will consider dismantling the unit and replacing it on the VAZ-2110 model.
It is noteworthy that CV joints are one of the few components in a car design that do not require pair replacement. That is, if one joint begins to crack, then only replace it; there is no need to touch the rest.
The tools you will need to carry out the work are:
- a set of keys and a set of sockets with a knob and rods (a 30 socket head is required);
- jack;
- mallet or regular hammer with a wooden handle;
- rags;
- steering wheel end remover.
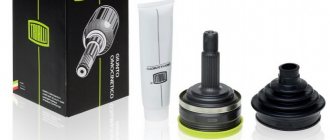
Parts and consumables you will need:
- new hinge;
- new shaft end mounting nut;
- anther;
- clamps (it is better to purchase not tape clamps, but screw clamps);
- “CV joints-4” lubricant or its equivalent (intended for use in constant velocity joints);
Next, we will consider the disassembly sequence, and also indicate some tricks that will help carry out the work more quickly. So:
- We place the car on the inspection hole and immobilize it.
- While all the wheels are still in place, take the 30mm head, tear it off and loosen the nut securing the shaft to the hub. This nut is pinned, so unscrewing it will not be easy, since it will require significant force, for which you can extend the wrench with a piece of pipe. On a jacked car with a wheel removed, it will be very difficult to loosen the nut.
- After loosening the nut, jack up the required wheel and remove it.
- To pull the hub off the shaft end, you need to ensure that the stand can move freely. To do this, unscrew the fastening of the ball joint of the suspension arm to the hub.
- Using a puller, disconnect the steering tip from the rack.
- Unscrew the nut completely.
- We grab the brake disc and pull the hub towards ourselves to pull it off the shaft end.
- After the shaft comes out, move it to the side;
- When replacing the outer CV joint, it is not necessary to completely remove the drive shaft, that is, there is no need to pull out the inner joint.
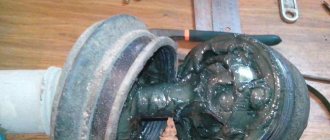
- Next, we dismantle the external assembly itself from the shaft. To do this, we loosen or cut (cut) the clamps, and then pull the boot off the CV joint (you can simply cut it, since it is no longer needed).
- We climb under the car and, using a hammer with an adapter, knock the hinge off the shaft. The blows applied should be of little force, the main thing here is to knock the assembly off the retaining ring, and it will come off the shaft splines themselves even with the force of your hand.
After this, assembly is carried out. First, a new boot is put on the shaft, and then a new hinge is placed on its splines. All that remains is to seat it so that the retaining ring fits into the groove made in the inner race. To do this, we again use a hammer with an adapter and, with gentle blows, press the hinge into place.
We apply lubricant (do not regret it), pull the boot onto the edge of the outer race, after which the rubber element must be slightly squeezed by hand to remove air. All that remains is to fix the boot on the holder and shaft using clamps.
We install the assembled shaft with the new hinge into the hub, attach and tighten the nut until it stops. Next, we put everything back together - install the steering tip, the suspension ball joint, and the wheel.
After removing the car from the jack, tighten the fastening nut with a wrench with an extended shoulder. All that remains is to secure it to prevent spontaneous unscrewing.
Is it possible to do without replacement?
Having seen the cost of repairing or completely replacing the CV joint, inexperienced motorists think that they can drive anyway: just think, something crunches down there, a big deal. And it's actually a big deal.
Some car enthusiasts think that the strength and durability of parts makes them completely invulnerable, which is absolutely not the case. Replacing the grenade is the only possible option that will allow you to drive comfortably.
It is necessary to change the CV joint after identifying the slightest problems in its operation. Have you noticed any wear on the boot? Does your wheel crunch when turning? Don't over-tighten, otherwise the machine will just fall into place one day. Why do we need a car that can only remain in the garage as a dead weight? That's right, an experienced driver is not interested in such a car. Moreover, replacing the external CV joint is quite feasible on your own.
Replacing the internal hinge
Next, we’ll look at how to change the internal CV joint (ball joint) on the same VAZ-2110. An additional tool will require a mount.
Some of the work does not differ from those described above, so they will be listed briefly. The replacement is done like this:
- We park the car, jack it up, remove the wheel (no need to loosen the nut).
- Disconnect the ball joint and steering tip.
- We climb under the car. We take a pry bar and drive it between the inner hinge and the gearbox. Using it as a lever, we push the limit switch out of the box, while asking an assistant to pull the hub towards himself.
After the limit switch comes out of the gearbox, we carry out the replacement identically to that described above - cut off the boot, knock down the hinge. Then we put a new boot on the shaft, use a hammer with an adjuster to seat the new CV joint, add grease, put on the boot and secure it with clamps. Next, we install the shaft end in the gearbox and push it into the hub into the box until it stops (you cannot seat it with hammer blows on the hinge, so as not to damage the new boot).
Now a few words about replacing the internal CV joint on a Volkswagen Golf 2, in which the hinge is bolted to the end switch. This design makes disassembly even easier because it does not require disconnecting the suspension arms from the hub.
To remove the hinge, you just need to unscrew 6 bolts, after which the shaft together with the hinge can be lowered down to remove (knock down) the CV joint; you do not need to remove the limit switch at all. And then we install a new boot, seat the assembly on the shaft, lubricate and secure the clamps. We place the shaft with the new hinge to the end switch and connect them with bolts.
What is the risk of CV joint failure?
CV joints cannot always be repaired even if only one of the boots is damaged. In most cases, their repair is not provided by the manufacturer; in case of wear or damage, the front inner CV joint is replaced with a new one.
However, on some cars, severe wear or breakage of the front hinge can lead to more serious problems. The fact is that the needles that fall off the roller bearings penetrate into the gearbox housing, and then, rising with the lubricant, are ground by gears. The consequences in this case are simply catastrophic.
If the front inner CV joint is not replaced in time, it may jam, causing the axle shaft to break and making it impossible for the vehicle to continue moving. The danger of such a situation is clear without further ado.
In order not to lead to trouble, it is worth inspecting the anthers of the front internal and external hinges every 5 thousand kilometers traveled. If there is a suspicion that the components are leaking, the best option would be to replace the boots with new ones and update the lubricants at the same time. If a crunching noise occurs while driving, you need to contact service as soon as possible or replace it yourself.
Features of replacing a tripod CV joint
Finally, let’s look at how the internal tripod joint of angular velocity changes using the example of the Ford Focus 2. The tools you will need are the same as those indicated above, as well as a universal three-legged puller and pliers for removing the retaining rings.
The difficulty of replacement is that you will have to completely remove the drive shaft. Everything is done like this:
- We take out the external hinge from the hub (identical to the VAZ-2110).
- We climb under the car, cut off the large clamp of the inner CV joint, and tighten the boot.
- We remove the shaft (there remains an assembled outer joint on one side and a three-pin fork on the other, while the outer race remains in the gearbox).
- We remove the outer race (push out the limit switch using a pry bar driven between the race and the gearbox);
- Using pliers, remove the retaining ring holding the fork.
- We pull the fork itself from the shaft with a puller.
- We place the boot and the new element on the shaft and install the retaining ring back.
- We put the outer ring in place (you can carefully hammer it in with a hammer with an adapter).
- Install the drive shaft.
- Apply grease, pull the boot onto the outer race and secure it with clamps.
- We collect everything removed in reverse order.
The indicated instructions are suitable for almost any car, but it is necessary to take into account the design features and this primarily concerns the disconnection of the lower arms from the hub.
As you can see, there is no particular difficulty in replacing CV joints, and all work can be done independently in a garage.
CV joint service life
The effective life of trouble-free operation of a CV joint often exceeds 100 thousand km. This is explained by its design features and the type of materials used to manufacture the parts. In fact, the design of this mechanism is quite complex, and the difficulties lie precisely in the disassembly process. It’s easier to completely replace a functional unit and actually handle this task on your own.
The service life of the CV joint is influenced by many factors:
- Speed limits and road curvature. The more bumps the car overcomes, the more the part is subject to wear. If significant irregularities occur, powerful impacts occur, which can cause the part to fall apart.
- Driving on dusty roads and temperature changes have a negative impact on rubber boots. They crack, allowing road dirt to penetrate into the hinge mechanism and cause damage.
- In the event of a traffic accident, the assembly may break or be significantly deformed. If the car has been in such a situation, you should check the condition of the chassis and assess the damage.
- Mechanical wear and tear over time. After a run of 100 thousand km, traces of severe mechanical wear are observed on the mechanism parts. A beating occurs in the hinge, which can cause its destruction right on the road.
Necessary tool
Before replacing the VAZ 2114 inner CV joint boot, you should prepare all the necessary tools for this. For competent work you will need:
- Open-end wrenches for 17, 19. But it is better to have a full set on hand;
- Set of heads and knobs;
- Wheelbrace and jack;
- Pliers;
- Screwdriver;
- Rag and gloves.
For ease of dismantling, you can drive onto a pit or overpass. Be sure to set the vehicle's parking brake or engage first gear. For greater safety, you can install supports under the wheels. Also, be sure to check that you have a complete replacement kit: grenade, boot, CV joint grease and two clamps.
Replacing the outer CV joint
- We tear off the mounting bolts from the wheel and the hub nut, and place wheel chocks under the rear wheels. (To make it easier to tear off the nuts, it is better to use an extension for the wrench).
- We jack up the car and put it on a stand (under no circumstances do we work on a jack) and hang the wheel.
- We remove the wheel.
- We unscrew the 2 bolts that secure the ball joint to the steering knuckle.
- If it doesn’t work, use a wrench extension and WD-40.
- We turn the steering wheel to the side and slightly pull back the steering knuckle with the stand and remove the outer part of the hub along with the CV joint (For convenience, you can make several gentle blows with a hammer).
The installed hinge, together with the outer CV joint boot, is fixed in the hub. All that remains is to add the oil drained before dismantling into the gearbox. Such a replacement of the outer CV joint does not present any great difficulties, and can easily be done independently. The partially disassembled front suspension is restored after installing a new outer joint.
Malfunction prevention
In order for this part to last as long as possible, it is necessary to completely eliminate the possibility of dirt and water getting under the rubber cuffs of the CV joint. If there is the slightest damage, this part must be replaced with a new one.
For this purpose, it is better to use original spare parts that are made from high-quality rubber. If you purchase counterfeit cuffs, the procedure for replacing this part will have to be carried out too often.
Another reason why the CV joint often fails is its insufficient fastening to the main gear shaft. If the bolts are not tightened well enough, then over time they begin to unscrew randomly. In this case, the outer CV joint moves significantly away from the shaft, and with a significant gap, knocking noises will be observed in the transmission. If this malfunction is not detected in time and the fastening bolts are not tightened, then in a short time the CV joint will be completely “broken.”
How to change the CV joint and how to determine the malfunction of this part is described in detail in the article. The operation of replacing the CV joint will not take much time, but if you do not want to fix this problem yourself, you can always turn to a car repair shop for help.
What is needed to install a new CV joint
If the car owner lacks locksmith skills, it is better to immediately go to a decent car service center. They will replace the mechanism at a reasonable price. Experienced car mechanics do this work quickly. If you want to do it yourself, you need to prepare:
- lift;
- set of spanners;
- pliers;
- screwdriver;
- metal pipe as a lever;
- bench vice.
You will need a new CV joint with a protective cover included, fixing clamps and lubricant. To make it more convenient to change the CV joint, part of the transmission oil is drained from the gearbox. To dismantle the drive, the front wheel is removed from its side. Then the hub nut is unscrewed with force, the brake disc with caliper, ball joint and steering wheel tip are dismantled.
To ensure greater torque when unscrewing and screwing the hub nut, it is better to stock up on a pipe that is put on the wrench. The splined drive shaft of the device is removed from the gearbox using a pry bar, which is used as a lever. Then, carefully knock out the outer joint from the wheel hub with a hammer and a wooden block.