Causes of malfunction
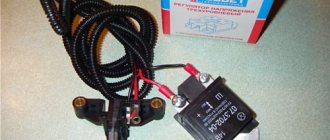
View of the old and new voltage regulator relay
There are several reasons for the failure of the regulator relay on a car. Let's consider the main ones :
- A short circuit in the on-board network, which led to the failure of the regulator relay. This happens quite often because the generator itself serves as the power source and there is no fuse between it and the current produced to protect it.
- Wear . Like any part in a car, the regulator relay can wear out.
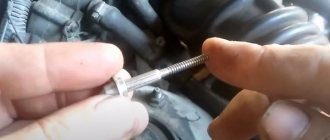
- The brushes are worn out .
The arrow indicates worn brushes. Their length is 3 mm instead of the required 5 mm.
How to determine that the regulator relay has failed?
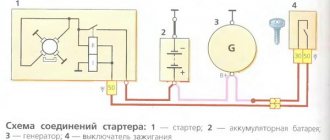
Connection diagram of the generator to the electrical circuit
Let's consider the main options:
- Insufficient battery charge means that after the ignition is turned off, the car has difficulty starting or may not start at all.
- The light shines normally at 2000 rpm, but dims at idle.
Once the root causes have been sorted out, you can move on to the replacement process.
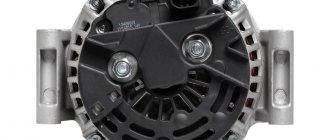
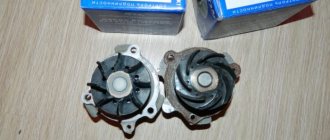
Kalina generator design
The process of replacing the generator regulator relay
So, the process of replacing the generator regulator relay will require dismantling the product itself, but it will not require a pit, and all operations can be carried out from the engine compartment. Let's take a step-by-step look at how to replace the generator regulator relay on a Lada Kalina:
- We remove the “minus terminal”.
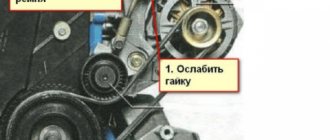
- To replace the relay, you will have to dismantle the generator.
The device serves to transform mechanical energy from the crankshaft into electricity. The generator charges the battery and is also a source of alternating current and power for all electrical equipment of the car. It has a diode bridge (rectifiers) and a voltage regulation unit, operating in parallel with the battery.
What to do if the voltage relay fails?
It happens that the relay fails at the most inopportune moment, when you still have a drive home and the battery is not charging. The battery capacity in economical mode can ensure fairly long engine operation, which will allow you to get to the repair site without any problems. Below we will provide a list of recommendations that will help you drive, as they call it, “on battery power” and not stall.
- If the battery is overcharged, the relay must be disconnected from the circuit. To do this, the contact wires are removed from it and left hanging. In the case of the “ten”, it is enough to unplug the plug with the wire from the generator brush connector. Thus, battery charging is turned off, and further movement will no longer harm the battery.
- Many experts suggest going the other way - turning off the generator excitation winding . To do this, remove the corresponding fuse. However, this can be done if you know where the fuse is located.
- If the battery is weakly charged, then there is practically no reason to panic. To get to your destination, you need to maintain high speeds in order to, at least a little, bring the voltage value to the nominal value. to maintain the speed at 3000 rpm for a few seconds using the gas pedal This will prepare the battery for the next start.
- Avoid using music, power windows, headlights (especially high beams), and other electrical devices unless their use is absolutely necessary. This will save battery power well.
Standard generator Grants
At the factory, VAZ 2190 and 2191 are equipped with a device with the catalog designation KZATE 115A (9402.3701-14). It has the following technical characteristics:
- rated voltage – 14 V;
- maximum current – 115 A;
- shaft rotation speed – 1200 rpm. (without load);
- shaft rotation speed at a maximum current of 115 A – 6000 rpm.
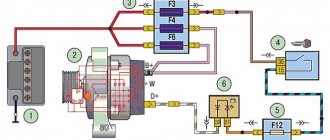
The main components of the generator are a stationary stator and a rotor rotating in it. The parts are separated from each other by an air gap. Their main working part is the winding and magnetic circuit. Other components serve to provide adequate rigidity, cooling, etc.
The brush assembly is necessary to connect the rotor electrical network to the stationary stator winding; it consists of several graphite contacts. A diode bridge is used to convert AC to DC current and is also called a rectifier block. The regulator converts the output electricity into the desired voltage.
Which TRN is suitable for LADA
| Generator, article number | Automobile | TRG, article number |
| 26.3701, 37.3701, 371.3701, 372.3701 | VAZ-2107, -2108, -2109, -2110, OKA | 67.3702-01 |
| 3002.3771, 332.3771, 3202.3771, 3212.3771, 4302.3771, 94.3701, 9402.3701, 9422.3701, 3740.3771-38, 3743.3771-61, 3747.3771- 93, eld-a-21214, LG01214 | VAZ, GAZ | 67.3702-02 |
| 4052.3701, 409.3701, PRAMO “ISKRA” 5102.3771, -10, 5112.3771, -10, 5122.3771, -10, -30, 5142.3771, AAK 5727 | VAZ, GAZ, UAZ with generators PRAMO “ISKRA” 5102.3771, 5122.3771 | 67.3702-04 |
| G222 | VAZ-2104, -2105, -2107 | 67.3702-09 |
| 26.3701, 37.3701, 371.3701, 372.3701 | VAZ-2107, -2108, -2109, -2110, OKA | 67.3702-11 |
| 3002.3771, 332.3771, 3202.3771, 3212.3771, 4302.3771, 94.3701, 9402.3701, 9422.3701, 3740.3771-38, 3743.3771-61, 3747.3771- 93, eld-a-21214, LG01214 | VAZ, GAZ | 67.3702-12 |
| generators with an additional three diodes, the excitation winding of which is connected to the positive circuit | 673.3702 |
Basic faults
Failures associated with the failure of the Granta generator lead to discharge or, conversely, overcharging of the battery and its boiling. In both cases, this will make further operation of the car impossible. If the belt is overtightened, problems with high bearing wear will soon arise. If the belt tension is insufficient, slipping will occur and the battery will receive too little charge.
Normally, a working generator produces 14.5 V; exceeding this value is most often due to a breakdown of the voltage regulator. Without urgent replacement of the element, constant recharging of the battery will lead to shedding of lead plates and battery malfunction. If the unit does not produce the required voltage, and it is below 13 V, then the problem may not only be with the regulator, but also with the fact that the brushes are worn out, the diode bridge or windings are damaged.
It happens that suspicious sounds occur during operation, in which case the nature of the noise is important. It’s not difficult to deal with this: just remove the wires from the generator. If the rotation of the pulley is accompanied by a howling or squealing noise, then the problem is in the bearings. If, after removing the wires, the noise disappears, then it is in the diode bridge, or a short circuit has occurred in the winding. In any case, repairs are inevitable, and sometimes only replacing the unit will help.
Typical faults and methods for their elimination:
Cause of malfunction
Remedy
The table shows the main faults. Mechanical and other damage is also possible.
Disadvantages of electrical equipment of the VAZ 2110
Where, exactly, do all the complaints about the battery come from? A good well-maintained battery will last five to seven long winters and no questions will arise about it if you charge it correctly, discharge it correctly and at least slightly monitor its condition. In the case when the battery is charged directly on board the car, which most often happens, the charging current strongly depends on the number of consumers on board.
The more of them, the stingier the generator becomes and pays less and less attention to the battery. He also needs to feed the voracious fog lights, a powerful audio system, additional comfort equipment, refrigerators, glass, mirror and seat heaters, and you never know what else the tuners come up with. And the generator is designed taking into account the rated charging current, without taking into account the additional load. As a result, the battery sits on starvation rations, is constantly undercharged, especially in winter, the plates crumble and after two years of grueling work asks to be thrown into a landfill. We blame the battery, of course. Only in vain.
Alternative belt replacement options
Insufficient tension creates less inconvenience than constriction. The latter provokes too rapid wear of the bearings. To avoid such a problem, many Grant owners install the tensioner themselves: a part from the Lada Kalina is perfect for this.
The manufacturer does not initially install the part at the factory, since it positions Granta as the most affordable in its class, hence the savings on components. This is typical for the cheapest models with an 8-valve power unit.
To adjust the belt tension, you can use a bracket from Kalina, modifying it a little with your own hands. To do this you will need the following set:
- bracket;
- tensioner;
- roller bracket;
- alternator belt from Kalina 1;
- screw tensioner.
Thanks to this kit, you can significantly improve the design of your car, extending the service life of some parts and components.
FakeHeader
Comments 17
I'm interested in the question, I found what I wanted
No. There is no regulator with such a brush assembly! And there is no longer any need for it, the voltage rarely drops below 14V, only when all electrical appliances are at full load!
Yes, he didn’t do anything! But lately there have been no failures in the on-board network!
Yes, at idle I have 14.2 with nogruskoy 13.7 when driving with nogouzko keep 13.8 but when you slow down the speed and rpm it drops sharply and sometimes it drops to 12.3 but 1-2 seconds and everything is restored
There was also voltage, I solved this by soldering a small diode from an old diode bridge, I did it according to this article www.drive2.ru/cars/lada/p…k/zver41k/journal/497417/
Yes, I read this article a long time ago, but I would like to do without soldering - I bought it and installed it. But if I can’t find it, I’ll have to solder.
I didn’t want to solder either, but the store couldn’t say anything definite, so I soldered it so as not to risk burning the gene
I have a staff in the same place)
An option is to simply solder a regulator to this brush assembly
If only someone would give instructions, but I don’t want to experiment with something...
Generator replacement
The problem with the standard Lada Granta generator is known to many owners of this car. To troubleshoot problems, it is most often necessary to remove the device. Conventionally, unit breakdowns can be divided into two types - mechanical and electrical. But one of the most common problems associated with replacing a device is the natural wear and tear of components. Therefore, sooner or later, every car enthusiast faces the question of replacing or repairing a generator.
The procedure has some difficulties, but it is quite possible to do it yourself. Removing the unit may also be necessary for maintenance or to improve the design of the car. The dismantling procedure has its own characteristics depending on the engine configuration (8- or 16-valve), as well as on the presence of air conditioning.
Is it worth making the regulator yourself?
If you are new to electronics, then such an undertaking will be quite difficult.
As we mentioned earlier, the main element of the circuit is a certain number of diodes. Finding three-stage switches for them is quite problematic. In addition, you need to correctly calculate and install radiators for cooling. Otherwise, the risk of diode burnout increases significantly.
During the development of the regulator, long wires will be needed, because the connection is made directly to the device through the cover.
Additionally, you will need to make or find a suitable plastic case for such equipment. All internals must be securely fastened inside the device.
Replacing a generator on an 8-valve Granta engine
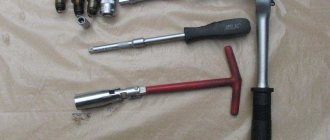
To work, you need to use three keys (at “8”, “10”, “13”) and a mounting blade. First, disconnect the “–” terminal from the battery. The operating procedure is as follows:
- Remove the engine protection by removing two rear and four front bolts.
- Disconnect the wire block.
- Remove the protective cap from the nut that holds the power wire.
- Unscrew the power cable nut.
- Release the top fastening by unscrewing the nut.
- Move the generator away with a mounting spatula or a long screwdriver, and remove the upper mounting bolt.
- Loosen the lower fastening.
- Press the generator from the engine using improvised means, for example, a mounting spatula, removing the lower mounting bolt.
- Move the generator to the right side.
- Remove the belt from the pulleys.
- Remove the generator.
To install the device in its original place, perform all steps in reverse order. You need to make sure that the grooves on the pulleys match the grooves on the belt.
Replacing a generator on a car with a 16-valve engine
Dismantling and subsequent installation of the device on Grant modifications with a 16-valve power unit have their own characteristics: there is a belt tensioner. Therefore, the procedure for removal and installation is somewhat more complicated. As in the previous case, you will need a standard set of tools, and before starting work, the negative terminal of the battery is disconnected. It is necessary to remove the engine protection, if any. After this, you can begin to remove the unit by following these steps:
- Disconnect the wiring harness from the generator.
- Remove the cap covering the power wire.
- Using a “10” wrench, unscrew the nut that holds the wire tip.
- Use a key set to “13” to loosen the tension bar nut.
- Loosen the belt by unscrewing the adjusting bolt to the left.
- Move the generator to the right and remove the belt.
- Unscrew the adjustment bolt completely and remove it.
- Remove the tension bar.
- Unscrew the fastening nut from below.
- Remove the bushing and remove the bolt holding the lower mount.
- Remove the generator.
To install, do all the steps starting from the end, then tighten the belt.
How the device works
Three-level regulators are able to fulfill almost any conditions that are necessary for a battery to charge efficiently, and the overall network voltage does not drop, but only stabilizes. There is nothing complicated in its design, since it is the same regulator, only three pieces, with a special electronic control mechanism that can take into account very important things:
- Battery condition.
- Its charge level.
- Load on the battery.
- Ambient temperature.
- Number of engine revolutions.
Based on this data, the device can independently set the optimal charging voltage for the battery without depriving other consumers, which is very important in winter and in the dark.