Causes of malfunctions
The fan may not turn on for the following reasons:
- the fan drive (electric motor) is faulty;
- fuse is blown;
- the relay has failed;
- broken electrical wiring;
- lack of contact in the temperature sensor connector;
- The temperature sensor is faulty.
Search for reasons
Diagnosis of a fan malfunction should begin with the fan itself. To do this, disconnect the connector on the fan and connect it, observing the polarity, directly to the battery terminals. If it turns on, it means the drive is working, the reason needs to be looked for further. If the fan does not work, this is the reason. But let's take things in order.
The fan did not turn on. We check the integrity of the wiring and the condition of the contacts on the sensor. If everything is in order, we move on to the fuse and fan relay. They are located under the hood on the left side closer to the driver, in the mounting block.
Fuse F4 is 20A, double, for the sound signal and the cooling fan (it is very easy to check; if there is no sound signal and the fan does not work, then most likely it is the culprit).
You can check the fuse with an ordinary autotester. With relays the situation is more complicated. To make sure that this is not the case, it is better to get a one hundred percent working relay somewhere and temporarily install it in the socket for testing. If the fan does not work even with it, we go to the sensor.
If the sensor is de-energized, the controller must start the fan in emergency mode for constant blowing. Disconnect the connector from it and turn on the ignition. Turning on the fan will indicate that the sensor has failed and requires replacement.
When is it necessary to change a fan?
If the cause is still in the fan itself, you can try to repair it. The problem is usually the brushes or bearings. But it also happens that the electric motor fails due to a short circuit or break in the windings. In such cases, it is better not to experiment and replace the entire drive.
It is strictly forbidden to operate a vehicle with a non-working cooling fan. Overheating of the coolant will inevitably lead to the destruction of rubber pipes and hoses, as well as cylinder head gaskets and valve covers. In addition, high engine temperature can cause destruction of the piston group elements.
How much does a cooling fan cost on a VAZ 2114
You can buy a new cooling fan for a VAZ 2114 for 1500-2500 rubles. Replacing this part at a service station will cost 300-400 rubles. But you don’t have to spend money on this. Dismantling the old fan and installing a new one at home will take no more than 30 minutes.
WHAT TO DO IF THE ELECTRIC FAN WORKS CONSTANTLY?
Sometimes another problem arises. Many car enthusiasts are interested in why the fan on the VAZ 2114 is constantly running?
There are four possible causes of the malfunction:
- a short circuit has occurred in the electrical circuit;
- the electric fan relay has broken down;
- The temperature sensor needs to be replaced;
- The electronic unit is broken.
Most often, the fan starts to work continuously as a result of a shorted wire. The electrical circuit remains on regardless of the signals from the temperature sensor and relay.
To troubleshoot the problem, you need to ring each wire and find the fusion point. Sometimes it is noticeable even upon visual inspection.
If ringing does not help identify the malfunction, you need to check and replace the fan relay. The cost of the device is low. Therefore, for diagnostics it is easier to buy a new relay and install it in place of the old one.
If this does not help, then you need to check the operation of the temperature sensor. After all, it is he who is responsible for turning on and off the electric motor of the VAZ 2114 fan.
If all other elements of the system are working properly, you need to check the electronic module. It rarely fails. If the problem still occurs there, you will have to perform a complete error reset. Sometimes only a complete flashing helps. Not everyone can do this work on their own. Therefore, it is better to seek help from a car service center.
It would also be useful to install a button to force the fan to start and turn off on the VAZ 2114.
This solution can be very useful if the breakdown occurs somewhere on the highway far from the city. In this case, using the button on the instrument panel, you can force the fan to cool the engine.
Operating principle
A fan is a device that allows you to increase the efficiency of a cooling radiator. The radiator takes heat from the engine and releases it into the air. This process is accelerated by blowing through the blades of an electric fan.
The coolant flows through a closed, sealed system. Its task is to remove excess heat from overheated engine parts. Hot antifreeze flows into the radiator, is cooled here and returns back. While in the radiator, the coolant passes through a system of thin tubes. The incoming air flow while the car is moving helps to quickly remove excess heat from the engine compartment.
But when the car is stuck in traffic or idling, the air flow stops cooling it. In this case, the cooling system may not cope with its task. An electric radiator fan is designed to create air flow artificially. The temperature for turning on the fan on a VAZ 2114 is 85 degrees Celsius.
Having received a signal that the permissible temperature value has been exceeded, the sensor starts the device’s operating mechanism. An artificial air flow is created that removes heat from the radiator. The mechanism operates until the temperature level drops to an optimal state.
The thermal switch then receives a signal that the normal temperature has been reached and turns off the fan.
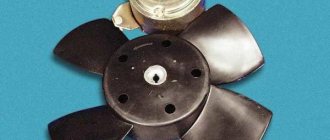
The device consists of four plastic blades that are mounted on the EDF shaft. A special controller regulates the automatic operating mode. The thermostat is equipped with a solid filler that is sensitive to temperature changes.
There are main and additional valves. When the temperature reaches 85 degrees Celsius, the main valve opens.
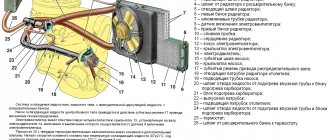
Decoding fuses and relays of block 2114-3722010-18
VAZ-2114, 2115, 2113 cars of the first models with a carburetor have certain differences in the fuse module.
Old style block fuse and relay diagram
Table 2. Decoding of fuses and relays of block 2114-3722010-18
| № | Current, A | Explanation of fuses |
| F9 | 7,5 | Right rear fog lamp |
| F8 | 7,5 | Left rear fog lamp |
| F1 | 10 | Front headlight cleaners at the moment of switching on, wiper contacts, headlight washer switch valve, headlight wiper switch relay contacts |
| F7 | 30 | Front headlight wipers during operation, winding of the relay for turning on the wipers, fuse for the interior heater, windshield washer, gearbox and timing controller for the rear window wiper, valves for turning on the front and rear washer, relay (winding) for turning on the engine cooling system, relay for turning on the rear window heating, glove box lighting, rear window heating control lamp |
| F16 | 15 | Turn signal indicators and activation of hazard warning lights in turn mode, indicator control lamp, reversing lights, gearbox and relay for activation of windshield washers, generator winding (at startup), control lamps for brake fluid, oil pressure, carburetor flap, hand brake. "STOP" display lamp, voltmeter and coolant temperature indicator |
| F3 | 10 | Interior lighting and rear brake light |
| F6 | 30 | Power windows, power windows on/off relay |
| F10 | 7,5 | License plate lights, engine compartment lamp, warning light on the dashboard (exterior lighting), instrument panel lights, cigarette lighter light, heating lever lights |
| F5 | 20 | Relay for turning on the cooling system fan (electric motor), sound signal. |
| F10 | 7,5 | Left front marker light Left rear marker light |
| F11 | 7,5 | Right front headlight, right rear headlight |
| F2 | 10 | Hazard warning lamp, turn signals and hazard warning relay. |
| F4 | 20 | Rear heated glass, heating on, portable socket, cigarette lighter in the cabin |
| F15 | 7,5 | Front right high beam |
| F14 | 7,5 | Front left high beam Light switch |
| F13 | 7,5 | Left low beam |
| F12 | 7,5 | Right low beam |
| № | Relay circuit | |
| K1 | Headlight washers | |
| K2 | Hazard and turn signals | |
| K3 | Windshield wipers | |
| K4 | Monitoring the health of lamps | |
| K5 | Windows | |
| K6 | Sound signal | |
| K7 | Heated rear window | |
| K8 | High beam headlights | |
| K9 | Low beam headlights | |
Where is the fan relay located?
It is located in an additional block.
4 – electric fan relay;
5 – electric fuel pump;
6 – ignition relay.
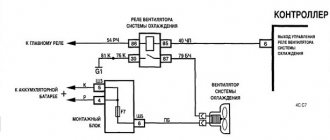
Relays and fuses may have a different order. Therefore, you need to focus on the color of the wires. The main relay is always located at the bottom. Find the relay that has a thin pink wire with a black stripe coming from it. It comes from the main relay through pin 85. Be careful! Do not confuse this with the red thin wire, which also has a black stripe and extends from the controller. And find a thick white wire with a black stripe (pin 87). This is where the cooling fan relay is located. There is always a fuse next to it. It is an element of the chain.
When do you need to change the fan on a VAZ-2114
If the reason for the non-working fan lies in the fan itself, you can still try to repair this part. As a rule, the problem lies in the bearings. But sometimes it also happens that due to a break in the windings or a short circuit, the fan motor itself fails. If this happens, then it is better not to try to repair anything, but to replace this part.
By the way, driving a car with a non-working fan is strictly prohibited. As a result of this action, the coolant can warm up significantly, which will lead to complete destruction of the pipes and rubber hoses. Driving a short distance with the fan not working can also cause the cylinder head and valve cover gaskets to fail. But that's not all. Overheating of the engine can also destroy some elements of the piston group.
Leaking cylinder head gasket
This problem is one of the rarest causes of engine overheating in VAZ 2114 cars. When it occurs, overheating is a secondary symptom that may be accompanied by a number of others:
- oil leaks from under the cylinder head;
- uneven engine operation and low compression;
- increased oil consumption, noisy engine operation and gas flow, black exhaust.
In this situation, at best, the solution would be to replace the cylinder head gasket. At worst, a major overhaul of the engine with cleaning of all internal cooling channels.
When the engine gets hot, it is dangerous not in itself, but because of its consequences. Long-term driving at elevated operating temperatures first leads to loss of properties of elastic parts: valve stem seals and piston rings. Because of this, oil consumption increases, and engine operation becomes uneven and dirty. All this leads to expensive major repairs.
The consequences of severe overheating are even more severe: the cylinder head and cylinder block are deformed and sometimes crack. An engine that has survived this can no longer be repaired.
Replacement
Tools:
- socket wrench 10;
- socket wrench 8;
- screwdriver with a Phillips bit.
Execution order
- We park the car on a flat surface and immobilize it with the parking brake.
- Open the hood and disconnect the negative terminal.
- Using a 10mm wrench, unscrew the fastenings of the air filter housing.
- Using a screwdriver, loosen the air duct clamp on the air flow sensor and remove the corrugation.
- We unscrew the screws securing the cover of the air filter housing and remove the filter element.
- Using a size 8 wrench, unscrew the air intake mount and remove it.
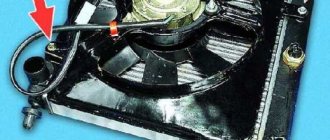
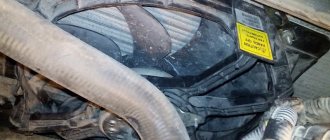
- Using a 10mm wrench, then an 8mm wrench, unscrew the nuts securing the fan casing around the perimeter (6 pieces in total).
- Disconnect the wire block on the fan connector.
- Carefully remove the fan casing along with the drive.
- Using a 10mm wrench, unscrew the 3 bolts holding the electric motor to the casing.
- We put a new one in its place.
- We install the structure in place, fix it, and connect the connector.
- We carry out further installation in the reverse order.
Necessary tool
The choice of tool used will directly depend on the nature of the breakdown. Often it is enough to open the relay box and replace the blown fuse with a new one, which will restore the fan’s functionality. Whereas in case of significant breakdowns, when the cooling fans of the VAZ 2114 do not turn on, it is necessary to dismantle the radiator, remove the fan, or change the relay and corresponding temperature sensors. To remove the fan you will need:
- Crosshead screwdriver.
- Socket wrenches 8 and 10
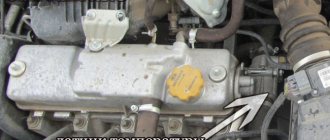
DTOZH
The radiator fan of the VAZ 2114 may not turn off due to a malfunction of the coolant temperature sensor. This device transmits information about the antifreeze temperature to the ECU. If it exceeds 101 degrees, the fan turns on to cool it down. If the DTOZh breaks down, the electronics receive an incorrect signal. Therefore, the element can operate continuously. The sensor is installed in the cylinder head on the intake manifold.
It is not necessary to call the DTOZH to check. You can borrow a known-good part for a while and evaluate the operation of the system. If everything works as expected, the sensor should be replaced. Sometimes damage to an element can be noticed visually.
When checking this part, it would be useful to inspect the wires and their connections. Sometimes the cause of the malfunction lies in poor contact or broken wiring. In this case, the connections are cleaned of contaminants and the integrity of the wires is restored.
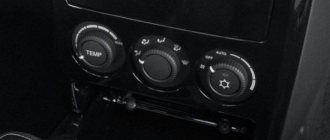
MODE SWITCH PANEL
Sometimes the stove cannot be turned on because the switches on the control panel fail. You can also fix this problem yourself. You must first remove the handles and remove the stove mode switching unit. When removing the panel body, pay attention to the latches. They need to be pressed with a thin screwdriver, and at the same time pulled out. When the latches are removed, the switch housing housing slides out of its socket easily. Here you can already see what kind of breakdown occurred and what parts can be replaced.
A car's heater, at first glance, is a simple unit in a car, but it is closely connected with the entire structure of the car, and primarily with the cooling system. Using the heat generated by the engine, the car heater does not require additional electricity and fuel. But often it is the failure of the interior heating system that can be the first signal of more serious defects.
Reset errors
Replacing coolant for Lada 2115 (VAZ 2115)
Sometimes after repairs have been carried out, error codes still remain in the memory of the electronic control unit. They may interfere with the normal operation of the fan and may also be displayed on the on-board computer. In order to restore the functionality of the element, you need to remove them. This can be done in two ways.
1 way. To do this, you will need an OBD scanner and a laptop or smartphone with the appropriate application. Errors are reset in the following sequence:
- Connect the scanner to the diagnostic connector of the car and a laptop or other gadget.
- Turn on the ignition.
- In the program, press the READ key and press ERASE. Sometimes you need to select YES or CLEAR to clear errors in an application.
Method 2.
- Turn on the ignition without starting the engine.
- Open the hood and loosen the negative terminal of the battery.
- Wait approximately 1 minute.
- Place the terminal in place, securing it securely.
- Close the hood and turn off the ignition.
After clearing the fault codes, you need to turn on the ignition and check for errors. You also need to make sure that the fan is functioning properly. If resetting does not solve the problem, the problem may have been identified incorrectly.
You can drive with a constantly running fan, but provided that the antifreeze temperature is normal. If it is high, then you need to stop and not use the machine until the problems with the cooling system are eliminated.
How to replace a temperature sensor
Before starting work, you need to partially drain the coolant from the cylinder block.
- Remove the wire.
- Using a 21 wrench, unscrew the temperature sensor.
- Take it off.
- Install the new one in reverse order.
Fuel system
If it is below -20 degrees outside the window, it is possible that condensation has formed in the tank. The presence of water in gasoline is a bad sign. Moreover, it is not necessary that it be “diluted” at the gas stations themselves. Due to the temperature difference, condensation forms on the walls of the tank. At low temperatures it freezes. As a result, the VAZ-2115 (injector, 8 valves) does not start. Frozen water can be both in the fuel lines and in the filter itself. There is no point in trying to turn the starter with the hope that the car is about to start. You'll just drain the battery. The only solution to the problem is to warm up the car. It's better if it's in a garage with this problem. By installing an oil or induction heater there, you will quickly warm up the air temperature in the room. And the car will start successfully.
Candles
If they do not produce sparks, even with new filters a situation will arise where the VAZ-2115 will not start.
It is worth unscrewing the elements using a multi-faceted wrench and inspecting their condition. Often they are “flooded”, which is why the VAZ-2115 does not start. This means that the working part of the spark plugs is covered with a large amount of fuel. As a result, the spark is unable to ignite the fuel.
And, as you know, not only gasoline, but also air is supplied into the chamber. If the amount of the latter is insufficient, starting the engine will be difficult.
Clogged filters
This problem can occur in both summer and winter. And this applies not only to the fuel filter, but also to the air filter. The latter is in a special plastic case. On VAZ 15th model cars it looks like this.
After moving the latches, lift the air filter housing cover and remove the cleaning element itself. If it is dirty, the part needs to be replaced. Filters are consumables and cannot be restored at home. Moreover, they cost pennies. As for the fuel filter, it is located under the bottom of the car. The element looks like in the photo below.
If the car has driven more than 30 thousand kilometers, the filter should be replaced. You will not be able to visually determine the degree of contamination as you can in the air. The part is located in a closed, non-separable case. It has porous paper inside. It is capable of passing particles smaller than 10 microns. Over time, the pores of the paper become clogged, and the filter is not able to pass the required amount of fuel through itself. So that the problem does not take you by surprise, change this part in advance.
A characteristic sign of failure is jerking when moving (as if the fuel supply to the cylinders had stopped for some time). This means that the submersible pump is not able to supply the required amount of fuel through the paper pores. As for the air filter, it is changed every 6 months or every 10 thousand kilometers. By following the regulations, you will protect yourself from such problems.
Useful video
You can glean additional interesting information from the video below:
What to do if the VAZ-2114 injector cooling fan does not work
It must be emphasized that if the car is moving at high speeds, there is, of course, no particular need for an efficient fan. But as the speed of the car decreases, even when the car is idling, you simply cannot do without a fan.
This device turns on automatically when a signal is sent to it from the electronic control unit. After stopping the VAZ 2107, the fan does not work facing the inside of the radiator. This signal is based on data received from a temperature sensor, which is triggered when the coolant temperature rises to 103 degrees.
How to solve a problem?
There are two ways to solve this problem:
- On the spot. If you don't have time to remove the spark plugs, you can try drying them directly in the engine. To do this, open the throttle valve 50 percent before starting. Fortunately, on the VAZ-2115 the accelerator pedal is mechanical, with a cable drive. This will allow more air to enter the combustion chamber. The candles are “blown out” automatically. After starting, the throttle valve can be closed. But this method is not always effective. And then the second method comes to the rescue.
- Self-drying. In this case, all four spark plugs are unscrewed. An important point - when removing armor wires, number each of them. Otherwise, the engine will not start at all, since the valve timing will be disrupted. You can quickly dry it with a home hairdryer, setting it to maximum blowing mode. If time permits, you can check the gaps between the electrodes of the spark plugs. When this parameter does not match the factory setting, the spark plug cannot produce a normal spark. We talk about this in more detail.
About spark plug gap
Over time, the gap between the electrodes increases. The normal parameter is from 0.7 mm to one millimeter. You can check this gap using a special feeler gauge.
The same is used for setting on carburetor engines. So, if a parameter does not meet the norm, it should be adjusted. To do this, you should use a negative screwdriver. To reduce the gap, press its end onto the upper electrode. Hold the part itself with your other hand. If you “overdid it”, it doesn’t matter - everything can be returned back. To do this, bend the electrode with the edge of a screwdriver (it bends quite easily) and check the distance again. It is worth noting that with a correctly set gap, you can not only ensure trouble-free engine starting, but also reduce fuel consumption by 5 percent. Also the car will run smoothly. After all, the mixture is ignited exactly at the moment when it is necessary. And the last thing is the resource of the candles themselves. If the gap is higher or lower than normal, the risk of breaking through the insulator increases significantly. As for the replacement schedule, it is about 40 thousand kilometers. Together with the spark plugs, it is recommended to replace and
Pump malfunction
The pump rarely fails completely, so the fault can be accurately diagnosed only after removal. The most common problem with it is the impeller breaking off. It can be solved by replacing the pump. Other troubles include deformation of the pump gear and blades due to defects or mechanical wear. This fault is especially serious as it can cause the timing belt to become misaligned. And this is its uneven wear and the danger of breakage with all the sad consequences for the piston group.