Correct adjustment of VAZ 2114 headlights is important for safe driving. When the optics are not adjusted, there is a risk of not noticing a pedestrian at night, blinding oncoming drivers, or vice versa, having insufficient visibility. Irresponsible car enthusiasts often ignore offers at service stations regarding the maintenance of lighting devices in order to save money, and subsequently operate the car in poor condition. How to adjust the headlights of a VAZ 2114?
Useful video on adjustment:
Preparing to independently adjust headlights
When you decide to start adjusting the headlights on a VAZ 2114 with your own hands, you should first prepare the necessary tools and the car for the procedure. First of all, find a level place (it is advisable to check the level) without additional lighting (or with the ability to turn it off). Opposite the car there must be a flat plane, for example: a wall, fence, garage door, etc. If the adjustment takes place outside, then pay attention to the weather, it should be dry and windless. Responsible preparation will influence the outcome of the adjustment.
Next you should start preparing the vehicle. First, the car should be washed. Both the body and the fender liners should be free of dirt. All you need to put in the trunk is a spare tire, a jack and a set of tools. The fuel tank must be full. Tire pressure is equalized in all wheels within 2.0 – 2.1 bar.
Please ensure that the optics are free of chips, cracks and other defects. In such a case, the light may be refracted distortedly, causing some of the light to fall incorrectly.
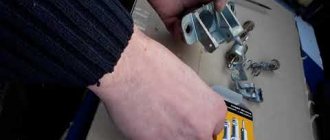
Also check the fastening of the light elements. They must be firmly fixed and not loose. Otherwise, replace the mounts, since the angle of the optics depends on them.
After preparation, it is worth drawing markings on the wall in front of the car. A schematic sketch will help you make the most accurate adjustment of the headlights on a VAZ 2114 with your own hands. To do this you need:
- Place the car at a distance of 5 meters from the wall. We measure from the glass of the element.
- We measure the height of the lamp relative to the asphalt.
- We transfer the resulting plane to the wall with a horizontal line.
- Mark the center of the car with a vertical stripe.
- From the horizontal line we measure 65 mm down and draw another one. We should have a cut-off strip on it.
- To identify the center of the beam, a daw transition mark is used.
- The centers of the checkboxes are marked with vertical lines. The distance between them should be 964 mm.
After completing all stages of preparation, you can proceed to the adjustment process itself.
Useful : What kind of bulbs are in the fog lights on a VAZ 2114?
Methods for installing PTF on VAZ 2113, 2114, 2115
Installation of fog lights can be done in several ways. Which one to choose, each car owner decides for himself, based on his capabilities and preferences. Let's look at the most common installation options:
- Buying a front bumper with PTF.
In this case, the headlights are sold already mounted in the front bumper. As a rule, a part can be purchased without any problems at a car tuning studio and immediately installed and connected. The disadvantages of this option include high financial costs. Buying a bumper with PTF installed is the most expensive option for installing fog lights on a car. - Buying a bumper with holes for PTF.
With this installation method, you should purchase a bumper with holes for the lights and the headlights themselves with all the necessary elements (wires, relays, power button, etc.). When purchasing a bumper with holes for fog lights, you will need to purchase the lights themselves and all the necessary components for connection - Self-installation of PTF is the most common installation method, since it requires minimal financial investment.
The car owner only needs to purchase headlights with the necessary installation kit and facing elements. The most common option for installing PTF is to purchase and then install a set of fog lights yourself.
PTF location diagram on a car
Before connecting the fog lights, it is important to install the devices correctly on the front of the car. This is done in accordance with certain rules, which clearly stipulate the location of the light source. On modern cars, the installation locations for fog lights are marked from the factory.
Basically, such lighting elements are installed on more expensive car configurations. If the headlights were not installed from the factory, then the places for their installation are closed with plugs
On modern cars, the installation locations for fog lights are marked from the factory. Basically, such lighting elements are installed on more expensive car configurations. If the headlights were not installed from the factory, then the places for their installation are closed with plugs.
Fog lights on the front of the vehicle must be installed in accordance with established regulations
Is it possible to install xenon in PTF
Many car owners seek to install xenon in fog lights, arguing their actions by increasing lighting efficiency. Is this really true? Let's figure it out. First of all, when installing xenon in standard PTF housings, focusing is disrupted, which is due to a different operating principle in contrast to conventional lamps. Since standard fog lights are designed to operate with certain lamps, they simply cannot cope with xenon. The result of such changes will be too much reflection in the reflector, the rays are refracted, the light becomes blurred. A well-known situation arises - the blinding of drivers of oncoming vehicles, which increases the risk of an accident. Installing xenon in PTF is far from the most successful solution and the effectiveness of such light is questionable, so it should be abandoned.
When installing xenon light in standard fog lights, focusing is disrupted, which leads to dazzling oncoming drivers
Adjustment process
How to properly adjust the headlights on a VAZ 2114? Moving on to this stage, it is worth having on hand the equipment that will be needed during the work process:
- Clean rag;
- Window cleaner;
- Cardboard or thick fabric.
After preparation, you can begin setting up the VAZ 2114 headlights:
- Turn off the car, as engine operation may create unnecessary vibrations.
- Turn on the low beam.
- Inside the car, move the corrector lever to position 0.
- Cover one element with cardboard or a rag prepared in advance.
- Use the built-in screws to adjust the direction of the light. Number 1 regulates in the vertical plane, and 2 in the horizontal plane.
- Rock the car to make sure the light is adjusted correctly.
- Using the same steps, adjust the light of the second element.
Try to completely rely on the instructions described in this article, and then you will be able to adjust the headlights correctly and as accurately as possible.
Interesting : DIY taillight tuning
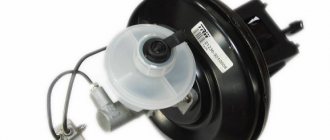
Design and principle of operation
The device is a non-separable device that regulates the position of the light beam by changing the fluid pressure inside the nozzles. The unit cannot be disassembled, so if it breaks, it is replaced with a new device. The design of the corrector consists of the following elements:
- master cylinder;
- working fluid;
- pipes containing liquid;
- cylinders
The headlights are adjusted using a hydraulic corrector by the driver using the corrector wheel located on the dashboard. By turning the wheel you can raise or lower the lamp.
Adjusting the fogs
Adjusting the fog lights is almost no different from the main light elements, the only thing is that you need to make some adjustments to the diagram that we depict on the wall in front of the car:
- With the car installed 5 meters away, we measure the height from the asphalt to the PTF.
- We transfer the measurement to the wall in front of the car, drawing a horizontal stripe.
- From the strip from the last step we retreat downwards by 65 mm.
- Mark the center of the car with a vertical line.
- The distance between beam centers is 908 mm.
Ultimately we will get this picture:
You can adjust the fog lights yourself by covering each fog light one by one with cardboard or a rag, using the adjusting bolt to set them according to the diagram.
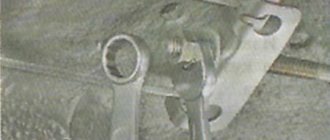
The screws that adjust the position of the light beam may be located under the plastic trim, so it will have to be pulled out of the bumper before you have access to the adjustments.
Features of DIY repairs
You can calibrate the corrector yourself using the instructions that come with it.
Before changing the device, you should find out the cause of the malfunction and try to restore the functionality of the hydraulic corrector. To do this, you must first inspect all the tubes and elastic bands; no defects are acceptable. If there is no leak, the cylinders are inspected and the stroke of the rod is checked. If the measures taken do not bring the device into working condition, then it is possible that the main unit is faulty and the hydraulic corrector needs to be changed.
What is the difference between Bosch and Kirzhach headlight adjustment?
The Bosch and Kirzhach headlight models have differences in the engraving on their glasses and also have different reflectors. In general, adjusting the headlights on a VAZ 211 will not have any special differences; everything is done according to the same points listed above. The only thing you can notice are fundamental differences in the operation of these models.
With Bosch headlights, the light beams are dispersed more accurately, giving uniform light and good visibility. And Kirzhach elements provide light pointwise in front of the car and weakly scatter it to the sides.
Installation and modification
To install a new corrector, follow these steps:
- Having loosened the clamps, remove them from the pipes with the working fluid;
- in the cabin we dismantle the handle on the main cylinder;
- Having unscrewed the mounting bolts, remove the main cylinder;
- At the last stage, we remove all the working cylinders and take them out through the interior.
Refinement and repair of the headlight hydraulic corrector consists of checking the position of the adjusting bolt. It must be set so that the light can be adjusted with minimal effort.
What to do if the headlights are not adjustable?
If you are faced with the problem that the headlight cannot be adjusted when you turn the adjusting bolt, it means that the hydraulic corrector, which is located in its housing, has failed. Turn the regulator from inside, and if the beam of light does not change its height, then the mechanism needs to be replaced.
The price of the mechanism is on average 500 rubles, and it is better to immediately replace it and adjust the headlights.
Understanding the question “how to adjust the headlights on a VAZ 2114,” we can conclude that optics are an important element, especially at night. It not only makes the car visible, but also allows the driver to assess the traffic situation around him. When the optics are not adjusted correctly, the driver can dazzle other road users, creating an emergency situation on the road. It is recommended that light fixtures be adjusted once a year during vehicle maintenance (of course, if this mechanism is not being replaced, then the adjustment should take place immediately). Proper adjustment at home will help ensure safe driving in the dark.
How to identify problems with optics
The need to adjust the light will be required in the following cases:
- lamps shine strongly up or down;
- the beam is shifted to one side;
- uneven brightness of headlights when inspecting the car;
- insufficient light intensity, a clear jackdaw is not visible;
- One of the headlights does not work.
The tuned optics of the VAZ 2114 or model 2115 cope perfectly with any weather conditions. To identify deficiencies, a visual inspection of the performance of the lamps should be carried out once a week, and adjustments should be made at least once a season.
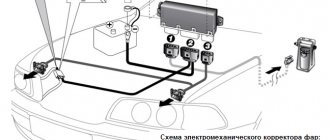
Hydrocorrector of headlights VAZ 2114 Depending on the vehicle load, the headlights can be directed lower or higher. To adjust the light flux, special devices called hydrocorrectors are used. If the car is loaded, it is better to lower the headlights so that the light output is directed towards the road and not up. This way you will provide the necessary illumination of the road surface and prevent the driver from being dazzled by oncoming traffic. With a minimum load of the car, when the rear of the car is raised, the headlights can be raised slightly.
The principle of operation of the fog lamp
Before grabbing the tools and adjusting the position of the PTF on the car with your own hands, every car owner must understand the features of their operation.
And for this you need to remember that fog:
- These are the smallest particles of moisture that are in the air;
- The emanating heat from the ground (road surface) does not allow them to sink, causing them to literally hang, which leads to the formation of a milky veil;
- The stream of light, reflected from them like a mirror, returns back and blinds the driver.
Narrow work space
All drivers know that turning on regular headlights in fog leads to poor visibility. This happens because droplets of moisture are located exactly at the level of the headlight of a modern car. After all, their location was determined for better illumination of the road situation - as close as possible to the driver’s organs of vision.
But PTF has another task - to make movement in fog possible. That’s why they are installed on cars as low as possible to the road surface, so that they, as they say, “shine under the fog.”
Correctly adjusted PTF shines “under the fog”
The fact is that moist air close to the ground is drier and, accordingly, does not have glare properties.
Warning! Under no circumstances should fog lights be installed lower than 25 cm from the road surface. This is prohibited by current GOST 8769-75. But what is not prohibited is making stickers for headlights that will protect them from stones. Since the price of PTFs does not allow their safety to be neglected.
Technical feature of the luminous flux
The second point that should be emphasized is that:
- The beam of the fog lights along the top edge has a clear boundary:
- This is done so that when it hits drops of moisture, it does not refract upward and blind drivers.
The peculiarity of PTF operation is the crossed upper limit
For reference: due to the special shape of the lens or marks applied to the glass of a classic headlight, the luminous flux of fog lights has a clear horizontal cut.
Roadside lighting
There is another feature of fog lights that is often forgotten.
After all, it is the same lighting device as the head light, i.e. must:
- Create sufficient visibility of the road situation for movement;
- And illuminate the side of the road to the right of the car in the direction of travel.
Both regular and fog lights should illuminate not only the road ahead, but also the right side of the road