Articles
- 2 Algorithm for carrying out an operation to “shumka” a VAZ 2114 car
- 3 Useful tips
- 4 Table
How to make sound insulation in a VAZ 2114
Do-it-yourself soundproofing of the VAZ 2114 has the most important goal - to reduce the level of audibility of extraneous sounds in the car interior. Noise comes from the power unit, the wind outside when moving quickly, and other sources.
If you know how to make noise insulation for a VAZ 2114 yourself, you can significantly reduce the noise level and save a lot of money at the same time, since services of this kind in service stations are not cheap.
How to remove the top panel trim of a VAZ 2114
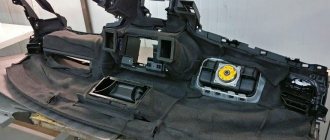
Torpedo is the modern name for the dashboard. Initially it was used for foreign cars, but today this name is used by motorists in the CIS countries. The dashboard in the VAZ 2114 car is a collapsible metal structure that contains plastic elements. It also uses polymer film and polymer foam to cover some of the controls. The instrument panel includes many monitoring instruments and controls.
Tip: a great way to decorate the interior of a VAZ 2114 is to reupholster the dashboard with genuine leather or eco-leather. The costs of such an update are minimal, but with proper design you can achieve high results. Also in the VAZ 2114 they practice covering the visor and roof. Tuning can be done independently, but if you don’t have time, you can contact a car workshop.
Removing the dashboard may be necessary if the owner of a VAZ 2114 wants to change the heater radiator or even the entire stove. To get to these parts, you will certainly have to disassemble the dashboard. Depending on the purpose, the analysis may or may not be complete. For example, dismantling a heater core requires only partial removal of some elements. For some body work, it is necessary to remove the dashboard, as the structure may be damaged during repairs. Disassembly of the structure is also required when the motorist decides to increase sound insulation in the car interior - for this it is necessary to seal the wheel arches, hood, doors and dashboard.
Regardless of the number of dismantled parts, the following tools are required to disassemble the dashboard:
- Several types of screwdrivers (flat and Phillips);
- A set of keys;
- Flashlight;
- An adhesive base, which is required if the panel is planned to be sealed.
Useful tips
Today, many owners of the VAZ 2114 install new acoustics in the car, more powerful and productive. They buy an expensive subwoofer (see 1000-watt subwoofer and a review of the best models), a powerful amplifier (see The best amplifier for a subwoofer and how to choose it) and a lot of other useful things that significantly increase the level and quality of sound. But imagine their disappointment when all the money spent turns out to be thrown down the drain, since the sound still leaves much to be desired.
It turns out that the whole point is insufficient insulation of the car body panels, through which noise penetrates from the outside. It’s no longer possible to enjoy clear sound: rattles, vibrations, knocks - all this degrades the quality.
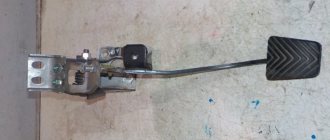
As mentioned above, car doors are very important in this regard.
Here's what you need to focus on:
- They must be insulated on both sides, although excessive zeal should not be shown either. Heavy doors mean they may sag over time;
Sound insulation for VAZ 2114
- In addition, we must take into account the fact that the doors of the VAZ 2114 are often covered with cellophane. The latter makes unpleasant sounds and creaks in the cold season in the frost;
- It is advisable to lay materials on the door in large pieces (as much as possible). The materials used should not be visible beyond the edges of the sheathing.
It’s not difficult to learn how to carry out “Shumka” with your own hands. Step-by-step instructions, photos, materials, and videos will help in this matter. The factory standard insulation must be completely stripped off so that new materials can be installed efficiently.
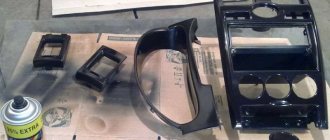
What is included in the design?
To make it easier to remove the entire dashboard or its individual elements, you need to know what the structure consists of. In a VAZ 2114 car, the dashboard includes 11 main elements, which are shown below:
Dashboard base. It contains controls for interior systems.
- Overlays. This part is needed to securely fasten the base.
- Bracket.
- The sealing element is a plug.
- Ashtray.
- Crossbar, there are two of them. The number “6” shows the right one.
- Right dashboard screen.
- A shield that blocks access to the wiring.
- Central bracket.
- Left screen of the instrument panel.
- Left cross member.
In VAZ cars, you can improve the appearance of the dashboard. To do this, you need to unload the dashboard from the dials. More stylish and modern information devices are usually installed to replace them. The same applies to the backlight; if you wish, you can update it yourself and install modern original LEDs.
By dismantling these elements one by one, you can completely disassemble the dashboard. Below you will find detailed instructions with which the motorist can completely remove the dashboard elements from the car.
Purpose and principle of operation
As you might guess, the main role played by the Shumka VAZ 2114 is to protect the driver and his passengers from extraneous sounds penetrating into the cabin from the outside (they can be the whistle of the wind, the noise of cars passing by, the sound of wheels moving along the road, especially if the latter is unpaved or gravel, the sound of tools lying in the trunk and much more).
Soundproofing VAZ 2114
The presence of sound insulation helps suppress these unpleasant sounds, which have a depressing effect on the mind and do not allow you to fully concentrate on the road (especially during long trips). In addition, the operation of the audio system in a soundproofed cabin will be of higher quality, and its sound will be clearer.
Speaking about the principle of sound cancellation, we can note 3 main features of noise insulation:
- Vibration protection to absorb sound waves.
- Preventing the occurrence of resonance in metal parts.
- Barrier function that prevents the spread of sounds.
In addition, the installed Shumka will also play the role of additional thermal insulation, which will better maintain the internal microclimate in the cabin both in winter and in summer.
Step-by-step instructions for disassembly
- The first step is to remove the left screen. To do this, you need to unscrew 3 screws, as shown in the photo. Once the fasteners are removed, the left dash screen can be removed.
Now the console can be completely removed if replacement is planned. When performing other repair work, it is recommended to navigate by access to the parts of interest. For example, to access the heater stove, it is enough to remove only the lower part of the dashboard.
Many car owners do not know how to remove the dashboard on a VAZ 2114. We will show you how to do it correctly. Usually the instrument panel is removed to replace the heater, remove the instrument cluster, seal the heater nozzles, glue, etc.
General information about the process
The initial one is provided by the manufacturer at the stage of assembling the machine. But gradually, due to temperature changes, any material loses its beneficial properties.
Before you start carrying out the “Shumka” on your own, it is recommended to dismantle the seats, door trims, mats and free the car from the old standard insulation.
Note. Only by carrying out a complete and thorough soundproofing procedure can one hope for a significant reduction in noise from the outside. Only in this case will the cabin be perfectly quiet and comfortable.
Soundproofing panel VAZ 2114
It is especially important to treat doors, as they often become the main installation location for speakers. It is clear that this place should be well protected not only from noise penetration, but also from plastic vibrations and other negative phenomena.
Acoustic speakers in the doors
Along with sound insulation, the interior will also receive high-quality insulation. In Russian conditions this is extremely important. To achieve this effect, you need to combine vibration and sound insulation.
Soundproofing for VAZ 2114
“Shumka” carried out on a VAZ 2114 is often called tuning. This is true, because a real modernization of the car is being carried out. Operational parameters are increased and comfortable conditions are created when the vehicle is moving.
The driver is no longer oppressed by engine noise, his nervous system is not irritated by the strumming and vibration of plastic elements. All this cannot but have a positive impact on overall driving safety.
As mentioned above, the standard “Shumka” will not be of good quality; relying on it is the last thing. The process of carrying out “Shumka” on cars with high mileage is especially relevant. In general, such cars are very difficult to drive, since the noise penetrates everywhere, interferes with the normal operation of the acoustics, creates complete discomfort, and the trip turns into a very tedious task.
On sale today you can find a sufficient amount of high-quality materials for carrying out “Shumka”. There are a lot of them and making the right choice can sometimes be extremely difficult. One of the main indicators of a good material is not only the ability to absorb sounds, but also to be light in weight (details about materials in the table below).
Note. If the material itself is heavy, making noise will be difficult. As a rule, good and proper insulation involves laying several layers of material, a kind of sandwich consisting of layers of vibration and noise absorbers. Heavy materials will create excess weight that is dangerous for the car and its body, which will inevitably affect fuel consumption and the overall dynamics of the car.
Splen with foil
Among other things, you also need to lay out materials skillfully. The fact is that if you don’t pay attention to this, the materials will simply turn into a time bomb for the metal component of the car.
Poorly laid material creates gaps through which air, moisture, etc. will penetrate. And all this will inevitably lead to the appearance of the most terrible enemy of the body - corrosion.
Correct installation of the material always means following the instructions in a step-by-step sequence, using the right tools, using a hair dryer and much more.
In some cases, especially when carrying out the noise yourself, partial sound insulation is also appropriate. In this case, the target is the most noise-producing parts of the machine. Definitely the doors, then the trunk, the rear parcel shelf, and so on.
Removal procedure:
Let's figure out how to remove the dashboard on a VAZ 2114. Using a Phillips-head screwdriver, carefully unscrew the 3 screws (top, middle and bottom) that secure the left console screen.
Next, remove the trim itself and the protrusion located at the bottom, then remove it from the body bracket.
Using a Phillips screwdriver, unscrew the next five screws, which are located in the right panel of the console, then remove the screen itself.
Then disconnect the negative cable terminal from the battery. If a radio is installed in the car, then remove it, also disconnect the connector of its harness with a wire or remove the plug container from the shield. Next, the wiring harness block must be disconnected from the cigarette lighter. You also need to remove the ashtray light bulb socket. Then remove the handle from the levers by carefully prying it off with a narrow screwdriver.
The next step is to remove the heater fan switch handle. To do this, you need to pull it towards you or pry it with a screwdriver.
Using a Phillips screwdriver, unscrew the two self-tapping screws located above the instrument cluster, as well as the two self-tapping screws located under it.
Prying off the plug, remove it and unscrew the self-tapping screw located under it.
Next, unscrew the two screws of the lowermost fastening of the lining.
Then remove the dashboard trim.
Now we mark the order in which the wiring harness blocks are connected to the switches, and disconnect them.
We place the already completely removed instrument panel and unscrew the bolts securing the steering column. Using the same screwdriver, unscrew the two screws, as shown in the photo.
Using an 8 mm wrench, we also unscrew the 2 screws of the lowest mounting of the bracket to the dashboard.
Next, unscrew the self-tapping screw securing the light guide using a Phillips screwdriver and remove the light guide.
Then we unscrew the screws that held the heating control unit, and also remove the lamp sockets from its reverse side.
Then we remove the decorative insert, but only after we have removed all its external parts.
We unscrew the nuts numbered one and two with a wrench or pliers (21 cm).
Then you need to remove the lamp responsible for illuminating the hydraulic corrector.
Carefully unscrew the screws for the lower and upper fastenings of the instrument panel, as well as the fastenings to the left cross member, using a Phillips screwdriver.
Now all that remains is to remove the instrument panel. That's it, now you know how to remove the instrument panel on a VAZ 2114 (VAZ 2115).
Installing Shumka in other compartments of the car
In addition to installing sound insulation inside the cabin, it is also recommended to install it under the hood (which is especially important, since a properly installed noise insulation can significantly reduce the audibility of sounds from a running engine), in the trunk, and also in the doors. The process of installing insulation is completely identical to its installation inside the cabin - you will need to apply three layers of the same materials as mentioned above.
Soundproofing the hood of a VAZ 2114
The only thing you should remember is that the sound insulation of the doors of the VAZ 2114 must be done most carefully, since the quality of the audio system installed in the car directly depends on it.
For these purposes, it is recommended to use the more expensive, but also much more effective vibration damping material Shumoff P4 (it is applied as the first layer instead of Vizomat). In addition, it is recommended to additionally cover all plastic door elements with anti-squeak coating Bitolon 5.
Soundproofing doors VAZ 2114
When performing noise insulation work, all technological openings, passages for laying wires, hatches and other cavities should be left open. They should absolutely not be sealed with insulating materials.
Sound insulation of the trunk
Thus, almost every driver can independently install effective and inexpensive sound insulation - you just need a sufficient amount of patience and free time to complete this work.
How to install the dashboard?
If you want to install the instrument panel of a VAZ 2114, then everything must be done in the same way, but in reverse order.
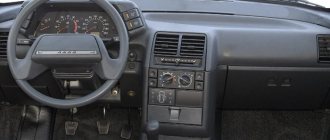
The instrument panel, also known as the “torpedo”, is the most important part of the car’s interior, which largely determines the comfort of both the driver and the front seat passenger.
There are three key requirements for a “torpedo”:
- Functionality - it must include all the necessary control levers, buttons and indicators to monitor the condition of the vehicle;
- Ergonomics - all functional elements of the “torpedo” must be placed so that their use is convenient for people of different heights and builds;
- Design – by the way the instrument panel is made, you can determine the class of the car. In cheap models, as a rule, developers do not pay due attention to the visual appeal and quality of the materials used, while the distinctive feature of all expensive cars is a beautiful, detailed “torpedo”.
Required tools and materials
To achieve good sound insulation, you need to prepare a whole set of tools and materials in advance:
- Stroyizol SD 90 grade.
- Splen marked 3004.
- Accent 15 LM KS.
- Be sure to buy vibroplast type Gold.
- Adgilin.
- Vizomat MP.
- Stock up on a metal ruler.
- A construction tape measure won't hurt.
- Square.
- Hairdryer, preferably a household one.
- Montage.
- Screwdrivers with different tips.
- Awl.
- Keys.
- Sharp scissors.
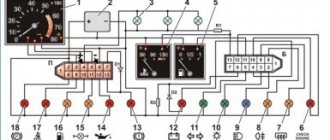
COMPONENTS OF THE INSTRUMENT PANEL VAZ 2114
Before proceeding to the practical part, it is necessary to understand what the instrument panel of the fourteenth is.
The VAZ 2114 belongs to the second generation Samara line of cars, which the Tolyatti Automobile Plant has been producing since 2004. All cars of this family are equipped with a “torpedo” of the Europanel type, for the development of which foreign designers were involved.
Europanel is distinguished by a high level of ergonomics - all its components are located in a freely accessible area, their use does not complicate the driver’s process of driving. Considerable attention is also paid to the comfort of the front passenger.
Dashboard tuning
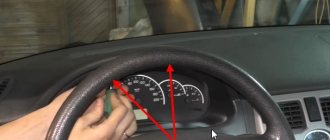
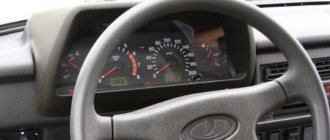
The main information element of the VAZ 2114 “torpedo” is the dashboard of sensors and indicators, which is located directly behind the steering wheel.
This panel includes the following elements:
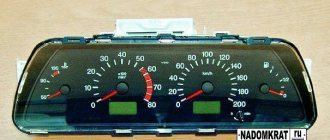
- Pointer instruments – tachometer and speedometer. Through the tachometer, the driver receives information about the engine operating mode - the arrow indicates how many revolutions the power unit produces at a given time. The speedometer displays data on the current speed of the fourteenth. The maximum mark on the speedometer is 200 km;
- Electronic screens are located at the bottom of the tachometer and speedometer needles: the screen under the speedometer displays the total mileage of the car and mileage data from the last control point, which can be set by the driver himself. The screen under the tachometer shows the time and ambient temperature;
- There is a rotation sensor between the dial instruments - when the turn signals are turned on, flashing green arrows are displayed on the dashboard;
- In the center of the dashboard there is a “Check Engine” indicator - which lights up when the on-board computer of the fourteenth detects any malfunction in the engine. Next to it is a brake light indicator;
- On the left side of the instrument panel there is a fluid temperature sensor in the cooling system of the power unit, on the right side of the panel there is a fuel level sensor in the gas tank. When the engine temperature exceeds a critical value or the tank is empty, orange lights above the sensors light up;
- There is also a series of indicators on the dashboard that indicate the following information: oil level, doors not closed, seat belts not fastened, amount of water in the window washer reservoir and brake pad wear.
The VAZ 2114 torpedo also includes the car’s on-board computer screen, which is located in its central part. Using the on-board computer, the driver receives detailed information about the operating modes and problems that arise in the systems and communications of the fourteenth. Also, recommendations on the timing of the next technical inspection are displayed on the BC screen.
In addition to information devices, there are also functional elements on the dashboard: turn signal levers, control buttons for headlights and heater, and window heating system.
The “torpedo” of the fourteenth is not without comfort elements, which are represented by a cigarette lighter, an ashtray, a fairly spacious glove compartment and a niche for storing various small items, located near the gear shift lever.