The control oxygen sensor (hereinafter referred to as UDC) is designed to record the amount of oxygen in the exhaust gases coming from the engine to the catalytic converter of the exhaust gas system.
UDC on Priora and Kalina
The electronic engine control system (ECM) calculates the duration of fuel injection using the following parameters: air mass flow, crankshaft speed, coolant temperature, throttle position, requested torque, additional consumers (headlights, stove, sound, etc.).
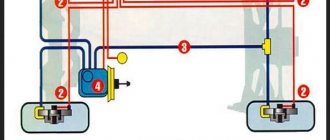
For high power mode, starting, fuel shutdown, ECM protection, this is all what happens. The readings of the control oxygen sensor (UDS) are not taken into account. The sensor readings are recorded precisely in the uniform load mode. This data is used to adjust the air-fuel mixture, or fuel injection duration, depending on other unaccounted factors. As a result, a high-quality fuel-air mixture is obtained.
Factors not taken into account by the ECM are the degree of engine wear, coking, changes in atmospheric pressure, fuel quality, data scatter (permissible deviations in readings) received from other sensors and errors resulting from this.
How to make a corrector (fake) lambda probe?
There are several types of correctors for oxygen controllers. The mechanical device is the simplest and most affordable in terms of corrector design. It is necessary to machine a special adapter into which the lambda probe is installed, as well as a mini-catalyst. After this, the assembled device is mounted in the standard place of the car muffler.
If the catalyst device or the oxygen sensor installed after it breaks down, a signal will be sent to the control unit. The module will be warned that the exhaust gases contain harmful substances, the volume of which exceeds the permissible value. The control unit will perceive this event as an emergency and increase the fuel supply to enrich the air-fuel mixture.
When installing such a corrector, exhaust gases will flow through a small hole in the adapter into the catalyst device. The latter is filled with ceramic dust with a catalytic layer. The concentration of harmful substances in the exhaust gases will be lower. The control module will perceive this as the correct operation of the controller and standard catalyst device. The manufacture of blende is carried out using a lathe and a diagram; steel or bronze can be used as a material.
Scheme of a mechanical corrector for a lambda probe
Universal drawings that can be found on the Internet may not be suitable for making a lambda probe blende for a specific car model; you need to look for a proven option.
Making an electronic controller fake:
- Using the SprintLayout program and a printer, a layout drawing and arrangement of circuit elements are printed. Printing is done on glossy paper.
- When sending a file for printing, you must select 100% black for layer K1. In the program, check the box next to Mirror and Scheme Outline. All other layers are deleted.
- Then the next layer is sent for printing. For the M2 layer, the color is black. The checkbox opposite the Mirror item is removed, but it remains opposite the second element. Other layers are removed.
- When performing the task, it is recommended to use foil textolite. It must be one-sided, and its thickness will be no less than 1 and no more than 2 mm.
- When the printout is in hand, it must be transferred to the LM324 board using an iron. The board itself is cut out taking into account the dimensions, and printouts must be made along its contour. After cutting, attach the diagram to the drawing; the dimensions must match exactly.
- Using fine-grained sandpaper, the copper layer is cleaned. The board is cleaned using fuel or solvent.
- Then you need to transfer the printout with the tracks to the working surface of the board. A printed layer of elements is installed on the reverse (copper surface). To do this, foil paper is applied to the board and heated with an iron; the procedure takes no more than 10 minutes. When warming up, the surface of the iron should be pressed as close as possible to the board. As a result, the toner should be reprinted from the foil surface onto the circuit. If the paper density is low, the tracks will be visible. The problem can be corrected using a permanent black marker.
- The next step will be etching, this will require ferric chloride or sodium perchlorate.
- Then holes are drilled on the board and the elements are soldered.
- At the final stage, the operating parameters of the corrector are adjusted. To do this, +950 mV is supplied to the input, and the voltage value is adjusted in the range from 950 to 1000 mV. For the LM324 board, the procedure is done by setting up elements VR3 and VR4.
Lambda probe repair
If the λ probe breaks down, it can simply be turned off, and the control unit will switch to average fuel injection parameters. This action will immediately make itself felt in the form of increased fuel consumption and the appearance of an error in the engine ECU. If the lambda probe breaks down, it must be replaced. But there are technologies for “revitalizing” a faulty sensor, which make it possible, with a certain degree of probability, to return it to a working state:
Repairing a lambda probe by soaking in phosphoric acid
1. Rinse the device with phosphoric acid at room temperature for 10 minutes. Acid corrodes carbon deposits and deposited lead on the rod
It is important not to overdo it, so as not to damage the platinum electrodes. The device is opened by cutting off the cap at the very base on a lathe, and the rod is dipped in acid, then washed in water and the cap is welded back to its original place using argon welding.
After the procedure, the signal is restored after 1-1.5 hours of engine operation.
Old and new lambda probe
2. “Soft cleaning” of electrodes with an ultrasonic dispersant in an emulsion solution. During the procedure, electrolysis of viscous metals deposited on the surface may occur. Before cleaning, take into account the design of the probe and the material of its manufacture (ceramics or metal ceramics), on which inert materials are applied (zirconium, platinum, barium, etc.). After restoration, the sensor is tested using instruments and returned to the car. The procedure can be repeated many times.
Cleaning
p, blockquote 58,0,0,0,0 —>
Cleaning the lambda probe is a last resort. It is performed only when there is confidence that the sensor accurately shows incorrect data and the last hope before sending it to the trash bin is cleaning.
p, blockquote 59,0,0,0,0 —>
There is experience in cleaning the probe using phosphoric acid or a rust converter. In any case, only the working surface of the sensor needs to be cleaned. To do this, the protective cover of the lambda probe must be removed.
p, blockquote 60,0,0,0,0 —>
It is better to clean it by regular washing, after first immersing the working area of the sensor in orthophosphoric acid for 20 minutes. You can clean it with a soft brush made of natural fibers. A good result can be obtained by using a goose feather as a brush.
p, blockquote 61,0,0,0,0 —>
The main symptoms of a malfunctioning lambda probe
The main sign of a faulty lambda probe is a change in engine operation, since after its breakdown the quality of the fuel mixture supplied to the combustion chamber significantly deteriorates. The fuel mixture essentially remains uncontrolled, which is unacceptable.
The reason for the lambda probe to fail to operate may be the following:
- depressurization of the housing;
- penetration of external air and exhaust gases;
- overheating of the sensor due to poor-quality engine painting or improper operation of the ignition system;
- obsolescence;
- incorrect or interrupted power supply that leads to the main control unit;
- mechanical damage due to incorrect operation of the vehicle.
In all of the above cases, except the last one, failure occurs gradually. Therefore, those car owners who do not know how to check the lambda probe and where it is located will most likely not immediately notice the malfunction. However, for experienced drivers it will not be difficult to determine the reason for changes in engine performance.
The gradual failure of the lambda probe can be divided into several stages. At the initial stage, the sensor stops functioning normally, that is, at certain operating moments of the motor, the device stops generating a signal, subsequently destabilizing the idle speed.
In other words, they begin to fluctuate over a fairly wide range, which ultimately leads to a loss of quality of the fuel mixture. At the same time, the car begins to jerk for no reason, you can also hear popping noises that are uncharacteristic of the engine, and a warning light always lights up on the instrument panel. All these anomalous phenomena signal to the car owner that the lambda probe is not working properly.
At the second stage, the sensor stops working completely when the engine is not warmed up, while the car will signal the driver about the problem in every possible way. In particular, there will be a noticeable loss of power, a slow response when pressing the accelerator pedal and the same popping noises from under the hood, as well as unjustified jerking of the car. However, the most significant and extremely dangerous signal of a lambda probe failure is engine overheating.
If you completely ignore all previous signals indicating a deterioration in the condition of the lambda probe, its breakdown is inevitable, which will cause a large number of problems. First of all, the possibility of natural movement will suffer, fuel consumption will also increase significantly and an unpleasant, pungent odor with a pronounced hint of toxicity will appear from the exhaust pipe. In modern automated cars, in the event of a breakdown of the oxygen sensor, an emergency lock can simply be activated, as a result of which subsequent movement of the car becomes impossible. In such cases, only an emergency call to a tow truck can help.
However, the worst case scenario is depressurization of the sensor, since in this case the movement of the car becomes impossible due to the high probability of engine failure and subsequent expensive repairs. During depressurization, exhaust gases, instead of exiting through the exhaust pipe, enter the atmospheric reference air intake channel. During engine braking, the lambda probe begins to detect an excess of oxygen molecules and urgently sends a large number of negative signals, which completely disables the injection control system.
The main sign of sensor depressurization is a loss of power, this is especially felt during high-speed driving, a characteristic knocking sound from under the hood while driving, which is accompanied by unpleasant jerking, and an unpleasant odor that is emitted from the exhaust. Depressurization is also indicated by visible deposits of soot formations on the exhaust valve body and in the area of the spark plugs.
How to determine a faulty lambda probe is described in the video:
How to choose high-quality fuel for a car?
Since all failures of the oxygen sensor occur due to low-quality fuel, it is worth paying special attention to its selection. For example, you should not purchase gasoline from an unknown manufacturer, second-hand. Typically, such “gray” gasoline is of very poor quality and contains harmful impurities.
Also, do not replace the brand of gasoline with another one not recommended by the manufacturer. The fact is that the entire fuel system and power unit are assembled at the factory for a certain type of gasoline, and if you replace it, you can significantly reduce the service life of both the engine and the entire car as a whole.
The same effect can be achieved by independently altering the fuel system, carried out by the car owner in order to switch to cheaper gasoline.
Another way to prevent fuel sensor breakdowns is timely maintenance. The fact is that a fully operational fuel system produces the cleanest exhaust mixture, which, in turn, has a gentle effect on the sensor without causing damage to it.
If the lambda probe begins to give incorrect readings, it must be replaced to prevent serious damage to the power unit.
Oxygen sensor for Lada Priora: original, analogues, price, catalog numbers
Despite the fact that the price of the original controller is slightly higher than 1,500 rubles, not many car enthusiasts are willing to buy factory spare parts. Cheap analogues are often preferred.
So-called “fake devices” are installed instead of standard sensors. After 90 - 100 thousand km. The Lada Priora catalyst becomes unusable, as evidenced by a number of signs. At the request of the client, the service station technicians remove (cut out) the standard catalyst from the exhaust system and replace it with a “dummy”.
Dummy exhaust manifolds are made according to the scheme: 4-2-2 or 4-2. Popularly called spiders. This is a one-piece design together with the exhaust manifold coupling and exhaust pipe.
To prevent the electronic control unit from identifying a system error, the lambda probe is replaced with one of the following types of decoys:
- Mechanical;
- Electronic.
Symptoms of a malfunctioning lambda probe
Failure of the oxygen sensor can be determined by several signs. If it fails, the quality of the fuel mixture supplied to the combustion chambers deteriorates. Engine operation becomes unstable at idle.
The range of speed fluctuations increases significantly. The correct operation of the vehicle’s fuel system decreases. The car jerks when driving.
There is a significant reduction in power. In addition, the system's response to pressing the accelerator pedal is reduced. The car begins to “sneeze” - characteristic sounds are heard under the hood.
Disabling the lambda probe.
Some car enthusiasts are interested in whether it is possible to disable the CD. It is theoretically possible to do this, but it is not advisable. It is not recommended to disable the lambda probe, because the engine electronic control unit (ECU) enables an autonomous mode of supplying the fuel-air mixture. This affects fuel consumption for the worse and leads to an increase in toxic substances in exhaust gases. If you drive with a disabled or faulty CD for a long time, the following problems may arise:
a black soot deposit will quickly appear on the spark plugs, which will lead to poor engine starting, especially when cold, poor ignitability of the fuel-air mixture, and a decrease in the spark plug gap;
carbon deposits on the valves, which leads to a decrease in the flow of suction and exhaust channels in the cylinder head, intake manifold and exhaust manifold, which reduces the vehicle’s power;
carbon deposits in the catalyst, which can even lead to its melting, after which the engine will stall immediately after starting;
carbon deposits on the pistons, which can ultimately cause a major overhaul, just like the above-mentioned malfunctions.
In connection with the above, the question of whether it is possible to drive with the CD turned off has a negative answer, because no motorist wants serious problems to arise with his vehicle.
Disabling the oxygen sensor is possible during exhaust system repairs. But first you need to disconnect the battery terminals, since any disconnection of the part chips is recorded in the RAM of the control unit, and on some car models the information is immediately sent to ROM.
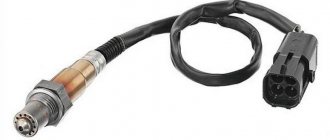
What is the lambda probe responsible for?
What does a lambda probe look like?
Simply put, a lambda probe, also known as an O2 sensor, is a sensor that estimates the amount of unburned fuel and oxygen in a car’s exhaust system. Although lambda probes are also used in other areas, in this article we will talk specifically about automotive oxygen sensors.
What is this oxygen sensor for? So-called catalysts, which reduce the share of harmful substances in exhaust emissions, are currently available in every more or less modern car. The lambda probe controls the amount of oxygen in the catalysts, thus extending their life. It also significantly affects the amount of fuel consumed by your car and improves engine performance.
If we mention specific facts, it is known that fuel burns efficiently only with the correct ratio of fuel and air in the fuel mixture. Otherwise (if there is less or more air), the catalysts will wear out and become unusable. Therefore, the lambda probe directly affects the vehicle's exhaust system.
Comments
Guests cannot leave comments on the site, please log in.
Products for LADA at the best price
A selection of accessories for LADA from AliExpress
Content
Some car enthusiasts who are wondering how to check the oxygen sensor of a VAZ 2114 think that doing it themselves is extremely difficult, but this is not so. It is enough to follow the instructions (which can be found below in the text). This will be quite enough to solve the problem.
The VAZ 2114 has a lot of complex electrical devices, each of which requires maintenance or periodic maintenance. The VAZ electronic control unit allows you to obtain data on the current state of any vehicle systems.
An oxygen sensor (also called a lambda probe) is one of the key elements of a car. If it fails, the performance of the machine will be impaired. In order to prevent this, you should study the principle of operation of the device, as well as the technology for checking an oxygen sensor that has failed.
Oxygen sensor VAZ 2114
Why do you need a lambda probe and when might you need a lambda probe snag Kalina
Using an oxygen sensor, the amount of oxygen contained in the exhaust gases is measured. The controller transmits a signal to the vehicle's ECU. The electronic brain makes a conclusion about the quality of fuel combustion and regulates its supply to the engine. This ensures stable operation of the catalytic unit.
The range of effective operation of the catalysis unit is quite small. Due to these features, it is necessary to monitor the serviceability of the lambda probe, because it is it that controls the exhaust tract.
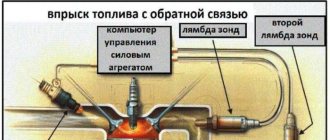
In cases where the environmental friendliness of the car complies with Euro and Euro 2, there is only one oxygen controller and is installed on the exhaust manifold in front of the catalyst. If environmental friendliness is Euro 3 and higher, then there is another sensor installed after the catalytic chamber.
Later in this article we will explain in detail why and when a lambda probe snag may be needed.
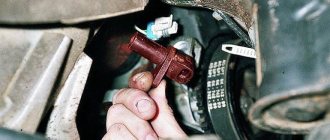
Where is?
Oxygen sensor 4x4
Oxygen sensor (control lambda) for Priora, Kalina
The oxygen concentration control sensor is installed on the body of the exhaust pipe of the catalytic collector (pants). In the photographs, number 1. However, if the car meets Euro-3 standards in terms of environmental friendliness, then, in addition to the driver, it also has a diagnostic oxygen sensor. It, in turn, stands after the catalyst and is practically invisible from the engine compartment.
Types of lambda probes
Modern cars are equipped with the following sensors:
- Zirconium;
- Titanium;
- Broadband.
Zirconium
One of the most common models. Created on the basis of zirconium dioxide (ZrO2).
The zirconium oxygen sensor operates on the principle of a galvanic cell with a solid electrolyte in the form of zirconium dioxide (ZrO2) ceramics.
The ceramic tip with zirconium dioxide is covered on both sides with protective shields made of conductive porous platinum electrodes. The properties of an electrolyte that allows oxygen ions to pass through appear when ZrO2 is heated above 350°C. The lambda probe will not work until it reaches the required temperature. Fast heating is achieved by a heating element with a ceramic insulator built into the body.
Exhaust gases enter the outer part of the tip through special gaps in the protective casing. Atmospheric air enters the sensor through a hole in the housing or a porous waterproof sealing cap (cuff) of the wires.
The potential difference is formed due to the movement of oxygen ions through the electrolyte between the outer and inner platinum electrodes. The voltage generated at the electrodes is inversely proportional to the amount of O2 in the exhaust system.
Article on the topic: How to use a car paint thickness gauge
The voltage that is generated across the two electrodes is inversely proportional to the amount of oxygen
Based on the signal coming from the sensor, the control unit regulates the composition of the fuel assembly, trying to bring it closer to stoichiometric. The voltage coming from the lambda probe changes several times every second. This makes it possible to regulate the composition of the fuel mixture regardless of the operating mode of the internal combustion engine.
Based on the number of wires, several types of zirconium devices can be distinguished:
- In a single-wire sensor, there is a single signal wire. Ground contact is made through the housing.
- The two-wire device is equipped with signal and ground wires.
- Three- and four-wire sensors are equipped with a heating system, control and grounding wires to it.
Zirconium lambda probes, in turn, are divided into one-, two-, three- and four-wire sensors
Titanium
Visually similar to zirconium. The sensor's sensitive element is made of titanium dioxide. Depending on the amount of oxygen in the exhaust gases, the volumetric resistance of the sensor changes abruptly: from 1 kOhm with a rich mixture to more than 20 kOhm with a lean mixture. Accordingly, the conductivity of the element changes, which the sensor signals to the control unit. The operating temperature of the titanium sensor is 700°C, so the presence of a heating element is mandatory. There is no reference air.
Due to its complex design, high cost and fastidiousness to temperature changes, the sensor is not widely used.
In addition to zirconium, there are also oxygen sensors based on titanium dioxide (TiO2)
Broadband
Structurally differs from the previous ones in 2 chambers (cells):
- Measuring;
- Pumping room.
In the measurement chamber, using an electronic voltage modulation circuit, the gas composition corresponding to λ=1 is maintained. The pump cell, when the engine is running on a lean mixture, removes excess oxygen from the diffusion gap into the atmosphere; when the mixture is rich, it replenishes the diffusion hole with the missing oxygen ions from the outside world. The direction of the current to move oxygen in different directions changes, and its magnitude is proportional to the amount of O2. It is the current value that serves as the exhaust gas detector λ.
The temperature required for operation (at least 600°C) is achieved through the operation of the heating element in the sensor.
Wideband oxygen sensors detect lambda from 0.7 to 1.6
Operating principle
The sensor's sensing element can be found in the exhaust gas stream. The electrolyte, which is located in one of the exhaust gas streams, is heated to a high temperature (350°C). To speed up warming up to operating temperature, the lambda probe has a special heating element. The sensor is installed in such a way that the tip on one of its parts is in contact only with gases, and on the other with clean air.
When oxygen accumulates in the collector, a process of changing the potential difference occurs. This information is transmitted to the ECU. The system then changes the amount of fuel that is sent to the cylinders.
Signs of a malfunctioning oxygen sensor on a Lada Priora car
The symptoms are in many ways similar to other breakdowns, so it is important to correctly identify the breakdown at the initial stage
- Difficulty starting the engine “cold” or “hot”;
- Increased fuel consumption;
- Power reduction;
- Passive acceleration dynamics;
- The engine is not running properly;
- An indicator on the instrument panel indicates the presence of system errors in the electronic control unit;
- Periodic shooting sounds are heard from the exhaust pipe, which indicates an enrichment (leanness) of the combustible mixture;
- Blue, gray, black smoke from the exhaust pipe.
If one or more signs are detected, immediately contact a service station specialist for a comprehensive diagnosis.
Checking the lambda probe: method No. 1
The simplest diagnostic method is visual inspection. To make sure that the Kalina oxygen sensor is faulty, you need to inspect its tip. It should not have any traces of soot. If any are present at the tip, it means that an enriched fuel mixture has entered the cylinders. As a result, part of it did not burn and went directly into the collector.
Another sign of a malfunction is a shiny coating. This indicates a high concentration of lead in the fuel. It is worth noting that this metal severely damages the ceramic particles of the sensor and the latter is not able to work normally. Usually the presence of lead indicates poor fuel quality. You should not refuel at questionable gas stations.
Gray deposits also lead to sensor replacement. This indicates the presence of engine oil in the exhaust. This happens due to worn rings in the cylinder-piston group. But gray deposits also form when using third-party fuel additives.
A more effective method of checking the Kalina oxygen sensor is to measure the voltage at the contacts. For this we need a voltmeter (or multimeter). So, turn on the ignition and connect to the contacts. The normal value is 0.45 V. If this parameter is below 0.42 V, it means the element has failed.
This method consists of computer diagnostics using an ELM adapter. For Lada Kalina, the optimal choice would be ELM-327. After connection, the computer reads all errors from the block. Below we list several codes indicating a malfunction of the Kalina oxygen sensor:
- PO134. No power to the sensor.
- PO136. The sensor shorts to ground.
- PO140. Talk about a broken circuit.
If you have a Kalina with a lambda probe heater, error PO135 may also appear. In this case, the element is also considered faulty.
In order to replace the oxygen sensor on Kalina, you will need a set of open-end wrenches and WD-40 fluid. If the design provides only one lambda probe, it is not necessary to carry out work in the inspection hole. This sensor is located on the exhaust manifold - to get to it, just open the hood.
Please note: work on removing and installing the oxygen sensor must be carried out with the engine cooled down. The lambda probe must first be treated with VD-40 liquid
What is it for? During operation, the thread strongly sticks to the manifold, so it becomes impossible to unscrew such an element. Next, remove the block with contacts. It can be mounted on a plastic clamp. The last one will have to be cut. The contacts themselves fit into the cooling system pipe. At the next stage, using a 22mm wrench, unscrew the oxygen sensor outward. Then all that remains is to install the new element in the reverse order
The lambda probe must first be treated with VD-40 liquid. What is it for? During operation, the thread strongly sticks to the manifold, so it becomes impossible to unscrew such an element. Next, remove the block with contacts. It can be mounted on a plastic clamp. The last one will have to be cut. The contacts themselves fit into the cooling system pipe. At the next stage, using a 22mm wrench, unscrew the oxygen sensor outward. Then all that remains is to install the new element in the reverse order.
Please note: the wires from the oxygen sensor must not come into contact with any metal part of the engine. Otherwise they may melt
Can it be cleaned?
A new sensor for Kalina costs around one and a half thousand rubles. The amount is small, but there are still people who want to save. Instead of replacing the sensor, they clean it by soaking it in some solvent.
But as practice shows, these works are ineffective. Even in the absence of carbon deposits and deposits, such a lambda probe will not work correctly. Therefore, in the event of a malfunction, the oxygen sensor must only be replaced. It's much easier and faster than cleaning.
Causes of oxygen sensor failure
- Poor quality fuel. The impurities it contains clog the sensor electrodes.
- Worn oil scraper rings.
- Antifreeze or solvents get on the ceramic tip of the controller.
- If the oxygen sensor housing overheats, this may occur due to incorrect operation of the ignition system.
- Incorrect connection of this part.
- Multiple attempts to start the engine with short intervals between them. In this case, unburned fuel accumulates inside the exhaust manifold, which may result in a fire.
How to replace the speedometer cable on a VAZ 2101-VAZ 2107?
Note! Before buying this sensor in a car store, take exactly the same one that you had (you need to look at the markings for this on the old sensor, but for this, of course, you will have to remove the sensor), if you neglect this, the engine will most likely not work as expected should, we also categorically do not recommend that you take oxygen sensors without heating, (Even if your car was equipped with one), such sensors may not always give correct readings until they warm up, due to which the engine will again not work correctly, so before When purchasing a new sensor, be sure to take all these nuances into account!
1. The sensor is removed very easily, first remove the negative terminal from the battery (How to do this, read “in this article”, point 1) and then disconnect the deck and wire connectors, as soon as this is done, unscrew the sensor itself by the thread that is on applied to it and thereby remove it from the hole in the exhaust manifold and that’s it, you can install a new one.
Additional video: Watch the video that talks about the oxygen sensor, which is located below:
Source
Replacing and checking the oxygen concentration sensor on LADA
The oxygen sensor (lambda probe or DC) determines the amount of free oxygen remaining in the exhaust gases. Based on its data, the electronic engine control unit adjusts the composition of the fuel-air mixture. Let's look at the features of replacing and checking the oxygen sensor on LADA cars.
Where is the oxygen sensor located? Control and diagnostic oxygen concentration sensors are installed in the exhaust system of LADA cars.
Signs of a malfunctioning oxygen sensor:
- high fuel consumption;
- floating engine idle speed;
- the car accelerates poorly;
- etc.
Catalog number (article) DK:
Replacing oxygen sensors. To avoid burns, we begin work after the exhaust system has cooled. Before unscrewing the sensors, disconnect the block with the wires (press the latch).
- To remove the upper oxygen sensor, you will need a 22 key.
- To unscrew the lower sensor, you will need an inspection ditch and a special “22” socket, or you can cut off the handle of a regular “22” open-end wrench.
If necessary, treat the sensor connection with lubricant.
Installation in reverse order. If the sensor is being reused, treat the threads with a special mounting paste, avoiding contact with the protective tube. Because the sensor draws reference air through the housing, it cannot be treated with contact spray or lubricant.
Checking the oxygen sensor (both sensors are checked in the same way). The easiest way is to replace the sensor with a known good one.
- Check the supply voltage of the heating element. We connect the “negative” probe of the voltmeter (the multimeter is in engine voltage mode, and the other to terminal B or No. 4. The voltage at the terminal must be at least 12 V. If it is not there or it is less than 12 V, then the battery, power circuit or ECU is discharged .
- We check the voltage between terminals A and C or 1 and 2 (we connect the negative probe to terminal C or 1). The voltage should be 0.45 V. If it is not there or it differs by more than 0.02 V, then the power circuit or the ECU is faulty.
If the oxygen sensor is faulty, it is replaced with a new one. In some cases, you can try to restore it. Have you ever had to change or check the lambda probe yourself? What difficulties have you encountered?
Caution: "Voltage"
In order to find out whether voltage is supplied to the heating circuit, you will need additional equipment. The signal is measured with a dial or digital voltmeter or a more modern multimeter.
- Turn on the ignition without disconnecting the sensor connector.
- Insert the probes into the wire connectors.
- The monitor should display
12 V. This value corresponds to the battery voltage.
- “+” goes to the heater directly through the fuse. If it is missing, you need to check the chain links: “battery-fuse-oxygen”.
- “—” is transmitted via electronic control systems. If it is missing, you need to check the circuit connectors leading to the control unit.
The reference voltage is checked with the same voltmeter or you can use a multimeter.
- Turn on the ignition.
- Measure the voltage between the signal wire and ground.
- The value of the number should be 0.45 volts.
If the readings differ by 0.2 V or more, this indicates a problem in the signal circuit or poor contact to ground.
Troubleshooting
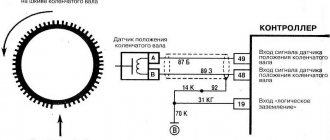
Connection diagram
The malfunction may be in the UDC heater circuit and in the circuit of the sensor itself.
Fault code P0030, P0032 indicates a heater malfunction.
Checking the heater circuits is carried out for the power circuit and for the control circuit of the UDC heater:
- for the heater power circuit, turn off the ignition, disconnect the wiring harness block;
- disconnect the harness block from the controller. We check contact X1/C4 by shorting it to the vehicle’s on-board network;
- if there is no short circuit, then the controller is faulty;
- when there is a short circuit, disconnect the UD block;.
- check the closure of contact “D” of the UDC block to the on-board network;
- the presence of a short circuit indicates a faulty wiring harness;
- absence of closure with code P0032 means failure of the UDC.
When code P0030 occurs, we perform the following actions:
- The controller block must be in place;
- The UDC block must be removed;
- then turn on the ignition and check the presence of supply voltage at contact “B” (12V);
- lack of supply voltage means a break in the heater power supply circuit;
- Next, we check the resistance between contacts “B” and “D” of the UDC;
- We measure the voltage on contact “D” - if it is less than 1V, then there is a break in the UDC control circuit;
- if the resistance is more than 1 kOhm, the UDC is faulty;
- otherwise the controller is faulty.
Finding out the cause of a malfunction associated with the control oxygen sensor at home is quite difficult.
There is no point in buying a diagnostic device or a special pressure gauge for this. However, you can check the circuits connected to the sensor. If the sensor's power supply circuits are in good condition, it is possible to assume a failure of the UDC and carry out diagnostics in the appropriate place.
We check the exhaust system for leaks and repair them if necessary.
By external inspection we determine the integrity of the ceramic insulator, wiring harness, block and UDC contacts.
At the same time, expect that their repair is not allowed. If damaged, the sensor assembly must be replaced.
When an error is registered, “low oxygen sensor signal level” or “high oxygen sensor signal level,” the ECM continues to control the engine without taking into account the UDC signal.
Since this happens in power mode, you can confidently count on reliable operation of the engine with such malfunctions. In this case, the efficiency and effect of the presence of a catalytic converter are lost.
To check the oxygen concentration circuit, we check the circuit between the contacts:
- on the UDC block there is contact “C”, on the controller block there is contact 4;
- on the UDC block there is contact “A”, on the controller block there is contact 30;
- The controller block is installed in place and the ignition is on, between contacts “A” and “C” of the UDC block there should be a voltage of about 450 mV.
Having verified the integrity of the circuit and the presence of a controller signal, we assume that the UDC is malfunctioning.
After all the manipulations carried out, we can recommend the most radical method of checking - replacing the supposedly faulty one with an oxygen sensor installed after the converter!
Errors associated with the lack of UDC activity are described in detail here.