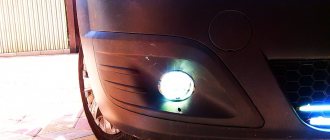
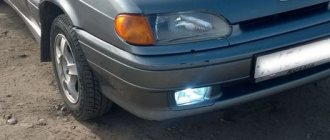
Fog lights are designed to provide more intense illumination of the roadway in poor visibility and bad weather conditions. Such optics are sometimes used during the day when the car is moving outside the city. It should be noted that a feature of fog lights is a wider angle of direction of the light flux. These headlights produce a flat and wide horizontal beam. Fog lights are not standard installed on Kalina in all trim levels. Therefore, the issue of choosing and installing this optics is very important for owners of these cars.
How to choose fog lights
The manufacturer equips the PTF car with only one configuration - this is the maximum “Lux” equipment. Owners of other versions are forced to install fog lights on the Kalina with their own hands.
But first you need to know what these headlights are. They are distinguished according to three criteria:
- Manufacturer.
- Quality of production of optics.
- Equipment.
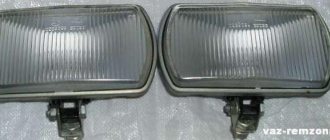
If we take these factors into account, then the best option is considered to be several headlights from different brands. Thus, Bosch optics are equipped with flat glass of high quality. Standard fog lights for the car in question are manufactured in Ryazan. The optics are equipped with flat glass.
A more affordable analogue is the Kirzhach product. This optic features convex glass. In it, through the use of a convex lens, the light flux is concentrated and directed where it is needed. According to the owners, this is a solid design. Luch produces high-quality fog lights for Kalina. But the headlights are not equipped with a defogging valve. This is an analogue of Bosch, which is produced by a domestic manufacturer.
If you need to install a PTF, but at the same time want to save money, there are a lot of Chinese products on the market. Among these products you can find quite high-quality headlights. One of the Chinese brands is ProSport. It is impossible to say anything about the quality of Chinese products. One copy may be good, but another will fail in just a few days. If you choose good foglights for Kalina, then it is either Bosch or Kirzhach. These are the most popular manufacturers whose products are in great demand among car owners. They will last quite a long time.
What can you buy?
Despite the wide variety of fog lights in auto parts stores, many owners do not understand what to choose and which fog lights are best for Kalina.
Many are also confused by the different terminal blocks, which forces them to look for adapters to integrate the PTF with the standard electrical wiring system (see also the article Wiring diagram VAZ 21074 - injector: we understand the intricacies).
The classic ones have lamps with an HB4 base, and the lensed ones have H11.
If you approach the choice from a practical point of view, then for the Lada Kalina, without additional alterations and changes to the standard electrical circuit, the following are suitable:
- Fog lights Kirzhach on Kalina (lensed);
- Classic PTF made by Bosch (headlight with reflector);
Advice: we can also recommend Luch foglights, since they are a copy of the German ones. But their main advantage is the price, while the quality is much worse.
Among the advantages of these models is the fact that the adjustment of Kalina’s fog lights will be simpler and more understandable due to their installation in the standard mounting locations of the front bumper.
Here's how to adjust fog lights on Kalina if the recommended models are installed
Standard fog light equipment
PTF of any manufacturer has standard equipment. So, the kit includes frames for fastening, the optics itself in the amount of two pieces.
The kit also contains mounting bolts, wires and connectors, a relay, a button for turning on/off, connectors for connecting wires and self-tapping screws. Often the devices are additionally equipped with corrugation, in which the wires can be hidden.
How to install fog lights on a Kalina car?
Installation is carried out without the need to dismantle the bumper. In order to perform installation, you only need to unscrew and remove the front parts of the fender liners. The bumper plug can be removed using a flathead screwdriver. The manufacturer often includes a special frame mount in the kit. It is installed instead of a plug in the bumper. The optics themselves are installed and secured last.
But there is an installation method where it is necessary to dismantle the bumper. To do this, first unscrew the screws and the mounting bolt, and then remove the sides of the bumper from under the wheel arches. Next, the plugs are removed and fog lights are installed. "Kalina" continues to stand still. From the inside, the PTF is secured to the bumper with three self-tapping screws. Outside, until it clicks, a decorative frame is installed in place of the plug.
Connecting fog lights
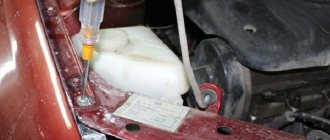
First of all, the wiring harness is carried out under the hood and connected using the supplied connectors to the left and right headlights. The “mass” is fixed to the body. “Plus” is connected to the battery terminal according to the diagram supplied by the manufacturer (one of them is shown in the photo below).
Next, the harness, which is located under the hood, is pulled into the cabin. It is better and more convenient to do this along the standard wiring harness, which is located in the left wing. It is more convenient to do this if you first remove the fender liner. Further all work will be carried out in the salon. The ashtray needs to be removed. To do this, remove four screws. The button covers are pushed through the opening.
There are two more screws under these plugs. They hold the trim on the instrument panel. Then remove the temperature control knobs. They can be easily removed by pulling them towards you. Next, carefully move the cover on the panel and at the same time push out the plug for the air conditioner button. A button that controls the fog lights will be installed in place of the plug.
PTF adjustment
To get the most out of your fog lights, you need to adjust the light. This is a simple procedure that even beginners can easily handle. Before you start setting up, you need to place the car on the most level surface possible. We need a wall or a solid fence in front of this area. It is in this place that the fog lights installed on the Lada Kalina will be adjusted. First of all, experts recommend checking the tire pressure. It is important that it is the same in all wheels. This is the only way the car will stand perfectly level. Then check the distance from the center point of the headlight to the ground. A line is drawn on the wall at the same height. According to GOST standards, it is necessary that the driver’s seat have a load of 75 kg.
The settings are performed in the dark. The machine is placed on a platform at a distance of 5 meters from the wall. Then the headlights are turned on. The setup process itself is performed using a special screw. It is located at the bottom of the plug. The process requires a Phillips screwdriver. Cover one of the headlights with any opaque material, and then use a screwdriver to adjust the luminous flux so that its center is on or below the drawn line. Then the same operation is carried out for another headlight.
How to adjust the light output
After installing new headlights or removing the front bumper, the car owner needs to adjust the light output.
The luminous flux for each headlight is set separately
The fact is that fog lights have a completely different principle of illuminating the road surface:
- PTFs have a clear upper boundary (cut);
- This is due to the physical properties of fog.
The best solution to the problem would be to visit service stations that have special adjustment stands designed for any car model. But if this is not possible, or the fog light on Kalina was replaced and removed from its original location, then you can do this operation yourself.
The algorithm will be as follows:
- Place the car 3 meters from a blank wall (residential building, garage);
- Check the tire pressure and bring it to factory settings;
- Using chalk and a ruler, mark two vertical lines on the wall opposite each wheel;
- Measure the distance from the ground to your car's headlights. This will be the parameter – h;
- Draw a horizontal line on the wall at the calculated height;
- Turn on the fog lights and cover one of them with a cloth or newspaper;
- Use the adjusting screw to set the luminous flux;
- Repeat the operation for the other headlight.
That's it, the work is finished, and the best part is that the price of the work is minimal.
Preparing to install fog lights
PTFs have a longer and more directional range of luminous flux. Almost all the light from such headlights is directed only directly, which allows you to identify the cars of other drivers in advance without shining them in the eyes.
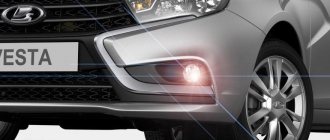
The Lada Kalina car is equipped with PTF “Lux”, however, there is a huge variety of models of such headlights on the spare parts market, so every car enthusiast will be able to install fog lights on the Lada Kalina that he likes best. Depending on the class and quality of parts, several types of foglights are distinguished.
In the process of replacing old headlights with new ones, you do not need to drill or cut anything. Included with the PTF for the Lada Kalina are special trims in the shape of the bumper cutout. All that will need to be removed are the plugs. After this, you can begin installing the parts.
In order to quickly and efficiently replace old fog lights with new ones, you will need to prepare or buy some spare parts and tools. So, for the work you will need:
- fog lights (set);
- relay, wires and button kit for connecting headlights;
- fuse and fuse holder;
- tape measure - necessary for adjusting the light;
- wrenches with heads 8 and 10;
- iron steel wire (small piece) - in order to stretch the wires;
- screwdrivers - Phillips, large flat;
- nylon ties - to secure wires;
- wire cutters;
- soldering iron;
- insulating tape;
- hexagon, which is needed to adjust the direction of the light.
Having all the above materials and tools available, you can safely get to work, of course, having first studied the instructions for replacing the PTF.
Principles of classification
PTF is characterized by a directional and long-range luminous flux. Taking into account quality and class, experts distinguish the following types of fog lights:
- square;
- round;
- double;
- for external installation.
On the second generation Kalina you can install halogen or xenon lamps. The latter type of optics has the following advantages:
- good brightness;
- long service life.
Experts recommend installing 2 fog lights from the German manufacturer OSRAM on the Lada Kalina. Optics of any color illuminate the road equally. Russian products are marked with the “E22” mark. Fog lights marked “02” meet all international requirements. There is a certain optics marking system:
- “C” - separate low beam device;
- “R” — high beam optics;
- “H” - headlight with halogen lamp;
- “PL” - a lamp with a diffuser made of optical plastic;
- “S” is a glass headlamp.
When choosing a fog lamp, experts recommend giving preference to optics with a sealed and durable housing and thick plastic. Glass headlights can quickly fail. You can install 2 aerodynamic fog lights with reliable fastening on Kalina.
It is better to install dismountable PTFs on the car. In such optics, you can replace glass or a burnt out lamp.
Types of PTFs and methods of installing them on Kalina
Stylish headlights for Kalina
There are a large number of fog lights that can be installed on a Lada Kalina car. PTF can be of the following types.
- Twin.
- Round.
- For outdoor installation.
- Square.
- Recessed.
- Oval.
However, in fact, not all of the above models can be installed instead of factory fog lights on Kalina. When making a thoughtless purchase, car owners have to redo the fastenings. If you want to avoid this, it is best to purchase one of the PTF kits produced by the following manufacturers.
- Bosch fog lights. A German copy, which is distinguished by high quality glass and light range. They are only sold as a pair.
- Fog lights “Luch”. One of the analogues of German products, the cost of which is significantly lower than the original. However, their quality is far from being the same as German foglights.
- ProSport fog lights from a Chinese manufacturer that produces spare parts for Russian cars.
- PTF “Kirzhach”. They have lens-shaped glasses that allow you to concentrate the range and brightness of the light stream.
It should be noted that all fog lights from the above manufacturers are ideal for Lada Kalina cars and will not require any additional manipulations. All you need to do is remove the old plugs and install new PTFs in their place. The new fog lights come with 4 plugs, which can be painted a different color if necessary to give the car more style.
PTF connection diagram
There are two common ways to install anti-fog lights.
- With the removal of the front bumper (a method that will be described).
- Without removing the bumper - the method is used by experienced craftsmen who have been repairing cars for many years.
Beginners are recommended to replace the PTF by first removing the front bumper. In the photo you can see what is included in the fog light installation kit.
Principle of operation
Before you do it yourself and install the purchased PTF kit on your car, you should understand the principles of operation of fog lights, and also find out what the car manufacturer recommends on this issue.
Advice: it would be useful to order the production of stickers for the headlights when purchasing foglights. They will protect the glass from branches and plant stems, as well as from stones flying from under the wheels.
Technical requirements
Current rules stipulate that fog lights should only work with side lights or low beam headlights (see also the article VAZ 21099 wiring diagram: carburetor with “Euro” panel). This is primarily due to current road safety requirements.
The second point that you should pay attention to is the installation location, determined by the provisions of GOST 8769-75:
- From the road - not lower than 250 mm;
- From external dimensions - no closer than 400 mm.
According to the requirements of GOST 8769-75, PTF must fit into the specified dimensions
Technical features
Currently, there are two main types of PTF used on Lada Kalina, in which:
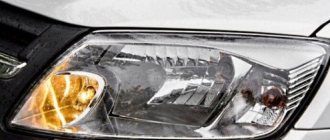
- The formation of a light spot is carried out on the headlight glass due to the marks applied to it. Such PTFs are considered classic and are commonly called a headlight with a reflector;
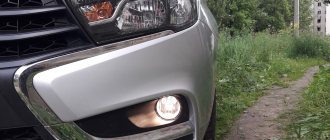
- The light spot is formed in a convex (parabolic) lens installed instead of glass. It is considered more progressive because it is equipped with halogen or xenon lamps. In everyday life they are called lensed.
Lensed fog lights for Kalina
Installation instructions for fog lights on Lada
This instruction is step-by-step, so it is imperative to follow the sequence of actions. Failure to comply with the installation steps may lead to installation errors and lack of the desired result.
- First you need to remove the front bumper. To do this, you need to first unscrew the fasteners. The screws are located at the bottom of the bumper under the grille. In addition, you need to unscrew the fasteners in the wheel arches, which are used to secure the edges of the bumper. The sides of the bumper must be removed from under the arches of both wheels. After this, the bumper is completely removed.
- Next, you should pull out the plugs, and the latches can be bent using a flat-head screwdriver. Now you need to screw the foglights using self-tapping screws. Each PTF is attached to 3 self-tapping screws.
- The following steps are carried out inside the car. Looking under your feet, or more precisely, under the clutch pedal, you can see a bundle of wires. At this point you need to push out the seal, and then use a metal wire to pull out the wires from the fog lights that run next to the main ones.
- The wires from the PTF must be connected to the main ones, and the entire bundle must be tightened using plastic clamps.
- Opposite the fog lights themselves, you need to leave wires of such length with connectors that they can be easily secured with zip ties. As for the negative terminals, they should be attached to screws on the car body.
- Since the total power consumed by PTFs is 110 W, they need to be connected only through a relay with a control button. The button itself can be installed on the dashboard or next to the lighter. In order to supply power to the headlights, you need to connect the pink wire, which is located in the fuse box, to the relay.
- The fuse to which the PTF is connected must be rated at 15 A. Power contacts of relays 30 and 87 are connected to the wires for the fog lights.
- After completing the work, you need to check the correct connections by connecting the battery terminal. Now the button in the cabin is pressed. If everything is in order and the headlights work, you can proceed to the final stage. For more unusual “cold” lighting, you can install xenon in the foglights.
- When installing the bumper on the car, the steps are performed in the reverse order. Now you need to check again that the entire system is working correctly.
Adjusting headlights yourself
After installation, you need to adjust the direction and brightness of the fog lights. To do this, the car is placed on a flat surface at a distance of 5 meters from the wall. Next, one headlight is covered, for example, with cardboard or a tin. By rotating the adjustment screw, you need to make sure that the boundary of the outgoing light is 0.5 m below the luminous flux level of the main headlights.
For the most precise adjustment, a special regloscope device is used, but you can do without it. This completes the process of installing new fog lights. If all steps were completed correctly, the new PTFs will serve for a long time and reliably.
Fog lights (FTL) are an additional source of light. The flat and wide horizontal beam of these headlights extends directly above the road, which improves road illumination in foggy conditions. PTFs were not installed on the Lada Kalina in all modifications, so the question “how to install fog lights on Kalina” is still relevant.
Readiness of electrical equipment
The electrical wiring on the Lada Kalina met modern requirements.
Already in the basic version:
- double-filament fog lamps were installed in the rear headlight units;
- the electrical circuit included relays and fuses (see also the article VAZ wiring: the need for modernization).
Fog lights Lada Kalina - connection diagram on production models
The diagram roughly shows:
- PTF circuit fuse (F9 according to international classification);
- Electronic immobilizer (anti-theft system);
- Rear headlights with PTF sections;
- Vehicle lighting control unit (installed on the instrument panel);
- Egnition lock.
Connecting Kalina fog lights
In addition to fog lights and mounts, the kit should include wiring, which is often missing. We recommend that you purchase several meters of wire with a cross-section of at least 0.75 sq. mm. We pull the wires from the engine compartment into the passenger compartment using a piece of wire on the starboard side through the hole above the clutch pedal. To gain access you will need to remove the front left wheel and fender liner.
The most practical places to install the PTF button are in the tunnel, or on the panel instead of the air conditioner button.
A less popular method is to connect the PTF to the light control module (LCM). We fix the relay with a hinged mount in the mounting block.
Repair work
- Fog lights from Bosch - German optics are equipped with high-quality glass. These fog lights are characterized by their range of light;
- optics from "Luch" - low price and quality;
- fogs "ProSport" (Chinese manufacturer);
- products from Kirzhach (lined headlights).
The fog lights come with plugs and covers. To install new LED or fog lights on Lada Kalina 2, you will need:
- optics kit;
- wiring;
- relay;
- button;
- fuse with holder;
- screeds.
PTF must be installed in standard holes. Otherwise, the headlights are positioned symmetrically with respect to the longitudinal axis (above 25 cm from the asphalt and at a distance of up to 40 cm from the side marker plane). The power of the lighting device should be within 50-60 W. The lamp base must have the following designations: H-3, H-1.
Before connecting the PTF, it is recommended to decide on the method of installing the optics:
- with preliminary removal of the bumper;
- without dismantling work.
The first method is used by beginners. Installation and connection of fog lights using the second method is used by qualified craftsmen.