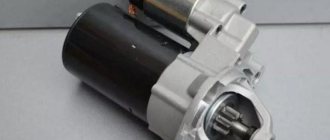
The Bendix or starter drive is a unit consisting of a clutch with a gear and a fork connected to a solenoid relay. The clutch is also called an “overrunning” clutch. Three types of starters were installed on Lada 114 hatchbacks: 29.3708, 423.3708. and also 5712.3708. The first two differ only in the shape of the fork, as well as in the design of parts not related to Bendix. And the starter 5712.3708 is a modern device equipped with a gearbox. The seating dimensions of all starters do not differ in any way. On any car, including the VAZ-2114, replacing the Bendix begins with dismantling the starter. We will look at this operation now.
The following video shows how a starter behaves with a faulty bendix.
Examination
Checking the Bendix begins with an external inspection of the gear. It should have straight teeth with a pronounced or slightly rounded lead-in chamfer, facilitating engagement with the flywheel. Without this chamfer, with a possible tooth-to-tooth contact, the starter will not rotate the flywheel until the crankshaft moves at a small angle.
The presence of chips and cracks on the teeth is unacceptable.
How to check starter bendix? Fix its outer race (by wedging it against the body with a powerful screwdriver) and turn the gear in both directions. In one it should turn easily, in the other it should be tightly blocked. Difficulty turning to the “idle” side indicates jamming of the rollers or contamination of the bendix.
First news of the problem
It is quite possible that the cause may be damaged wiring or a faulty ignition switch.
If when you turn the key in the ignition switch you hear a click and nothing else happens, then the reason for this may be a discharged battery or the starter itself.
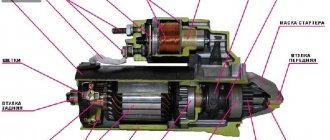
I will not describe the device and principle of operation of the starter; full information on this topic can be studied in the picture below.
Problems with the starting system can be caused by poor maintenance or simply wear and tear. With many modern vehicles equipped with a start/stop button, the load on the starter and battery has increased significantly.
Bendix replacement
Regardless of whether you are going to replace the bendix or rebuild it, you will first have to remove it from the starter. There are two types of starters:
- With a “beak”, where the front support of the starter shaft is made in its housing.
- And without the “beak” where the front starter support bushing sits in the crankcase.
The most common mechanisms are of the first type, the “beakless” ones are familiar from the VAZ of the “eighth” family.
Since you can change the Bendix on the starter only by removing the starter itself, first the battery ground is disconnected, and the power cable and the solenoid relay control wire are removed from the starter. Having unscrewed the fastenings of the starter to the crankcase, we pull it out.
Regardless of the design of the starter, the solenoid relay is first removed, since its plug later interferes. We unscrew the nut on the power terminal of the starter winding, remove the terminal, then unscrew the screws connecting the retractor to the housing. We take out the relay winding, after which the core can be easily disengaged from the Bendix fork.
Then we disassemble the starter. Having unscrewed the longitudinal coupling bolts of the covers, remove the “beak” or front cover of the starter. After this, you can easily remove the fork from the Bendix and pull the rotor towards you.
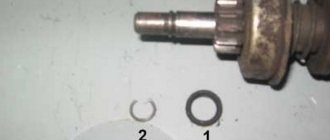
A thrust bushing is installed on the rotor, limiting the stroke of the bendix. Before removing the bendix from the starter, you need to compress this bushing. In garage conditions, an open-end wrench is used, the mouth of which fits onto the rotor shaft, but rests against the bushing with its jaws. Having firmly fixed the key in a vice, we rest the thrust sleeve against its jaws and apply a sharp blow to the end of the shaft through a drift made of durable wood, copper or aluminum, so as not to damage the shaft itself. After this, the retaining ring installed inside the bushing jumps off the groove and releases it. After removing the bushing, pull the retaining ring off the shaft by prying it off with a thin screwdriver.
After this, we take out the Bendix assembly. Installing the Bendix is done in the reverse order, and the main difficulties are caused by pressing the thrust bushing back. It should be taken into account that it is asymmetrical - on one side there is a wide chamfer, which makes it easier to enter the locking ring. When removing the bushing, the retaining ring is deformed; it must be straightened before assembly. The thrust bushing must be seated on the retaining ring without distortion, otherwise the edge may be squeezed out of the groove on the rotor, the ring will bend and will not allow the thrust bushing to be pressed into place.
Something else useful for you:
Video: Replacing the Bendix starter
Performance evaluation
After completing the work, you should check how the engine starts. The starting engine should run smoothly, without knocking and grinding noises characteristic of a faulty overrunning clutch. This is a sign of a high-quality replacement of the Bendix on VAZ-2109-2115 cars.
In some cases, changing the bendix is not enough. Prolonged operation of a faulty clutch leads to wear and damage to the flywheel teeth. In this case, the symptoms of failure that existed before replacing the gear may become weaker, but do not disappear completely. In such cases, it is necessary to replace the flywheel.
Source
Bendix repair
Do-it-yourself Bendix starter repair is possible if the rollers are worn out first, or the source of the problem is contamination or frozen lubricant.
The Bendix is assembled by rolling, and the outer race of the clutch is made of durable metal. It is difficult to flare it, so the fastest way is to carefully cut through the clip with a grinder.
Having knocked the weakened clip off the Bendix, we remove the gear, rollers and springs from it. After washing the insides, we check the absence of deep nicks in the grooves of the coupling and on the gear shank.
We inspect the rollers: the surface should be cylindrical, without signs of wear. A replacement for the rollers can be found by disassembling a roller bearing of a suitable size (bearing parameters can be found in reference books). We stretch the weakened springs a couple of millimeters or select new ones.
After assembling the Bendix dry, we check its operation by turning the gear in the direction of jamming: the rollers should block the Bendix, after turning in the opposite direction, immediately release the gear.
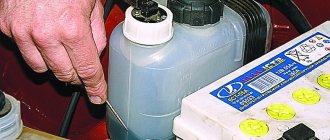
Before assembly, add a medium-viscosity grease to the Bendix so that it does not thicken excessively in the cold. Moreover, there should be a minimum of lubrication: its task is to protect the insides of the coupling from corrosion; excessive lubrication only gets in the way.
Possible causes of failure
As mentioned above, gear rotation is only possible in the direction of rotation of the starter armature. If rotation in the opposite direction is possible, this is an obvious malfunction, that is, the bendix must be repaired or replaced. There may be several reasons for this:
- Reduction in the diameter of the working rollers in the cage due to natural wear. The way out is to select and purchase balls of a similar diameter. Some car enthusiasts use other metal objects, such as pieces of a drill, instead of balls. However, we still do not recommend doing it yourself, but buying balls of the required diameter.
- The presence on one side of the roller of flat surfaces formed due to natural wear. Repair recommendations are similar to the previous paragraph.
- Grinding the working surfaces of the driving or driven race in those places where they come into contact with the rollers. In this case, repair is hardly possible, since such excavation cannot be removed. That is, it is necessary to replace the bendix.
Note! It is often better to completely replace the bendix than to repair it. This is due to the fact that its individual parts wear out approximately equally. Therefore, if one part fails, the others will soon fail as well. Accordingly, the unit will have to be repaired again.
Another reason for failure is wear of the gear teeth. Since this happens for natural reasons, repair in this case is impossible. It is necessary to either replace the mentioned gear or the entire Bendix.
Since the starter not only experiences heavy loads, but also comes into contact with the external environment and is susceptible to irritants such as moisture, dust, dirt and oil, freewheeling can also occur due to deposits in its grooves and rollers. A sign of such a malfunction is the noise of the armature when the starter is started and the immobility of the crankshaft.
Preparing to replace the bendix: removing the starter on a VAZ-2114
The starter can be accessed from above or from underneath. Let's consider the second option: roll the car into the pit and use the handbrake. Next, use a 10mm wrench to unscrew two screws from the bottom (photo 1) and two screws on the side members.
Finally, the screws on the cross member are unscrewed (photo 3) to remove the engine splash guard.
Disconnect the negative terminal from the battery - you will need a 10mm key.
On a VAZ-2114, you can replace the bendix in one way - remove the starter.
The location of the starter under the hood is marked with a red arrow.
- Unscrew the nut securing the power wire to the starter (photo 1). Remove the terminal and also disconnect the block with the control wire (photo 2);
Installation is carried out in reverse order.
The appropriate key size is “13 mm”.
Also check out
- Using a 10mm wrench, unscrew and remove 2 long coupling bolts.
- To separate the starter housing, strike the lower part of the housing several times. To do this, you can use a rubber or wooden hammer. Assess the condition of the brushes.
Worth checking out:
Take a new bendix (overrunning clutch) and install it in place. Clean and lubricate parts as necessary. Perform assembly. After this, the repair of the VAZ 2114 starter can be considered complete. All that remains is to put the starter in place, connect the battery, and start the engine.
Repair of starters 29.3708 and 423.3708
Use a screwdriver to unscrew the screws securing the solenoid relay. Then the relay is removed - its armature is disconnected from the plug.
Down with the relay... and both rings
Taking a tube of suitable diameter, knock the upper retaining ring off the shaft. Then remove the lower retaining ring using special pliers. The top ring must also be removed.
The body is disassembled: the protective cover is unscrewed, the stopper and all washers are removed, then two nuts are unscrewed and the rear casing is removed.
Disconnect the rotor and stator
Next, being careful, dismantle both brushes and remove the brush holder. As a result, what remains is an “assembly” consisting of parts: rotor, front cover, bendix.
Removing the stopper and rotor
Now you need to remove the plastic fork stop from the cover. The rotor is then pulled back.
The Bendix assembly with the fork is easily removed from the cover. Installation of the unit is carried out in the reverse order.
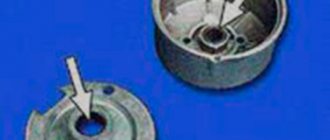
How to disassemble the bendix itself
Remove the retaining ring - here you need pliers again. Then the disc and thrust washer can be easily removed. The result is shown in the photo.
Bendix parts separately
Finally, the coupling and fork are simply pulled off the bearing. There shouldn't be any problems.
When installing a new bearing or a new fork, you don’t need to skimp on lubricant. LITOL-24 is suitable here.
Update for starter 29.3708
Above we discussed how starter 423.3708 is disassembled. For the 29th model, everything looks more complicated:
- The relay is mounted on three screws, not two;
- The fork is fixed to the axle, and this axle is removed before knocking out the ring over the bendix;
- To remove the bendix, you need to separate the bearing and fork. To do this, bend the fork eye with a screwdriver.
Points 2-3 are illustrated by one photo.
The 29th model is more “complicated”
Performance evaluation
After completing the work, you should check how the engine starts. The starting engine should run smoothly, without knocking and grinding noises characteristic of a faulty overrunning clutch. This is a sign of a high-quality replacement of the Bendix on VAZ-2109-2115 cars.
In some cases, changing the bendix is not enough. Prolonged operation of a faulty clutch leads to wear and damage to the flywheel teeth. In this case, the symptoms of failure that existed before replacing the gear may become weaker, but do not disappear completely. In such cases, it is necessary to replace the flywheel.
A starter is a necessary element of a car, designed to start the engine from the ignition key. The rotation of the starter is transmitted to the crankshaft through the flywheel.
The starter is a direct current electric motor, which includes: a stator (a stationary part consisting of windings); armature (shaft in the grooves of which the collector and winding are located); overrunning clutch (gear with a mechanical device) and retractor relay.
Quick repair of Bendix starter 5712.3708
If the starter has been removed, remove the solenoid relay from it by unscrewing the two screws on the housing. Then the four pins are unscrewed and the cover can be moved forward. Everything here looks simpler than in starters of “early” models.
The goal is to dismantle the drive with gearbox
Remove the plastic stop. Then we remove the drive assembly - here it consists of a bendix and a gearbox.
On starters of the “new” model installed on the VAZ-2114, the bendix must be replaced strictly according to the instructions: first remove the gearbox cover, then the three gears, and only then can you knock off the retaining ring.
Removing the gears from the gearbox...
The three axes of the gearbox must be located on a flat surface. Then, taking a hammer and a mandrel, carefully knock down the upper retaining ring.
Dismantling “extra” elements
Both the top and bottom rings will need to be removed from the shaft. Everything here differs little from the starters of the first models.
Finally, you need to remove the plug. The side fastening tab is bent with a screwdriver. This operation is difficult to perform - there is a risk of breaking the plastic.
Removing the plastic plug
There is only one operation left: the bendix without a fork is pulled up from the shaft. We wish you success.
Price issue
Finally, it’s worth adding that Bendix is an inexpensive spare part. For example, a Bendix VAZ 2101 (as well as other “classic” VAZs) costs about $5...6, catalog number is DR001C3. And the price of Bendix (no. 1006209923) for VAZ 2108-2110 cars is $12...15. The cost of Bendix for FORD cars of the Focus, Fiesta and Fusion brands is about 10...11 $. (cat. no. 1006209804). For TOYOTA Avensis and Corolla cars Bendix 1006209695 - $9...12.
Thus, repairs are often impractical for Bendix. It's easier to buy a new one and simply replace it. Moreover, when repairing individual parts, there is a high probability of rapid failure of others.
Signs of a bad overrunning clutch
High-strength steel grades are used to make Bendix. However, over time, the gear teeth wear out and it begins to slip without engaging the crankshaft flywheel crown. If it breaks down, the signs of a Bendix malfunction are as follows:
- After switching the ignition key to the “start” mode, the starter motor begins to rotate, but the engine does not start.
- When the starter is turned on, a metallic sound (“ratcheting”) is heard: this means that the Bendix comes into contact with the flywheel crown with difficulty.
- The promotion of a car engine begins “every time.”
- Very difficult to start when cold
- After the engine starts running, the metallic grinding noise does not stop (turn off the engine immediately);
How to check the overrunning clutch
If you are not in a hurry to change the Bendix, then it is worth testing it. To do this, clamp the body of the overrunning clutch, already removed from the starter, through a soft gasket (for example, a rag) in a vice to prevent damage. Try scrolling the bendix left and right. It should only rotate in one direction, because when you try to rotate it, the working part will lock. If the overrunning clutch turns, this means that it will not engage with the teeth and the starter will “thresh” idle. You can determine the serviceability of the gear visually: you will see the “eaten” teeth immediately. But if the starter is stuck, then you can understand this only by disassembling it. In this case, all the “internals”, including the gearbox, must be cleaned of dirt, dried grease and washed with clean gasoline. Next you will have to decide whether the bendix can be repaired or whether you will need to purchase a new one.
Video instructions for node “5712”
On any VAZ 2114 car, including the starter, the engine starts, and therefore it is so important to promptly identify and correct problems with this unit, due to the breakdown of which, normal driving of the car is, in principle, impossible. That is why it is advisable for VAZ 2114 owners to know how to independently diagnose and repair the starter of this car model.
A starter malfunction is most often determined by the following symptoms: insufficient rotation of the starter due to a drop in power. As a rule, in such cases it is necessary to repair the starter and replace the relay. You should also be wary of voltage surges that occur. However, the most common cause of starter malfunction is idle, i.e., rotation of the unit without engine rotation. This symptom indicates the need to repair the solenoid relay.
In addition, turning on the starter may be delayed or when, after turning the ignition key, the starter simply does not work. These symptoms indicate that the bendix is faulty and needs to be replaced urgently, because although the starter is spinning, the engine does not start.
The tool requires two keys: “13”, “10” and two screwdrivers - flat and figured (cross-shaped).
First, the negative wire is disconnected from the battery.
Then, using a key set to “13”, unscrew the 2 fixing screws located at the top and connecting it to the clutch housing.
Most often there is no third bolt, and if there is one, dismantling requires a lift or an inspection hole.
Then, by pushing the starter forward from the connector in the starting relay, the first wire is removed. Next, use a key set to “13” to unscrew the fixing nut of the wire connecting the traction relay in the starter to the positive terminal of the battery.
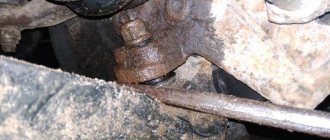
Assess the condition of the flywheel teeth.
Next, you need to unscrew the 2 screws securing it from the starter cover. Next, using a key set to “13”, you need to unscrew the nut securing the starter output winding with the solenoid relay.
Then the washer-bracket is dismantled.
Next, use a “10” key to unscrew and then remove two long tightening screws.
Assess the condition of the bushings.
To disconnect the starter housing, hit its lower part a couple of times or more with a rubber wooden hammer or hammer.
Then use a screwdriver to remove the bendix ears from the fork and replace it.
The order of assembling the parts is reversed and finally the starter is installed in place, connected and its functionality is checked.
To ensure that spark plugs do not bother you for a long time, you need to buy them only in a professional store. Here you can find a huge range of spark plugs at the lowest prices.