Heating in a car is not a whim, but one of the functions that ensures a comfortable and safe ride. If frost formed on the glass reduces visibility, then it won’t be long before you end up in an emergency.
As always, in our country, the frosty season comes unexpectedly. If on your next trip, when you press the heating button instead of warm air, cold air blows from the air duct, then the moment has come when you need to clean the heater radiator.
To make this process efficient, it would be useful to understand how the car’s heating system works and what methods and means can be used to clean it.
Heating system
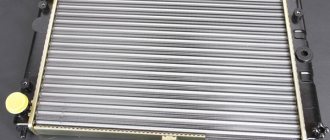
The stove and bypass valve, integrated into the cooling system of the machine, are the main heating elements. The heater radiator is heated due to the high temperature of the engine coolant, which also enters the heat exchanger.
So if the pump is in order, the thermostat is working, the heater fan is not burned out, the air ducts are not clogged, the antifreeze level is normal and there is no air lock in the cooling system, then the cause of poor heating is contamination of the heater radiator.
This happens because all the dirt traveling through the system ends up in the heater radiator, gradually clogging its cells. Over time, this leads to a decrease in the temperature of the air entering the vehicle interior.
There are two ways to clean the heat exchanger: flushing the stove radiator without removing it from the car, and the same procedure, completely dismantling it.
Useful tips
After cleaning the heat exchanger, do not be lazy to replace the underwater hoses and install new clamps. After all, it will be very disappointing when, after a few days, the cabin becomes cold again, and the culprit is a small hole in the hose or a loose clamp that leads to air getting into the heater radiator.
Periodically clear the air ducts of leaves and dirt that could reduce the heating efficiency.
Use high-quality coolant to prevent re-contamination of the heater with impurities found in low-quality antifreeze.
Periodically turn on the fan at maximum speed to blow through the outer fins of the radiator.
In winter, you can’t do without a stove. Therefore, if the VAZ 2114 stove does not heat well, then you need to look for and eliminate the cause of the malfunction. The article is devoted to the car heater: its structure, the causes of the malfunction are considered, repair instructions are given, as well as how to replace the radiator.
Washing without dismantling
The first and most easily accessible method is to flush the radiator without resorting to any disassembly of the system.
We make a solution of citric acid and distilled water based on the proportion of 100 grams of lemon juice for the entire volume of the cooling system of your car. Drain out the old antifreeze and fill in the solution. Then we drive it for 5-6 days. After this period, drain the liquid, along with which all dissolved dirt and scale will come out. We fill in new antifreeze and enjoy the warmth in the cabin.
The second method requires a little preparation and minor disassembly of the components of the car's heating system.
For this procedure you will need:
- Compressor or water pump.
- A pair of hoses with adapters. One end of which corresponds to the diameter of the hoses coming out of the stove.
- Clamps, container for flushing liquid, fume tape.
- A product that will be used to flush the heat exchanger.
The products that are used to clean the heater radiator are worth covering in more detail. In the selection of such substances, you need to proceed from what material the heat exchanger is made of. If the radiator is aluminum, then it is unacceptable to wash it with alkaline solutions; in this case, products with a certain percentage of acid in their composition are suitable. When flushing a copper-brass heat exchanger, everything should be exactly the opposite.
For the washing procedure, you can use professional products, such as special Mannol liquid, or improvised means.
In choosing available liquids, advice varies; for some, Xylitol or Antiscale has become a panacea for descaling household coffee makers and kettles; others advise using regular Coca-Cola or whey; others praise Krot for cleaning pipes.
But it is better to use a proven method - washing with citric acid, and if the heater is copper - with caustic soda.
Reasons for refusal
We have already noted that there may be several reasons for the heater not to work. Namely:
- Failed thermostat;
- Air lock formation;
- Broken heater tap;
- Clogged radiator;
- Radiator failure;
- Low pressure in the system;
- Lack of antifreeze;
- Burnt-out BC gasket;
- Failed electric motor.
Now let’s look at each of the presented breakdowns in more detail and figure out what needs to be done in a given situation.
Thermostat
To begin with, we recommend starting the engine and turning on all operating modes of the stove fan one by one. If there is no noise characteristic of a working heater, then repairs will have to begin.
A faulty thermostat is one of the most common problems. Because of this, the coolant that circulates through the circuit cannot cool properly. This causes the stove itself to fail.
Heater thermostat
Airlock
Air pockets appear when the engine is turned off. At that moment, the temperature of the coolant begins to decrease.
As a result, air leaks into the upper part of the radiator, which gradually passes into the thermostat. When the engine starts again, the pump drives the accumulated air into the radiator of the heating system. As a result, the stove does not heat the interior at all.
To get rid of the air lock, remove the pipes and gradually begin to fill in antifreeze. The tank should be topped up to the maximum level.
Broken tap
It is noteworthy that the heater valve often becomes the main and most common cause of a non-working interior heater. The faucet simply cannot open all the way. There are two reasons for this.
- The faucet is completely out of order and therefore must be replaced.
- The device does not work properly due to poor fixation or deformation of the heater cable. The latter is located near the pedal assembly. To eliminate the breakdown, simply tighten the cable using pliers.
If a leak is detected and there is no hot air supply, the faucet must be replaced. Damage is easily detected by greasy deposits on the glass and stains with the smell of antifreeze on the floor.
Clogged radiator
Your heater may not work at all if the radiator is clogged with all kinds of debris and dirt. In this case, there may be very little air flow from the ducts.
Option two:
- Clean the radiator;
- Replace the unit with a new one.
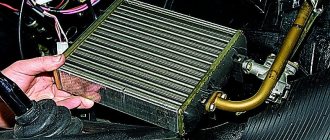
Faulty radiator
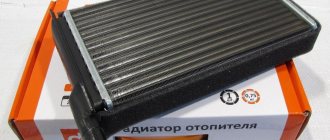
Many car owners simply do not pay attention to heater radiators until winter comes. And when, even at low air temperatures, the driver tries to turn on the heating, it turns out that the radiator is not working or is seeing its last days.
Such situations are often encountered by those who bought a car during the warm season and did not bother to check the condition of the radiator. There is only one way out of the situation - replacement.
Heater radiator
If you decide to do the work yourself, we strongly recommend watching the video instructions. This way you can understand how the stove is removed, how its individual elements or the main unit - the radiator - are replaced.
Low pressure in the system
If there is no proper level of pressure in the system, the stove will not be able to idle. The pump, that is, the pump, is responsible for creating pressure.
It is quite easy to determine that a heater malfunction is related to the pump. When the car moves, heat goes into the interior. This pump should be replaced with a new one.
Experts recommend using duralumin pumps, which are highly efficient and have a long service life. Focus on . They work well with the VAZ 2114.
Lack of antifreeze
Often the heater does not provide adequate heat to the interior for a more common reason - due to a lack of antifreeze in the tank.
To cope with this problem, simply add the missing amount of coolant.
Burnt head gasket
Malfunction of the stove can occur as a result of burnout of the cylinder head gasket.
A breakdown can be determined by several characteristic signs:
- The coolant has acquired an unpleasant odor of a mixture of gasoline and exhaust;
- The smell of engine oil has acquired the characteristic notes of coolant;
- White thick smoke comes out of the muffler.
If a burnt gasket is found, it must be replaced.
Broken motor
The electric motor, which is directly involved in the operation of the stove, often breaks or burns out. Replacement is not always the right decision.
It is quite possible that the motor has not burned out, but simply needs repair. Check if the heater temperature switches are working. Plus, make sure the ignition relay is working. Often the problem can be solved by replacing the faulty heater.
To do this, free it from the pipes, remove the old stove and install a new one. We are talking here so that you understand about changing the radiator.
Let's start the washing process
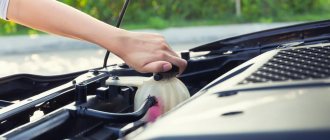
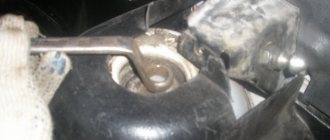
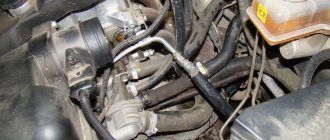
To begin with, by lifting the hood, we find two hoses that provide supply and drainage of fluid to the stove. Then:
- in the radiator fins. Having disconnected these hoses, we extend them, securing the joints with clamps and wrapping them with fum tape for tightness.
- Turning on the compressor, blow out the old antifreeze from the heat exchanger.
- Fill the radiator with diluted citric acid or another selected cleaning liquid, give it time, up to half an hour, to dissolve dirt and deposits. In more advanced cases, this time can be increased to several hours. Some people advise that before pouring, for greater effect, heat the solution to the operating temperature of the antifreeze, and in the case of using Coca-Cola, generally boil it.
- After the selected period of time, drain the liquid into a prepared container.
- This procedure must be repeated until no clear liquid comes out of the drain hose.
- By connecting the pump to one of the hoses, rinse the stove under pressure with clean water.
- By connecting the hoses back and adding antifreeze, you need to eliminate air in the system.
As an additional way to influence internal contaminants, some experts suggest connecting a pump to one of the hoses and lowering it into a bucket that serves as a container for draining liquid, driving the cleaning solution inside the stove in different directions. In order to evenly press all passages in the radiator plates.
In any case, both methods of flushing without dismantling can only clean the system from the inside.
If this does not help and cold air continues to flow from the air duct, you will have to dismantle the heater.
Washing with dismantling
Complete dismantling of the heat exchanger is a troublesome and time-consuming task, but this method makes it possible to clean it not only from the inside, but also from the outside. This method is also better because it can be diagnosed in case of leaks, which can be eliminated by argon welding.
If you still decide to dismantle it, then to gain access to the stove you will have to unscrew the dashboard.
This disassembly is similar to what is required to remove the evaporator when cleaning the air conditioner.
After removing the torpedo you need to:
- Disconnect the pipes leading to the heating unit. In some brands of cars, the heating unit contains an evaporator of the air conditioning system, which means that in order to dismantle the stove, these pipes will also have to be disconnected.
- Carefully unscrew the heating unit and remove it from the interior.
Flushing the stove radiator in this way is made several times easier, because it can be done at home, under hot running water. And even if the chemical ingredients do not help, you can solder the heat exchanger and clean it manually using a brush or similar improvised means in the form of a drill with a long drill bit.
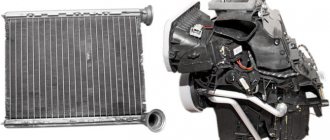
The design and principle of operation of the VAZ 2114/15 stove
The heating system of the VAZ 2114/15 is designed to heat the air entering the passenger compartment. Its design is the same in cars with injection and carburetor engines. The coolant heated by the engine flows from the cooling system into the heater radiator, which is blown by a fan. The flow of warm air created in this way enters the cabin through the air duct system. The intensity and direction of air flow is regulated using deflectors and dampers. The interior heating system of the VAZ 2114/15 can operate in several modes.
The VAZ 2114/15 stove is designed quite simply: 1 - assembled heater; 2 — protective casing; 3 - seal; 4 — front air duct; 5 — rear air duct; 6 — rear air duct; 7 — right nozzle; 8 — right side air duct; 9 — right side nozzle; 10 — intermediate body; 11 — central nozzle; 12 — draft of the windshield heating flap; 13 — heater control levers; 14 — control handle for the heated windshield damper; 15 — heater control handle; 16 — symbol plate; 17 — control handle for the foot heating damper; 18 — right air duct; 19 — interior heating air duct; 20 — heater control damper rod; 21 — heater valve control rod; 22 — heater valve; 23 - leg heating damper rod
Stove design
The VAZ 2114/15 stove consists of the following elements:
- Fan.
- Windshield defroster.
- A distribution flap that directs air flow to the central and side deflectors, to the lower and upper parts of the cabin.
- Control valve.
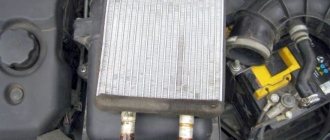
- Stove radiator.
- Duct that directs air flow to the legs.
- Internal air duct.
Heater fuse and reasons for its failure
Often the cause of malfunction of most components and systems of a car is a blown fuse. The stove is no exception. Failure of a 30A heating system fuse causes the fan motor to stop and air to stop flowing into the cabin. In this case, find an element marked F7 in the fuse block and replace it. The new fuse should also be rated 30A. If the fan does not work after this, the problem should be looked for elsewhere.
Heater fuse F7 is located in the mounting block under the hood on the driver's side
It is often difficult to determine that it is the fuse that has blown. It can fail due to a short circuit in the electrical wiring, a malfunction of the electric motor, severe clogging of the cabin filter and in a number of other situations. The difficulty lies in the fact that fuse F7 is simultaneously included in the rear window heating electrical circuit and is responsible for the cigarette lighter, glove compartment lighting and headlight washer motor. If it fails, all these components will not work.
Heating system relay location
The cause of a non-functioning stove may be a relay that wears out during operation. It cannot be repaired and is immediately replaced with a new one. The relay is located under the instrument panel in the fuse box.
The heater relay is located under the instrument panel in the fuse box
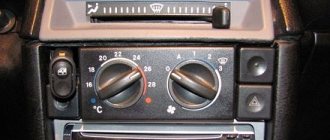
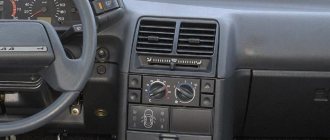
Stove mode switch
The mode switch or heater regulator is installed on the center console, which will have to be removed when repairing or replacing it. If the switch fails, the fan motor stops working.
The heater control is located on the left side of the center console
Prevention methods
To avoid a reoccurrence you will need:
- The first preventative measure is to disassemble the system in advance and clean every part.
- The presence of a clean cabin filter under the hood. As you understand, a dirty and clogged filter prevents the passage of hot air, and for the same reason the radiator becomes covered with a large layer of dirt.
- Fresh antifreeze. It needs to be changed regularly and maintained at the proper level. Then the air supply to the radiator through the thermostat will be uninterrupted.
- Hermetically sealed faucet and radiator. This can be verified when the engine is well warmed up.
A functioning heating system will be confirmed by the silent, well-functioning operation of the fan and a continuous flow of warm air even when the car is static.
Good luck on the roads!
Diagnosis of heating system faults
Heating system malfunctions are accompanied by the following symptoms:
- the fan does not work;
- cold air enters the cabin;
- the damper does not work;
- there is a coolant leak;
- the stove begins to make uncharacteristic sounds (whistles, hums, gurgles);
- Steam or smoke appears from the heater ducts.
Why the stove does not work or does not heat the air
If the stove fails, it either does not work at all, or it works but does not heat the air. In the first case, first check the fan wiring, starting with fuse F7. If the fuse is blown, replace it. Then they check the relay, which may not turn on the first time or only when the engine is warm. In this case, the relay is replaced with a new one.
Then the serviceability of the electric motor is assessed. To do this, power is directly supplied to its contacts from the battery. If the electric motor starts to operate at maximum speed, then it is in good condition. Otherwise, it will need to be repaired or replaced.
The intensity of the air flow is adjusted using a resistor having two spirals with resistances of 0.82 Ohm and 0.23 Ohm. In the first mode, the current flows through both spirals, in the second - only through a spiral with a resistance of 0.23 Ohms, in the third - bypassing the spirals, that is, without resistance at all. If the resistor is faulty, the fan will only operate in the third mode at maximum speed (handle in the extreme right position). The problem is solved by replacing the resistor, which is located on the driver's side above the accelerator pedal.
If the resistor is faulty, the heater fan will only be able to operate at maximum speed.
If cold air enters the cabin, this may be due to:
- Airlock. It could have formed when replacing the coolant, when the system was depressurized, or because there was insufficient amount of coolant in the system. To remove the plug, remove the heater radiator pipe, use a watering can to add antifreeze to the maximum and put the hose back in place. After starting the engine, coolant under pressure will displace the remaining air from the system.
- Stove tap jammed. This happens if the tap was not initially opened all the way, and during operation, oxide and scale formed on the inner surface, preventing the normal circulation of the liquid. You can try to open the tap using pliers or immediately replace it with a new one.
- The stove radiator is clogged. When using low-quality coolant, the radiator honeycombs may become clogged. The problem is solved by flushing or replacing the heat exchanger. The feasibility of washing is determined by the scale of contamination.
- Installation of a low-quality radiator. In a defective product, the honeycomb may be incorrectly soldered. The radiator should be replaced.
- Low pressure in the cooling system. If heat transfer increases at higher speeds, the pump needs to be replaced.
- Low coolant level. It is necessary to check the level and add antifreeze if necessary.
- Damage to the heater fan impeller. The impeller is carefully inspected and replaced if mechanical damage is detected.
- Cabin filter dirty. If it is heavily polluted, the power of the electric motor will not be enough to pump warm air into the cabin. The filter is replaced with a new one.
- Damage to the cylinder head gasket. If the cylinder head gasket is blown, white smoke will come out of the exhaust pipe. The problem is solved by replacing the gasket and dismantling the cylinder head.
Heater dampers don't work
The distribution of air flows throughout the cabin is carried out by dampers, which, in turn, are controlled using cables. When these cables fail, problems arise with directing the air flow to the windshield or to the foot area. In addition, the damper that blocks the flow of air from the street begins to work incorrectly. In this case, adjustment of the damper drives is required.
Main causes of malfunction
The following factors can cause the VAZ 2114’s heater to not heat up at low speeds:
- The fan does not turn on when the required temperature is reached;
- The thermostat has failed;
- an air lock has formed in the system;
- the stove tap does not function correctly (does not open completely);
- the radiator is clogged;
- incorrect fan impeller installed;
- the coolant level has dropped below the permissible level;
- the pump has failed and does not create the required pressure;
- The head gasket is blown.
As you can see, there are quite a few possible reasons, and the search should begin with the simplest of them, gradually moving to less possible and at the same time more serious ones.
Cleaning and flushing the radiator of the VAZ 2114/15 stove
You can increase the efficiency of the stove by cleaning and flushing the radiator. The procedure can be performed without dismantling the radiator or with dismantling it. In the first case, you will need to remove the outlet and inlet pipes from the heater and pour a cleaning solution into it. Citric acid, plumbing cleaners (for example, “Mole”), etc. are used as such a solution. Then the radiator is washed with running water and coolant is added. You can clean the radiator better by removing it from the car. This will allow you to wash it not only from the inside, but also from the outside, removing dirt between the honeycombs. Washing is usually carried out with running water.
If after performing these procedures the stove does not work better, the radiator must be replaced.
Video: flushing the stove radiator
Thus, diagnosing a malfunction and determining the cause of poor heating of the VAZ 2114/15 interior with your own hands is quite simple. Self-repair and replacement of individual elements of the heating system are also not very difficult. It is enough just to strictly follow the recommendations of specialists.
With the onset of cold weather, car owners often find that their car's interior heating system is not working efficiently. Everything seems to be fine, but the air coming from the deflectors is not warm enough. This problem may be an indication that the car’s heater core is clogged and cannot pass the required amount of heated coolant through it.
What to do in such a situation: replace the heater or try to repair it? Do not rush to resort to radical measures. If the heat exchanger does not leak, it can be repaired.
In this article we will talk about how to flush the heater radiator without removing it from the car. In addition, we will discuss which products are best suited for this procedure.
Basic aspects of tuning
Car tuning is not only about illuminating the dashboard with LEDs. Tuning the VAZ 2114 stove is required in situations where cold air blows from the sides of the stove, or the interior is heated unevenly.
To do this, you need to remove the side cover on the gas pedal side. The clamps holding the throttle cable should be loosened. Then you need to pull it back and tighten the clamp. Next, you should install the damper control levers. From this moment on, warm side air should blow, warming the driver and passengers in the cabin.
Heating system repair
At the second stage of tuning, it is necessary to ensure that air coming from outside passes through the heater. The operation of the damper and the tap is carried out by the operation of one engine. It should be ensured that it does not control the damper. To do this, the right cover of the torpedo is removed, and then the one located on the right is disconnected and pulled from the two temperature control cables from the engine. The damper should be in its maximum position. The cable should be tightened and the excess should be trimmed.
Modification of the pipe is required if the air flow from the left deflector is too weak. It needs to be forcibly strengthened. To do this, you need to install a fan with a diameter of about 50 mm in the pipe. You can use a computer fan. First you need to remove the deflector. Then, having made a hole of the appropriate size, insert the cooler and seal it. Next, the pipe with the cooler needs to be returned to its place and the power supply restored.
You can connect the fan directly to the heater contacts. However, in this case, in order for it to work, you need to turn on the ignition.
If you properly modify the stove, it will work more efficiently. This will improve the comfortable conditions in the cabin of any car, both VAZ 2114 and UAZ. LED lighting will give the panel a beautiful appearance, especially at night.
Why does the radiator clog?
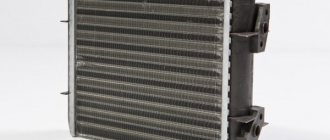
In modern cars, two types of heater radiators are used: copper-brass and aluminum. Each has its own advantages and disadvantages, but they are all susceptible to oxidation and corrosion. Over time, the channels of any radiator lose their capacity due to deposits on the internal walls. This process can also be speeded up by:
How to deal with it
The easiest way to get rid of this problem is to flush the stove radiator. Its essence is to drive a special agent through it that can dissolve and wash away all the scale and dirt. There are two cleaning methods: flushing the heater radiator without removing it from the car and with removal. The first method does not involve dismantling the heater. It is enough to simply disconnect it from the cooling system. In the second case, the heat exchanger is dismantled, and the entire procedure can be successfully carried out even in the bathroom. We will focus on the first option, since flushing the stove radiator without removing it is much easier. And considering that in some cars it is not so easy to get to the heater, it is also faster.
Effective stove cleaning products
Now let’s figure out how to effectively flush the radiator channels. Plain water, you will agree, is unlikely to do. Flushing the stove radiator involves pouring into it agents that can destroy the scale that has formed and deposited on the walls. These means can be:
- special liquids for flushing the cooling system (factory-made);
- household products for cleaning sewer pipes and removing scale (“Mole”, “Komet”, “Tiret”, “Kalgon”, etc.);
- acid solutions (citric, acetic acid);
- alkaline solutions (caustic or soda ash);
- drinks like Fanta or Coca-Cola;
- milk serum.
Device
If the stove suddenly starts blowing cold air or a leak develops, you must immediately begin work to detect and correct the breakdown. But in order to understand the essence of prevention and repair, you first need to understand the structure of this unit.
The interior heater includes the following elements:
- Radiator;
- Special pipes through which liquid circulates;
- Fluid circulation level adjustment valve;
- Dampers to control air flows;
- Air ducts;
- Electric fan.
If each of the units works properly, then the hot air flows will move freely through the system, exit into the cabin and blow in the direction specified by the driver.
Do no harm
Independently flushing the heater radiator without removing it from the car or with removal is not the point; it must take into account the properties of the material from which the element being washed is made. Under no circumstances should you use alkaline solutions to clean aluminum heaters. The metal will instantly begin to oxidize, and the situation will only get worse. The same thing will happen if you pour acid into a copper radiator. Therefore, for aluminum - acidic agents, for copper - alkaline.
Universal remedies include Coca-Cola or Fanta heated to a boil, as well as whey, which has a “mild” destructive effect on scale.
If special liquids for flushing the cooling system have instructions for use, then with household powders, citric acid and soda you need to be extremely careful and know the proportions for preparing the solution.
How to prepare the solution
Flushing the radiator of the Krotom stove involves preparing a liquid based on it. This will require 10 liters of water and 100 g of the specified powder. The powder is poured into heated water and then mixed thoroughly. After this, it is recommended to strain the resulting liquid (you can use it through an unnecessary woman’s stocking). The same proportions are necessary for the soda solution.
In order for flushing the stove radiator with citric acid to be as effective as possible, you will need at least 300 g per 10 liters of water (30 packs of 10 g each). After dissolution, the resulting liquid must also be filtered.
How to flush the heater radiator without removing it from the car: instructions
First, drain the coolant from the system after warming up the engine. Then we find the inlet and outlet pipes of the heater radiator and, loosening the clamps, disconnect the rubber hoses from them. In their place we attach pre-prepared hoses through which we will pour and drain our cleaning solution.
Before you wash the heater radiator without removing it from the car, you need to remove all the dirt that has not yet settled on the walls. This can be done with ordinary tap water. To do this, pour water (10-20 liters) into one of the hoses, allowing it to flow out from the other end.
Only after this can you begin to clean the heater radiator from scale.
We begin to pour liquid into the first hose through a watering can. Raise the end of the second hose a little, and after the solution flows from it, close it. When the stove is completely filled, close the first hose. Leave the radiator for 2-3 hours so that the scale has time to dissipate. After this, it must be rinsed again with water. If necessary, the procedure can be repeated.
After cleaning the heater radiator, attach communication hoses to it. Pour coolant (preferably new) into the system. Start the engine and check the heater operation. If the situation does not improve, then it is time to replace the radiator.
Cylinder head gasket
Sometimes the cause of the malfunction is hidden in a burnt-out cylinder block gasket.
Cylinder head gasket
You can determine whether the gasket is intact by these signs:
- Antifreeze smells like gasoline and contains exhaust gases.
- When the engine is running, white smoke comes out of the exhaust pipe.
- There is a light mixture on the dipstick and oil filler cap.
If at least one of these signs is detected, you need to urgently check the condition of the gasket and replace it if necessary, otherwise the problems will be much more serious.