How long the heater motor lasts depends on the intensity of its use and conditions. If you actively load the climate systems and do not change the cabin filter, the problem may appear after 20-30 thousand kilometers . The most common malfunction of the stove motor is squeaking and squealing. To prevent this from happening, you need regular maintenance of the stove, its motor, and the entire climate system as a whole.
With gentle operation and periodic maintenance, repair of the stove fan may only be required after 100-200 thousand kilometers or more. The main signs by which such a need can be determined are noisy operation (crackling, whistling, howling, etc.) or vibration. If there are no signs of operation at all or the intensity of the air pressure flow from the air ducts has decreased when the climate control equipment is turned on, you will most likely have to disassemble the stove, check it and carry out more complex repairs.
Most cars are equipped with centrifugal fans (barrel-shaped) with a commutator motor, so checking the heater motor and restoring it in many cases is similar. Axial fans (propellers) are used only on old cars, like Zhiguli and Moskvich, and brushless motors are rare even among expensive foreign cars. Therefore, this article is devoted specifically to the collector motor of a stove with a centrifugal fan.
Signs and causes of stove motor failure
If the motor is noisy or the stove is blowing weakly, the problem is not necessarily that it is broken. To identify the cause of the malfunction and obtain a comfortable microclimate in the cabin, you need to analyze the symptoms indicating improper operation of the motor.
You need to start repairs if the stove motor cracks/creaks/howls/whistles. In this case, you can get away with simply cleaning the fan impeller or lubricating the bearings, or you may have to disassemble it for diagnostics. In the table you will find the main symptoms and where to look for the cause of the malfunction, and below there will be information on how and what you need to do in order to repair the heater motor with your own hands.
| Signs of breakdown | Possible causes of the malfunction | How to repair |
| Rustle | Impeller clogged | Cleaning dirt, replacing the cabin filter |
| Makes a loud noise | Brush wear | Replacing motor commutator brushes |
| Impeller play | Lubrication or replacement of bearings or motor bushings | |
| Air does not flow through the deflectors | Filter clogged | Cleaning the housing and replacing the cabin filter |
| Fan electrical circuit broken | Finding a break and fixing it | |
| Motor failure | Checking the motor with a multimeter (brushes, windings, armature) and repairing or replacing damaged parts | |
| Heater fuse blows | Short circuit in the supply line | Testing the power supply and motor control circuits, searching for a short circuit, eliminating it and replacing the fuse |
| Short circuit in the motor | Checking and troubleshooting the motor, searching for a short circuit, eliminating it or replacing the motor | |
| Replaced heater motor, blows fuse | Short circuit or incorrect connection | Testing the stove circuits (preferably with current measurements), searching for a source of increased current and eliminating the problem |
| The motor beeps or whistles when cold | Lubrication deficiency | Disassemble and lubricate rotating components |
| The heater blows weakly and the motor turns slowly | Filter clogged | Cleaning the housing and replacing the cabin filter |
| Motor brush wear | Replacing motor brushes | |
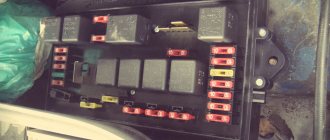
| Motor control relay malfunction | Replacing the heater motor relay in the mounting block | |
| Poor contact with ground in the fan circuit | Continuity testing of the power supply and fan control circuits with resistance measurements, searching for weak contacts and restoring them | |
| Faulty current limiting resistor | Checking the resistor and replacing it | |
| Broken armature windings | Checking the rotor and motor windings, replacing a damaged armature or electric motor assembly | |
| Fan speed is not adjustable | The rheostat (resistor) in the motor control circuit is faulty | Repairing or replacing the control resistor |
| The stove control knob is faulty | Checking the stove handle with a multimeter, replacing it with a working part | |
| Heater motor vibration | Worn bearings and/or bushings | Replacement and lubrication of bearings or bushings, maintenance of the stove motor |
| Heater motor doesn't work | Open or short circuit of power supply | Finding a break or short circuit and eliminating it |
| The motor burned out | Restoration of the stove motor or its replacement | |
| Fan switch is faulty | Switch repair or replacement |
In many cases, repairs may not be necessary; servicing the heater motor is sufficient. For example, if the fan barely blows, after replacing the filter the problem very often goes away. If even with a new filter the pressure remains weak, there are two options: either the electric motor itself is faulty, or the filter is simply installed incorrectly (on the wrong side or skewed).
The heater motor is often located in a hard-to-reach place, so you need to remove and disassemble it after you are convinced that it is the problem.
If the stove motor has already whistled, started to roar, or simply stalled, it is important to immediately detect the cause and promptly eliminate it, since in the early stages most problems can be eliminated with “little cost.” In this case, we approach the electric motor, find the defect, repair it, and if repair is impossible or impractical, we simply replace it.
How to check the serviceability of the motor
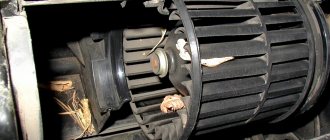
After removing the electric fan, first of all, inspect the impeller and bearings for contamination. Checking the output of the heater motor without disassembling it is possible with your fingers.
It is necessary to move the impeller and determine the amount of play, both in the longitudinal direction (back and forth) and in the transverse direction. There shouldn’t be any noticeable movement, but if there is, there should be production. If it is small (small play with almost no knocking) - you need to lubricate the bearings and bushings, and if it is large (it hangs noticeably, sometimes to the point that the impeller catches other parts) - replace them.
Disassembling and checking the stove motor (determining a malfunction)
Stove motor connection diagram
If the stove motor does not work at all, it should be disassembled (remove from the casing) and checked with a multimeter. You need to understand where the problem is: in the electric motor itself or in its power supply circuit. The easiest way to check if the stove motor is working is to apply 12 volts directly to it.
On some cars, the motor does not have additional electronics and is connected with two wires “+” and “-” (as on a VAZ and most other cars). In this case, it is enough to connect these contacts directly to the battery (usually red, blue or yellow for positive, black for ground). If there are more contacts, you will need a wiring diagram for the heater motor specifically for your car.
If, with direct power supply, the motor spins poorly or stands still, the problem is in the electric motor itself, and when it spins well, check the electrical circuits.
How to check a heater motor with a multimeter
Using a multimeter you need to check the resistance of the armature windings and ring the wires going to the brushes. The heater resistor is also checked separately (if the electric motor rotates straight, but with a resistor it does not). Possible causes of the malfunction most often lie in:
How to ring the stove motor
- Connector soured . If the contact is lost due to oxides, you need to inspect the terminals of the connector chip and, if necessary, clean them.
- Brush wear . It is necessary to disassemble the brush (collector) assembly and inspect the brushes for wear.
- Development at anchor . You can see it even without disassembling it. The entire repair is a complete replacement of the motor.
- Break or short circuit of windings . The stator and rotor (armature) windings are checked in resistance measurement mode at a low limit (up to 20 or 200 Ohms) or in continuity testing mode. How to check the stove motor for broken windings is shown in the video.
Work order
Before starting work, you need to fully read the instructions on how to repair the device. A complete understanding of the process will allow you to act more confidently. The technician must first understand how to remove the fan. First you need to prepare the car for work: remove the gear shift lever, remove the radio and all the blocks with wires. Now you can start working:
- To gain access to the device, carefully remove several parts. First you need to remove the shelf on the passenger side, it is secured with 4 bolts.
Now you need to remove the panel with the cigarette lighter, it is removed with a screwdriver, you need to pry the corners one by one until it clicks.
Then you need to dismantle the console with the buttons; it can be easily lifted with a screwdriver and moved upward. This makes the two fasteners located underneath accessible; they need to be removed. Now the part is completely free, it can be removed and put aside.
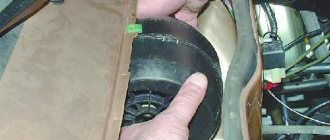
- Also, access to the motor cooler is blocked by air ducts; to dismantle them, you need to pry off the plastic latches with a screwdriver. But you need to understand that the fasteners are made of fragile plastic and must be bent carefully. Access to the bottom of the heater is now open. There are four latches on the stove - two on each side. You can bend them with your fingers or a screwdriver, but be careful - the latches spring strongly and fly off far away.
- Now access to the required unit is open, and you can begin to remove the VAZ 2107 heater fan. The electric motor and cooler are secured with two steel latches, one on top, the other on bottom. You can bend them with a screwdriver with a thin and long tip.
The dismantled unit is removed and a new device is installed in its place.
- Now you can perform assembly in the reverse order of disassembly.
You can also see the procedure for replacing the stove fan on a VAZ 2107 in this video:
DIY stove motor repair
Once the nature of the breakdown and its specific culprit have been determined, we begin disassembling the stove motor and repairing it. You can contact specialists at a service station, which is easier, but sometimes expensive. Official dealer services, as a rule, change the entire part, which in a non-warranty case can be very expensive (up to 10 thousand rubles or more for an original electric motor). Small and specialized service stations can undertake the maintenance and repair of the stove motor; the price of work starts from about 1000 rubles.
Repairing the stove motor yourself will cost less. This is not very difficult, but not always possible. Procedures that can be carried out in the garage and restore the performance of the electric motor include:
The process of disassembling and cleaning the components of the stove motor
- cleaning and lubrication of bearings and bushings (lubrication costs);
- cleaning the lamellas on the armature commutator (costs of abrasive and lubricant);
- replacement of bearings (50-300 rubles);
- replacing the impeller (100-500 rubles);
- replacement of brushes (50-300 rubles);
- anchor replacement (up to several thousand rubles)
- replacement of current-limiting resistors (200 rubles on a VAZ and from 1 to 5 on foreign cars).
Repairing the stove fan motor is impractical if damage (breakage, short circuit, burnout) of the stator windings is detected. Damage to the rotor (windings or commutator lamellas) can only be repaired if there is a new rotor assembly, which is not easy to find. Therefore, in such cases, repairing the car’s heater motor does not make sense. A complete replacement will definitely solve all problems without much time, and often even costs less.
Disassembly
In most cases, disassembling the stove motor proceeds in the same way, using a standard set of tools:
- flat and Phillips screwdrivers;
- a set of small wrenches or sockets (usually from 6 to 13);
- pliers or pliers.
The specific set and numbers of keys/heads depend on the design of the climate system motor in your car.
To get to the manifold you need to drill out the rivets, using the example of Volswagen
Flare the bends so that the components are separated, using the example of Volswagen
Disassembling the heater electric motor is carried out according to the following scheme:
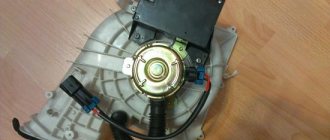
- Removing the motor from the housing. It is only necessary for cars on which it is removed along with the snail casing.
- Removing the electric motor impeller from its rotor. The fan impeller is usually secured to the shaft with a bolt or metal retainer. If it fits tightly, you need to remove it by carefully prying it up with two flat screwdrivers, trying not to damage the part.
- Removing the cover from the manifold assembly or separating the halves. If there is a separate cover on the collector side, it must be removed. On motors consisting of halves, they are separated. For fastening, screws for a screwdriver or a small 6-10 wrench are usually used (depending on the motor).
- Removing the brushes. To remove the brushes, simply bend the fixing bar above them.
- Removing the rotor. The rotor is removed from the housing to the side where the impeller is installed. Usually, when removing it from the shaft, the front bearing is also removed, and the rear (if any) or bronze bushing remains in the manifold cover or other part of the electric motor.
Before disassembling the stove fan, find a disassembly diagram (or better yet, a video) specifically for your model. Below are several videos of disassembly of different engines, but although the general principles are the same, the subtleties may differ (especially on Toyotas).
Disassembly and repair of the axial motor of a car heater
Removing and disassembling the heater motor on Priora and VAZ 2110-2112
If the motor itself is disassembled, it is recommended to immediately replace the bearings and clean the contacts from oxides. Often even such simple procedures help restore the proper operation of the motor.
Restoring functionality
Reassembling the stove motor involves visually inspecting the part for wear and malfunctions, identifying defective parts and restoring their operation as a result of repair or replacement. In many cases, all problems are solved by cleaning them from dirt or oxides and lubricating them. However, if parts wear out, without replacing them, it will not be possible to restore the functionality of the electric motor of the interior heater.
If the stove motor does not turn, possible reasons lie in the brushes, commutator lamellas or windings. The first two problems are relatively easy to fix. But if the impeller of the electric motor does not rotate due to the windings, then they need to be rewinded. This is difficult and impractical, so you need to change the armature or electric motor completely.
If the stove motor turns weakly, the problem could be in the brushes or bearings, or in the bushings or windings. Replacing brushes and bearings or bushings is not a difficult task, but if the armature windings are faulty, the motor most likely needs to be replaced.
In some cases, the problem with a weak motor may not be the problem. If the current-limiting speed control resistor is attached to the housing, then the reason why the stove motor turns slowly may be a breakdown of this very resistor. Such a motor can be distinguished by the multi-pin connector chip, the presence of a large resistor somewhere at the back, or by the radiator there.
Motor control board with a resistor on the stove, using Toyota as an example
Location of the current-limiting resistor separately from the stove, using the example of Opel
If the heater motor whistles or crackles, the problem is in the bearings or bushings. In mild cases, the sound is eliminated by cleaning and lubrication, in severe cases (excessive wear, severe play) - by replacing fans or bushings.
In cases where the electric motor is made non-separable, and instead of bearings it uses bushings of rare standard sizes (polymer, bronze or brass) that cannot be found on sale - restoration of the heater fan is realistic only if you have access to a lathe so that you can turn the required bushing out of bronze . There is no such possibility - the motor will have to be replaced with a new one.
Cleaning the stove motor
If the stove motor squeaks, sometimes cleaning and lubricating it is enough to eliminate the sounds and extend its service life. But, in general, cleaning the stove motor will be useful for any intervention during repairs, regardless of the type of malfunction. For cleaning you will need:
Cleaning the impeller using foam for cleaning car interiors
- brush;
- acetone or degreaser;
- thick rags.
When disassembling the heater electric motor, it is necessary to clean its components from deposits of dust, dirt and oxides:
- impeller;
- rotor shaft (armature);
- body and covers.
Cleaning is done carefully with a brush dipped in acetone. You can also use aerosol and contact cleaners, such as spray for carburetors and throttle bodies. Dense deposits that cannot be removed with a brush or a jet from a spray can must be wiped off with a thick cloth that does not leave threads or lint.
Do not overdo it with liquid or aerosol cleaners when cleaning bearings. They have high penetrating power and can get under the seal of a closed bearing. There they dissolve the lubricant, thereby shortening the service life of the part.
Before lubricating the stove motor, check it again for wear after cleaning. Sometimes dirt plays the role of an additional seal and does not allow us to assess the degree of wear, reducing backlash.
Lubrication and Maintenance
Elimination of squeaking and squealing noise from the Volkswagen stove at 1st and 2nd speeds. Stove motor maintenance (cleaning and lubrication)
If the stove motor is humming, but troubleshooting has not revealed much wear and play, it is enough to lubricate it normally to remove the noise. Lubricant must be applied to the bearings and bushings in which the shaft rotates. It is impossible to lubricate the internal parts (armature, lamellas), since the stator and rotor do not form friction during operation, and the commutator lamellas must have tight contact with the brushes! It is the metal-graphite brushes that play the role of lubricant in this friction pair.
How to lubricate the stove motor and what lubricants should not be used
When servicing the fan, the question arises of what to lubricate so that the heater motor does not whistle, and at the same time serves for a long time. In order for the lubricating layer to remain on the rubbing units for a long time, the lubricant must be sufficiently thick and not runny. The most suitable lubricant for stove motors, regardless of its design, is Total Altis SH2, Mobil Polyrex EM, Chevron SRI, Mannol Grease Lc2. The composition of this lubricant is quite thick, withstands temperature changes, lasts a long time and repels moisture well.
Hub motors that use a ring of felt or other dense absorbent material can be lubricated with regular motor or transmission oil. You need to drip it a little into the bushing and saturate the felt seal with it. But it is not advisable to use GL-5 grade gear oil, since the sulfur additives it contains accelerate the wear of parts made of copper alloys.
If the question often arises as to why the heater motor whistles or howls despite periodic maintenance, here are three possible answers:
- Wear . If the electric motor is pretty tired, then lubrication helps only for a short time, and then the howling returns.
- Bushing design . If instead of rolling bearings the motor uses plain bearings (simple bushings made of copper alloy or plastic), then the lubricant is quickly washed out of them and noise occurs.
- Incorrect lubrication . If the stove motor has already been serviced, it is possible that the wrong lubricant was selected, which does not cope with the tasks or has simply already leaked out or dried out.
To keep the stove motor running for a long time, you should not use:
To prevent oil from getting onto the brush assembly, a syringe is used
- Graphite grease . Graphite lubricant is contraindicated for electrical equipment, since graphite conducts current well.
- Dry lubricants . They are not distributed very well, they disappear quickly and therefore fail to cope with the task.
- Solid oil . Solid oil hardens quickly in the cold, and when heated it becomes quite liquid, so it is poorly suited.
- CV joint Lubricants for drives in the stove motor are not suitable, since the operating conditions of the hinges and electric motors are very different.
CIATIM and Litol-24 lubricants are also not suitable in terms of their properties, but they are quite often used by car owners. A repeat situation of noisy operation of the stove after using such motor lubricants is guaranteed.
After servicing the stove motor, lubricating and assembling it, you need to turn it by hand. Firstly, this way you will better distribute the lubricant. Secondly, this will make sure that everything is assembled correctly, installed smoothly, and that the impeller or other parts do not catch anything when rotating.
Restoration of individual parts
Restoring a stove motor makes sense if worn parts can be replaced and its design is dismountable. Breakdowns that can be repaired in a garage include:
- impeller failure;
- worn brushes;
- damaged collector;
- worn bearings or bushings;
- failed resistor.
In the case of a non-separable and maintenance-free design, repairing the heater damper motor is impossible (or possible with great labor costs), so it is better to replace it with a new one.
Replacing the impeller
This is an easy malfunction, since the impeller of the stove motor can be replaced without completely disassembling it. To change a purchased used impeller, it is enough to remove it from the rod, first removing the lock washer (if there is one), basically it just sits tightly on the shaft. But usually the fan does not simply break, so the motor still needs to be examined for play and distortion. After all, the impeller often breaks due to jamming.
Replacing brushes
If the metal-graphite brushes are worn out and have poor contact with the commutator, they can be replaced. To do this, you need to measure the size of the brushes and select similar ones. Sometimes the brushes are soldered to the leads, so replacement may require a soldering iron. But in most cases they are pressed down by springs and to change them you just need to bend the clamps.
Please note: brushes can be either simple graphite (cheaper) or copper-graphite (more expensive). It is not advisable to install the former instead of the latter, since their resistance is often higher, which causes the motor to heat up and accelerate its wear. If there were copper-graphite ones from the factory, then you only need to install these, but on the contrary, you can change them.
Collector repair
Oxidized lamellas on the anchor can be cleaned using soft sandpaper or a rough cloth with an abrasive paste. To speed up the process and uniform stripping, the anchor can be inserted into the chuck of a drill or machine. If the lamellas are severely damaged by oxidation, burnt, or worn out, you can repair the armature by replacing the collector itself.
Repairing the stove motor armature involves disconnecting the old commutator from the windings, pressing it off the shaft, installing and connecting a new commutator. You need to choose a part that has the same size and number of slats. To ensure reliable fixation on the shaft, you can place the new collector on epoxy or glue. In this case, it is important to seat the new part evenly so that the brushes slide normally.
A burnt-out motor lamella, with such a malfunction you need to either change the commutator or the entire electric motor
New and old manifold after repair of the Audi heater motor armature
Replacing bushings or bearings
If the rotor bushings or bearings are severely worn, they are replaced with new ones. The bushing must be selected according to the motor markings or by manual measurements with a caliper (but take into account the wear of the internal hole). Bearings usually have markings according to which new ones should be selected.
If the design uses an open type bearing, it is better to replace it with a closed type analogue. It lasts longer because, due to its tightness, it does not require periodic lubrication.
To replace the heater motor bearing, it must be pressed off the shaft or pressed out of the housing using a puller. You can press out the bearings using a vice or a piece of tube (larger than the outer diameter of the bearing) and a bolt with a washer and nut. The bolt is inserted into the bearing, the tube is put on it, then the washer and nut are put on. When tightening the bolt and nut, the bearing will pop out into the tube.
Replacing heater motor bearings
It is not advisable to knock out bearings with a hammer or use other impact tools, as you can damage entire motor parts!
Resistor repair
Resoldering a burnt resistor to a new one
In most cases, it is more advisable to replace the resistor with a new one, selecting it according to the car model or nominal value. When this is not possible or a temporary solution is needed, then you can try to repair it. As a last resort, you can switch to direct current supply and then the motor will spin constantly only at the highest speeds.
A more difficult task is to assemble a resistor block with your own hands, instead of a burnt one. To do this, you need to find a circuit of the original resistor (on stoves with several speeds it usually consists of steps), select resistances in the radio components that are similar to the original ones, and solder them according to the circuit.
Recommendations and tips for repairing the stove fan
In order for the car heater motor repair to be successful, you should prepare in advance and take on board a few useful tips:
- If repair kits for your motor are available for sale, it is better to buy all the replacement parts (bearings, bushings, brushes) at the same time. Firstly, it’s cheaper than taking them separately, and secondly, it’s better to change everything at once in order to forget about problems with noise or improper operation of the stove for a long time.
- In some cars (for example, BMW, Mercedes), the climate control unit is located directly in the blowing area of the heater fan. If the flow is weak, it overheats, so if the motor operates intermittently or does not blow, there is no need to delay repairs. The climate control unit can burn out from overheating, which will result in repairs to the car's heater motor and climate system being much more expensive.
- In order not to replace a worn armature commutator, it can be machined by clamping the rotor in the chuck of a lathe. But after this, due to the reduction in diameter, you will need longer armature brushes or install slightly longer springs.
- If the journal of the shaft under the bearing is worn out and its inner ring does not fit tightly on the shaft, you can clean the shaft and build up a layer of metal by galvanizing (this can be done with a battery, as when removing saffron milk caps on the body).
- To extend the life of the motor, it is advisable to maintain and lubricate the bearing or fan bushing every time you replace the cabin filter, every 30,000 km.
After the repair of the car heater motor is completed, you need to check it, first by manual rotation, and then by connecting it to a 12-volt power source (battery). If the electric motor works normally, does not howl and does not catch anything anywhere, you can begin to install it in place. So that later you don’t have to disassemble the panel again, because it is often quite difficult to remove the stove fan.
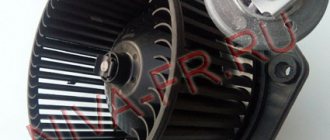
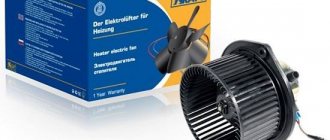
Purpose of the heating fan on the VAZ 2107
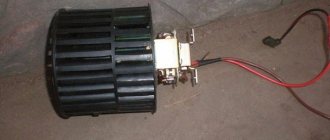
The main task of the heating fan is to blow on the hot stove radiator and through special air ducts to pump warm air into the interior of the VAZ 2107, heating it. The fan is made of ordinary plastic and is driven by a small electric motor.
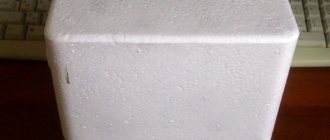
The stove fan on the VAZ 2107 is made of plastic and is not very durable
Both plastic and the electric motor are not highly reliable, so car owners have to carefully monitor the condition of these parts so that they do not fail at the most inopportune moment.
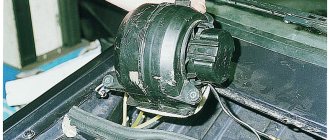
Furnace Fan Location
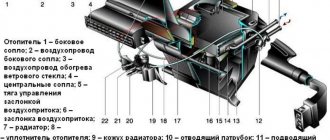
The VAZ 2107 heating fan is located under the central panel, behind the heater casing.
The heating system of the VAZ 2107 is quite complex, so getting to the fan is not easy
That is, in order to get to it, the car owner will have to disassemble the central panel of the car, and then remove the stove casing. Without these preliminary operations, replacing the heating fan is impossible.