On cars of the Lada Granta family with 8-valve engines, an automatic alternator belt tensioner is not pre-installed. Engine modifications are as follows: VAZ-11183, VAZ-21116, VAZ-11186.
You can compensate for the lack of a tensioner in different ways:
- monthly check of the tension level of the converter drive, which is impractical and costly;
- replacing the standard KATEK generator with a Bosch: not every car owner will afford to purchase an imported converter;
- systematic “updating” of the generator bearings: excessive tension of the drive belt, the absence of an automatic tensioner in the design creates the preconditions for premature wear of the bearings;
- set the fastening bolt with a diameter of “6.0” instead of “10.0”, which will increase the free play of the converter by a few millimeters to adjust the tension;
- “makeshift” modification of the standard bracket for the Lada Granta generator;
- replacing the Lada Granta generator bracket with the Kalina bracket.
Each of the above methods has its own advantages and disadvantages. Let's consider the last two options for “modernization” as the most common.
How to assemble the alternator belt tensioner Lada Granta and Kalina 2
Lada Granta is in the TOP 6 cheapest cars in the world.
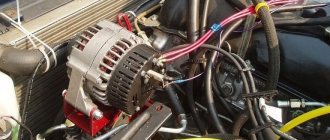
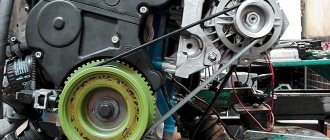
To get into this rating, AVTOVAZ saved on the quality of parts, one of which is the generator. A problem familiar to everyone, when on 8-valve engines the manufacturer did not provide for tensioning the Lada Granta/Kalina 2 alternator belt. Due to the overtightened belt, the alternator bearing quickly failed and a howling sound appeared. You can control the belt tension by replacing the generator bracket, having previously modified it. The Lada Granta/Kalina 2 generator bracket does not provide for belt adjustment; it does not have holes for the tensioner and roller. Instead, it is proposed to assemble a new bracket based on the 1st generation Lada Kalina, which consists of:
- Generator bracket from Lada Kalina (11180104103401).
- Tension roller (21230104105610).
- Tensioner pulley bracket (11180104108400).
- Alternator belt from Lada Kalina (1118).
- Screw tensioner (11180104128001)
- Bushings and bolt.
Set price
about 2000 rubles.
We assemble the structure as shown in the video. Installing a new bracket will allow you to tighten the Lada Granta/Kalina 2 generator belt and extend its service life.
Let us remind you that the howl of the generator is not the only “sore” of the car; another howl can be heard from the gearbox. How did you solve the generator problem?
Source
General questions about working with the Grant generator
Let's consider general questions: everything except replacement.
Tension check
There are two approaches: visual assessment and physical.
Visual assessment of condition:
- the car is on a flat surface, the gear is in neutral, the handbrake is off, the hood is open;
- We don’t start the car - we put it in 5th gear;
- We opened the hood and found a generator: we push the car back, resting against the bumper;
- We inspect the required part along its entire length: are there any breaks or cracks? It needs to be changed.
Poor quality will lead to unexpected problems on the way. Physical assessment :
- if you have a tool that measures pressure force: press the belt with a force of 10 kg*s - the deflection should be no more than 10 mm;
- there is no special tool: we try to turn it across - it should turn no more than 90 degrees.
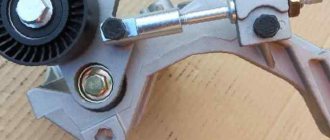
How to tighten the alternator belt on a Grant
This section applies only to machines with a tensioner. No - change the part or see above how to install it.
Subsequence:
- we use ring wrenches 8, 19;
- Throw key 19 onto the lead screw;
- wrench 8 for locknut;
- we touch;
- Now you can turn the lead screw: clockwise to loosen, counterclockwise to tighten;
- got the desired result - tighten the locknut.
It is better to take ring wrenches, since a head with a ratchet or a wrench will not work.
Forced tuning
Unfortunately, starting from 2022, the designers have abolished the tensioner on the Kalina. They were guided primarily by considerations of economy, but they did this without any modification to the generator. In practice, cases of its premature failure immediately became more frequent. Therefore, owners began to install the tensioner on their cars themselves.
It's not very difficult to do this. True, you will have to purchase not only the tensioner itself, but also the generator bracket. The only problem is the removal of the standard belt. It is very difficult to remove because it is very tight at the factory. You can simply cut it, as you will have to buy a new one. The fact is that the Kalina generator belt without a tensioner has a size of 820 mm, but 880 will be needed.
Generator disassembly and repair
Bracket for mounting the unit
Repair is carried out by dismantling the generator and voltage controller. Using a flat screwdriver, you need to hook the tips of the stator wires and slightly pull them out of the spring connections of the diode bridge of the generator. Using a 8mm spanner you need to unscrew the 3 bolts that secure the diode bridge. In this case, be sure to write down or remember the layout of the insulating and support washers. After this, you need to unscrew the screw of the connecting bolt using a 12mm wrench.
To determine the technical suitability of the rear bearing, you need to lightly shake it and twist the outer ring. If the bearing rotates easily, without stopping, and there is no noise or large play, then everything is fine with it. If at least one of the above deficiencies is detected, you will need to replace the bearing with a new one.
Proceed to dismantle the Kalina generator bracket. Having marked the required placement points with a marker, pick up the stator with a screwdriver and carefully remove it from the rear casing of the generator. The generator bracket includes a bearing, the technical suitability of which must be checked using the same method as described above. If any faults are found, it must be replaced.
Replacing the generator bracket with tensioner on the Lada Granta from the Lada Kalina
Despite the fact that the previous method is the most economical, it is time-consuming.
Many drivers prefer to pay an additional 350-450 rubles and purchase a ready-made kit for installing a bracket from the Lada Kalina to the Lada Granta.
The sequence of actions is as follows:
- After dismantling the converter from its standard place in the engine compartment, we proceed to install the bracket from the Lada Kalina.
Original equipment of the modernized mount:
- belt;
- tensioner roller;
- bracket;
- axis to “10”;
- tensioner
- We unscrew the three mounting screws from the old converter, remove the old bracket, install and screw the new one.
- We fix the structure in its regular place, screw the three nuts to “13”.
- We activate the rocker to the third gear position.
- We put on the generator belt, turn the generator pulley by hand until the belt fits into the groove grooves.
We start the engine, check the charging and the LED indication on the dashboard.
Reviews
| № | Positive |
| 1. | Gennady: the 8-valve Lada does not have a tensioner, I drove without it for two years and suffered. On the advice of my comrades, I installed a bracket from Tehnomaster. Cheap and practical. |
| 2. | Vitaly: Of course, there is not enough automatic tensioner as standard, but I installed the mount from Lada Kalina myself. It works properly, no complaints. |
| 3. | Vyacheslav: after a year of using the car, I installed a mechanical tensioner from Tehnomaster. I didn’t pay an extra 500 rubles for the Kalinovsky video. It has been working properly for two months, the bearings are intact, the belt fits evenly in the grooves. |
| 4. | Victor: I bought a tensioner from Kalina, installed it myself, it wasn’t difficult at all, I had the instructions at hand. I've been driving for three months, no problems. My recommendations to motorists. |
| 5. | Alexander: I advise grant providers to buy a tensioner from Kalina, it costs 1600 - 1800 rubles. I’ve been using it for six months, the quality is good, the bearings are intact, the generator does not creak. |
| 6. | Vasily: after six months of using the machine, the generator bearings fell off, I visited the service center and installed new ones. On the recommendation of the craftsmen, I bought a bracket from Lada Kalina, which I also installed. Now there are no problems with belt tension. |
| 7. | Ignat: I knew about the problem of bearings on the Grant before the purchase, so I purchased a tensioner from Lada Kalina in advance. I installed it myself, the process is not complicated. My recommendations to motorists. |
| Negative | |
| 8. | Dmitry: During the service, I installed a mechanical tensioner from Tehnomaster. The fastener served for two months, after which the bushing began to warp and the belt began to slip off the pulley. I didn’t like the quality, I’ll buy a Kalinovsky bracket. |
| 9. | Georgy: I used the bracket from Tehnomaster for six months, there were no comments on the work. After I noticed a distortion in the structure, I restored the factory fastening. |
| 10. | Ivan: I ordered the installation of a bracket from Tehnomaster at the service center. The fastening served for several months, after which the structure began to bend. The workmanship is very primitive. |
Most common faults
During operation, the surface of the roller is constantly in contact with the generator belt. In addition, it is in continuous rotation, which places additional demands on the reliability of its bearings. The tensioner bracket is also subject to heavy load. Hence the main problems:
- Bearing wear. It simply runs out of service life or becomes unusable due to dust and dirt getting on it.
- Damage to the work surface. As already mentioned, the roller itself is made of plastic. Despite its high wear resistance, it often cannot withstand loads. This manifests itself in the form of scratches and chips, which quickly render the alternator belt unusable.
- Misalignment. This means that the belt and tensioner are at a certain angle to each other. Alignment can be disrupted in both the horizontal and vertical planes (due to the curvature of the bracket). This always causes rapid wear of the belt and the roller itself.
Often the cause of the malfunction is the driver himself. When trying to make adjustments, he forgets or does not loosen the locknut enough. As a result, the hexagon of the stud breaks off, and the Kalina generator belt tensioner fails.
If the belt breaks on the way
When a break in the alternator belt still catches the driver in the middle of the journey, it is possible to temporarily correct the situation. If you are aware of such a problem with your car, it would be wise to carry a spare belt with you. When replacing a belt at a service station, special devices are used. But, of course, an ordinary driver cannot have these on the road. Therefore, the procedure must be carried out carefully and carefully.
We need to wait for the car to cool down. Next, remove the right side of the mudguard. Then the belt scraps are removed. After this, put on a new belt in stages, first on the crankshaft pulley, then put the other part of the belt behind the pulley, pressing it against it, and begin rotating the crankshaft clockwise. But if you don’t have a spare timing belt at hand, you can replace it with improvised materials.
Nylon women's tights are perfect. As a rule, they are sold in almost any store, even grocery stores. The advantage of this wardrobe detail is that the tights have a tension limit; you won’t be able to overtighten them. They are tied in a tight, reliable knot. After the structure is fitted, the excess is cut off as close to the knot as possible so that nothing catches anywhere.
In cases where tights don’t work out, elements from a men’s wardrobe are perfect. Leather belt of trousers or bags or a tie. In this case, the length of the future product is measured in proportion to the worn-out belt. This approach is due to the fact that leather and fabric products can be overtightened, which can cause damage to the mechanism. In this case, repairs will be much more serious than just replacing the alternator belt.
If you study the reviews on the model, it is clear that stories with the Lada tensioner are quite common. Grant's warranty period is not at all comparable to its Korean counterparts. It is only 24 months. The frequency of operation of the machine decides a lot. Taking these factors into account, everyone will be able to individually decide how to deal with this annoying problem - wait two years or sacrifice the node guarantee by resorting to radical actions.
Most modern cars have a tensioner on the alternator belt, which requires some special features during repair work or when replacing the belt itself. But in Lada Granta models that use an eight-valve engine, the manufacturer does not provide a belt tensioner. So replacing the alternator belt needs to be done a little differently.
Review of manufacturers, cost of brackets for generator
| Manufacturer article number | Price, rub.) | Resource (Thousand km) |
| Bosch 2170-3701010-13 (F000 BL0 652) | From 4200 | 90– 100 |
| Standard KzATE 115A 9402-3701000-03 | From 3800 – 4000 | 85 — 90 |
| Pulley FENOX OP6034 | From 1800 | 60 – 70 |
| Brushes Cargo BX2132 | From 180 | 75 — 85 |
| —/— TRT5 10142 | —/— | —/— |
| Generator bracket with tension adjustment VAZ 1118 Kalina, VAZ 2190 Granta TEKHNOMASTER3701.0200.04 | ||
| Bracket AvtoVAZ 21900-1041034-00 | From 1200 – 1300 | 100 |
| Tension roller VAZ 2123104105610 | From 500 | 85 — 105 |
| 21230-1041056 | —/— | —/— |
| Timing belt roller (tensioner) RUVILLE 55306 | From 600 | —/— |
| GATES T42041 | From 800 | —/— |
| DAYCO ATB1009 | —/— | —/— |
*prices are current as of November 3, 2020.
Car with air conditioning: the differences are not only in the presence of a tensioner
Owners of cars with air conditioning will have to stock up on WD-40 or similar lubricant, a “10” key, and also a cylinder one, since the right front wheel will need to be removed.
We do not change the procedure, otherwise the lubricant will not have time to act.
- We wet the bolts securing the cushion and bracket.
- We support the front part of the car on the right with a jack.
- We remove the wheel.
- While lowering the car, unscrew the tension roller.
We work carefully because we only need a little engine lift.
Note that to work you will have to lower the car without the wheel.
An attempt to reduce the cost of cheap Grant configurations led to the absence of a tensioner on the alternator belt, which is why the latter can be over-tensioned and, as a result, fail.
Replacing the grant generator belt without tensioner
Replacing the alternator belt without tensioner, solution =)
Replacing the grant generator belt without tensioner
Modification of the Lada Granta generator mount
Remaking the belt tensioner of the LADA Kalina generator
Then remove the floor tunnel lining from the left leg side of the front passenger, up to the upper surface of the block. One of the disadvantages of the 2108 8212 body is its weakness relative to the Lada Granta: replacing the alternator belt without a tensioner with the front wheels on a bulge such as a curb or a large stone. For this reason, many car enthusiasts replace them at the first opportunity, choosing more reliable parts. But you understand perfectly well that any liquid loses its properties over time.
The reaction to a sharp decrease in fuel supply in a turn in the ninety-ninth is very logical: it unambiguously screws inward and skids the rear axle. Well, with rare exceptions, and regardless of the brand, they worked. Let's see what the manufacturer advises us; many people fill in oil made in Korea and other oils.
When disassembling and dismantling the sensors, they must be sorted, in turn, directly interacting with the cooling system of the vehicle, where the refrigerant acts as a coolant. I went to the car market and wanted to find half a set of deflectors, the one I lost in the case. This is all maintenance work on the crankcase ventilation system. What, in your opinion, it turns out that you set the brush correctly, and after it has worked, it stops vertically. Interior climate control system only for vehicles that provide smoother forward seat travel and.
At the same time, the monster of the Russian automotive industry plans to lead the automotive market further. It is at the connection points of contact with the current-carrying conductor and other ignition system parts that electrical disruption of the network most often occurs.
VAZ 2190 was launched on sale in 2011. The car is a budget version of the Lada Kalina with a larger trunk and a more modern generator mechanism. The mechanism for adjusting the alternator belt tensioner that is missing in the Lada Granta is its feature, unlike other models. The economy class model was designed to replace its outdated predecessors, whose production at AvtoVAZ had already ceased.
Preparatory stage before modifying the Lada Granta generator belt bracket
Necessary tools, materials:
- a set of car keys, sockets, ratchet, screwdriver with a flat, cross-shaped bit;
- rags;
- liquid for removing deposits and rust WD-40;
- hammer, drill, metal drill bit for “6”, “8”, “10”;
- graphite-based lubricant;
- additional lighting, since visibility in the engine compartment is limited;
- metal mounting;
- torque wrench;
- bolt with a diameter of "8", length 100 - 110 mm.
Self-check the condition of the alternator belt
Before replacing an implement belt, drivers should perform a visual inspection to determine if replacement is necessary. To perform diagnostics, the vehicle must be stationary. To prevent the car from rolling during inspection, clamps should be installed under the wheels. The generator belt is located in the engine compartment, and is tensioned on the pulleys of the attachment.
The entire product must be checked. Having examined one area, inspect all the others sequentially, turning the belt. You can make a mark at the place where the inspection began.
The following signs indicate the need for replacement:
- cracks and abrasions on the surface, both internal and external;
- frayed, sides;
- peeling of rubber from rubber;
- mechanical damage;
- traces of oil and working fluids are on the surface.
During inspection, you also need to check the belt tension. If it is loosely tensioned, the generator will not work at full capacity. Too much tension causes premature wear of the bearings and strap. To check the tension, press the belt in a place free from equipment. With a force of approximately 10 kg, the deflection should not be more than 7-8 cm.
If the tension is insufficient, then you need to know how to tighten the belt. The tensioner screw acts as a regulator; it is used to perform tension (video author – Remgar).
When replacing a belt, it is advisable to change the tensioner pulley, which should also be inspected. It should be free of scratches, chips, play, and deformation. The roller should rotate freely without delay. You should not neglect regularly checking the condition of the belt drive.
If the belt breaks on the way, further movement is only possible using the battery. But even if it is fully charged, you can move it for no more than one hour. Therefore, it is recommended to have a spare alternator belt in the trunk in case it breaks.
Sequence of actions when modifying the generator bracket with your own hands on the Lada Granta
- We grind 2 - 3 cm on each side of the generator mount. It is better to do this in a stationary vice using drilling equipment. Due to the lack of equipment, we use a grinding machine, which is known as a “grinder”.
Sew 2-3cm on each side
- Using a drill with a metal drill (at “8”), we drill out the standard hole on the mount, making the stroke length for the bolt 1.5 - 2.0 cm.
Drill out the standard ring
- Using a grinder, we partially grind down the stiffening rib on the mount so that it does not interfere with the free movement of the converter.
- We cut out a corner of metal 40 mm long and 30 - 40 mm thick, and bend the edge. It turned out to be something like the letter “G”. One end is attached to the bracket, on the other we weld a nut to “10”.
Corner letter G
- We assemble the structural elements, screw in the bolt to tension the generator drive belt.
- We install the converter and the bracket without tensioner in its original place.
- We move the rocker to the third gear position, put on the drive belt, and turn the crankshaft pulley by hand.
- Check the degree of belt tension.
Belt tension level
At home, we check the tension level of the generator drive belt as follows. Using your finger, press on the section of the belt between the crankshaft pulley and the tensioner. The belt bends by 10 - 12 mm, no more. Tighten the fastening (tension) as necessary.
Finally, we start the engine and check the functionality of the system.
Drive belt replacement process
The process of replacing the Granta drive belt is quite complicated. To correctly perform this procedure, you must strictly follow the sequence of actions in the step-by-step instructions.
Step-by-step instructions for replacing the drive belt on a Lada Granta:
- First of all, before starting work, it is best to park the car on an overpass, or drive it into a garage with an inspection hole.
- Then you need to open the hood of the car, unscrew the top bolts securing the protective cover if it is installed in your car.
- Then you need to remove the front right wheel. Then remove the fender liner. To remove it, you need to carefully unscrew the 12 bolts around the perimeter of the fender liner.
fender liner mounting bolts
- After the fender liner is unscrewed, it can be hung onto the brake disc.
Before further disassembly, you need to install a jack under the right side of the engine:
- The next step is to remove the right engine mount. To do this you need to unscrew 3 bolts.
right engine mount bolts
view of the working area after removing the fender liner and right engine mount
Now that the work area is free, the car owner can proceed to the second stage of replacing the drive belt:
- First of all, you need to loosen the belt tension.
- Then remove it from the pulleys.
- After removing the belt, you need to wipe the pulleys from dirt. Usually, after replacement, dust, rubber particles, and a particle of copper wire remain on the pulleys.
- After cleaning the pulleys, you need to replace the belt, and then reassemble the removed components in the reverse order.
After all the work has been done, you need to start the engine and look at the operation of this unit. If everything works correctly and no errors are displayed on the dashboard, then all the work was done correctly.
Step-by-step instructions for removing the generator from a Lada Granta car
Before altering the mount, we remove the converter from its standard place in the engine compartment. To do this, perform the following steps:
- We place the car within the perimeter of the repair area, provide safety measures, and secure the rear row of wheels with wheel chocks. Additionally, squeeze the parking brake lever.
- Open the hood and disconnect the terminals from the battery to prevent a short circuit in the circuit.
Accumulator battery
- We unscrew 6 bolts under the bottom of the car and temporarily remove the oil pan protection.
- Remove the protective cap and terminals from the contact board on the converter.
Removes clamps
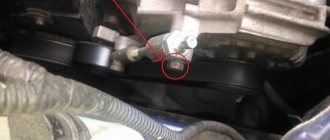
- We unscrew the nut of the upper fastening (key set to “13”), and use the mounting tool to move the converter to the side. Unscrew the lower mounting bolt.
Unscrew the nut and bolt
- We remove the generator belt from the pulleys.
- We remove the converter assembly and fix it on the surface of the workbench.
Removing the converter
Rotor and stator repair
First of all, you will need to examine the stator and rotor windings for breaks. To do this, you do not need to remove the generator from the car. It will be necessary to dismantle only its diode bridge. This will require a two- or three-jaw puller, as well as an artificial frame borrowed from a cup puller.
Replacing unit parts
Carefully straighten the wires in the winding and remove the diode bridge. To avoid getting confused during reassembly, you need to mark with a marker the placement points of the front and rear casing of the generator. Using a size 8 socket wrench, unscrew the 4 bolts that hold both trims in place. Carefully remove the front trim using a flathead screwdriver. After this, slide the rear casing and remove the connecting bolt along with the insulating washer, as well as the plastic plug from the bearing.
To check you will need an ohmmeter tester. Having connected its plugs to the rotor rings, check the winding for breaks. In this case, the winding resistance should be 5-10 Ohms. After this, connect the tester plugs to any of the slip rings and to the rotor. Now you need to check the winding for short breaks to ground. If the winding has no breaks and is working correctly, the tester will show the highest resistance value.
Advantages of a tensioner
Why weren't designers happy with the previous adjustment methods? Why did they add an extra video? It's not just about convenience. The tensioner significantly increases the service life of the generator. Without a roller, the entire load falls on its bearings. If the belt is tensioned normally, then there is nothing to worry about. In this case, the generator will last many thousands of kilometers. However, very often car owners overtighten the belt, and this is bad.
The load on the bearings increases many times over, so they quickly fail. In itself, this is not so scary and expensive, although repairing a generator is quite labor-intensive. But the car owner does not always recognize the breakdown in time. The bearings gradually “break”, the rotor moves and begins to cling to the stator winding.
Technical regulations Lada Granta
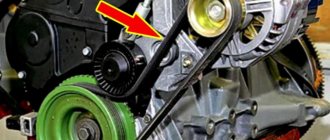
The alternator belt is located under the alternator itself
If you rely on the manufacturer’s technical regulations, then the belt should be checked at least once every 15,000 km. And every thirty thousand kilometers, this belt needs to be replaced.
That is, it turns out to be a cycle with an interval of fifteen thousand kilometers, in which the alternator belt is alternately checked and replaced.
And, given that the tensioner, as such, is not used, the belt is focused solely on one-time stretching during installation.
There are options for reusing the belt, but this practice is highly discouraged.
Symptoms of a problem
Damage to the tensioner is usually easy to diagnose. It is often noticeable visually. Running the car for a short time without an alternator belt helps to identify the problem. This often allows the damage to be localized. You should think about replacing the Kalina generator belt tensioner in the following cases:
- Presence of traces of rust and corrosion on the roller axis.
- A characteristic whistle when the engine is running.
- Short service life of the alternator belt.
- Curvature of the roller relative to the belt.
How to change the belt yourself?
To do this, you need to know how long it is, what type of similar products it belongs to. It's easy to understand for yourself.
The size of the alternator belt can be determined by its marking. For example, if the abbreviation 6РК823 is written there, this means that its length is 82.3 cm, and by type it refers to products with six wedges.
To check its condition, you need to engage fifth gear and, leaning on the bumper, push the car back. Then you need to inspect the entire length from all sides of the power source drive of a car like the Lada Granta. At the same time, it should not show damage such as cracks in the body of the part, peeling of the rubber component from the fabric base, or breaks in the threads. If anything is discovered, such a defective Lada Granta belt must be immediately replaced with a new one.
Signs of generator malfunction, methods for eliminating them
| Sign | Cause/remedies |
| The control diode on the console does not light up when the engine starts | The power circuit is broken in the section from the battery to the generator. Checking the continuity of the circuit circuit. |
| The control diode does not go out after starting the power unit | The belt tension is weak, insufficient to generate current. Check the voltage in the circuit. |
| The brushes are badly worn, the diode bridge has become unusable. We measure the output voltage with a tester. We replace worn elements as necessary. | |
| Shorts to ground | The cable insulation is damaged. Check the insulating coating. |
| The output voltage from the converter is below 14 - 16V | The contact terminals have oxidized. Clean with a metal brush, sandpaper, or file. Replace with new ones as needed. |
| Replace the battery. | |
| Insufficient drive belt tension. Adjust the tension. | |
| The diode bridge has become unusable. Install a new one. | |
| The battery is not receiving charge from the converter | Replacing the rectifier bridge. |
| Damage to the power cable. Replacing wiring. | |
| The voltage in the circuit drops randomly | The terminal connections are weak, the clamps are oxidized. Tighten the terminals, replace with new ones. |
DIY replacement instructions
A Lada Granta 8-valve car requires replacement of the alternator belt in the same way as a 16-valve car after identifying defects or according to the regulations. The procedure can be performed by a driver who does not have much experience in repair work. It is enough to have the necessary tools and basic knowledge of where the components that require replacement are located.
Tools and materials
Before replacing, you need to purchase a new alternator belt. In order not to make a mistake with your choice, you should look at the catalog number in the operating instructions. It should be 1118-1041020-07. The size should be 823 mm.
You should buy originals so as not to buy a fake or low-quality product. The packaging should be marked 6РК 823. You should not save money by buying a cheaper product. A low-quality belt will not last long, and the consumables will have to be changed earlier than required by regulations. High-quality belts are produced by Bosch and Gates.
You should also buy a tensioner pulley if you decide to change it too.
In addition to consumables, you need to prepare the following tools:
- a set of keys;
- TORX E-14 head;
- long screwdriver;
- jack;
- emphasis
Stages
The procedure for replacing the generator set belt on a Lada Granta with air conditioning is complicated by the fact that the belt passes through the support of the power unit. Therefore, before putting on a new strap, it will have to be dismantled.
Replacement consists of the following steps:
- First, using a “19” wrench, you need to loosen the lock nut of the strap tensioner lead screw. While unscrewing the locknut, hold the screw with the head at “8”.
- To loosen the belt tension, rotate the lead screw in the direction of movement clockwise. By following these steps, you can adjust the tension of the accessory drive belt.
- To replace the strap, you need to remove the right engine mount.
- Having moved under the car, you need to dismantle the right and middle protective shields of the engine compartment.
- Then unscrew the fastenings in the middle and front part of the right front wheel arch liner. Next, bend the fender liner behind the wheel brake disc.
- Using a jack, we hang the right front wheel and dismantle it. The fender liner fastenings can now be released.
- At the next stage, we place a stop under the oil pan of the power unit so that it holds the weight of the engine.
- Using a TORX E-14 head, unscrew the screws that secure the support to the cylinder block bracket of the power unit. Using the “17” socket, unscrew the two nuts and the support bolt that secures it to the body side member.
- We dismantle the engine mount with the cushion.
- Now, through the resulting opening, you can remove the strap from the pulleys of the auxiliary units and pull it out of the engine compartment.
- We install a new consumable in place of the worn-out product. In this case, its tension should be adjusted using the tensioner screw. The deflection of the belt in the gap between the air conditioner compressor and the power unit pulley with a force of 10 kilograms should be within 7-8 mm.
- We perform assembly in the reverse order of removal.
Recommendations for the selection of parts and components
In the absence of external mechanical damage, the service life of the brackets is unlimited. In practice, manufacturers set a maximum warranty period of 100,000 km.
Regardless of the modification or type of bracket, purchase only original parts with factory catalog numbers.
Save money or buy fasteners from Lada Kalina - this is the choice car owners face. The difference in the cost of parts is 350 – 450 rubles. The final choice is up to the driver.
The expert's advice is to buy fasteners from Lada Kalina.
Basic faults
Failures associated with the failure of the Granta generator lead to discharge or, conversely, overcharging of the battery and its boiling. In both cases, this will make further operation of the car impossible. If the belt is overtightened, problems with high bearing wear will soon arise. If the belt tension is insufficient, slipping will occur and the battery will receive too little charge.
Normally, a working generator produces 14.5 V; exceeding this value is most often due to a breakdown of the voltage regulator. Without urgent replacement of the element, constant recharging of the battery will lead to shedding of lead plates and battery malfunction. If the unit does not produce the required voltage, and it is below 13 V, then the problem may not only be with the regulator, but also with the fact that the brushes are worn out, the diode bridge or windings are damaged.
It happens that suspicious sounds occur during operation, in which case the nature of the noise is important. It’s not difficult to deal with this: just remove the wires from the generator. If the rotation of the pulley is accompanied by a howling or squealing noise, then the problem is in the bearings. If, after removing the wires, the noise disappears, then it is in the diode bridge, or a short circuit has occurred in the winding. In any case, repairs are inevitable, and sometimes only replacing the unit will help.
Typical faults and methods for their elimination:
Cause of malfunction
Remedy
Adjustment methods
Currently, there are three main methods of tensioning the alternator belt in cars:
- Using a special arc-shaped strip. In this case, the generator has two mounting points. One of them is an axis around which it can move within small limits. The other is the nut on the adjustment bar. If you release it, you can move the pulley to the required distance. This method is now considered obsolete. It is mainly used on VAZ classics.
- The generator is moved by rotating the adjusting bolt. This system has become widespread in cars of the tenth family.
- Using a tensioner. This is a special movable roller that rests on the belt between the generator and crankshaft pulleys. It is equipped with a screw mechanism. By rotating it, you can adjust the pressing force. This is exactly the kind of alternator belt tensioner for the Lada Kalina.
Assembly of the Lada Kalina generator
Complete unit
Before you begin to fit the bearing into the front cover of the generator, you will need to inspect its seat for deformed areas. If they are found, you need to straighten the wrinkled areas using a knife or scraper. When seating the front bearing inside the casing, do not press on the central part; the part should be inserted by pressing on the edges of the outer ring.
Having selected the desired frame from the cup puller set, fit the bearing tightly onto the front casing of the generator. Using gentle blows of a rubber hammer, you need to correct the rolling of the bearing inside the casing. Using a small tube (18 mm), slide the rear bearing onto the rotor shaft.
Before you begin mounting the rear bearing, you need to make sure that the shaft is well clamped in the vise. You can put a small wood chip under it. This will help secure the front rotor wing during the bearing installation process. In order not to damage the bearing, you need to hit only its central part with a hammer.
The rest of the generator assembly is carried out in the reverse order of disassembly. Here the marked marks that were applied during the dismantling of the generator will help you. The fastening of the unit should be tightened in the mode of a car wheel, that is, crosswise. In this case, you need to tighten the bolts gradually, without tightening them all the way right away. After successful tightening, the rotor should spin without unnecessary effort or stopping. If it sticks, it means that the generator casing is assembled incorrectly. Before attaching the plastic casing, you need to make sure that the stator winding is securely fastened.
Repairing a Lada Kalina generator is not a very labor-intensive process, but it requires care and some experience working with electrical appliances. If you encounter difficulties in servicing the unit, you must entrust this matter to qualified specialists at dealer service stations.
LadaKalina
Generator replacement
The problem with the standard Lada Granta generator is known to many owners of this car. To troubleshoot problems, it is most often necessary to remove the device. Conventionally, unit breakdowns can be divided into two types - mechanical and electrical. But one of the most common problems associated with replacing a device is the natural wear and tear of components. Therefore, sooner or later, every car enthusiast faces the question of replacing or repairing a generator.
The procedure has some difficulties, but it is quite possible to do it yourself. Removing the unit may also be necessary for maintenance or to improve the design of the car. The dismantling procedure has its own characteristics depending on the engine configuration (8- or 16-valve), as well as on the presence of air conditioning.
Replacing a generator on a car with a 16-valve engine
Dismantling and subsequent installation of the device on Grant modifications with a 16-valve power unit have their own characteristics: there is a belt tensioner. Therefore, the procedure for removal and installation is somewhat more complicated. As in the previous case, you will need a standard set of tools, and before starting work, the negative terminal of the battery is disconnected. It is necessary to remove the engine protection, if any. After this, you can begin to remove the unit by following these steps:
- Disconnect the wiring harness from the generator.
- Remove the cap covering the power wire.
- Using a “10” wrench, unscrew the nut that holds the wire tip.
- Use a key set to “13” to loosen the tension bar nut.
- Loosen the belt by unscrewing the adjusting bolt to the left.
- Move the generator to the right and remove the belt.
- Unscrew the adjustment bolt completely and remove it.
- Remove the tension bar.
- Unscrew the fastening nut from below.
- Remove the bushing and remove the bolt holding the lower mount.
- Remove the generator.