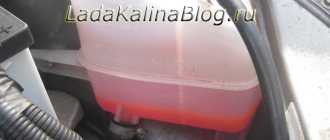
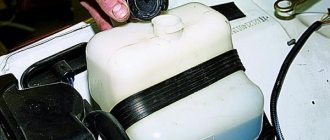
Today I went out to the car in the morning, started it up and sat there warming up. As usual, out of habit, I got out of the car, opened the hood and saw that the level of antifreeze in the tank had dropped sharply. Usually he always stayed at the maximum level, but here I see that he has dropped almost to the very bottom:
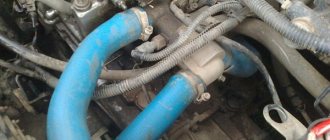
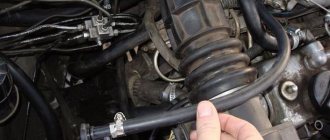
I looked carefully under the hood and at first did not see any traces of coolant anywhere. But then I looked at the radiator on the left side and saw a rather unpleasant picture, which, by the way, I also captured:
As you can see in the photo, the leak was from the upper pipe, since everything is in antifreeze from top to bottom. Apparently, the severe frosts made themselves felt, and they “fried” them to the fullest for two weeks!
Since it is impossible to just crawl up to the pipe to tighten the clamp, it was necessary to remove the air filter housing completely. After this, at least somehow you have access to the clamp, but you still won’t be able to use a long screwdriver there. I had to tighten it with a short screwdriver, but there wasn’t much room for it to turn around either.
In general, after a minute of effort, we managed to tighten the clamp a little, the bolt turned about one turn.
It looks like the pipe is intact, but it’s hard to say for sure; it will become clear over time. After tightening, I poured antifreeze into the expander to the MAX level. So far there seem to be no traces of a leak, but it is better to look on a cold engine in good frost, since at low temperatures the coolant becomes more fluid.
Procedure for checking the Lada cooling system
1. Check the coolant level in the expansion tank; it should be between the “MIN” and “MAX” marks. If antifreeze has to be added periodically, then the system is not sealed (we check the integrity of: hoses, radiator drain holes, cylinder block, sensor installation locations, expansion tank housing, pump and its connections, engine and heater radiators).
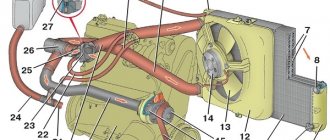
2. Check the thermostat. We warm up the engine to 85-92C and check the lower radiator hose leading from the radiator (in diagram No. 10), if it is cold, it means the coolant is circulating only in a small circle, the thermostat is faulty and should be replaced.
3. Check the circulation of antifreeze in the cooling system. Open the cap of the expansion tank and monitor the flow of antifreeze into the tank. Attention, the cooling system is under pressure, and the antifreeze in the system may be hot; open the expansion tank cap very carefully. Poor circulation of antifreeze indicates a malfunction of the water pump (pump), or the cooling system is clogged (needs to be cleaned).
Replacing the thermostat on Kalina 8 valves
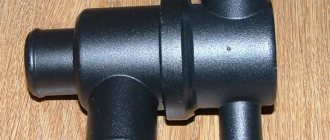
The thermostat on Kalina consists of 2 parts - the so-called thermostat cover and housing. The cover is the part in which the thermocouple is located, and the housing is the part that is attached to the engine. Housings are not sold separately, unlike covers, at least I haven’t seen them. Therefore, you can either replace the cover or buy a completely assembled thermostat.
It is attached to the engine with 2 nuts along with the ground wire from the battery. We unscrew them and remove the thermostat. In most cases, the remaining gasket will stick to the engine. They will need to be removed with a knife or blade.
The coolant temperature sensor is screwed into the thermostat housing. You need to unscrew it from the old one and screw it into the new thermostat, or just buy a new one. It is attached under a copper gasket, which seems to need to be replaced with a new one, but practice shows that a used one also holds up normally. The thread of the sensor itself, closer to the gasket, can be lightly coated with sealant.
To be sure, I additionally applied a thin layer of sealant to the new thermostat gasket and installed it in the prepared place. According to reviews on the Internet, it is best to buy an original thermostat from AvtoVAZ. He will last the longest. In second place, this is exactly what I bought, since I simply couldn’t find the original one. Some samples may open not at 85 degrees, but at 90-95º. Not sure if this is normal. It should also be noted that the PRAMO thermostat cover will not fit into the AvtoVAZ body; the side will interfere, which the craftsmen successfully saw off with a grinder.
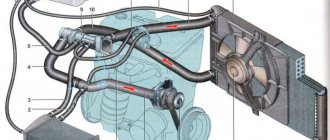
Replacing the pipes of the Kalina cooling system can be divided into replacing the heater pipes and replacing the radiator pipes. There are 2 pipes suitable for the stove - inlet (1) and outlet (2). There is also an inlet (3) and outlet (4) to the radiator. There is also a small connecting pipe (5) from the thermostat to the siphon.
Common faults
The stove itself on Kalina is well conceived, but due to the poor quality of the elements and parts, various troubles constantly happen to it. Even the latest models with climate control have various “diseases”. The list of the most common faults looks like this:
- The heater core is leaking;
- the heater damper is jammed or does not open completely;
- failure of the fan or control unit;
- gear motor failure;
- the temperature sensor or heater resistor has become unusable;
- The cabin filter is clogged.
To find out where this or that element of the heating system is located, you should look at the operating instructions; there will definitely be a corresponding diagram there.
The design of the Kalina stove without climate control is such that the air sucked in by the fan passes through the air filter and enters the heater radiator. There it is heated and supplied to different areas of the cabin through adjustable grilles and openings. The dampers are controlled and the fan speeds are switched manually. This heating system is more reliable because it does not contain any electronics.
On a Lada Kalina with climate control, the rotation of the dampers is controlled by a gearmotor at the command of the electronic unit. The latter receives signals from a temperature sensor located inside the car and reacts accordingly to changes in the microclimate. The controller interacts with both the heater and air conditioner.
Why are pipes needed?
Together they serve to forcefully remove excess heat from engine parts and then transfer it to the environment. During the cooling process, a normal temperature regime is created in which the engine does not heat up and does not cool down for no reason when the operating cycle proceeds normally.
Heat removal from engine parts is necessary, since when the gas mixture inside the cylinders burns, the engine temperature reaches 2000°C, the average temperature remains at 800–1000°C. Everything is clear here, if you do not cool the liquid, the engine will overheat and subsequently fail. Therefore, to create a normal operating temperature for the engine of any car, there is a cooling system itself along with the pipes. This system also helps to quickly warm up the engine, especially in winter.
In modern cars, we use antifreeze, antifreeze or distilled water. It is not recommended to use plain water, as scale will form.
We will not consider the main elements of the cooling system, for example the block cooling jacket, cylinder head, thermostat, pump, radiator, fan, and heater hoses in detail. We will just find out the most important thing for motorists when operating a car by looking at, for example, a review of photographs of the connecting pipes of the radiator of the VAZ Kalina and Priora cars and their design numbers.
Beginning car enthusiasts and experienced drivers should not forget, remembering how they taught in driving school, that a car requires simple maintenance from time to time.
Replacing radiator pipes Kalina
When replacing radiator pipes, no difficulties should arise. We take off the old ones and put on new ones. The inlet pipe is attached to the top of the radiator, the outlet pipe is attached to the bottom. It is worth noting that the outlet pipe consists of 2 - one part (the main one) goes to the thermostat, the second goes to the expansion tank. This pipe is the most expensive - its cost exceeds the total cost of all other pipes taken together. Therefore, it is advisable to treat it with care.
There is only one connecting pipe left (from the thermostat to the siphon) and heating hoses for the throttle assembly. Replacing them shouldn't cause any problems either. I bought a hose for the throttle (10mm) separately, 1 meter long, then cut it to the length of the old ones.
I did not touch the hose for the overflow from the radiator to the expansion tank. She appeared to be in good condition.
Cooling scheme
The cooling scheme of the Lada Kalina 8 valves is quite simple. The entire system consists of several fundamental elements that are interconnected. The Lada Kalina power unit has a cooling system with two circles - small and large. The first is designed to warm up the engine, but the second is to provide cooling.
The Lada Kalina engine cooling system has the following diagram.
Replacing the pipes of the Kalina stove
In my case, the heater pipes were in the worst condition. In addition, unscrewing the clamps on the heater radiator itself was very problematic, since they are located immediately under the steering rack. To do this job I used a small ratchet with an 8mm head. It was simply impossible to get through with a screwdriver.
Before removing the pipes, be careful - the liquid remaining in the heater radiator will flow from them, so prepare small dishes in advance. Do not allow liquid to get on the speed sensor, which is installed exactly under the heater pipe.
Preparatory process with preliminary disassembly
To ensure the ability to carry out repair work to replace the radiator, you will need to acquire the following tools:
- locksmith set, which includes a wide range of standard keys;
- a hacksaw for metal with the ability to extend the blade;
- a container paired with a hose to drain antifreeze;
- silicone sealant or other means for gluing plastic;
- with a rag.
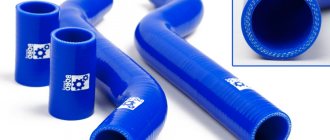
During the procedure for replacing the heater in the LADA Kalina model, we also recommend replacing its power supply and return pipes. On old hoses there is a high probability of cracks appearing, which can manifest themselves unexpectedly and negatively. This approach will eliminate the need to repeat the labor-intensive disassembly procedure in order to replace the pipes. We advise you to pay attention to silicone products.
How to diagnose a heating system in Kalina
Before performing a diagnostic procedure, you will need to carefully study the diagram. You should only try to check while the engine is running.
- The temperature regulator, located on the control unit in the cabin, is installed in the extreme left position. We activate the fan and observe hot air entering the cabin through the deflectors. Gradually moving the handle to the right until it stops, we reach the exit of the cold air stream.
- Checking the speed should begin by setting the appropriate knob to the minimum speed position. If the fan and its control module are working properly, then the force of the air stream should increase as the handle is moved to subsequent positions (and so on until the 4th speed mode, corresponding to the maximum number of revolutions).
- We check the dampers. Here we move the temperature level regulator to the maximum to the left position. We move the fan speed switch to the position corresponding to the 4th speed. The check itself boils down to smoothly moving the damper regulator between the extreme positions. This should be done in order to feel the adjustment in the direction of flow. By moving the temperature regulator to different positions, we observe a change in the degree of heating of the incoming air.
Main stage
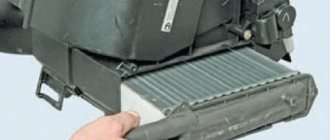
Replacing the heater radiator in Lada Kalina is available in two ways:
- Traditional. Here you will need to disassemble the front panel. The assembly is supposed to be removed through the opened opening.
- Fast, without removing the panel. It does not provide for the need to dismantle the panel. The radiator is removed from the side. A similar procedure is used to install a new product. Here you will need to slightly cut the decorative radiator panel in order to increase the width of the technological opening necessary for the installation process.
It is this method that will be discussed further, how to change the radiator with your own hands directly without removing the panel.
Many experienced owners advise making a designated opening before directly dismantling the LADA Kalina radiator. You may also be puzzled by creating an opening before installing a new product.
- To freely remove the assembly to the side, you will need to unscrew the plastic cover located on the side.
- Now we move aside the previously mentioned plate, which serves to cover the radiator fittings.
- We cut these elements with the extended blade of a hacksaw. Manipulation is required to allow lateral displacement of the old node.
- By raising the brake pedal, we remove the used product.
If there are difficulties in removing the brake pedal assembly rod, we recommend cutting and removing the old radiator in parts
- After removal, cut the previously specified plastic frame
- Now you can easily install a new product into the opening that appears.
- The last action in the assembly stage, performed according to the reverse algorithm, will be filling the liquid.
The stove radiator replacement has been completed.
How to get to the damper
To see where the central heater flap is located, you will need to partially disassemble the dashboard, and specifically, unscrew the beard.
This is the place on where the heater switches are located. Progress:
- Remove the ashtray.
- Squeeze out the 2 plugs located next to the emergency lights button.
- Remove all control knobs.
- Unscrew the 2 self-tapping screws of the center console and carefully pull it out, while prying it at the latches.
- Disconnect all wires.
- Now you can easily reach the damper.
- Replace the damper or its drive components.
Very often, the cause of the malfunction may be a broken damper drive mount. If the situation is not critical, then you can simply glue the part that has fallen off using superglue.
There are cases when the valve drive mount breaks off due to an undeveloped cable that is very difficult to lower. In this case, it must be developed manually, after which this problem should not arise.
Preliminary disassembly
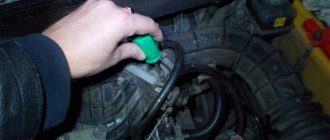
- First, you will need to empty the system of working fluid before replacing the heater radiator. This is done by opening the cap on the main radiator and draining the antifreeze into a previously prepared container.
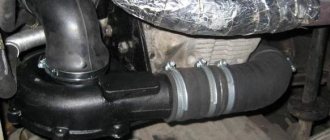
- Now it is necessary to dismantle the air filter along with the suction pipe.
- We remove the battery.
- When access to the stove pipes appears, we first move the container under the junction of the pipes with the heating radiator. After removing the hoses, at least 1 liter of antifreeze will collect in the container.
- Near the pipes we find a nut that secures the plate inside. It will need to be moved, since there is a likely risk of interfering with the process of removing the radiator assembly. To do this, loosen and unscrew the nut from the engine compartment. We do this after the liquid has completely drained from the designated pipes.
- We go into the interior and remove the accelerator drive cable.
- Next you will need to dismantle the pedal itself. It is secured with three bolts.
- Remove the decorative radiator panel (it is located on the right side of the gas pedal).
- The brake pedal of the LADA Kalina can also cause inconvenience during the disassembly operation. There is no need to dismantle it, but by removing the rod it can be raised above its working position.