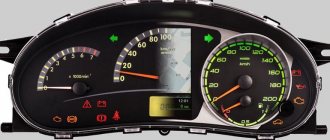
The new generation of Lada Priora cars is equipped with a more modern dashboard, which provides a standard place for placing a multimedia system or on-board computer. This design feature is actively used by some car enthusiasts when making modifications. We are talking about installing a tablet in Priora.
This solution allows you to significantly expand the functionality of the multimedia system, using the device as a navigator, on-board computer, or monitor. Listen to music, watch movies, the possibilities are almost endless. For installation, you can use a device from any manufacturer, but you should remember that products with a screen diagonal of 7 inches are most suitable.
Options for installing a tablet in Priora
There are several options for installing a tablet in Priora 2:
- an option when the mobile device is installed and powered from its own built-in battery;
- when the built-in battery is removed and power is supplied from the vehicle's on-board network.
In the first situation, installation occurs much faster than in the second case. However, a significant disadvantage is that the tablet battery, when exposed to sub-zero temperatures in winter, will quickly lose its capacity or even fail. In addition, there is a possibility that in the hot season, when the car interior heats up, the battery may ignite (remember the story with tablet computers and spontaneous combustion of Samsung batteries). As a result, the car can burn out completely.
The second option involves independently modifying the tablet and resoldering some contacts. The point is that the tablet is powered directly from the battery in the car, so it can be turned on and off at any time, regardless of whether the radio is active or not. This approach provides a number of advantages, but it is more complex in implementation than the first, above-mentioned approach.
Which option to use - decide for yourself, it all depends on the level of preparation and the desire to delve into the essence of the issue in detail.
Connecting a tablet through a car amplifier
There are two options here:
- If your car has a standard audio system, then it can be replaced using an external amplifier and a tablet.
- If you have a removable radio, then you can use it as an amplifier and connect it to the tablet.
I used the first option.
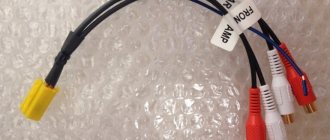
Replacing a stock stereo system with a tablet requires connecting an external amplifier. The fact is that the tablet cannot be directly connected to the speakers. The audio output is for headphones only. That's why an amplifier is needed. I chose 4 channel because my car has four speakers. I have the amplifier installed under the front passenger seat, but it can be installed almost anywhere, such as in the trunk of a car, but I think that is too far from the battery. I chose a location under the passenger seat to limit cable length. The seat will have to be removed, but it's really not difficult. Google how this is done in your car.
The amplifier will be powered directly from the battery. To do this, you need to run fairly thick wires from the car battery. Read the amplifier's instruction manual to determine the required cable size. There are amplifiers that come with wires for connection. You can also save money and go buy such a wire yourself.
I chose the cheapest amp I could find. I rarely listen to music, mostly audio books, so the sound quality didn't bother me too much.
Tools and materials
You will need a ferrule crimper on the end of each wire. I have tips that have heat shrink cambric. Not a bad option and looks very professional.
- Wire Stripper/Crimping Tool
- Soldering iron (recommended)
- Screwdrivers
- Drill
- Knife with cutting blades
- Tablet from car dock (I chose Samsung Galaxy Tab 7+)
- 1/4" Lexan sheet (approx. 10"x6")
- Dye
- 1-1/4" circle cutter
- 3/8" drill
- Amplifier
- Car Audio Adapter
- 12 V plug into cigarette lighter
- Wire - thick-walled to the amplifier
- Wire - for speaker signals
- Gaskets
- Insulating tape
- Scotch
Connecting the tablet to the car’s on-board network (important note)
You need to connect two devices to the on-board network - a tablet and an amplifier. Of course, they can also be connected through the cigarette lighter, but this option can only be considered temporary. To avoid short circuits and ensure stable power supply, it must be connected directly to the battery.
Which tablet to put in Priora 2
As mentioned above, the main and basic requirement for a tablet computer is the size of its screen. In our case, this figure should be 7 inches. If we talk about specific device models, the most popular of them are:
- Samsung Galaxy Tab 3 (with 7.0 screen);
- more budget models from Lenovo (for example, the A3500 product).
The second requirement for the device is the ability to recharge it using a standard USB cord. The third, but important parameter is the quality of the device’s battery. Please note that when installed in a car, the battery of a mobile device will be subject to aggressive external influences in the form of heat or cold, and temperature changes.
Firmware for Lada Priora radio
Modern technologies are rapidly moving forward, also improving car gadgets. Firmware for the standard Lada Priora radio allows car enthusiasts to expand the capabilities of the player by adding additional functions that the standard software does not have. The updated radio interface can be supplemented with a convenient touch keyboard, fresh programs and new versions of players with the ability to play all audio and video formats.
Radio set from Priora 2
The firmware of the VAZ 2170 audio player system is carried out using an SD card with a capacity of at least 4 GB, formatted in the FAT system.
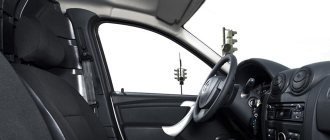
Installing a tablet in Priora 2
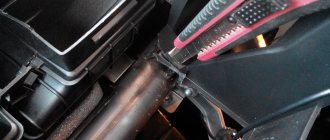
To complete the work, you will need a flat-head screwdriver, a durable utility knife, and a small amount of soundproofing or sealing material. The first step is to remove the on-board computer from the car's dashboard. To do this, you need to remove the panel visor, which is attached to it using clips (pry up the edge of the visor with a flat screwdriver and pull it towards you). Remove the BC from the case, disconnect the contact wires that are connected to it.
Prepare a tablet of the required size. We unscrew the mounting plate, turn it over and secure it so that the tablet can be installed on it (we first glue the places of contact between the device and the metal with some anti-vibration material). We place the device at the place of future installation, analyze the dimensions, as well as how much plastic of the top and side panels needs to be trimmed. Using a utility knife, cut the required amount of plastic. We connect the USB charging cable to the electronic device and connect it to the radio. We connect the audio output of the device to the AUX connector on the radio. We install the visor back. To do this, we lean it against the fastening points and tap its body in several places so that the latches are fixed and firmly hold the part in the grooves of the panel.
Here is a simple and very useful way to install a tablet in a Priora with your own hands.
Installation of 1 din radio in Grantu standard and norm
What is needed to install a radio in a VAZ 2190:
- The radio itself is also the head unit;
- flat screwdriver;
- Straight arms.
Abbreviations and symbols in the text:
- GU – head unit;
- MMS – multimedia system;
- DIN (din) – installation size for acoustics in a car.
Step-by-step instructions for installing the head unit
- a narrow flat screwdriver or plastic spatula for installing acoustics;
- 1-din radio with frame.
The seat in Grant is designed for 1 din. To work with large 2-din sizes, you will need to cut out the partition and install a decorative frame.
Step 1 . Using a flat-head screwdriver, remove the plastic plug for the radio. To do this, carefully pry it around the edges and pull it towards you.
The placeholder for the radio is installed from the factory.
Step 2 . On the back of the plug there is a mount for ISO connectors. There are two connectors: music power and wires for the speakers.
Step 3 . If necessary, connect an adapter for your radio to the ISO. Usually it comes included .
If an adapter is not needed , proceed to step 4.
If an adapter is needed for acoustics, it is included in the kit. Example in the picture.
Step 4 . We remove the glove compartment. Holding the glove compartment clamps in the upper position, forcefully lower the glove compartment down.
Overcoming resistance, we pull the lid towards ourselves - the glove compartment is removed.
Removing the glove box on a Grant is easy when you know where its latches are located.
Step 5 . We climb under the panel in the area of the front right passenger's feet with a flashlight. Behind the felt on top we find a thick black wire - at its end there is a plug for the factory antenna.
We extend the plug to the installation location of the radio.
Here we are looking for the antenna wire.
Step 6 . We install metal slides for the radio. a screwdriver to bend the fastenings of the slide at the top and bottom to ensure secure fastening.
These fasteners secure the slide into the panel opening.
Step 7 . We connect the power connectors, speakers, antennas to the radio. We insert it into the slide all the way. We attach a decorative plastic frame.
What to do if the length of the wires and antenna is not enough
To get by without extending the wires , you will have to suffer:
- We put our hand under the panel in the glove compartment area;
- We put the radio in the slide and connect it to the plugs;
- We blindly connect the power, the connector for the speakers, the wires for the amplifier, and the antenna.
Functions and principle of operation
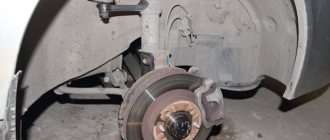
The rear axle reducer (RAG) is part of the vehicle transmission. This unit changes the direction and increases the value of torque, which is transmitted from the driveshaft to the axle shafts of the drive wheels . The engine rotates at high speed (from 500 to 5 thousand revolutions per minute), and the task of all transmission elements is to transform the direction and angular speed of the rotational movement of the motor and ensure the efficient operation of the drive wheels.
The gearbox is designed to enhance the torque transmitted from the driveshaft to the axle shafts of the drive wheels
Technical characteristics of the gearbox
The VAZ 2103 gearbox is suitable for any “classic” VAZ model, but engine performance may change after installing a “non-original” gearbox. This is due to the design features of such a gearbox.
Gear ratio
Each type of REM installed on the VAZ 2101–2107 is characterized by its own gear ratio. The lower the value of this indicator, the more “speedy” the gearbox is. For example, the gear ratio of a “penny” RZM is 4.3; a gearbox with a gear ratio of 4.44 is installed on a “two”, i.e. the VAZ 2102 is a slower car compared to the VAZ 2101. The VAZ 2103 gearbox has a gear ratio of 4, 1, i.e. the speed indicators of this model are higher than those of the “kopek” and “two”. The fastest of the “classic” REMs is the unit for the VAZ 2106: its gear ratio is 3.9.
Video: a simple way to determine the gear ratio of any gearbox
Number of teeth
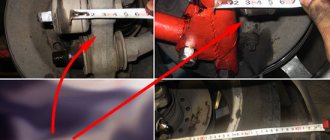
The gear ratio of the RZM is related to the number of teeth on the gears of the main pair. On a “three-piece” RZM, the drive shaft has 10 teeth, the driven one - 41. The gear ratio is calculated by dividing the second indicator by the first, i.e. 41/10 = 4.1.
The number of teeth can be determined by the gearbox markings. For example, in the inscription “VAZ 2103 1041 4537”:
- VAZ 2103 - gearbox type;
- 10 and 41 - the number of teeth of the drive and driven shafts, respectively;
- 4537 — number of the final drive gear set.
Consequences of installing a non-standard gearbox
You should know that installing a “faster” REM does not mean an automatic increase in vehicle speed. For example, if on a VAZ 2103, instead of the “native” gearbox with a gear ratio of 4.1, you use a VAZ 2106 unit with a gear ratio of 3.9, then the car will become 5% “faster” and the same 5% “weaker”. It means that:
- effective torque will decrease by 5%;
- to accelerate to a certain speed, fewer engine revolutions will be required, i.e., to accelerate, for example, to 120 km/h, 3900 rpm will be enough, instead of 4400. The problem is that now the engine may not have enough power to spin up to 3900 rpm.
Thus, if you installed a non-standard RZM with a different gear ratio on a VAZ 2103, then in order to maintain the dynamic performance of the car, a proportional change in engine power will be required.
Any gearbox can be installed: if it is normal, it will not hum with any gearbox. However, you need to take into account the gear ratio: if you set it with a lower number, the car will be faster, but it will go slower. And vice versa - if you set it with a larger number, it will take longer to accelerate, but go faster. The speedometer readings also change. Don’t forget about the traffic cops: it’s better to install the same one as it should be, and it’s better for the engine.
genchik64
https://vaz-2106.ru/forum/lofiversion/index.php/t5261–600.html
Sucker
To make such a simple holder, you will need a suction cup, used for attaching toys to the windshield, as well as a stationery pin. This is perhaps the easiest way to make a holder; even girls can cope with this task. The suction cup connects to the clothespin. The resulting structure is installed on the deflector. The phone is attached to the suction cup.
To hold a more massive tablet you will have to use 2 of these mounts. The advantage of such a holder is its convenience; it can also be removed if necessary; it will not take up much space in the glove compartment.
Norm of life from LADA Granta sedan
The car in the “norm” version already gives an idea of comfort. Electric power steering in the base - coupled with a shortened steering rack - improves the quality of vehicle control. The car listens better to the driver in city modes and on the highway, the steering wheel returns to the zero position more readily after completing a turn. The cable drive gearbox also adds comfort. Thanks to the German gear selection mechanism, made with pinpoint precision, gear shifting is brought to the level of European analogues. This is confirmed both by the conclusion of Ricardo experts and by numerous reviews from consumers and journalists. A people's car must be strong and durable. Therefore, when developing the LADA Granta sedan, special attention was paid to reliability and quality. As a result, the first scheduled service for 2000 km disappeared from the service book of the Lada Granta sedan - and this is an indicator of increased reliability.