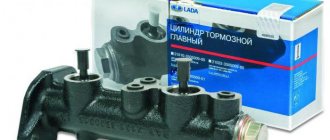
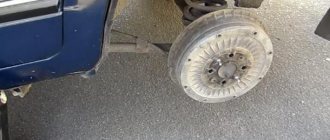
Failures of CV joints on a VAZ 2109
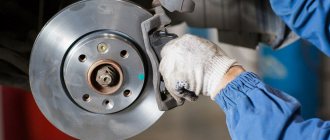
Insane grinding and knocking noise from the wheels, especially when starting with the steering wheel turned to the side. This is the first sign that the grenades are out of order. The service life of CV joints is quite long, but many factors influence it:
- Driver's driving style. The sharper the starts, the shorter the service life of the hinge. The same goes for braking.
- Caring for the condition of anthers. If there is even a small crack, it is necessary to completely disassemble the drive, wash the grenade in solvent or kerosene, dry, lubricate and install a new boot.
- Quality of the product at the time of purchase. Some manufacturers make hinges from low-grade steel, but this is unacceptable, since the mechanical impact is very large.
Pay attention to the condition of the VAZ 2109 steering rack boot. The comfort of driving a car also depends on it. But replacement is much more difficult
The price of one set of external CV joint is at least 950 rubles. Moreover, the cost may vary, it all depends on the region and the greed of the sellers. The set consists of:
But replacement is much more difficult. The price of one set of external CV joint is at least 950 rubles. Moreover, the cost may vary, it all depends on the region and the greed of the sellers. The set consists of:
- Directly to the hinge.
- Two clamps.
- Anther.
- Pack of lubricant.
- Retaining rings.
But the price of the boot ranges from 150-200 rubles, plus new clamps - no more than 50 rubles. The difference is noticeable, so it is cheaper to replace the boot than to repair the drive.
Do I need to change the brake fluid - visual assessment
Most often, the “brake fluid” is in a plastic translucent container. In this case, it is easy to assess the level of the product without additional manipulations.
But remember that opening the lid too much allows oxygen and water from the air to enter the tank.
Do I need to change the brake fluid? Definitely yes. It is important to understand that there is no exact deadline. It is necessary to take into account the parameters specified in the car's operating manual (follow the manufacturer's recommendations). A huge influence in this matter is exerted by the individual characteristics of the car, the regularity of its care and the driving style that the driver prefers.
Experienced car owners advise that diagnostics should always be carried out during a routine oil check. They also note that a “burnt” smell, cloudiness and low levels are direct signs of the need for urgent action.
Features of work on models starting from VAZ-2108
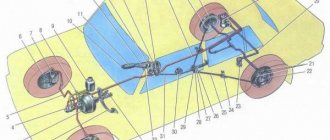
Now let’s look at the specifics of the operation on other cars of the VAZ family. Starting with model 2108, the circuit diagram has changed, and therefore the sequence is somewhat different. And you need to know it before bleeding the brakes on the VAZ-2108, 2109, 21099.
These cars already use a diagonal arrangement of contours. That is, one of them combines the rear left and front right wheels, and the second - the other two.
Bleeding begins, as usual, from the farthest wheel, that is, from the rear right one. An operation to remove air from its brake mechanism is carried out according to the described sequence.
But there is one caveat. The design includes a pressure regulator for the rear wheel drive mechanisms. If the rear of the car is hung out before bleeding, this regulator must be unlocked. To do this, just install a screwdriver between the regulator rod and the thrust plate.
After all work it should be removed.
Then it is pumped to the second rear wheel, and the front left one, since it is the one that is combined with the circuit with the already pumped rear mechanism.
After pumping each mechanism, it is necessary to check the level in the tank. If you omit this point, then during operation the liquid will go into the system and air will enter it again.
Compound
Replacing brake fluid on a VAZ 2109 is quite quick and easy. Before starting this matter, you should carefully study its composition.
Replacing brake fluid on a VAZ 2109
It would be ideal if it consists of:
- Motor oil
- Synthetic base
- Mineral base
Note: it is advisable to pour liquid into the tank without additional additives. That is, the way it was purchased in its original form.
General properties
VAZ 2109 fill the brake fluid
By pressing the brake, the force goes to the brake mechanisms. Actually, due to this, braking is carried out. However, if the fluid overheats during this process, the following may occur:
- It will boil (it boils at different temperatures and this depends on how old it is).
- So-called “plugs” of steam will appear.
- It will become compressible.
- The pedal will fail and will not return to its original position.
- All this leads to braking failure.
Note: to prevent this from happening, you must use only the liquid that is suitable for the “nine”.
Requirements
VAZ 2109 brake fluid volume
Brake fluids must meet the following requirements:
- No negative impact on parts made of rubber material. If this requirement is neglected, the rubber cuffs located between the cylinders and pistons will become deformed. That is, the rubber will increase significantly in volume.
Note: Parts must not swell as this will cause brake failure.
- They must protect the metal from corrosion. Different parts of the brake system are made up of different particles. There are also metal, steel, cast iron elements. Substances are added to some fluids that protect against rust. You should find just such a liquid.
VAZ 2109 brake fluid is leaking
- Must act as a lubricant. It is this property that ensures maximum mobility of the elements, thereby significantly increasing their service life.
- Must be able to withstand temperature changes. In the system, temperature, like pressure, is not constant. Therefore, the task of brake fluid is to maintain its primary properties at temperatures from -40 to +100 degrees.
Checking the fluid level
VAZ 2109 brake fluid leak
The sequence for checking the fluid level is as follows:
- Prepare the car for this operation.
- Remove the cap from the brake fluid reservoir.
- You need to look at the fluid level.
Note: It is important that it is above the Max mark. Brake fluid “doesn’t go anywhere.” A “fluid cycle” occurs in the system. That is, the liquid circulates to all parts and returns back to its desired place.
- Once the cover with the sensor is installed, its level will rise automatically. This is due to the fact that the volume of the sensor will “squeeze” it out.
VAZ 2109 brake fluid
Note: When lowering the level, you need to check whether the pads are working correctly. Because this usually leads to their breakdown.
- To refill the tank, remove the cap and pour in liquid up to the Max mark.
Note: TJ consists of chemical elements, so if it gets on soft parts, it will begin to corrode them.
- Close the lid.
Is it possible to mix brake fluids?
Theoretically, brake fluids that contain the same component, for example, DOT 3, DOT 4, DOT 5.1 contain glycol, must be mixed, however, due to the presence of a certain set of additives in them, this can only be done in extreme cases, after which a complete replacement of the brake fluid is mandatory. You cannot use TJ in a brake system that is designed for a certain type, for example, DOT 5, which is made on a silicone basis; in a system for DOT 3, DOT 4, DOT 5.1, rubber drive elements (cuffs, seals) may fail.
Key words: brake fluid, brake fluid replacement, VAZ brake fluid, brake fluid reservoir, what kind of brake fluid, brake fluid dot, brake fluid dot 4, brake fluid dot
SIGNS OF PROBLEM
When the fluids are partially used up, the brake system begins to work incorrectly. The pedal begins to sink or becomes soft. Braking occurs silently, and the braking trail gradually increases. The car may skid when the brakes are pressed.
Having discovered one of the signs, the first thing you should do is look into the brake fluid reservoir. A cloudy color and the presence of sediment are an alarming signal; it’s time to go shopping, because you urgently need to change the brake fluid on your VAZ 2114.
Change brake fluid immediately - if necessary
How to properly fill brake fluid on a VAZ 2107
- DOT-4 in a volume of 1.0 – 1.5 liters, with a reserve in the tank;
- plastic container to change waste;
- rubber hose;
- key to “10”;
- rags;
- flashlight;
- new boots on the working cylinders as needed.
- Install the machine above the inspection hole;
- Open the hood, unscrew the cap from the expansion tank of the master brake cylinder;
- Bleed the brake pedal, hold it in the lower position (assistant function);
- Remove the rubber cap on the working cylinder, put the hose on the grease fitting, and lower the end into a plastic container;
- Using the key “10”, unscrew the grease fitting, drain the fuel fluid, tighten the valve;
- Repeat the procedure with pumping until light DOT-4 liquid flows from the hose.
3 flushes are enough to completely update the system. After each cycle, replenish the missing amount of DOT - 4 in the expansion tank. After updating the contour of one working cylinder, we move on to the next. DIY replacement completed.
We pump the front and rear brake circuits according to an identical scheme; there are no fundamental differences.
Replacing the brake fluid reservoir of a VAZ 2114
To change the brake fluid in your car you will need:
- invite an assistant;
- a transparent tube of the required diameter;
- container for old liquid;
- new brake fluid;
- inspection hole or overpass;
- 8mm spanner.
- Disconnect the brake fluid level sensor and open the reservoir cap.
- Using a blower, pump out the brake fluid from the master cylinder reservoir.
- Fill the new fluid to the top.
- We bleed the brakes as written in the instructions.
- We continue bleeding the brakes until new, lighter fluid begins to come out. In this case, you need to ensure that air does not enter the system.
- After the clear liquid comes out, you need to fully pump the brake pedal 2 times. After the second time, keep the pedal pressed and tighten the fitting.
- In this way we pump each wheel.
- After pumping, add fluid to the reservoir to the maximum and check how the brakes work while driving.
Brake fluid is hygroscopic. Therefore, the more she is outdoors, the worse it gets.
Brake fluid must be replaced every 45 thousand km. or 3 years.
Before replacing brake fluid, you need to buy it with a reserve.
Video on how to bleed the brakes on a VAZ 2114 yourself:
Leave a Reply Cancel reply
Similar articles
How to replace the rear engine mount on a VAZ 2114
How to replace the front engine mount on a VAZ 2114
How to replace the left engine mount on a VAZ 2114
How to remove and install the oil pump on a VAZ 2114
What you need to replace tie rods and ends
To carry out this type of work you will need some equipment and tools:
- The first tool is a twenty-two open-end wrench;
- A puller that will help you remove the ball joint;
- Pliers;
- A hammer, this tool should definitely be in every owner’s home.
Symptoms of faulty steering rods
There are two symptoms that indicate that the steering rods of the VAZ 2107 are faulty:
- The first reason is a knocking sound from the front suspension. Quite a bad symptom with serious consequences. This knocking noise is especially audible when the car is driven on bad sections of the road and at low speeds. It is worth noting that this symptom may also indicate other problems with your car. For example, some suspension elements, ball joints, stabilizer struts and more.
- The second reason that may indicate this malfunction is when the free play of the steering wheel increases. This is noticeable to the naked eye when, when the steering wheel is turned, the wheel itself remains in place and does not move. This makes it very difficult to drive a car at high speed, and especially on bad roads.
If you want to check the serviceability of the steering rods on your VAZ 2107 yourself, there is a way by which you will not need to contact professionals to diagnose the car. You just need to put your car in a pit. Next, you will need to take this rod from below and try to sharply move it up and down, and if you manage to do this with your hands, then you should change the tips.
Next, let's move directly to the process that interests us, this is replacing the tie rod ends of a VAZ 2107 car.
Check and control
To top up or evaluate the DOT4 status for effectiveness, you need to unscrew the tank cap. The cover can be snow-white or yellowish, depending on the make and model of the car. It is worth paying attention to the fact that there is often an annotation on the lid of the tank. When pouring DOT4, it is best to follow the indicated instructions.
- It is important to know and keep in mind that to top up brake fluid you need to use the same substance that is already used in the reservoir and throughout the entire brake system. Information about the type of fluid can be indicated both in the car's manual and on the reservoir cap itself, usually DOT4.
- The DOT4 status is determined by 2 methods. An electrical tester that measures the boiling point of a liquid. Characteristics within the range of 165-175˚С are considered acceptable for future operation. In this case, at a reduced level, you can add the missing amount of the composition. And if the boiling point is less than 165˚C, the base has become unusable and it makes sense to completely replace the contents.
- In the absence of a tester, you can judge the structure of the brake fluid by its color. The freshest high-quality liquid has a light yellow color.
With prolonged use, DOT4 begins to darken, and the darker it is, the worse its quality factor, so to speak.
- Before opening the tank lid, you need to wipe it with a lint-free, stain-free rag, making sure that no dirt or lint from the rag gets into the tank. It is also necessary to ensure that the brake pedal is not pressed while the cap is being removed, because DOT4 may spray out of the reservoir and get on the skin. And this is very unsafe, because this substance is very poisonous and caustic. It quickly dissolves paint, pipes, wires and has a negative effect on the skin. But if the substance does spill, it must be wiped off as quickly as possible, and the skin must be thoroughly washed with soap.
Once you open the lid, you can start topping up. To prevent the brake fluid from spilling during refilling, you can use a clean watering can.
- When adding DOT4, you must immediately look at the high and low level marks. If there are no marks, then the tank should be filled to 2/3 of its volume.
How to replace brake fluid on a classic VAZ
In fact, replacing brake fluid on a VAZ-2107 is a simple procedure. And it consists of just a few steps. Remember
The main thing is attention and accuracy! Among the tools you will need: a wrench for bleeding the brakes, a 20 ml medical syringe. with a tube instead of a needle, a transparent container for draining, a silicone hose of the required diameter and brake fluid. Before you start replacing, you need to try to unscrew the bleeder valves on the brake cylinders (just “move” them out of place)
If any of the valves are loose or broken, then replacing the fluid without repairing or replacing the cylinders will not work!
Before you start replacing, you need to try to unscrew the bleeder valves on the brake cylinders (just “move” them out of place). If any of the valves are loose or broken, then replacing the fluid without repairing or replacing the cylinders will not work!
How to unscrew a soured fitting
One sticky fitting can turn brake bleeding or fluid changes into a major hassle involving expensive parts. Here are a few “tricks” that can help when working with “stubborn” fittings.
The worst thing that can happen is that the bleeder valve is bent. After this, the fragment will have to be drilled out, and only an experienced mechanic can successfully perform this work. With this in mind, do not apply too much force to the wrench.
If you fail to unscrew the fitting on the first try, you need to clean the surface around it from dirt and rust, treat it with a penetrating liquid and wait about ten minutes. After that, try again.
Have the edges been torn off? A special key with a cutout and a clamping bolt will help. 8 and 10 mm wrenches are available for sale. A small gas key can also help out in this situation. And again, try not to break the fitting!
With this key you can unscrew the fitting
The use of local heating gives very good results. Take an industrial hair dryer and heat the problem part for a few minutes. Thermal expansion will “stir” the threaded connection and the fitting will come loose.
You can use a hairdryer to heat the part.
The parts that were unscrewed with such difficulty must be replaced with new ones because cracks have already appeared along them, which can lead to breakdown at any moment. Once the problem with the fittings is resolved, you can move on.
Step #-1
You need to suck the liquid out of the tank into a container with a syringe. If the tank is dirty, it must be washed with an alcohol solution.
Use a syringe to syringe the old liquid
Step #-3
Changing the fluid begins with the right, rear wheel. To do this, open the bleeder valve on the brake cylinder, put the silicone hose on the tap fitting and drain the fluid into a transparent container. Carefully monitor the amount of liquid in the tank. If it goes away, you'll have to bleed the brake system, and you can't do that alone. Therefore, add it periodically. As soon as clear liquid comes out of the hose, close the valve. The contour of this wheel is the longest and most voluminous, so a lot of fluid will be lost.
Step #-5
Let's move on to the front brake circuit. Here, in order to get to the brake cylinder, you will have to remove the wheel. Don't forget to put a support under the car. We start from the right side. This outline is longer than the left one. Do not pour clean liquid into the container. Monitor this through a transparent hose. The method is the same as with the rear circuit: open the valve, put on the hose, drain until the liquid is clear, close the valve.
Drain the old brake fluid until fresh appears.
Step #-6
We finish with the front left wheel. All the same. The method does not change. But this technique is intended for cars with left-hand drive. Changing the fluid on right-hand drive cars begins with the left, rear wheel. That is, from the longest contour.
In custody
Compare the volumes of filled and drained liquids. It should be as dirty or a little more. Check the brake pedal. When you press it for the first time, the pedal may “fail”. If after several presses the “failure” remains, you will have to bleed the brakes. Well, we will look at this topic in the next article.
If everything is ok, try the brakes while driving. To do this, in a free area, accelerate the car and sharply press the brake. The car should stop without skidding. Perform several of these tests on areas with different surfaces. If everything suits you, then have a nice trip! No nail, no rod! More articles about the braking system: “Why do brakes squeak”, “How to restore the effectiveness of the handbrake yourself”, “How to choose brake pads”
Vehicle malfunctions leading to replacement of the vehicle with a VAZ 2114
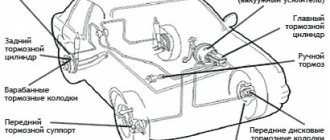
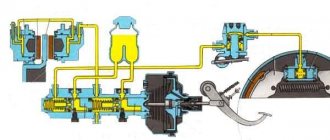
The hydraulic brake system includes many different parts that allow you to operate the brakes using hydraulic fluid. It includes:
- a tank that is attached to the gas turbine engine and is intended for filling the fuel fluid;
- metal pipelines of both circuits;
- flexible brake hoses of front and rear wheels;
- GTZ installed in the engine compartment;
- working brake cylinders of front and rear wheels;
- dual-circuit pressure regulator;
- a sensor showing at what level the fuel fluid is located;
- a vacuum booster, the task of which is to create working fluid pressure in the pipelines of the circuits in order to ensure effective operation of the brake systems on the wheels during braking.
A car’s vehicle is one of the main systems that ensures the safety of the driver and passengers of the car, therefore regular preventive inspection of all elements of the vehicle is mandatory for the owner of the car.
The brake fluid on the VAZ 2114, according to the recommendations of technical specialists, is replaced every three years or no more than after 45 thousand kilometers of the vehicle.
At the same time, during the operation of a vehicle, malfunctions periodically occur in its braking system and especially in the hydraulic drive, leading to the need to replace the brake fluid. Knowledge of these malfunctions and the reasons leading to them can help the driver avoid serious troubles on the road, since in this case he can promptly identify the failure and take measures to eliminate it.
Malfunctions in the vehicle resulting in the need to replace the vehicle:
- Leaks from the working brake cylinders leading to significant loss of fuel fluid.
- The formation of air pockets in main pipelines and flexible hoses, which are formed as a result of leaks in vehicle units.
- Rupture or fraying in the flexible hoses on the wheels, in this case the brake hoses on the VAZ 2114 need to be replaced. Damage to metal pipelines is also possible; as a rule, a leak forms due to “chasing”. In both cases, the liquid quickly flows out of the vehicle, so at the slightest sign of disorder in the vehicle, these parts should be checked first.
- Damage or swelling of the sealing rings in the GTZ or wheel cylinders. This also leads to leaks.
- Leakage of fuel fluid through the sealing rings of the rear wheel RD pusher.
- There may be a leak in one of the brake circuits. In this case, partial failure of the brake pedal occurs.
- Quite rarely, but metal pipelines become clogged.
- As a result of mechanical damage, failures of the GTZ, RTC, vacuum unit and other vehicle elements are possible. To eliminate these damages on the VAZ 2114, replacing the brake fluid is a prerequisite.
Replacement on a vehicle with an ECM
Due to the characteristics of the fuel system of “injection” cars, fuel filtration, therefore, replacing fuel filters plays a very important role. In addition, replacing them is more difficult than on carburetor cars. This is due to the need to maintain a constant pressure in the fuel supply system from 2.5 to 3.5 MPa. For this purpose, either threaded or fitting connections with snaps are used everywhere.
This ensures that there is no fuel leakage. And it facilitates the process of replacing system components.
How to replace a fine fuel filter
First of all, you need to relieve the pressure in the fuel rail. It is located on the engine and combines all the injectors into one unit. There is a special connector on the ramp or next to it. It is used to connect a pressure gauge that measures fuel pressure. It is made in the form of a valve. It is convenient to dump excess through this valve. After this, you can replace the filter. For any placement of the fuel filter, it is secured to the body with a bracket tightened with a 10-point bolt. If the filter fittings are threaded, then you will need two wrenches of sizes 19 and 17. Without releasing the bracket, loosen the fittings and unscrew them completely. Release the mounting bracket, replace the sediment filter and screw everything back into place.
Check the tightness carefully to avoid leakage.
Replacing the fuel filter in the tank
This is the most delicate and complex of works of this type. The fact is that on most models this filter is installed directly on the fuel pump, which, in turn, is installed in a special fuel module. As a rule, the fuel module is made of petrol-resistant plastic
Therefore, when replacing, it should be handled with care.
The simplest device is the fuel module for VAZ cars with an engine capacity of 1.5 cubic meters. see. The most complex in design and fastening are the latest VAZ models - “Kalina”, “Priora” and others.
It is quite inconvenient to replace this filter on front-wheel drive VAZ 2105 and 07 cars. In order to remove the device from the tank, you must at least move the tank 20 cm away from the fender. After this, use two 17 keys to unscrew the inlet-outlet fittings and disconnect the fuel pump and sensor control harness. Using a 7 socket with a knob, unscrew the eight fastening nuts. Carefully remove the module. The pump is mounted on a long rod that reaches the bottom of the tank. Replace the filter and replace the module. When installing, check the condition of the rubber seal on the hole for the module. Reassemble in reverse order.
Front-wheel drive 1.5 l and 1.6 l
As on carburetor models, the inspection hatch is located under the rear seat.
On cars with a 1.5 liter engine, the fuel pump module is metal and open. It is enough to lift the seat, unscrew the hatch cover, disconnect the harness, unscrew the metal fuel supply fittings and unscrew the eight nuts in a circle from the clamping ring.
You can remove the module. You just need to carefully inspect and, if necessary, replace the seal. There is a removable glass at the bottom. It comes off effortlessly. A fuel pump with a fuel filter is mounted underneath it. Replace the filter and reassemble in reverse order.
On cars with a 1.6 liter engine, the pipes are plastic and are secured with latches. Remove the latches and fuel lines. Also unscrew the eight nuts, disconnect the wiring and pull out the module. The module is made of plastic. The lower part, the glass, is fixed to the upper part using a ring on a metal support tube. Remove the pin and unfasten the return pipe from the side. Unclip the fastening of the level sensor with the float. The glass will go down. Inside, the pump is located in a special socket with three latches. Unfasten them and remove the glass. That's it, you can change the filter and reassemble in reverse order.
On new VAZ models, there is no bolted module fastening. It is held in the opening of the gas tank by a special round-type clamping structure, which includes special protrusions and clamps. Quite a clever solution. To replace, you need to turn the fasteners by tapping the special protrusions with a hammer.
On many foreign cars this issue is resolved even more simply. Made with a screw-on lid. Although its reliability is lower than that of the Russian version, replacement is faster.
Replacing the rear brake cylinder of a VAZ 2101
The following set of tools and materials is required for work:
- Special wrench for brake pipes. It has a cutout that is necessary for installation on the edge of the fitting.
- Penetrating lubricant WD-40.
- Socket wrenches, open-end wrenches for 8 and 10, or heads with a ratchet.
Step-by-step guide to replacing brake cylinders on the rear wheels of a VAZ 2101:
- A jack is installed under the car and the rear part is raised. It is necessary to remove the bolts from the wheel in advance.
- Finally unscrew the bolts on the wheel and remove it.
- The pads are removed from the rear wheel.
After these procedures, access to the cylinder opens. Its location can be seen in the photo. Before unscrewing the nuts and bolts, it is necessary to carry out treatment with a WD-40 mask. First, the tip of the tube is unscrewed, then the two bolts securing the cylinder. The latter are located on the inside of the mechanism. The head and ratchet are easy to use. After these manipulations, the VAZ-2101 brake cylinder can be removed and inspected for damage.
There is little point in repairing this mechanism; it will be much easier to install a new one. Installation is in the reverse order. In any case, at the end of the replacement procedure, the system is bled to get rid of air pockets. The price of the set for both wheels will be about 800 rubles. It is advisable to replace the cylinders on both sides to ensure maximum uniform braking.
Hand (parking) brake
Its name speaks for itself. It is needed to prevent the car from rolling away while parked.
Design
- Handle or pedal inside a car
- Cables with adjusting element
- The lever, which is located in the housing of the rear brake element, is connected by cables to the interior lever
- Pad spacer
How does he work
When you “pull” the handle in the cabin and park the car, the lever inside the drum moves through a cable connection. It is connected to one of the blocks by a movable axis (it can rotate around it). The spacer bar rests on one side against the handbrake lever, and on the other side against the opposite block. The lever has a special shape, which, when it moves, causes the opposite shoe to move towards the brake drum. The block rests against the drum cover, blocking the wheel.
To prevent the car from releasing the parking brake spontaneously, the handle is equipped with a locking system that is activated when it is lifted up. In the case of the foot version - when you press the pedal with your foot. To unlock the handle, you need to press a button on it and you can freely lower it down. In this case, the lever in the drum will return to its original position, releasing the pads, which will close under the action of the return springs.
A visual video of the operating principle of the parking brake and working cylinder on a Zhiguli:
Bleeding brakes VAZ 2101
If repairs have been made to the GTZ or RTC, or these mechanisms have been replaced, then the car’s brake system needs bleeding. The procedure involves removing air from the system circuits for its efficient operation. To bleed the brakes you need to prepare:
- 8 (10) mm key;
- silicone transparent tube according to the diameter of the fitting;
- capacity;
- brake fluid.
For VAZ 2101 and other “classics”, DOT-3, DOT-4 brake fluid is suitable. Since the volume of fluid in the brake system of the car in question is 0.66 liters, a capacity of 1 liter will be quite sufficient. It is best to bleed the brakes with an assistant. We start the procedure with the right rear wheel. The sequence of actions is as follows:
- Open the hood and unscrew the cap of the expansion tank of the GTZ.
- Check the fluid level according to the marks, if necessary add to the MAX mark.
- Remove the protective cap from the fitting of the rear right wheel and put a tube on it, the other end of which is lowered into the prepared container.
- The partner sits in the driver’s seat and presses the brake pedal 5–8 times, and when pressing the last time, squeezes it all the way and locks it in that position.
- At this time, you loosen the fitting with a 8 or 10 wrench, depending on the size, and liquid with air bubbles will begin to flow from the tube.
- When the liquid stops flowing out, tighten the fitting.
- We repeat steps 4–6 until clean liquid without air flows out of the fitting. During the pumping process, do not forget to control the fluid level in the expansion tank, adding it as needed.
- Upon completion of the procedure, securely tighten the fitting and put on the protective cap.
- We repeat similar actions with the remaining wheel cylinders in the sequence shown in the image.
- We pump the front cylinders using the same principle, after removing the wheels.
- When bleeding is complete, press the brake pedal and check its movement. If the pedal is too soft or positioned lower than usual, check the tightness of all connections of the brake system.
Video: pumping brakes on a Zhiguli
Any problems related to the car's braking system need to be addressed immediately. Diagnostics and repair work on “penny” brakes do not require special knowledge and skills, as well as special tools. You can check the system and troubleshoot problems using a standard set consisting of keys, screwdrivers and a hammer. The main thing is to familiarize yourself with the sequence of actions and follow them during the repair process.
REPLACEMENT
Some drivers don’t even know where to fill the brake fluid in the VAZ 2114 (even though the VAZ brake fluid reservoir is visible), not to mention the rules. DOT-4 needs to be added only if its level in the tank has dropped below the halfway point between the MIN and MAX marks. To do this, simply unscrew the tank cap and fill it to the top mark. The brake fluid volume should not exceed the maximum mark.
Do not under any circumstances mix products from different manufacturers and brands. This may lead to system failure, which will adversely affect your financial situation when contacting the service. Be sure to ask an expert how to add brake fluid.
In general, if all necessary conditions and rules are observed, everything is done quite simply. Any measures to normalize the operation of a car require certain tools and special clothing. This should not be forgotten, since contact with human skin of chemicals contained in fuels and lubricants is extremely dangerous to health.
But whatever one may say, in the quest for durability and reliability of your car there is nothing you can do. The acquired skills can be applied not only to the VAZ 2114, but also to other models of the domestic automobile industry. For example, the VAZ 2115 has an absolutely identical device.
The procedure for replacing fuel filters on a VAZ 2107
Any mechanism in a car will sooner or later need replacement or restoration. It should be noted that owners of VAZ 2107 carburetor models have the opportunity to wash the filter, removing all deposits from it, and use it again. The installed filters on injection VAZs cannot be washed.
When to change
In any case, it is more advisable to immediately replace the fuel filters rather than waste time washing and cleaning them. Not all car enthusiasts know when exactly these elements need to be replaced. Of course, each filter (coarse and fine) has its own designated resource, but you should not wait until it runs out.
As a rule, obvious signs of malfunctions in the operation of the fuel system filter elements are:
- jerks and failures in the operation of the power unit (the first signs can be noticed at low speed or in idle mode);
- decrease in traction when accelerating, overtaking, driving uphill;
- problems starting the engine;
- increased fuel consumption.
If it is heavily contaminated, the filter will not allow gasoline to pass through in full, which is why problems with engine operation begin.
Which filter to buy
If the car owner intends to change the filter on a VAZ 2107 on his own for the first time, he will need to choose the best option in the store
It is important to know that the prices of analogues from domestic and Western manufacturers are approximately the same, however, experienced car owners are advised to choose Mahle and Big filters. These devices are more reliable and durable, and the risk of purchasing a defective filter is virtually eliminated. One of the most popular filters among car enthusiasts
One of the most popular filters among car enthusiasts
How to choose new brake fluid
Usually replacement begins with a trip to the store. A good, but no less expensive (almost 400 rubles) would be a bottle of American brake fluid from Step Up Brands (DOT 4). No less worthy, but much more affordable, will be the offer of the European brand Mobil (about 250 rubles).
If you want to save an extra hundred rubles, you will lose a little by choosing a domestic manufacturer. Here, the Dzerzhinsky Tosol-Sintez (RosDOT 4.5) has proven itself well, which will ask only 120 rubles for a liter bottle of its brake fluid. The offer from Siburneftekhim (Nordix Kapros brand), which is also very good in its performance characteristics, costs the same.
Features of repair of VAZ-2104 and VAZ-21043 VAZ 2105 Zhiguli cars
11.2.1 Features of repair of VAZ-2104 and VAZ-21043 cars VAZ-2104 and VAZ-21043 cars have different springs in the rear suspension and a modified electrical circuit for the rear part of the car, due to the use of a station wagon body. The body has a different design of the rear frame, rear seat and additionally has a tailgate. The rest is remo.
11.2.2 Rear suspension Rear suspension springs under a load of 3185 N (325 kgf) are divided into two groups: group A springs - length greater than 278 mm, marked with light brown paint; group B springs (length equal to or less than 278) are marked with blue paint on the outside of the coils.
11.2.3 Electrical equipment The electrical equipment of the VAZ-2104 and VAZ-21043 cars differs from the VAZ-2105 by the additional installation of: – wiper 65 (see subsection 12.2) and rear window washer 64, which are turned on by switch 37 installed on the instrument panel; – lampshade 67 for illuminating the rear part of the body. Power supply circuits
11.2.4 Body
Replacement process
Before starting work, you need to stock up on the following tools:
- Hose 10-15 centimeters long and 6 mm in diameter;
- Wrenches for 8 and 10;
- Plastic bottle;
- Gloves (work clothes and safety glasses are also a good idea);
- Hydraulic fluid (there are a lot of manufacturers, each with its own characteristics).
Having collected all the tools, you can start working. The procedure is not complicated and does not require any professional skills. Most motorists do the replacement themselves.
It is extremely difficult to do this kind of work alone, so I recommend taking a friend with you who will undoubtedly help in the process. This will not only save time, but will also greatly simplify the procedure.
We are changing bunker - 4 in the VAZ 2114 in stages:
We park the car on a pit or overpass; Remove the cap from the brake reservoir; We go into the pit. Here we need a fitting located on the rear right wheel; It is closed with a cap, which we remove; Take a bottle and pour some DOT-4 into it; We put the hose on the fitting and lower the other end into the bottle (do not forget to lower it to the bottom); Now you need someone to press the brake pedal
Smoothly 7-8 times in a row, and the last press all the way and hold; Unscrew the fitting a couple of turns; We observe how the waste product comes out; When 1-1.5 centimeters remain in the tank (it is important not to be late, otherwise air will enter the system), tighten the fitting and release the pedal; Add the missing DOT-4 to the tank (up to the Maximum mark); Then we repeat the procedures with the fitting and pressing the pedal until clean pillbox flows into the bottle; We tighten the fitting and move on to the next wheel.
There is a specific order in which the replacement must be performed. After the left rear wheel, we need the right front, then the left rear and finally the right front. If you started doing everything according to the instructions, then this is the sequence in which the bunker runs.
HOW MUCH TO BUY
The VAZ 2114 system has a volume of 750 milliliters. Taking into account pumping and unforeseen situations, one liter is enough. There will be some left over for topping up. There is no need to carry it with you and constantly top up the pillbox. You can buy it in any quantity at any gas station. Motorists who have been driving for several years can always find out how much brake fluid is in the VAZ2114 system.
It must be remembered that DOT-4 is extremely toxic, so spilling it on open skin is highly undesirable. Therefore, it is not worth storing it in the trunk.
Engine oil. When to change?
Is it possible to drive on oil that was changed 10 years ago? The answer is obvious - no, under no circumstances. Since friction constantly occurs in the engine, there must be a lubricant of appropriate quality with satisfactory properties.
And oil loses them over time. And it needs to be changed every 10 thousand kilometers of your “four”. You can determine whether the oil has lost its properties or not using an oil dipstick
When checking the engine oil level, pay attention to the color of the oil. If it has a dark (black, gray) color, this is a sign that the VAZ 2104 engine oil needs to be changed.. Please note! If the oil level in the engine begins to increase noticeably, you should contact a service station.
This is a sign that either fuel or coolant is getting into the crankcase.
Note! If the oil level in the engine begins to increase noticeably, you should contact a service station. This is a sign that either fuel or coolant is getting into the crankcase. And this already threatens a major overhaul of the engine.
And this already threatens a major overhaul of the engine.
Which liquid to choose
The technical documentation describes in detail recommendations on what brake fluid to fill in the VAZ 2114. However, many motorists choose the product individually for themselves. Some prefer Bosh bunkers, others Ferodo or TRW. There are many brands of manufacturers with different technical properties to choose from. If the recommended product does not suit you in any way, you can contact a service station for help. There they will describe to you in detail the pros and cons of all famous brands. In our case, DOT-4 synthetic is recommended. This is an excellent brake fluid for VAZ 2114.
When choosing, you can pay attention to the technical properties of the product. The best samples should have high scores in the following parameters:
- Boiling temperature;
- Viscosity;
- Anti-corrosion.
The higher these parameters, the better. Choose wisely.
How to bleed the brake system of a VAZ 2101 with your own hands - step-by-step instructions
- Empty container for old brake fluid.
- Special key for “8” or “10”.
- New TZ.
- A rubber hose or piece of vinyl tubing from a medical “system”.
- An inspection pit or a lift, a “to the extreme” lift.
- In addition to tools, you will need an assistant. There is indeed an option for bleeding the brakes without an assistant, but this is more likely for “advanced” “single” motorists who do not have assistants.
As I already said, we begin to pump the brakes from the rear right wheel. Afterwards we will proceed to the front left, rear left and finish with the front right.
Sources
- https://mylada.net/remont/zamena-glavnogo-tormoznogo-cilindra-na-vaz-2107.html
- https://avtodrug-ufa.ru/slesarnye-raboty-slesarno-sborochnyh-avtomobilja-mashin-sajt-uslugi-avtoservis-ufa-cena-skolko-stoit-stancija-tehnicheskogo-obsluzhivanija-sto-avtoremont/remont-tormoznoj- sistemy-tormozov-proverka-diagnostika-avtomobilja-mashiny-vaz-na-inomarki-uslugi-avtoservis-ufa-cena-sto-avtoremont/zamena-tormoznoj-zhidkosti-sistemy-avtomobilja-mashiny-vaz-na-inomarki-uslugi- avtoservis-ufa-cena-sto-avtoremont.html
- https://vaz-remont.ru/kak-prokachat-tormoza-vaz-2101/
A little theory
To transmit force, one of the properties of the fluid is used - its incompressibility. That is, when a force is created on a liquid, its volume does not change, and it acts as a transmitter.
A hydraulic brake drive is more practical than a mechanical or pneumatic one, but it has one drawback - if air gets into the fluid, the transmission of force will be significantly reduced. This is because air, like any gas, is compressible. As a result, the presence of air leads to a change in the volume of the liquid when creating force (due to gas compression). Because of this, the force is no longer transmitted to the actuators, since it is absorbed by the volume change.
It turns out that effective operation of the brakes on a VAZ occurs only until air enters the drive system. And this can happen for several reasons.
Article on the topic - The design of the VAZ brake system
Vulnerabilities of the VAZ 2114
The most vulnerable points in the VAZ 2114 brake
- Master brake cylinder - most often, leakage occurs due to wear of the sealing collar, which is subjected to stress during operation. There are also cases of installation of initially poor-quality seals. Detecting this leak is the most problematic, since liquid can go into the vacuum booster. In this case, no leaks are formed. If there are leaks on the left CV joint and gearbox, the GTZ is leaking.
- Brake cylinders of the rear wheels - in the VAZ 2114 their cuffs are susceptible to destruction, especially in frosty weather. A leak is determined by the presence of traces of leaking brake fluid on the calipers. If there is a strong leak, there may be marks under the wheels and on the road surface.
- Brake hoses - they are also subject to mechanical damage. If the rubber is dry, cracks will form on it. You should also inspect for leaks.
Brake hoses
The easiest way to detect a leak is on the brake hoses - here it is enough to check the rubber by touch. If it is rigid, inelastic and cracks form when bent, the hose must be replaced, even if there are no leaks.
Sometimes brake hose of the wrong diameter falls off the fitting. In this case, it should be replaced with a similar one, but smaller in diameter. You can put on the same hose, but in this case you will have to secure it with special clamps.
Features of work on the VAZ-2121 Niva
As for the VAZ-21213 Niva, this car has its own characteristics. And although the system on this car is dual-circuit, it is different from other VAZ cars.
On this SUV, one circuit combines all 4 brake mechanisms, and the second - only the front wheels. To ensure that the circuits are independent, the Niva uses a block caliper in front, to which two brake hoses fit; accordingly, there are two fittings for bleeding.
Bleeding the brakes on a Niva is done in the following sequence: first, air is expelled from the rear right mechanism, then from the rear left one. Next, the general circuit on the front brakes is pumped - first the right, then the left (the principle of the distance of the wheel from the master cylinder)
In this case, it is important not to confuse the fittings - the upper one is responsible for the general contour, and it is this that should be used
Only then is the front brake circuit pumped, for which the lower fitting is used. Here the pumping sequence does not matter; you can start with both the left and the right mechanism.
But the Chevrolet-Niva does not use such a brake design. A conventional diagonal dual-circuit system is installed there, so the pumping sequence is identical to the process on VAZ-2108 and higher cars.
Messages 11
To post a reply you must log in or register.
The site provides reference and technical documentation on repair and maintenance, reviews of production and tuned cars, as well as articles and news. The site is a club for owners of VAZ cars of the Samara line: 2108, 2109, 21099, 2113, 2114, 2115.
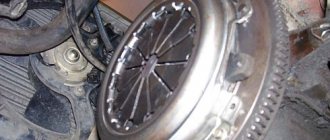
The brake pedal fails, check the brake cylinders and pipes. The vacuum serves to reduce the load on the foot when the engine is running. Otherwise, check the main brake fluid for leakage.
There’s not even anything to add. +1. Most likely GTZ.
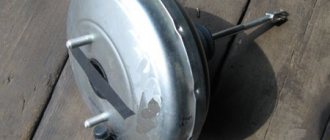
Location and purpose of the GTZ
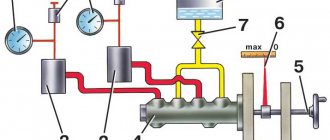
The master cylinder is an oblong cylinder with sockets for connecting brake circuit pipes. The element is located in the rear of the engine compartment, opposite the driver's seat. The GTZ is easy to detect by a two-section expansion tank installed above the unit and connected to it by 2 hoses.
The GTZ housing is attached to the “barrel” of the vacuum booster located on the rear wall of the engine compartment
The cylinder is secured with two M8 nuts to the flange of the vacuum brake booster. These components work in pairs - the rod coming from the pedal presses on the GTZ pistons, and the vacuum membrane enhances this pressure, making the driver’s work easier. The cylinder itself performs the following functions:
- distributes fluid over 3 working circuits - two serve the front wheels separately, the third - a pair of rear ones;
- through fluid, it transmits the force of the brake pedal to the working cylinders (RC), which compress or expand the pads on the wheel hubs;
- directs excess fluid to the expansion tank;
- returns the rod and pedal to their original position after the driver stops pressing it.
In classic Zhiguli models, the rear wheels are combined into one brake circuit
The main task of the GTZ is to transfer pressure to the pistons of the working cylinders without the slightest delay, maintaining the force and speed of pressing the pedal. After all, the car slows down in different ways - in an emergency situation, the driver presses the pedal “to the floor”, and when going around obstacles and bumps, he slows down slightly.
What kind of brake fluid is needed for a VAZ
All brake fluid has its own classification, which indicates its composition and properties. At the moment, there are several brands of TJ - DOT 3, 4, 5 and 5.1. There is also another outdated type of brake fluid BSK, which is still used on older cars.
- DOT 3 is made on a glycol base, which includes anti-corrosion and lubricating additives. DOT 3 is recommended for use on low-speed vehicles with front disc and rear drum brakes. DOT 3 brake fluid reacts poorly to negative temperatures and at -40 degrees its viscosity increases, which negatively affects the operation of the braking system. Therefore, it is extremely undesirable to fill in such liquid on cars operated in northern regions.
- DOT 4 is also made on a glycol basis, but unlike DOT 3 it contains additives that increase the boiling point of the brake fluid, which allows it to be used on high-speed cars, where during braking the slowing mechanisms are exposed to high temperatures.
- DOT 5 is made on a silicone basis and also has fairly high temperature conditions - 180-260 degrees. With and lower viscosity 900 sq. mm/s. DOT 5 brake fluid is more suitable for cars with powerful engines, which, as a rule, are used for fast and difficult driving.
- DOT 5.1 is made on a glycol base, but with the properties of DOT 5. Increased boiling point, more anti-corrosion additives, and low viscosity - 900 sq. mm/s., used on cars with powerful engines.
- BSK - this type includes all brake fluids made on the basis of Butyl Alcohol and Castor Oil, hence the abbreviation in the name. It has very low boiling readings for TJ (115-120 degrees C), as well as at – 20 degrees. It crystallizes, which renders the car’s braking system unusable.
Selecting brake fluid and the procedure for replacing it on a VAZ 2114
For the normal functioning of the vehicle’s vehicle with maximum efficiency, it is important for the car owner to correctly select the working fluid for the hydraulic brake drive. Modern TG, such as “Rosa” and its varieties, are based on polyglycols and this accounts for from 93 to 98 percent of the total composition. The rest is various additives that are necessary to combat oxidation of fuel fluid and prevent corrosion of metal parts of the vehicle.
When purchasing a vehicle, you need to pay attention to the following parameters:
- boiling point, it should be high to reduce the likelihood of plug formation from steam bubbles;
- good viscosity, which characterizes the ability to pump liquid in the system;
- the ability to absorb water, that is, hygroscopicity;
- ability to lubricate internal surfaces;
- neutrality in relation to rubber parts of the braking system;
- oxidation resistance and corrosion resistance.
According to the TZh class for the VAZ 2114, they are marked DOT 3.
How to change the brake fluid on a VAZ 2114 - for the correct actions you need to carefully study the car’s operating manual.
Before starting work, you need to prepare the necessary tools and materials:
- TJ in the amount of 0.5 liters;
- keys and screwdrivers;
- transparent flexible hose;
- container for draining spent fuel oil;
- rags to wipe surfaces, especially plastic and painted ones, since the liquid is toxic and aggressive to these surfaces.
To replace the turbocharger, you need to hire an assistant, because it requires bleeding the system using the brake pedal.
- Open the lid on the GTZ tank and place it on the prepared surface. The cover is combined with the float of the fuel fluid level sensor and there are remnants of old toxic fuel fluid on it.
- Unlock the rear brake lever using a screwdriver, which must be inserted between the piston and the plate.
- Clean the air outlet valve of the right rear brake from dust and dirt and unscrew the rubber cap that closes this valve.
- Place a flexible hose, previously inserted into a transparent container, onto the fitting of this valve.
- At intervals of two seconds, press the pedal all the way four times, and on the fifth press, lock it in the pressed position.
- Unscrew the valve at least half a turn. As the fuel drains, the pedal should fall. As soon as the liquid stops flowing, immediately close the air valve.
- During these actions, it is necessary to monitor the fluid level in the tank, constantly adding it to prevent an air lock. It is necessary to add and drain the fluid until new, clean fluid flows from the tube.
Brake fluid level VAZ 2114
- After the right rear brake, you need to do a similar procedure with the left front brake mechanism. Thus, the working fluid in one brake circuit is completely replaced.
- Now, knowing how to replace the brake fluid in the second circuit, all work is performed in the same sequence. After completing the work, be sure to close the valves with rubber caps and add the missing fuel fluid to the GTZ tank.