The VAZ 2114 car is equipped with an injector, as well as a “Check engine” sign, which indicates problems with the car’s engine. When this icon lights up, for the sake of safety and preservation of engine operation, it is necessary to urgently diagnose the cause of the error and eliminate the malfunction in a timely manner. But if, in addition to the illuminated “Check engine” icon, there are other symptoms, then you need to rule out a problem such as clogged injectors.
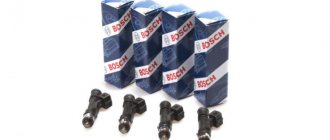
Injectors VAZ 2114
Injectors - what are they?
Let's figure out what injectors are and what they are needed for. Injectors are an electromagnetic mechanism designed to spray fuel into the cylinder. Their number depends on the number of cylinders in the car. The VAZ car has 4 cylinders, therefore there are also 4 injectors.
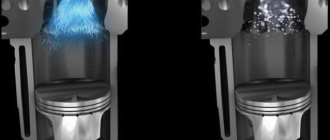
A serviceable and clean injector sprays fuel evenly without any delays or jerks.
Operation of a serviceable and clean injector
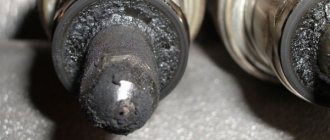
A clogged injector may not spray fuel at all or, on the contrary, pour it in drops. As a result, the engine cannot operate normally and correctly.
Dirty nozzle
Symptoms of a problem
Although injectors are a fairly reliable mechanism capable of operating for tens of thousands of kilometers, they can still fail and cause a lot of trouble for the car enthusiast.
Faulty injectors are accompanied by the following symptoms:
- Any of the cylinders is turned off;
- The engine knocks heavily;
- Engine power is lost;
- The engine does not start well;
- Black or white spark plugs;
If such malfunctions appear on your car, most likely the fuel injectors are faulty; they require cleaning or replacement with new ones. In most cases, the problem is solved by cleaning the injectors or replacing the repair kit.
Symptoms of clogged injectors
Loss of dynamics is one of the main signs of clogged injectors. If they are contaminated, the car simply will not accelerate properly.
- Unstable idling, the engine at idle will operate unstably and intermittently.
- Starting difficulties can occur when there is contamination or when the injectors stop holding pressure. Fuel begins to drip into the cylinder, which can cause popping sounds in the exhaust pipe.
- Ringing fingers are inevitable when the spray nozzle is clogged; this is due to the fact that the fuel entering the cylinder is mixed with air and the concentration of fuel in this mixture is quite small, so the engine experiences detonation.
Driving with dirty injectors will not provide any driving pleasure. And driving with such a problem is highly not recommended.
Cleaning inside
This is one of the most important points when working with devices. Among the main devices are tubes and syringes, and delivery cartridges. Cleaning agents get inside through tubes. First, they test the composition on a small area, because it is very aggressive. Work begins if nothing happens.
After cleaning, new rings are installed. It is not recommended to put the old ones back, even if they are cleaned. The filters and fuel pump mesh are also removed and replaced with new ones. Their location is easy to find out if you study the VAZ 2114 diagram; the injector rarely changes its position.
When to clean injectors
Cleaning of injectors on Lada cars is carried out according to the condition of the car. If there are no problems with your car, then there is no need to clean them. Also, to find out for sure whether the injectors need to be cleaned, you first need to diagnose the fuel system. You can learn more about how to diagnose the fuel system in our article.
The manufacturer recommends cleaning the injectors every 50,000 km. Since the fuel at our gas stations leaves much to be desired, just before this mileage they begin to become clogged and flushing them will be useful. You can wash it at a service station, or you can do it yourself. Next, we will look in detail at how to wash the injectors on a VAZ car at home.
Carburetor. Advantages and disadvantages
Let's start with the negative points. These include:
- Such engines have not been installed on production cars for a long time. In Europe, due to environmental requirements, carburetors are blacklisted. That is, they are prohibited because they heavily pollute the atmosphere;
- At high speeds, the engine's capabilities drop significantly. Torque does not reach the desired levels. But at low speeds it is effective and allows you to accelerate well from zero to hundreds;
- When overtaking, the carburetor is a pain. It is problematic to overtake cars normally and confidently. Especially considering the power of the carburetor nines;
- High fuel consumption when compared with injection engines. On average, a nine with a carburetor in normal mode consumes about 8.5-9 liters of fuel per 100 kilometers;
- The air damper is controlled manually. The exception is some versions of the latest samples, where automatic devices have been installed. Some motorists claim that manually controlling the throttle in winter has its advantages, as it allows you to feel the engine. But only experienced drivers can understand this.
Methods for cleaning injectors
Injector flushing additives
Additives that are poured into the tank
There are a huge number of different additives for flushing the injector. Such additives are poured into the car tank and mixed with fuel. The mixture of fuel and additives enters the main elements of the fuel system and flushes them, including the injectors. But, as a rule, such washings do not bring much results, since all the dirt that was washed away to the injectors gets and settles on them, which can only aggravate the situation. Using this method is not recommended.
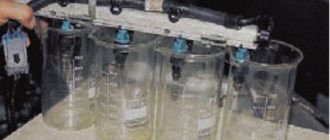
Ultrasonic cleaning
Ultrasonic cleaning of injectors
This washing is considered as effective as washing the injectors during dismantling. We will not dwell on this method, since this method of washing can only be carried out at a service station. And the price of this method is not small, from 2000 rubles to 5000 rubles.
Clean in place without removal
This flushing method is carried out using special additives, but differs from the first method in that this flushing is used only on the injectors without going all the way along the fuel line. We will dwell on this method in more detail.
Washing with dismantling
This method is very reliable and probably the most popular among garage car enthusiasts who like to repair their car themselves. After reading this article, you can easily wash the injectors on a Lada car with your own hands without any special knowledge.
Injector system design
This system includes:
- Computer. Serves to select the optimal operating mode and the quality of the supplied mixture based on the performance of all sensors of the machine. In addition, the computer detects possible problems in the injector elements themselves.
- Sensors They provide the computer with all the information about the state of the engine at a particular moment. We are talking about a fuel flow sensor, an air flow sensor, a lambda probe, a knock sensor, and so on.
- Injection system. Modern engines are distinguished by two types of injection. First of all, mono-injection is when one nozzle works on all cylinders, and the prepared fuel mixture has the same characteristics. This type of injection is becoming less and less popular today, as it is ineffective. In a distributed fuel injection system, unlike the first, a separate injector is installed on each cylinder, and it is responsible for regulating the amount of fuel supplied.
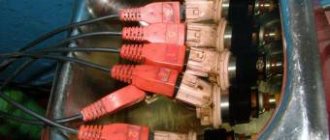
- Injectors. They can be called the “workhorses” of the injection system, because they are responsible for the main work of mixing air and fuel, and supplying it to the combustion chamber.
The injectors, in addition, turn off the supply of the fuel mixture, say, during a descent from a mountain with the gear engaged.
This part of the injector system is specifically subject to the greatest wear, primarily due to microparticles of dirt that can wear out the injector channels and the locking mechanism.
Due to wear, the injector will begin to supply more fuel to the chamber than required. This affects the stability of the engine and power is lost.
Washing without removal
What you will need:
- Set of wrenches;
- Screwdrivers “+” and “-“;
- Flushing fluid;
- Fuel hose;
- Fitting for tubeless wheel – 2 pcs;
- Bottle;
- Clamps;
- Drill 10 mm;
- Compressor with pressure gauge (can be used for a car);
Making a device for washing injectors without removing them from the car
- In a 1.5 liter bottle, drill a hole in the bottom with a diameter of 10 mm.
- Insert the wheel fitting into the drilled hole.
- Similarly, drill a 10 mm hole in the bottle cap.
- Insert the wheel fitting into the bottle cap and screw it on.
- Unscrew the spool valve from the fitting in the bottle cap.
- We attach a fuel hose to the fitting installed on the cover and secure it with a clamp.
This is what should happen
Nozzle cleaning device
Relieving pressure in the fuel rail
- In order to relieve pressure in the fuel rail, you need to remove fuse F3 (15A) it is located under the central panel where the foot air ducts are.
- After that, you need to start the car at the residual pressure and let it run until the car engine stops.
- After which you can start working
Connecting the device to the fuel line
- Under the hood we find a fuel line pipe (if the engine has a return line, there will be two pipes, one of them goes to the fuel rail, so you need to connect to it).
Connect to the “straight” hose
- We take two Keys on “17” and unscrew the fitting connection, carefully without damaging the tube.
- You need to unscrew it like this: position the keys like scissors and squeeze them; you must follow the correct direction so that the fitting and nut are unscrewed and not tightened.
- After the fitting connection is unscrewed on the tube, you will see a rubber ring; it must be removed; if it is in poor condition, it is better to replace it.
- Next, we connect the hose from our device to the tube and tighten it with a clamp.
- Pour washing liquid into the bottle and tighten the cap.
- We pump a pressure of 3 atm into the bottle with a compressor.
- We hang the bottle with the cork down and start the car.
Washing process
- We start the car on the flushing fluid and let it use up half of the flushing fluid.
- Next, we stop the car engine and let it sit for 20 minutes. This is necessary so that all the dirt in the injectors becomes sour and dissolves.
- We start the engine again and press the accelerator pedal and keep the speed around 3000 rpm. This must be done until the flushing liquid runs out.
- Next, remove the flushing device and screw the fuel line hose into place.
Attention
Don't forget to install the rubber O-ring when connecting the tube and the fuel line fitting.
Washing with removal of injectors
What you need:
- Set of wrenches;
- O-rings for injectors 16 pcs;
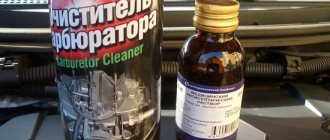
- Carburetor cleaner;
- Syringe;
- Injector plug 1 pc. or mother chips 2 pcs;
- Two-core wire up to 1 m long;
- Intake receiver O-rings;
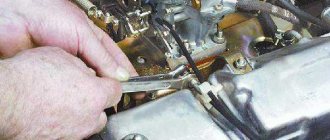
Injector removal process
- First, we relieve the pressure in the fuel rail; how to do this is written above.
- In order to dismantle the fuel rail, it is necessary to remove the intake manifold.
- We remove the intake manifold corrugation by unscrewing the clamp from the DZ and unscrewing the clamp from the low crankcase ventilation, and remove the chip from the mass air flow sensor.
- Unscrew the dipstick with a screwdriver and pull it up.
- Unscrew the breather clamp, remove the hose and bend it down.
- We remove individual ignition coils except for the 4th cylinder (it does not interfere).
- Unscrew the two nuts securing the intake manifold from above.
- Unscrew the 2 bolts and 3 nuts securing the intake manifold.
- We move the intake manifold towards the radiator and lift it to the top.
- Under the hood we find a fuel line pipe (if the engine has a return line, there will be two pipes, one of them goes to the fuel rail, so you need to connect to it).
- We take two Keys on “17” and unscrew the fitting connection, carefully without damaging the tube.
- You need to unscrew it like this: position the keys like scissors and squeeze them; you must follow the correct direction so that the fitting and nut are unscrewed and not tightened.
- After the fitting connection is unscrewed on the tube, you will see a rubber ring; it must be removed; if it is in poor condition, it is better to replace it.
- Disconnect the injector wiring harness.
- Using a screwdriver, unscrew the bolt securing the fuel rail tube to the cylinder head.
- Unscrew the two hex bolts to “6”.
- Pull the fuel rail towards you; with a little force, the ramp should come off.
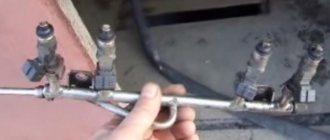
Removing injectors from the fuel rail
- We remove the chip from each injector and dismantle the wiring harness.
- Remove the retaining rings from the injectors
- Pull out the nozzles in a circular motion
Preparing to wash the injectors
In order to wash the removed injectors, it is necessary to prepare a washing device. The injectors are flushed under pressure. To do this, we assemble the injector power supply circuit. The injector receives power from 9 to 12 V. The power source for opening the injector can be a crown battery or a car battery. We will use a rechargeable battery.
So, let's start assembling a device for washing injectors on a Lada car
For convenience, it is better to carry out the procedure together.
- You need to prepare a syringe. Pull the piston out of it; the syringe cylinder should fit tightly onto the nozzle with the ring. You can also use a hose of a suitable diameter instead of a syringe and tighten it with a clamp. We will use a hose.
flushing with a syringe
flushing through a hose
- Next, we twist the wires with the injector plug or with the “mother” terminals.
- We connect the nozzle to the power source, observing the polarity. "+" and "-"
- The injector should click, which means the injector is opening.
- We hold the nozzle and spray carburetor cleaner into the hose and hold it, creating pressure in the hose between the nozzle and the cleaner bottle.
- Then you need to open the injector by connecting the wires to the battery
- The injector will spray carburetor cleaner and clear itself.
- You can complete the procedure as soon as a uniform spray of fuel begins to emerge from the injector.
- Next, you should do the same procedure with all the injectors.
- Assembly should be carried out in the reverse order of disassembly.
Advice
For easier installation of the fuel rail with injectors into the cylinder head, it is recommended to lubricate the O-rings with engine oil.
Now you know in what ways and how you can wash the injectors. We hope our article helped you and you chose a method of washing injectors that is convenient for you.