March 15, 2019 Lada.Online 42 628 0
According to the maintenance regulations for Lada Granta, Lada Kalina and Lada Priora cars, the technical condition of the front suspension parts must be checked every 15,000 km. mileage You can determine the causes of knocks and squeaks in the suspension using self-diagnosis.
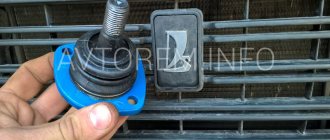
Replacing the ball joint of the suspension arm
Brake the vehicle with the parking brake and place wheel chocks under the rear wheels.
Loosen and tighten wheel bolts only with the vehicle on the ground. The tightening torque of the bolts is 65–95 Nm (6.5–9.5 kgf m).
1. Raise and place the front of the vehicle on supports.
Remove the wheel.
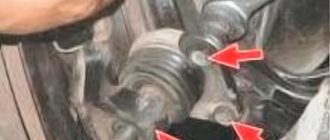
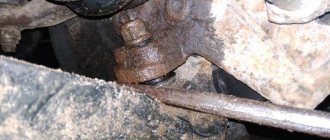
2. Unscrew the ball joint nut using a 19mm wrench.
3. Press the ball joint pin out of the lever using a puller.
Puller for ball joint of suspension arm.
4. If there is no puller, do not unscrew the nut completely.
Press the lever with a pry bar and use a hammer to press the hinge pin out of the lever using a hammer along the axis of the lever.
After this, finally unscrew the nut.
5. Unscrew the two bolts securing the ball joint to the steering knuckle using a 17mm wrench
6. Press the lever down with a mounting tool and remove the ball joint
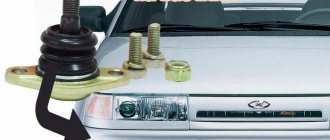
7. Before installation, lubricate the hinge and the internal cavity of the cover with grease
8. Install the ball joint in the reverse order of removal.
After lowering the car to the ground, rock it vigorously several times.
Tighten with the appropriate torques: nut securing the ball joint to the lever - 80-96 Nm (8.0-9.6 kgf m), nut securing the ball joint to the steering knuckle - 50-63 Nm (5.0-6.3 kgf m).
After driving 100 km, tighten these threaded connections again to the required torque.
When installing, be careful not to damage the ball joint protective boot.
We replace the front suspension arm when the silent block is worn out or the arm itself is worn out and deformed.
We also remove the lever when repairing the front suspension.
To check the silent block of the front suspension arm, insert a mounting blade between the body bracket and the head of the arm and try to move the arm along its axis and along the axis of the bolt.
If the lever moves freely, without effort, it means that the silent block of the lever is badly worn or damaged, and it needs to be replaced.
Cracking or swelling of the rubber of the silent block is not acceptable.
To replace the lever, place the car on a lift or inspection ditch.
Remove the middle engine splash guard.
We disconnect the ball joint from the lever, as described at the beginning of the article.
Unscrew the nut securing the brace to the front suspension arm and remove the washer.
Unscrew the nut of the bolt securing the stabilizer bar to the arm and remove the bolt.
Using two 19mm wrenches, unscrew the nut of the bolt securing the lever to the body
Use a bronze or aluminum drift to knock out and remove the bolt, remove the lever from the bracket and remove it
Using a vice and suitable tool heads, press out the silent block
Using a chisel, we knock down the silent block of the guy wires on one side and the other.
New silent blocks are moistened with soapy water and pre-pressed in a vice
We finally press the silent blocks by striking a punch with a diameter of 8 mm through three windows in the rubber layer
Install the lever in reverse order.
We tighten the threaded connections of rubber-metal hinges when the car is on its wheels.
Tightening torques:
— nut of the bolt securing the front suspension arm to the body 79 – 96 Nm (7.9 – 9.6 kgf.m);
— nut of the bolt securing the stabilizer bar to the front suspension arm 43 -52 Nm;
— nut securing the brace to the front suspension arm 163 – 176 Nm (16.3 – 17.6 kgf.m);
After installing the lever, you need to check the angles of the front wheels.
Checking the condition of the Lada Granta chassis and transmission
Tool:
- Adjustable stand - 2 pcs.
- Jack or ditch lift
- Mounting blade
Parts and consumables:
- Wheel bearings
- Ball joints
- Silent block of the front suspension arm
- Anti-roll bar rubber bushings
- Silent block of the rear suspension arm
- Shock absorbers
- Suspension springs
- Protective covers for wheel drive joints
- Transmission seals
Notes:
Check the chassis and transmission every 15 thousand kilometers. Carry out the work on an inspection ditch or overpass. The parts of the chassis (wheels, suspension arms, anti-roll bar, rear suspension beam, shock absorbers and suspension springs) and transmission (front wheel drive shafts) must be free of deformations, cracks and other mechanical damage that affect the shape and strength of the parts. Lifting the front wheels one at a time, check the condition of the wheel hub bearings.
1. Using a ditch lift, place the vehicle on adjustable stands and spin each wheel. It should rotate evenly by hand, without jamming or knocking.
2. Holding the wheel in a vertical plane, alternately sharply pull the upper part of the wheel toward you, and the lower part away from you, and vice versa. Make sure there is no play (knocking).
Note:
If there is a knocking sound on the front wheel, ask an assistant to press the brake pedal. If the knocking noise disappears, then the wheel bearing is faulty, and if the knocking noise remains, then the ball joint is most likely worn out. The hub bearings of the front and rear wheels are not adjustable and must be replaced if there is play.
3. To check the serviceability of the ball joint, insert a mounting tool between the suspension arm and the ball joint housing. Be careful not to damage the ball joint boot. While pressing the lever with a mounting blade, watch the movement of the lever head relative to the ball joint housing. If there is play in the connection, replace the ball joint.
4. Then check the condition of the ball joint protective covers. Replace ball joints with torn or cracked covers.
5. To check the silent block of the front suspension arm, insert a mounting spade between the body bracket and the arm head and try to move the arm along its bolt axis.
Note:
If the lever moves freely, without effort, it means that the silent block of the lever is badly worn or damaged and needs to be replaced. Tearing, cracking and bulging of the rubber bushing of the silent block are unacceptable.
6. Check the condition of the silent blocks of the front (first photo) and rear (second photo) ends of the guy wires. Tearing, cracking and bulging of rubber silent blocks are unacceptable.
7. Inspect the stabilizer bar mountings and rubber bushings on the stabilizer bars. If ruptures, cracks or severe deformation are detected on the rubber pads and bushings, they must be replaced.
8. Lifting the rear wheels one at a time, check the condition of the rear wheel hub bearings. The wheel should rotate evenly by hand, without jamming or knocking.
9. To check the condition of the silent blocks of the rear suspension arms, insert a mounting spatula between the suspension arm bracket and the arm head and try to move the arm in different directions.
Note:
If the lever moves freely, without effort, it means that the silent block of the lever is badly worn or damaged and needs to be replaced.
10. Check the condition of the springs, telescopic struts and shock absorbers of the front and rear suspensions.
Note:
The suspension springs must not be damaged. Tearing, cracking and severe deformation of rubber bushings, cushions and compression buffers of shock absorbers are unacceptable. Liquid leakage from shock absorbers is not allowed. A slight “fogging” of the shock absorber in its upper part, while maintaining the characteristics, is not a malfunction. If the rubber element of the upper support of the front suspension telescopic strut settles or is destroyed, the support must be replaced.
11. Check the condition of the hinges and protective cover of the gear shift rod and torque rod.
12. Alternately rotating and turning the front wheels (with the front part of the car hanging), inspect the protective covers on the outer and inner joints of the front wheel drives, check that they are securely fastened with clamps.
Note:
Covers that are cracked, torn or have lost elasticity must be replaced.
13. Check that there is no oil leakage from the gearbox through the seals of the internal drive joints. If there is a leak, replace the seals.
The article is missing:
- Photos of parts and consumables
Options
As you can see, the quality and durability of a ball joint for any car is built on these important details. And for the VAZ-2110, the support should have the following parameters, if you can check them:
- finger angle - minimum 50°>;
- finger swing moment - 0.4-0.8 kGs/m >;
- moment of finger scrolling - 0.4-0.8 kGs/m >;
- the force of destruction of the top cover (pulling out a finger) is 2900 kgf .
Article number and cost of analogues of original ball joints
The lack of stable quality of original ball joints forces car owners to search for good analogues from third-party manufacturers. At the moment, the market is filled with a lot of alternative spare parts options. The price for non-original supports is comparable to the original. The best brands of balls are presented in the table below.
Table - Recommended alternatives to ball joint 11180-2904192-00.
| Manufacturer | vendor code | Approximate cost, ruble |
| BelMag | BM.0033 | 370-400 |
| Hofer | HF815503 | 300-350 |
| Pilenga | TS-P 3142 | 380-420 |
| Stellox | 52-00840A-SX | 400-430 |
How to replace a ball joint on a VAZ car?
Raise the car with a jack and remove the wheel.
Advertisement
Unscrew the ball joint using a 19 key.
Unscrew the two nuts a little higher, here you need a 14mm wrench.
Advertisement
Using a crowbar, you need to lift the upper arm of the front suspension and remove the ball from the mount.
We install the new ball joint and tighten all the bolts and nuts into place.
Replacement
Even a novice car enthusiast can replace the lower ball joint of the front suspension. Let's consider the replacement process using VAZ cars as an example.
Getting ready for work
For work we will need:
- wheel wrench;
- metal brush;
- jack;
- VD-40;
- socket and ring wrenches 13;
- open-end wrench 22;
- sliding pliers;
- ball joint remover.
ATTENTION! A ball joint remover is not cheap, but it greatly simplifies and speeds up the replacement process.
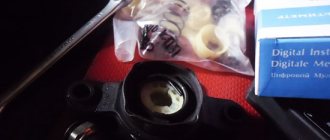
Experts recommend using ball joints, Belmag, Belebey, Kedr, Trek TRS Sport, which are sold complete with or without fasteners. A set with fasteners is more expensive, but it is also more convenient to work with. This kit, in addition to the ball joint, includes a ball stud nut and three bolts with nuts and engravers.
REFERENCE. The upper and lower reinforced ball joints are very similar in appearance. Therefore, manufacturers stamp on them the letters “B” - upper and “H” - lower
Before installation, it is necessary to check the presence of grease under the support boot. If it is not there, add it, but without fanaticism, since excess lubricant can quickly tear the boot.
Progress
We place anti-roll stops under the rear wheels, put the car in gear and the handbrake. Loosen the wheel bolts, lift the car with a jack, finally unscrew the bolts and remove the wheel. We install insurance under the car body; a removed wheel or a wooden block is suitable for this.
If we change the left support, then we twist the steering wheel to the extreme left position, if we change the right support, then to the right. Now we take a metal brush, clean the ball brush and treat it with WD-40 or brake fluid.
We take the 22mm wrench in our hands and unscrew the ball pin nut. Due to the design of the steering knuckle, it will not be possible to completely unscrew the nut. Using VD-40 we process the threads of the ball stud and the nut. Tighten the nut and treat it again with WD-40. We repeat the cycles “unscrewed - poured WD-40 - tightened” until the nut begins to unscrew without effort.
If the replacement is made without a puller for ball joints, then take a soft metal attachment, a sledgehammer and begin to hit the steering knuckle eye with force. As a rule, a few strong blows are enough to loosen the ball joint. If unpressing does not occur, you need to patiently tap the eyelet until the efforts are crowned with success. If you have a puller, dismantling the lower ball joint is greatly simplified and accelerated.
After unpressing the pin, unscrew the fastening nut. If the nut is difficult to unscrew, we use the “Unscrew it, pour it with WD-40, and tighten it.” After the nut is removed, we arm ourselves with 13mm wrenches and unscrew the bolts with which the ball is attached to the lever. We remove the support.
We clean the lower arm from dirt, inspect the place where the support fits on the arm for breaks and cracks. If the lever is damaged, it should be replaced. If everything is in order, then we install a new support, lubricate the finger with lithol, nigrol or motor oil and assemble the parts in the reverse order.
Additional recommendations for replacing the ball joint
There are special stock Lada Granta ball joints for sale for sporty driving. They have increased strength. Many car owners recommend installing them. According to reviews, the service life of tuned supports is 20-30% longer than original ones.
"Sports" ball joints for Lada Granta
The service life of the ball joint is directly proportional to the quality and quantity of lubricant under the boot. Therefore, it is recommended to remove the cuff and check the contents before installation. For fear of tearing the boot, car owners apply additional lubricant using a syringe, bending the rubber band on one side.
Adding Additional Lubricant
You can dismantle the ball joint without a puller. To do this, you will need to remove the lever with accompanying elements in the assembly.
Dismantled lever
Hammered out ball joint
If you do not have special tools, you can remove the support from the lever by knocking it out with a hammer. Strikes should be applied sharply and accurately. With this method of dismantling, the risk of damage to the lever and ball seat increases significantly. For this reason, experienced drivers still recommend purchasing a puller, the cost of which is from 500 to 1400 rubles.
Required tools and materials for replacement
To independently replace the ball joint on a Lada Granta car, you need the tools from the list below.
Table - Tools and materials required to replace the ball joint.
| Name | Note |
| Socket head | Torx E12 |
| Vorotok | Under the end cap |
| Ball joint remover | Makes it easier to remove the ball joint from its seat |
| Balloon wrench | For dismantling and installing wheels |
| open-end wrench | "at 17", "at 19" |
| Hammer | Required if you do not have a ball joint remover |
| Jack | To lift the car |
| Wheel chock | For fixing the rear axle |
| Penetrating lubricant | To make it easier to unscrew stuck threaded connections |
| Grease | To fill the boots in case the manufacturer has supplied too little lubricant |
| Rags and wire brush | For cleaning fasteners and working surfaces |
Ball joint puller
Video review on replacing ball joints on Grant
For those who are too lazy to understand photo reports, everything can be shown clearly and easily using the example of a video review, which was taken from open sources.
This concludes this repair report.
Before starting work, you need to prepare: a set of keys, a universal puller, a jack, WD-40 fluid, as well as new spare parts.
1. Before starting work, apply a few drops of WD-40 to threaded connections that you think may have problems. They will be different for everyone, it all depends on the condition of the car, the roads on which it drives, and the attitude of the owner towards this car...
2. Unscrew the ball joints. There are two TORX bolts that are attached to the hub; for this we take an E12 head.
At least walk
In the city of Zlatoust, about 60% of the territory is occupied by the private sector, and the roads there are dirt, consisting of crushed stone mixed with earth. Driving on such a road is not much fun. If you have ever driven on a washboard, you will understand what I mean. It would be nice to “shake up” on such a path once again, but the specifics of working in a taxi forces you to ride over such potholes many times a day.
If you add to such a shake the unbearable rattling sound that the car makes, you just want to walk. How to deal with this? I can’t “win” the road, so we will “fight” with the source of the chatter.
Photo 1: Lada Granta before starting diagnostics
Which ball joints are better for the VAZ-2110: reviews, articles
As often happens, the most popular spare parts are produced by all and sundry, to the detriment of quality and in favor of price.
The service life of a VAZ-2110 ball joint rarely exceeds the hundred thousand mark, so there is always a demand for this part. And since there is demand, there is more than enough supply on the market.
In order not to throw money away and not experiment with your car and safety, let’s look at the issues of buying a ball for tens in more detail.
Features of ball joints on the VAZ-2110
Structurally, the support, as one of the main elements of the suspension, bears a huge load.
Not the same as in the classic double-wishbone suspension, but even in the MacPherson suspension it gets a lot of mileage.
The main purpose of the unit is to transfer force to the steering knuckle without losing the possibility of angular movements in all planes.
The simplest technological solution for this was a design based on a threaded ball pin, rolled into the body through plastic inserts.
Ball circuit.
As can be seen from the diagram, it is almost impossible to spoil anything in the simplest design. However, some manufacturers and artisanal cooperative enterprises manage to mess up here too.
Differences between a good ball and a low quality fake
Fortunately, we know how to distinguish a good support for a VAZ-2110 from a cheap fake, not only by brand (more on them later), but also visually:
- Let's look at the finger . The thread on it cannot under any circumstances be cut on a machine. It should only be forged or rolled. Pay attention to the color, it should be ashy with scale. This indicates the correct production technology and heat treatment of the finger.
- Frame . On dozens, the body is ball-welded, but we should see the welding points only on one of the halves. The halves fit neatly, distortions are excluded. The top cover should have a slot in the form of a neat hemisphere, but not an oval or other shape. It is important that the top cover must be made of hardened metal. This can be checked easily - two or three movements with a needle file, and a damp, low-quality lid will give itself away. The lower part of the body must be strictly cylindrical, and a cadmium-plated grease fitting is screwed into the lower part
- There is also a hemisphere on the finger, which should also be made of hardened metal.
- Support work . We take the ball in our hands, hold the body and rotate the finger, swaying it from side to side. It is strictly unacceptable for the finger to get jammed - it must turn with a uniform, slight force. If the effort is uneven, it turns with jamming, we immediately look for another option, it’s a fake. If the finger is stuck to the liners and does not give in, we also leave this support, we can do without broken lower arms.
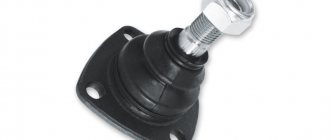
- Boot and fasteners . The boot is made of elastic but durable rubber; it has a metal ring at the bottom for pressing onto the body. Correct supports are sold with fasteners - the nut should be cadmium plated, with a light plastic insert.
Reinforced ball joint BZAK.
Video
This video shows in detail the design of the ball, what it is used for, etc.
Here you can clearly see how a ball joint works in motion.
How to diagnose the suspension yourself.
Diagnostics of steering tips and balls.
This video shows how to check the suspension.
Checking and replacing the ball joint on a FORD FOCUS 2 / FORD FOCUS 2 car.
The suspension of any car consists of many different parts that have different functions. One of these parts is a ball joint, which is a connecting part that allows the front wheels to rotate in different directions. If a part malfunctions, serious consequences can arise, so we will figure out how to check the ball joint of a VAZ 2107, and what may be needed for this.
Reasons for failure
There are several reasons why a ball joint may fall out. Let's consider the main ones:
- Wear . The most common malfunction that occurs on cars.
- Insufficient lubrication in the boot leads to the fact that the finger begins to creak and may eventually simply break.
- The penetration of dirt and water into the ball contributes to the development of corrosion, which can affect the operation of the vehicle. At best, a wedge and the inability to turn the wheels; at worst, the car will fall onto the asphalt.
To avoid consequences, it is necessary to regularly diagnose and maintain ball joints.
Diagnostic operations
How can you diagnose the condition of ball joints on a Lada Kalina:
- The first thing you need to pay attention to is the condition of the boot. If it has cracks or is torn, then it must be removed and the ball should be inspected.
- We hang the wheel a little and swing it up and down with our hands. If there is play, then it’s time to replace the ball.
- The presence of a squeak, as well as heavy turning of the steering wheel, can also be signs that the ball joints are in critical condition.
- Instability in control, namely departure from the trajectory of movement to the left or right, with the steering wheel in a level position, indicates that the ball joint has failed.
Second diagnostic method
But such a tool for measuring backlash is not always at hand. It is much easier to complete all the work with a mounting blade. To do this, you will need an assistant who needs to be seated behind the wheel. The diagnostic procedure looks like this:
- A partner must press the brake pedal to hold the hub. This will eliminate the possibility of bearing play influencing the diagnosis.
- Raise the side of the car that needs to be diagnosed.
- Rock the wheel sharply, holding it by the top.
- You can use a mounting blade; to do this, you need to install it between the upper arm and the hub. Move the lever up and down, assessing the play between the support cage and the pin.
If you find play in the upper ball joint, be sure to replace the element.
Diagnostics of the ball joint condition
The car owner can learn about the need for diagnostics by the following symptoms of a ball joint malfunction:
- driving over small humps and pits is accompanied by extraneous sounds emanating from the front suspension;
- There is a knocking sound in the wheel arches when entering a turn at speeds over 35 km/h;
- it becomes more difficult to turn the steering wheel and a creaking and grinding noise appears;
- decreased level of control over the car when cornering;
- partial loss of vehicle control while driving on uneven road surfaces.
To indirectly check the condition of the ball joint, you must use the method below.
- Hang the wheel on the side where the ball joint is expected to fail.
- Firmly grasp the tire with one hand from below and the other from above.
- Shake the wheel rim. If this is successful, then more accurate diagnostics of the suspension is required. Play can indicate not only a malfunction of the ball joint, but is also often a consequence of excessive wear of the stabilizer struts or steering tips.
Checking wheel play
You can more accurately identify a faulty ball joint if you gain access to the car from the bottom. To do this, you need to use an overpass, inspection hole or lift.
- Insert the mounting bracket between the lever and the ball.
- Shake the mount.
- The presence of noticeable play is unacceptable, as it is a sign of the need to replace the support.
Having gained access from below the machine, you should visually inspect the boot. It should not show any mechanical damage, such as cracks or tears. Seeing grease is also a reason to pay attention to the ball joint.
Leaking grease on the ball joint boot
The most accurate diagnosis of the ball can be carried out by dismantling it. The support must be clamped in a vice and the axial and radial movement of the pin must be checked. It should not move due to hand effort. The presence of any play indicates that the ball joint must be replaced.
Checking the axial and radial movement of the pin in the support clamped in a vice
A torn boot, in most cases, signals the need to purchase a new support. Still, if you want to save money, you can conduct a more detailed diagnosis of the condition of the lubricant and, based on the test results, decide on the advisability of replacement. If it is noticeable that dirt is present inside the ball, then applying new grease on top does not make sense and you will need to buy a new spare part.
If you do not want to troubleshoot or have doubts about the failure of the ball, it is recommended to contact a service station.
Checking the car on special equipment, for example, a vibration stand, will show the true breakdown quickly and with high accuracy.
Methods
Diagnostics of the ball joint is possible in independent “mode”. This is relevant for those who do not have the opportunity to get to the service for diagnostics.
To work you will need:
Lift with inspection hole. But there is one popular method that allows you to do without this.
Jack. It will replace the lift.
Spanners.
Mount.
Ball joint remover.
Detailed inspection instructions are available online, including wrench sizes and puller types. However, we will not provide these data, since they differ for different car brands. All of the listed tools are selected by the driver independently, based on the characteristics of his car.
Checking the lower ball
Checking ball joints, especially the lower ones, is carried out according to the same principle as checking the upper ones. But the final result of the “diagnosis” will be better if the driver uses a lift or pry bar.
First you need to prepare a pry bar and a jack. The car is placed on a lift or driven over a pit.
Using a jack, you need to hang the wheel that needs to be checked. This is done in the case of using an overpass.
If the driver decides to use a lift, then he needs to raise it to a certain height.
The flat side of the mount is placed between the support lever and the trunnion.
Rock the mount in both directions so that the ball pin moves vertically.
A good hinge has no play. If play is detected, then the support needs to be replaced. All the same actions are performed on the other side, since the supports wear out in pairs.
Checking the upper ball joint without a lift
Most of all, drivers are interested in how to check a ball joint without a lift, because not everyone has the opportunity to use it. As mentioned above, the verification is carried out in the same way as in the previous paragraph.
First, you will have to use a jack to lift the wheel that requires diagnostics. Next, you should place a stop under the support so as to load it. If the part is truly in good working order, the wheel will remain suspended and will rotate quietly without any extraneous noise. If you feel beating and knocking, it means the support is faulty and needs to be replaced.
Some car models have a diagnostic hole in the suspension. This is what helps measure the distance from the support to the finger. In order to carry out diagnostics in this way, the driver needs to know the distance values. Measurement will require special instruments, as well as technical documentation.
Checking the boot
When diagnosing ball joints, special attention must be paid to the boot. This part is made of rubber. It plays a protective role, that is, it prevents liquid and dirt from getting inside. The boot is considered a consumable item, so it should be replaced from time to time. In the winter season, as a result of frosts, as well as mechanical stress, cracks appear on it. Sand and dirt get inside the cracks, so the surface is destroyed and the lubricant is washed out.
We recommend that before diagnosing the hinges, you always look at the condition of the boot, check for lubrication and the presence of cracks. If there is damage, you should replace the boot with a new one without delay. It is because of the torn part that the life of the ball is reduced. During the replacement process, do not ignore the filling of the boot with lubricant.
Due to the damaged boot, the ball's performance suffers. Another method has been invented to check it. It is suitable for those whose car support is in a vertical position, i.e. the liquid enters from above and remains inside, like “in a bottle.”
If it is extremely difficult to reach the support, you need to use a regular injection syringe. Liquid oil is taken into the syringe, the boot is pierced with a needle and the oil is poured there. Next, you need to compare the knocks before and after pouring. If the difference becomes immediately noticeable, it means that the supports are really out of order and need to be replaced. Many people worry that water will start to leak through the pierced hole. This won't happen, so you don't have to worry about the needle hole.
Checking the new ball
Unfortunately, failed ball joints cannot be repaired. At the same time, car parts, even those released only from the factory, are not always of excellent quality. This applies to details of unknown Chinese companies and more. The same thing happens with new ball joints. We recommend checking the product visually after purchase. To make this easier, follow the tips below.
The easiest way to check the part is by turning it down. The ball is considered broken or of poor quality if the upper end of the pin moves down. Don't look at the fact that there is no play in it. Over time it is guaranteed to appear. At the same time, we advise you to pull your finger in different directions. There should, of course, be no play, and movement should be difficult.
Sometimes you can buy a ball that will make it difficult for your fingers to move. A good part, after moving the pin to the side, remains quite smooth and easy to move. If it still continues to move slowly, we recommend not purchasing the product.
Poor-quality parts are also indicated by the grease fitting (grease fitting) or the space made for it. Most often this can be seen on Chinese supports. Why shouldn't you buy the product? The fact is that the grease fitting is obsolete. The original products simply do not have it.
The last thing to pay attention to when checking the ball is the boot. It must be intact, without scratches or cracks. It will be best if there is a large amount of lubricant on it. If desired, the car enthusiast can fill the lubricant himself.
Removing the ball joint
The operation is performed when replacing a ball joint. We install the car on an inspection ditch or overpass. We hang up the front of the car and remove the wheel from the side of the ball joint being removed. We wet the screws securing the ball joint to the steering knuckle with penetrating liquid. If there is no puller, unscrew the nut securing the ball joint pin not completely.
We install an adjustable stop under the nut with a pin, tighten it and, striking the lever with a hammer, press the pin out of the lever. After pressing the pin out of the lever, unscrew the nut completely.
Using the E-14 head, unscrew the two screws securing the ball joint to the steering knuckle...
...and remove the ball joint. The ball joint can also be removed with a special puller. In this case, unscrew the pin fastening nut completely.
Using the tool shown in the photo, press the ball joint pin out of the lever. Unscrew the two screws securing the ball joint to the steering knuckle and remove the ball joint (see above). A working ball joint should have no play in its pin. We replace the faulty support with a new one and install it in the reverse order.
Symptoms of a problem
It’s good that there are signs by which it is possible to determine the beginning of wear or damage to the ball. Below we describe the most common symptoms:
- knocking noise from under the front wheels when driving over potholes and bumps - as a rule, this indicates wear of the rod or lack of lithol;
- wobbling of the car on the highway - usually caused by the free movement of the finger (the car yaws the more, the higher the speed);
- loss of wheel alignment - this occurs on the wheel where the support fails (checked at a stand in a car service center, such changes are not noticeable to the eye);
- uneven tire wear - if the wheel alignment is lost, then the tires wear unevenly, because the wheel does not stand level to the surface of the tire, but at an angle;
- creaking when turning the steering wheel is a rare symptom for a ball joint, but it also occurs;
- change in direction of movement during braking - the car usually turns a little to one side, just on the side of the broken hinge (at the same time, clicks are heard).
If you notice these signs of wear, take immediate action. Go to the nearest car service center and have the ball joints diagnosed.