02/04/2022 4,219 VAZ
Author: Ivan Baranov
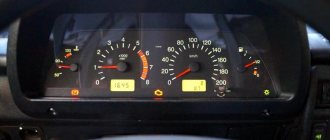
Depending on the position of the clutch pedal and the brake signal switch, the controller is able to distinguish the position of the pedals. In this article, special attention will be paid to the Kalina brake pedal sensor, as well as the clutch sensor.
[Hide]
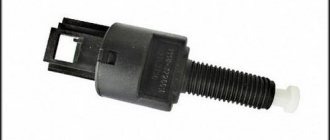
Description of the brake pedal sensor
Below we will find out how it works and how to replace it.
Purpose, location and operating principle
The essence of the system is that when you press on the brake, the piston in the cylinder begins to move. After this manipulation, fluid enters the brake system from the intake valve. It passes through the pipelines towards the main wheel mechanism, thus creating a suitable situation for the pads to move towards the wheel discs and drums. As a result, contact and subsequent braking occur. The controller itself turns on the brake lights.
Brake end piece
Typical malfunctions and methods for their elimination
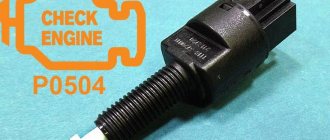
When “communicating” with a car, you can encounter various problems, but there is the most common and annoying problem. This problem is called error P0504, or otherwise “Brake pedal sensor mismatch.”
This malfunction often slows down the car. To solve this issue, you need to release the brake pedal and adjust the gap in the position sensor.
The adjustment is quite simple:
- It is necessary to hang a small but weighty weight in the area of the rubber brake pad.
- Unscrew the sensor nut a little and bring the white part to the brake pedal so that there is a gap of 0.2-0.5 mm between the body thread and the white tip. The sensor must be fixed in this position.
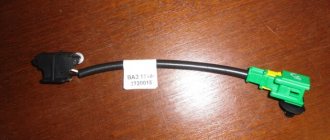
New replacement part
Carrying out work on dismantling and repairing the sensor
In most cases, repairing a sensor does not take a significant amount of time and does not require the car owner to have either specific knowledge or the use of complex tools. You can do it yourself without going to a repair shop.
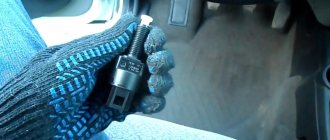
First you need to disconnect the negative terminal from the battery, and then move to the driver’s seat in the car. Move the front seats back as far as possible and remove the interior carpet. The sensor is located next to the brake pedal; to remove it, you will need to disconnect the clamp and the block with wires from its connector.
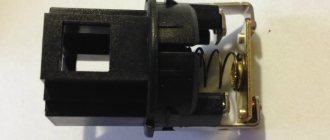
Carefully loosen the fastening nut and carefully unscrew the body of the part, then disassemble it. This element is a two-piece element, and both parts are held in place with latches.
There is a spring in the inside of the sensor, which is often what causes problems. Replacing a faulty spring with a new one, having the same number of turns and suitable dimensions, most often helps to eliminate the problem.
Having completed the repair, reassemble the element by performing the manipulations you performed to disassemble it in the opposite sequence, and then install it in its original place, and if necessary, adjust it. The part is tightened until the brake pedal goes down, after which it is turned 90 degrees clockwise and secured with a lock nut. As a result, with the brake pedal lowered, the switch rod will be in a recessed position, and when you press it, it will go beyond the boundaries of the switch body.
Next, start the engine and wait at least ten minutes; if the error does not appear, you have correctly identified the cause of the problem. If error P0504 appears again, adjust the sensor; if this error continues to appear, the part will need to be replaced.
Instructions for replacing the brake controller
- Pump out the liquid.
- Place the vehicle on a support stand and remove the wheel.
- Use a wrench to unscrew the two wheel pins.
- Remove the brake drum.
- Then, using a screwdriver, pull out the hook of the upper tension spring and remove the part. Perform the same manipulation with the lower tension spring.
- Then remove the front pad and spacer bar, while disconnecting the pressure spring and lower the pad.
- Remove the shoe lever from the parking brake hole, straighten the cotter pin and remove it from the parking brake drive.
- Remove the washer and lever.
- Install a new block and assemble the part in the reverse order.
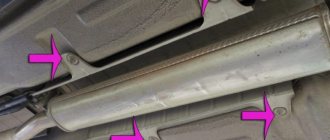
Rear disc brakes on Lada Kalina
OBD-II Error P0504: Brake Light Switch
The Powertrain Control Module (PCM stores trouble code P0504) when it detects a malfunction in the vehicle's brake light switch. A warning light comes on on the dashboard.
When a fault occurs in the brake light circuit, a number of problems can arise. To prevent the vehicle from getting into a dangerous situation, this error will be recorded and the error warning indicator will remain on until the cause is corrected and the code is cleared from the PCM.
Reasons for the error
The causes of the P0504 code are quite simple and easy to diagnose. These include:
- faulty brake light fuse
- damaged or faulty brake light switch
- brake light lamp
- open or short circuit in the brake light wiring
- problem in the connector or circuitry of the brake switch
Symptoms of error P0504
The first sign of an error will be an illuminated “Check Engine” light. In addition, you may notice other symptoms, including:
- pressing the brake pedal does not disable the vehicle's cruise control system;
- one or both brake lights do not turn on when you press the brake pedal;
- one or both brake lights remain on even after you take your foot off the brake pedal;
- pressing the brake pedal at speed causes the engine to stop;
- On an automatic transmission, it is impossible to shift the shift lever.
Diagnosis of the error
If the error code is determined using an OBD-II scanner, it is cleared. All possible causes must be checked. From simple to more complex. You need to start with fuses and light bulbs. If the problem persists, you need to check the brake light switch, wiring, and connectors.
Common diagnostic errors
Often, when the brake light comes on, it is not the driver who assumes that the problem is a burnt out bulb. Replacing the light bulb may not solve the problem, because the source could be the wiring or switch. If the fault is in the switch, then replacing the fuse will do nothing. The new one will also burn out.
Description of the clutch pedal sensor
What kind of device is this and how to replace it is below.
Purpose, location and operating principle
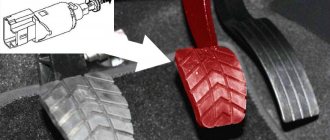
The clutch sensor is installed directly on the clutch pedal. It influences engine control with an electronic gas pedal and provides a convenient and flexible control scheme for machine modes. On its own, it looks like a nondescript switch that has on and off modes.
Typical malfunctions and methods for their elimination
If the controller does not detect signals from the clutch, then there is a risk of error 0830. The occurrence of this problem is usually a malfunction of the clutch sensor or a short circuit or open circuit. To correct this state of affairs, it is necessary to identify the reasons. That is, inspect the contacts for breaks or corrosion.
Device for replacing Lada Kalina
Possible faults
Oddly enough, the system has only one most likely cause of failure: an open circuit behind the sensor terminals. Since the indicators are installed in close proximity to the pads, frequent temperature changes, contact with reagents, dirt and constant changes in the position of the hub negatively affect the wiring and the brake pad wear sensors themselves. Cracks most often occur where wires break.
The wear indicator light is on
Many drivers don't like electronic brake pad wear monitoring because the light comes on when they think the brake pads are still "running and running." In the event of a breakdown, many drivers do not consider restoring the system necessary at all, so they simply bite off the protective insulation and connect the wires with a twisted pair. A
Instructions for replacing the clutch controller
- It is necessary to check the condition of the external wires.
- Unfasten the self-tapping bolts and use a screwdriver to remove the device along with the fixing plates. This should only be done after checking the pedal pusher to ensure it is applying pressure to the controller.
Photo gallery “Dismantling instructions”
1. Find the required part under the steering column.
2. Remove the housing from the pedal to get to the sensor.
3. Unscrew the bolts and remove the device.
Loading …
Video “Eliminating squeaks”
You can learn how to solve one of the problems associated with the clutch in a car from the video from the author Konstantin Biyanov.
1) VAZ 2114 car, the check light came on, the diagnostics revealed the error MISCONFORMITY OF SENSOR 1 AND 2 BRAKES. I bought a new sensor, installed it, and reset the error. After a 10-15 minute drive the light comes on again. Maybe the sensor is defective? Or could the reason be something else? Question from: Viktor Tikhonov Separate topic: 2) Good afternoon. VAZ 21124 2006 The problem is that fuel consumption has increased; diagnostics showed that the mass air flow sensor is faulty. It was replaced, but still the average consumption is 8.8. What is the reason, what should I do?? Question from: Ilya Povolnov Separate topic: Write the number of the question you are answering! To authors of questions: be sure to write in the comments how you solved your problem!
Similar articles
18 comments on “Diagnostics revealed an error MISCONSISTENCY OF SENSOR 1 AND 2 BRAKES”
2) 8.8 is normal
1. Throw away these sensors 2. Excellent consumption, for mixed mode) and, in principle, for the highway if you like to heat)
Which one to buy
Experts and service workshop specialists recommend purchasing an original brake sensor. It is of better quality and lasts longer.
Table 1. Price of brake pedal position sensor
| Manufacturer | Code | Cost, rub. |
| AvtoVAZ | 11183720010 | 170 |
| Avar | 2113720 | 180 |
| AMY | 11183720010 | 95 |
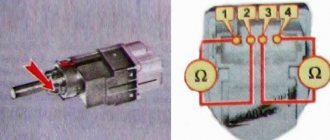
Before changing the “frog”, you can “ring” it with a tester to make sure the part is working.
Performance diagnostics
Checking the functionality consists of: 1. Testing the product with a multimeter. 2. Disassembly and visual inspection of the internal components of the part. 3. Replacement sensor is not known to be good.
The first method involves alternately measuring the contacts of the dismantled sensor. The point is to check each contact individually and in pairs (second and third contact). This is quite convenient to do, since at the place where the contact chip is connected, all connectors are numbered.
The second method is used to identify faulty or deformed internal elements of the product (in most cases, damaged springs). Remove all internal elements and pay attention to their integrity and performance. In addition to the condition of the springs, pay attention to the metal contact plate. There should be no traces of oxidation or contamination. If there are any, clean them out.
The third method is quite simple and trivial. Install a new part to replace the one whose serviceability you doubt. Test the operation of the car by driving in various modes, when switching up and down gears. When the system is restored to normal operation, the malfunction indicator (check engine) should go out (if it does not disappear within 15 minutes, the error should be reset manually).