Print this article Font size 16
The vacuum brake booster (VUT) makes it easier to operate the brake pedal. This assembly is divided into two chambers - one has a permanent connection with the intake manifold, and the second is connected to the atmosphere when the brake pedal is pressed.
The unit is located under the hood behind the brake master cylinder. Through the rod it is connected to the brake pedal.
Main brake cylinder VAZ-2109: device, diagram and reviews
The main brake cylinder of the VAZ-2109 is necessary to ensure the normal operation of the cylinders and calipers, which clamp the pads and stop the car.
The design of the entire system is quite simple - there are no frills like a traction control system, and you won’t even find sensors signaling excessive pad wear. The condition of the elements must be monitored by the driver. To help him, there is only a level sensor on the expansion tank. When the brake fluid level drops below a critical level, a warning light on the dashboard will light up.
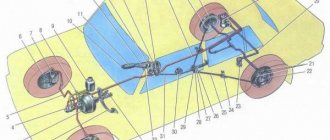
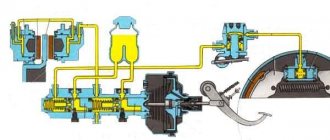
General system diagram
The brake drive system here is of a hydraulic type, functioning using two circuits, they work independently of each other. The use of a dual-circuit system is justified by safety. If one of the calipers leaks or a hose breaks, you can still stop the car. Even directly on the main brake cylinder of the VAZ-2109 there may be a leak. But the car can still be stopped.
True, if the braking system operates on only one circuit, you will feel discomfort. The car will pull to one side when braking. Braking efficiency is also reduced. For these reasons, continuing to drive a vehicle that has a faulty brake system is strictly prohibited. Using the VAZ-2109 master brake cylinder, pressure is created inside the system. When the driver presses the brake pedal, it moves the rod and piston inside the cylinder. This increases the pressure inside the hoses and tubes.
Actuators are installed on each of the wheels. These are the working cylinders that are located on the rear wheels. As well as calipers on the front wheel mechanisms. With the help of these elements, the rear pads are unclenched and the front pads are compressed. In this case, under the influence of friction between the discs, drums and pads, the car is braked.
Why is this happening?
In most cases, failure of this element occurs due to natural wear and tear. The rear brake cylinder is a very reliable part, and its service life is about 200 thousand kilometers. If the car has not yet reached this mileage, the cuffs are most likely damaged. This happens when the replacement is ignored or mixed with other brands. It absorbs moisture well, which makes it ineffective. And the water begins to corrode all metal parts. Therefore, the fluid must be changed every two years, regardless of the mileage of the car. Also, the rear brake cylinder fails due to squeezed out pistons. This happens when the rear pads are not replaced in a timely manner. Sometimes the pistons simply jam, causing the car to constantly slow down while driving or slow down a little. At the same time, the drum begins to get very hot.
The next thing you need to pay attention to is technology. When performing this work, do not break off the fitting on the cylinder. If it gets stuck (which often happens), purchase a repair kit so that in case of deformation you can replace the damaged element. Some motorists tap the body around the fitting with light blows of a hammer and spray WD-40. In some cases this helps. Next, we will look at how to remove the old rear brake cylinder and install a new one in its place.
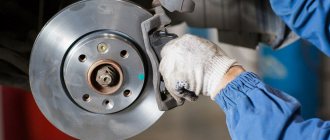
Front brake
A metal disc is rigidly fixed directly to the hub. The brake disc is secured using:
- Small conical studs that serve as guides for the wheels.
- The bolts that secure the wheel to the hub.
The rotation speed of the disk and wheel will always be the same. Therefore, in order to brake a car, it is necessary to stop all its wheels. To do this, you need to clamp the disc using pads and brake calipers.
The calipers have two parts - external and internal. On the inside there is a cylinder, a steel piston is installed in it. Under the influence of the pressure created by the main brake cylinder of the VAZ-2109, this piston moves and acts on the block located from the inside. At the same time, the outer part of the caliper moves towards. When the pressure in the system decreases, the pads return to their original position under the action of springs.
Symptoms of a problem
How to determine that an element requires replacement? First of all, a breakdown can be detected by the level that began to disappear in the master cylinder reservoir. The latter is located under the hood, near the vacuum brake booster. It is worth noting that when the pedal is operated, the liquid always decreases from the reservoir. But as soon as you release it, the pistons will return to their original position and the level will resume. If this does not happen, look for the problem.
Leaks can also come from the cylinder itself. In this case, the rear drum will be wet. Well, the last sign is the behavior of the car when braking. The pedal begins to “grab” at the very end, sometimes you have to press several times to create the required pressure. These signs indicate that the car needs to replace the rear brake cylinder. Don't put off repairs until later - it's for your safety.
Rear brakes
The brake design, which is located on the rear wheels, has approximately the same design. Only instead of a disk a drum is used. It is made of aluminum alloy, inside of which there is a steel cage. The pads are made of metal, the outer part of which is in contact with the drum, and special linings are glued on. They are made from various friction materials. The pads are driven by brake cylinders.
This element allows, under the influence of pressure created by the main brake cylinder of the VAZ-2109, to release the pads. The service life of the rear drums and pads is much higher than that of similar elements of the front brakes. The reason lies in the fact that the rear wheels account for no more than 30% of the load during braking. The service life of the rear elements of the braking system is approximately two to three times higher than that of the front ones.
Master brake cylinder
The design of this element is quite simple. The main cylinder is made of special aluminum alloys. A one-piece body to which the expansion tank and tubes are attached, through which the liquid is supplied to the actuators.
The design of the VAZ-2109 master brake cylinder is somewhat similar to an internal combustion engine. There is a cavity inside, it is perfectly flat, and two pistons move in it under the action of the pedal. These pistons have rubber seals on the outside. They are necessary to improve tightness. The repair kit for the VAZ-2109 master brake cylinder necessarily contains these cuffs.
An expansion tank is installed on top of the cylinder; it is made of plastic. There is a plug on it, inside of which a float level sensor is built. It does not show intermediate values, but allows you to simply turn on the lamp power circuit when the liquid level in the system decreases.
Replacement or repair?
The price of the VAZ-2109 master brake cylinder is about 1000 rubles. The repair kit will cost half as much. But the feasibility of its installation is highly controversial. When repairing, you will need to do the following:
- Drain the liquid from the expansion tank.
- Remove the expansion tank.
- Unscrew the pipes that are located on the brake cylinder.
- Remove the two nuts that secure the master cylinder body to the vacuum booster.
- Loosen the locking bolt that holds the first piston in place.
- Pull the piston out of the cylinder. This must be done carefully so that the spring does not jump out. Try not to lose all the elements.
- Loosen the locking bolt holding the second piston and remove the element from the cylinder.
Choice
We will give some recommendations regarding the choice of a new vacuum amplifier.
Selection criterion
Required parameters
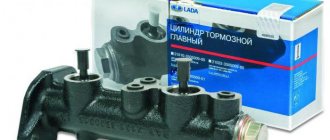
The cost of a good vacuum cleaner is now about 2.5 thousand rubles. These are not the most expensive, but not the cheapest Chinese options. Optimal for VAZ 2109
This packaging, used by a genuine manufacturer, is made of corrugated cardboard
The label should be clearly legible - the production batch number, the production date of the part and the name of the manufacturer itself
The vacuum unit corresponding to the technical parameters of the VAZ 2109 has article number 2108-3510010TM
You should not buy from market traders. There are many good, trusted spare parts stores in any city. Don’t be shy to ask for certificates, documents for parts
Choosing wisely
Now there are a lot of fakes on the market. Such parts cost the same as the originals, but last much less.
Installing a new cylinder
The layout of the VAZ-2109 master brake cylinder is the same as on classic series cars:
After this, you need to install new cuffs and pistons and fix the device in place. But it is much better to change the main brake cylinder of the VAZ-2109. How to do it yourself:
- Secure the cylinder body with two nuts on the vacuum booster.
- Install the brake pipes.
- Secure the expansion tank to the cylinder.
After this, it is necessary to fill the system with fluid and bleed the brakes. If this is not done, there will be air pockets inside the system that will not allow maximum braking efficiency to be achieved.
Source
Let's get started
Replacing the master brake cylinder on a VAZ-2110 is complicated by the fact that this mechanism is hidden behind the soundproofing padding of the engine compartment. Therefore, you first need to find its mounting bolts and remove the part outward. For this we need screwdrivers and a little patience. After this, you can begin replacing the master brake cylinder of the VAZ 2110 model. First, disconnect the plug with the wires on the lid of the plastic tank. This is an emergency liquid level indicator. Next, loosen the nuts holding the brake pipes. There are only four of them. Then remove the GTZ from the studs. To do this, you need to completely unscrew the nuts securing the tubes. Be careful - liquid may leak from the cylinder at this time. Therefore, we immediately place some container under the holes.
What do we do next? The next step is to drain the remaining liquid from the tank into an empty reservoir. Then you can safely take it out.
repair of the main brake cylinder on VAZ 2108, VAZ 2109, VAZ 21099 cars
1. Remove the main brake cylinder from a VAZ 2108, VAZ 2109, VAZ 21099. 2. Using a wooden spatula as a lever, remove the brake reservoir 13 (see Fig. 8.5) from the main brake cylinder. 3. Remove connecting sleeves 12 from the main brake cylinder body. 4. Remove two locking screws 10 (Fig. 8.11). 5. By hand, remove the pistons of the first and second chambers with cuffs, washers and springs from the main brake cylinder body. In this case, the piston 11 of the second chamber may not come out freely. To remove the piston with the remaining parts, push the piston through the first chamber by hitting the end of the brake master cylinder body from the side of the first chamber on a clean board. To remove the piston, you can also use compressed air, which must be supplied to the outlet of the second chamber, while closing the hole under the tank.
6. Carefully inspect and make sure that the mirror of the master brake cylinder and the working surface of the pistons are completely clean, that there is no rust, marks or other irregularities. Otherwise, replace the parts with new ones. 7. Replace cuffs that are torn, swollen, or have lost elasticity. It is recommended to replace the cuffs with new ones whenever disassembling the master cylinder, regardless of the condition of the cuffs. 8. Check the elasticity of the piston springs, the length of which should be under a load of 38.26-46.1 N (3.9-4.7 kgf) 41 mm, under a load of 81.81-99.47 N (8.34-10 ,14 kgf) - 21 mm, in a free state - 59.7 mm. Replace springs that have lost their elasticity. 9. It is recommended to replace gaskets 12 (see Fig. 8.11) under the locking screws with new ones.
10. Before assembling the master cylinder, wash all parts with clean brake fluid. Do not allow parts to come into contact with mineral oils, gasoline, kerosene or diesel fuel, as even residual traces of these liquids can lead to destruction of the rubber seals.
WARNING The time for washing the sealing rings in isopropyl alcohol is no more than 20 seconds, followed by blowing with air.
11. Assemble the brake master cylinder in the reverse order of disassembly. In this case, lubricate all parts with brake fluid.
Rice.
8.5. Main brake cylinder with a brake reservoir for VAZ 2108, VAZ 2109, VAZ 21099 cars: 1 - main brake cylinder body; 2 - low pressure sealing ring; 3 — piston of the left front-right rear brake circuit drive; 4 - spacer ring; 5 - high pressure sealing ring; 6 — pressure spring of the sealing ring; 7 — spring plate; 8 — piston return spring; 9 — washer; 10 - locking screw; 11 — piston of the drive circuit of the right front-left rear brake; 12 — connecting sleeve; 13 — brake tank: 14 — emergency brake fluid level sensor; A - gap
Parts of the main brake cylinder of VAZ 2108, VAZ 2109, VAZ 21099 cars:
1 - main brake cylinder body; 2 - low pressure sealing ring; 3 — piston of the left front-right rear brake circuit drive; 4 - spacer ring; 5 - high pressure sealing ring; 6 — pressure spring of the sealing ring; 7 — spring plate; 8 — piston return spring; 9 — washer; 10 - locking screw; 11 — piston of the drive circuit, right front - left rear brake; 12 - sealing gasket
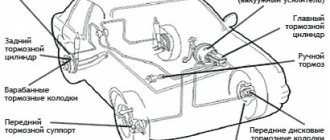
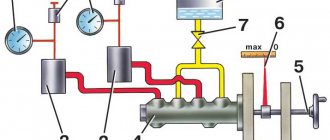
VAZ 2109 brake system diagram
As in other domestically produced car models, in the Nine the brake system consists of a front and rear circuit. The operation of the brakes involves very high pressure in the system, so it is very important to use reliable and high-quality pipes through which the brake fluid circulates. In addition, it is extremely important to maintain the brakes in good condition and perform regular preventive maintenance to detect and promptly eliminate fuel leaks.
It is worth noting that the dual-circuit braking system is very reliable, since in the event of depressurization or failure of one circuit, the second will remain operational, which provides a higher level of safety.
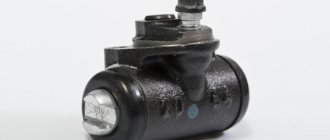
GTZ: what is it and why is it needed
The GTZ or master brake cylinder is one of the components of the car's brake system, responsible for creating pressure in the pipes. It is implemented by a cylinder with a piston, which is responsible for pumping brake fluid. To prevent leakage of the fuel fluid during operation, two rubber seals are used. This unit is characterized by high reliability and durability, which are achieved through the use of high-quality components.
In order to avoid any problems with the brakes throughout the entire time the vehicle is used, the car owner must constantly monitor the level of coolant in the GTZ. In addition, experts recommend periodically replacing it completely, since during operation it is exposed to high temperatures, as a result of which some of the additives included in the fuel fluid and giving it the necessary viscosity evaporate. Thus, over time, brake fluid loses its properties.
Some tips
- If you start having problems with the brakes, first of all you need to carry out an external inspection of the vehicle: check the fluid level in the reservoir, make sure that the front/rear cylinders are not leaking. There should not even be stains of brake fluid in the brake hydraulics.
- “Brake fluid” must be filled with the same brand; it is recommended to completely replace the brake fluid at least once every two years.
- If faults are identified in the gas turbine engine, and it has already served for at least a year, it is more advisable to replace it completely than to repair it. The same can be said about the rear working cylinders.
- Before changing the turbocharger, the brake fluid should be removed from it; this operation is usually done using a syringe.
- Usually a leak in the master cylinder is not visible, but if there is any suspicion that this part is faulty, you should remove the main cylinder - there will be traces of leaks at the rear, and this indicates its faulty condition.
- If, during an external inspection, cracks were found on the brake hoses, it is better not to take risks and immediately replace the defective parts.
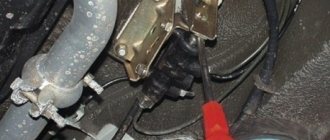
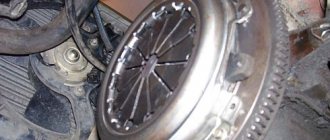
Vacuum booster
This element of the nine's brake system is located between the passenger compartment and the engine compartment. It has a cylindrical shape and is connected via hoses to the carburetor and the brake master cylinder. The main purpose of this unit is to improve vehicle controllability. It is thanks to the vacuum booster that the brake pedal has a very soft stroke, and stopping the car becomes very easy. To truly appreciate the importance of this detail, it is necessary to compare the braking process of the Nine with that of older VAZ models, stopping which took more effort and the braking distance was much longer.
Malfunctions occurring in the brakes
From time to time, various malfunctions occur in the vehicle, and the working and master cylinders also often fail. The following breakdowns occur at the RTC:
- the piston gets stuck in one of the positions;
- the inner surface wears out;
- The sealing cuffs fail (tear or swell).
The main sign of a faulty condition is the appearance of smudges (leaks) of brake fluid (FL) from the RTC. If the pads are worn down to bare metal, the pistons in the RTC extend too far, and as a result, the brake fluid may leak and the brakes will fail.
In the GTZ, the piston can also jam, the internal cavity of the mechanism can wear out or rust, and the cuffs can leak. Symptoms of a GTZ malfunction are as follows:
- when braking, the brake pedal (BP) “fails”, the effectiveness of pressing disappears, this usually happens when there is a small leak from the turbocharger;
- braking occurs at the very end of the pedal stroke, and you have to press the PT several times to brake;
- there are no brakes on the front or rear wheels, this happens if one of the GTZ circuits does not work.
You cannot drive with faulty working and master brake cylinders; the parts should be replaced immediately.
Brake calipers
The brake calipers are located on the front axle of the wheel and are responsible for tightly pressing the pad and brake disc. These spare parts have a long service life and can remain suitable for use throughout the entire life of the vehicle. This unit is based on an aluminum housing, to which a pipe for supplying brake fluid is connected. Nearby there is a hole for a fitting, which is necessary when bleeding the brake system. Inside the housing there is a steel piston, which is responsible for pressing the pads against the discs during braking.
The front circuit calipers are attached to the hub with two fixing bolts. It is worth noting that if you are repairing or replacing any parts, it is not recommended to press the brake pedal with the pads removed, as this will cause the piston to be squeezed out of the system. It will no longer be possible to insert it back and you will need to completely replace the entire assembly.
Pressure regulator
This device is responsible for increasing the efficiency of the braking system. Probably every car enthusiast knows that during the braking process, the main part of the braking force is transmitted to the front wheels and the remaining small part to the rear wheels. The degree of distribution may depend on several factors, the main ones being the level of vehicle load and the intensity of braking. However, the design of the brake system of the nine includes a pressure regulator, which is responsible for the rational distribution of braking forces between the front and rear calipers.
Thus, thanks to this unit, there is a significant reduction in pressure in the pipes of the rear axle system. The pressure regulator is located on the rear beam, and is mounted using a special bracket. It is worth noting that when taking preventive measures or replacing this unit, you will need a special key that does not grind the edges of the fixing elements.
Delivery to regions
- Delivery of an order worth over 3,000 rubles is free if the delivery cost does not exceed 500 rubles; in other cases, delivery of goods is paid upon receipt of the goods. If the delivery cost exceeds 500 rubles, we make a discount of 500 rubles on the delivery cost.
- Delivery to the transport company is FREE.
- The timing, cost and method of delivery depend on the weight, dimensions and cost of the ordered product.
- Delivery options can be selected by the online store manager.
Orders are processed daily from 08:00 to 20:00 (local time).
Order of shipment to regions of the Russian Federation:
- Place an order in the online store (on the website or by calling 8-800-234-96-34).
- Pay for the cost of the goods in any convenient way (card, Yandex.Money, QIWI, Webmoney, by bank receipt).
- After receiving the money (usually money arrives instantly), we will almost immediately deliver the order to the transport station.
Online store managers will help you choose the cheapest and fastest method of order delivery; you can trust our specialists who have studied all the nuances of pricing of transport companies.
We send parcels to: Russian Post, Business Lines, PEC, SDEK, KIT, Energy, Boxberry and other companies. You will find detailed information on deliveries on the delivery page.
| See all advertisements in the archive |
Hand brake
The handbrake can be considered a secondary means of braking, since very few drivers regularly use this element. Moreover, there is also a category of motorists who do not monitor the condition of the handbrake at all and do not maintain it in good condition. This phenomenon is explained by the habit of setting the vehicle at speed. Nevertheless, in the winter season this approach turns out to be even useful, since if the car is placed on the handbrake for a long time, the brake pad may simply freeze to the drum, which can lead to the destruction of this brake system unit when trying to move.
Repair and preventive measures of the brake system
Operating a car involves a lot of wear and tear on the tubes and hoses through which the brake fluid is supplied, as a result of which cracks may appear on them, through which the brake fluid leaks out. Therefore, it is extremely important to identify such faults in a timely manner and promptly replace these elements. To do this, you will need an eight-inch crimp wrench, as well as a set of new gaskets.
It is worth noting that when replacing the hose, the brake fluid must be completely drained from the system. A special fitting located on each caliper is designed for this purpose. At the intersection of the tube and hose, it is necessary to use metal brackets, with which they are attached to a special bracket.
As already mentioned in the article, it is periodically necessary to completely replace the brake fluid, since over time it loses its properties. In addition, this procedure must also be performed when replacing hoses and tubes, since during the work it becomes airborne, as a result of which further use of the hose becomes impossible. To do this, add fluid to the expansion tank to the maximum level and pump the brakes of each wheel in a strictly defined sequence. If you have not previously performed a similar procedure, then it is recommended to seek help from more experienced motorists in order to avoid making the basic mistakes that all beginners most often encounter. Nevertheless, the procedure for bleeding the brake system itself is not complicated; the only thing that is required is a large container into which the aired fuel fluid will be drained. It is worth noting that it is necessary to drain until liquid with air bubbles stops flowing.
For stable operation of the vehicle's brakes, it is necessary to replace worn out brake pads, since it is thanks to them that the car stops. This is one of the most common types of repairs that car enthusiasts regularly encounter. To replace the braking elements on a VAZ 2109, you need to place the vehicle on a jack and remove the wheel. Next, the caliper fixing bolt is unscrewed, which then simply moves to the side. After this, we press the piston into the housing so that it does not interfere with the removal of used pads and installation of new ones, and we directly replace the spare part.
Tools
What do we need to prepare for work? Replacing the rear brake cylinder is impossible without the following tools:
- Heads "10".
- Driver or ratchets.
- A special wrench for unscrewing the brake pipe.
Since there is liquid in the system, it will leak out during work. To restore serviceability of the brake mechanism, after repair you need to bleed the system, removing air from it. To do this we need a transparent bottle and a short hose. The volume of the container must be at least 500 milliliters.