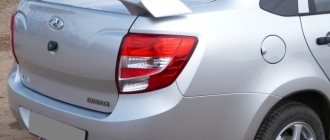
An on-board computer is a device that can increasingly be found not only in foreign, but also in domestic cars. The Lada Granta in the “Norma” and “Lux” trim levels is no exception (owners of a car in the “Standard” trim level can buy it additionally, although the price is quite high). It gives the user many amenities that make driving and monitoring the car’s performance much more comfortable. Today we’ll talk about what the on-board computer is that comes with the Lada Granta, and we’ll look at the errors that the user may encounter.
On-board computer firmware Grants
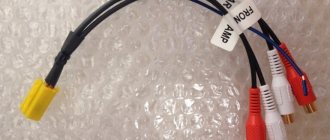
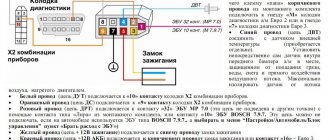
You can update the software yourself. To do this, you will need a USB-K-Line cable, the firmware itself, a diagram of the Lada Granta ECU, an installation program and a driver for connecting to the adapter.
Electrical diagram BC connection diagram for firmware
Schema collection algorithm:
Take 3 wires. Switch T1 is closed as required by the program. The computer serves as the power source; just connect to Molex. For the on-board device, you can use the terminal block from the cooler. Connect the adapter to the USB port and install the driver. Next, you need to remember the port number you are using. The firmware process looks like this:
The program starts and the firmware is selected. The desired port is selected. Click on the lightning icon, after the “Turn on power” message appears, you need to press any button and start the firmware protocol, this will take several minutes.
Firmware program
Related:
Setting up an on-board computer for VAZ 2115
Which car tint is best?
What on-board computers do developers offer?
How to start a carburetor engine in winter?
Author. Specialist in car and auto electronics repair. For more than 15 years I have specialized in the installation and configuration of on-board computers, parking sensors and other electronics.
What are the advantages of the device?
Commercially available on-board controllers, adapted for Lada Grants, are equipped with displays and are endowed with a significant amount of information memory. This feature is very useful for owners with poor eyesight, and will also prove to be an indispensable assistant for female drivers who are unsure of the purpose of the information elements of the dashboard.
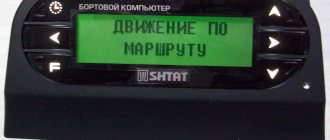
In view of the noted features, the on-board controller can contribute to more comfortable driving due to the efficiency and timeliness of providing the driver with route information. After all, it is capable of displaying information regarding the following points:
- travel time;
- fuel consumption during various driving modes;
- average speed and specific fuel consumption;
- remaining fuel equivalent to mileage;
- speed of the car at the start of movement;
- fixed motor temperature at a certain time, whose control avoids overheating of the unit;
- occurrence of malfunctions in Lada Granta units that have feedback from the control unit;
- timely heating and drying of candles;
- temperature inside the cabin and a similar parameter outside.
In addition to the indicated functions, the on-board computer is equipped with options, including:
- non-volatile storage device;
- the ability to generate a signal about emerging problems;
- supervisor: the option warns about the unauthorized start of the car (rollback), left lights and turn indicators on;
- “afterburner”: the function allows you to cancel memory data that implies the use of fuel of questionable quality, and during sudden acceleration, return to the original settings.
To activate this option, you must use 95 gasoline as fuel.
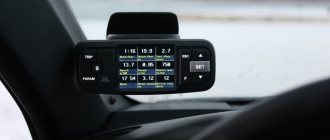
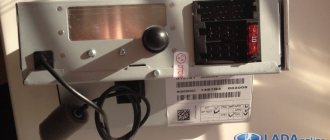
The on-board computer in the basic modification is marked “State X1 M” (“Multi-Set”). This is the highest priority option for the Lada model family. Thanks to its compact dimensions, it can be easily integrated into the seat on the panel. If you are inclined to purchase a “standard” device, you will find instructions and cabling in the kit.
The on-board computer “State X1 M” has a processor capable of processing the entire amount of information required by the driver regarding the operation and diagnosis of on-board systems.
The computer diagnostic tester is equipped with a plasma lamp, a digital tachometer, and a speedometer. The tester allows you to accurately determine the position of the throttle valve of the power system and monitor the condition of the electrical network on board. This useful option allows you to prevent a possible short circuit or fire in the cable network in the car.
The concept of self-diagnosis mode. What are error codes and how to use them
We have already said earlier that the VAZ 2110 on-board computer greatly helps prevent problems that arise due to improper operation of the executive and control systems of your car when the “Check Engine” light comes on. All this is real, since the chip has an on-board self-diagnosis mode installed on the VAZ 2112 computer. The BC receives information from the ECU via the K-line and tells the motorist what’s wrong with his iron horse.
This is very important, since all engine systems on the VAZ-2110 injector type are controlled by the ECU and failures in its operation and the functioning of the main diagnostic systems can lead to failure of the entire vehicle, irrational fuel consumption and severe loss of internal combustion engine power. If you have a VAZ 2110 on-board computer, you just need to ask it what’s wrong with the car, and your “electronic” friend will immediately give out all the ins and outs. There is no need to call expensive specialists or spend a long time digging under the hood of the car - self-diagnostic systems can do it all for us
There is no need to call expensive specialists or spend a long time digging under the hood of the car - self-diagnostic systems can do all this for us.
Of course, the VAZ 2110 on-board computer tells us information about errors in encoded form. You won't see a text message telling you exactly what's wrong with your vehicle, just a digital fault code. The main reason for this approach is that the size of the on-board computer screen is very limited. But this is actually not a problem if you have a guide with decoding at hand (it can also be easily found on our website).
If your car is equipped with only a basic on-board computer VAZ-2110, located under the speedometer on the dashboard, then the self-diagnosis mode in it is started by simultaneously turning the ignition key and holding down the daily mileage reset button. Immediately after this, all the arrows on the dashboard should start “dancing” in front of you. By pressing the reset button twice, we switch from the firmware version, in fact, to error information
If your car is equipped with a luxury package, where the VAZ 2110 on-board computer is installed next to the SAUO unit (and AMK 211002), the self-diagnosis mode there is activated even easier by pressing the “clock” button in the time display mode. If an error message appears, you just need to connect the VAZ 2110 on-board computer to the diagnostic interface.
Setting up the AMK 211001 on-board computer
We set up the staff on-board computer on a VAZ 2110 using the example of a basic BC of a luxury configuration. Some useful tricks.
Undoubtedly, in order to fully cover all the capabilities of the on-board computer on the VAZ 2110, it is worth reading the operating instructions for it. We will consider only a short list of some useful functions that the standard on-board computer of the VAZ 2110 is capable of. For example, setting up a sensor responsible for the fuel level in the tank:
- 1. First of all, you need to completely empty the gasoline tank in your car. Next, you need to switch to the fuel selection mode by holding the first button from the top in the right row for several seconds. The on-board computer of the standard VAZ 2110 will display the number “0” on the display.
- 2. We switch to the testing mode by holding down the button with the image of the car for a second, about which the on-board computer on the VAZ 2112 will notify us with a short sound signal. The number “3” now lights up on the display.
- 3. Fill the gas tank with 3 liters. gasoline. After waiting for some time, press and hold the button with the image of the car again.
- 4. We continue to fill the tank with gasoline to its maximum capacity. The bookmaker will complete the thorification procedure itself and switch to standby mode.
- 5. It’s even easier to set up a BC for speeding alarms. To do this, you need to switch to the “medium speed” mode and again hold the upper right button for several seconds. The integer digital value is set using the “+” and “-” function keys on the instrument panel. We exit the speed setting mode in the same way as we entered it.
Lada Granta Standard › Logbook › BC STATE GRANTA - X1 - RELOAD
In general, not long ago I purchased an on-board computer STATE GRANTA - X1
The history of its acquisition can be read HERE and a little more HERE
In general, everything would be fine if there weren’t a few jambs. Jamb No. 1 - the BC sometimes interfered with starting the car because I have an activated immobilizer. Jamb No. 2 - Didn’t leave the adjustment mode. Jamb No. 3 - read to the end what’s written there.
Having discovered that there were shoals, I began to search through forums and websites. I found information that the Manufacturer sends FREE Date cables for flashing the GRANTA - X1 on-board computer purchased through their website shtat.ru.
I started watching and observing forums. I found out that everyone is sent a cable for firmware with a COM connector, to which in addition you need to look for a 12-volt power supply. . . Here is the link to this cable - CLICK
What the hell. . . . . It's the 21st century, what the hell is the COM connector - it's the last century
I decided to write a letter to ask them to send USB and not the obsolete COM.
As a result, the letter received a response.
As a result, a month passed. There is no parcel. I decided to remind them that I wrote them a letter with previous letters attached.
The next day the answer came.
On the same day (yesterday) I come home from work, look in the mailbox and see a notice about a parcel from Togliatti.
Today (Saturday) I go to the post office and receive a package for FREE! ! ! ! ! :).
As a result, having read the instructions on the state website and tried to reflash the BC more than once, I am posting my instructions on how to reflash the BC using USB, because... This point is not entirely clear in the instructions.
Step No. 1. Download firewood for USB from the website - CLICK Step No. 2. Unpack the driver we need (I chose for Windows, because that’s what I use) into some folder and remember its location. Step No. 3. Install the driver according to instructions - CLICK Step No. 4. Go to the device manager, look at our device, and REMEMBER the port number. In my case it is “COM 3”
Step No. 5. Download Firmware version 009 for BC - CLICK and unpack it into any folder and remember its location. Step No. 6. Next. Download the bootloader for the firmware - TYTS and unpack it into the same folder where you saved the firmware! ! !Step No. 7. Open our bootloader. Open the CHELK instruction and follow the instructions strictly until point No. 5. Here you will need to select the COM port No. that we remembered in Step No. 4.
Next, perform all the steps up to point No. 7
This monente caught me in a stupor. because acted strictly according to instructions. Pressing the right BC button did nothing and the flashing did not start. I thought for a long time. Tried again. As a result, I developed my own methodology.
At stage No. 7 it should be like this: This should be on the computer screen.
Let's take it! ! ! Press any button found BC (I pressed the right one) and HOLD IT. I repeat once again - HOLD THE BUTTON of our bookmaker.
ALL! ! ! The flashing of our bookmaker begins. DO NOT RELEASE THE BUTTON UNTIL THE FLASHING IS COMPLETED.
After the firmware is completed. Let's release the button. We disconnect the BC from the computer and go install it on the car.
Well, now the most interesting part.
After flashing: 1. The BC does not freeze and normally exits the adjustment mode.2. The car starts normally and there are no conflicts observed when they work together (BC and car).3. What was written about above is Jamb No. 3. The instructions for the BC say that it should emit a sound signal when the low beam or high beam is forgotten when the ignition is turned off (the engine must be turned off). This was not the case before the re-flashing. Now this function “functions” :).
How to install an on-board computer on a Granta
In the time of Karl Benz, the man who showed the world the first prototype of a modern car, the design of cars was quite simple. Engine, transmission, body, brakes, steering - these are all the simple components that have remained unchanged in our time. There was no talk of safety, comfort, or accessibility of cars in those days.
But a modern car is a complex technical device. Modern electronic systems of this “organism” monitor almost all parameters and record the slightest deviations in their operation. The driver’s participation in this comes down to monitoring the instruments and, in case of any deviation, contacting a car service center. The device that monitors the parameters of the car is the car computer. What it is, what it serves, and how to install an on-board computer on the Grant will be discussed in this article.
What is the on-board computer used for?
An on-board or trip computer is designed to calculate vehicle movement parameters. These can be not only cars, but also bicycles, mopeds, and motorcycles. Modern on-board computers are multifunctional devices; they can not only measure the speed of movement, but also have options such as turning on the front running lights when moving away, activating the windshield wipers if there is a rain sensor, calculating fuel consumption, travel time and much more.
An alternative on-board computer on the Grant can complement the main one, in which most options are cut down. A significant part of trip computers are connected directly to the vehicle controller, but may also have their own power source. Such computers determine parameters thanks to a built-in GPS sensor and can even be installed on bicycles and scooters.
Why install an on-board computer
It would seem that all modern cars are equipped with standard computers. Even in a car like the Lada Granta, an on-board computer is installed by the manufacturer. But what do we really have? Not all trip computers display the necessary parameters. In the “norm” or “standard” configuration, the BC options are very limited. At best, they show the fuel level, time, gasoline consumption and the distance that can be covered with the remaining gas.
Such computers do not even show the coolant temperature, which is very important for the driver. It is precisely for this reason that an on-board computer is installed on the Grant as an alternative to the standard one.
Types of alternative on-board computers
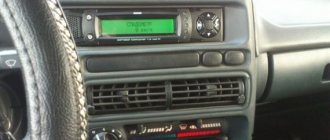
There are manufacturers that produce BCs that are exclusively suitable for all cars. These trip computers can also replace the standard BC; they differ only in the mounting method, functionality and price. Such BCs can be mounted on the dashboard, on the windshield, or in the standard places of the radio. Staff X1 - the on-board computer on the Grant is installed instead of plugs on the instrument panel; it looks like a regular button.
Installing BC on “Granta”
Before installing the BC on Granta, you need to decide on the choice of this device based on your needs. Know that the cheaper the on-board computer for the Lada-Granta, the less its functionality. However, inexpensive models may also have functions that are not available to regular standard bookmakers. For example, heating candles in winter or adjustable activation of a cooling fan. The choice of such models is quite wide, and it all depends on the needs of the buyer.
On the Grant, the on-board computer can be installed either in a standard location or in an alternative location on the instrument panel. The “STATE” type BCs are mounted instead of button covers on the front side of the torpedo. There are trip computers that can be installed in the floor tunnel, on the instrument panel instead of the radio, mounted on the windshield, or even completely replace the instrument panel. To install such a trip computer, just secure it according to the instructions and connect it to the connector on the car controller. On the Lada Granta, this connector is located in front of the passenger seat in the left corner.
Conclusion
This article raised the question of how to install an on-board computer on a Granta. As it turned out, this is not a difficult operation at all, and any car enthusiast can do it, regardless of his experience. It is enough to choose a bookmaker that satisfies the car enthusiast in terms of parameters and price. Any modern trip computer is equipped with detailed instructions for its installation. You just need to carry out the actions prescribed in it and not invent anything unnecessary.
Disconnecting the battery terminal
In inexpensive cars of domestic brands, as well as in foreign cars in the budget segment, the ECU is rebooted by disconnecting the battery.
It is necessary to turn off the engine, open the hood, remove the positive terminal from the battery and wait about 15 minutes or more so that the computer’s RAM is completely cleared of accumulated information.
Then you can reconnect the terminal and perform a tricky operation with the ignition.
Without starting the engine, you will need to turn the key in the lock to the second position, in which power is supplied to all systems of the car, but the starter does not operate yet. At this moment, the ECU scans the vehicle systems. Then you need to turn off the ignition and turn it on again. The ECU system will then restart.
However, after resetting the memory, you must let the machine configure itself again. To do this, you need to drive at a speed of 20-25 km/h for several hundred meters around the yard without active acceleration. The ECU will automatically diagnose the electronics within a few minutes and correct the operation.
General information and features
Remaining fuel in the tank Forecast of mileage on remaining fuel Fuel meter Travel time Travel time Average fuel consumption per trip Average speed per trip Diagnostic codes of the system Engine management Engine temperature On-board voltage Throttle position Digital tachometer Digital speedometer Plasmer Tropic Alarm Dangerous engine overheating Crash on-board network Exceeding the speed threshold Non-volatile memory
The BC is installed in a standard connector instead of a plug.
The X1-G state is connected to the standard diagnostic connector. No additional connection required.
The functions are distributed on both buttons, as in the photographs.
In diagnostic mode, if there is an error, its code is displayed on the display. A description of the error and possible malfunction can be found in the instructions for the bookmaker or download the program for the mobile application.
Transmission malfunctions
| Code | Description of the error |
| P0717 | In this case, the BC reports incorrect operation of the turbine speed control device. |
| P0706, P0705 | The on-board computer reports the absence of a signal or several simultaneous signals coming from the automatic transmission selector. |
| P0720 | A failure of the output signal speed control device has been registered. |
| P0973, P0974 | BK detected an open circuit or short circuit in the wiring of the gearbox on/off solenoid. |
| P0962, P0963 | The motorist is notified of an open circuit or incorrect signal coming from the transmission pressure control solenoid. |
New Lada: Which is better to choose, Lada Kalina 2 or Lada Granta
Basic device errors
Setting up such an on-board computer is not something extremely difficult; detailed instructions are always attached to it. If some points are not clear to you, you can always find a video of this process. At the same time, the device can also upset you with an error, despite the fact that there is not always time to look for instructions. Here's an example of a few common device errors you may encounter along the way:
- P0030, 0031, 0032. Errors in the oxygen sensor before the heater. In this case, the on-board computer checks for an open circuit, as well as a possible short circuit to the ground or to the on-board network, respectively;
- P0036, 0037, 0038. In this case, you will be signaled by a sensor located behind the heater. The description of the errors is similar to the previous ones;
- P0112.0113. Intake air temperature sensor signal. In this case, we are talking about too low or high signal, respectively;
- P0116, 0117, 0118. Alert from the coolant temperature sensor. The code signals either that the signal is out of range, or that the readings are too low or too high;
- P0122, 0123. In this case, throttle valve sensor No. 1 signals you, notifying you that the signal level is too high or low.
These and other errors must be indicated in the instructions, so try to always have it with you if you do not know them by heart (which is highly unlikely due to their large number). With the manual at hand, you can always determine which error code means what. Thanks to them, you can always quickly identify a particular malfunction in your car, quickly fix it and continue on your way with minimal delay.
Nowadays, it is very difficult to find a modern car that does not have a multifunctional on-board computer in its arsenal. Cars such as the Lada Granta have their own standard computer, but its performance is so poor that car owners change it almost immediately after purchasing the car. Now all that remains is to find out which device will ideally and aesthetically fit into the set of original innovations installed on the car.
Depending on the location of the device in the cabin, they can be divided into several types. So, the on-board computer can be installed:
- In place of the missing button on the instrument panel, removing the plug;
- In the niche under the instrument panel;
- Directly above the dashboard;
- Replace the factory instrument panel;
- Attach to windshield.
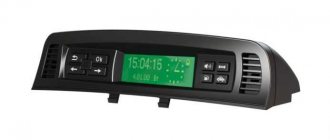
On-board computer STATE X1
Basically, all on-board computers suitable for the Lada Grant have in their list a fairly wide selection of options that satisfy the needs of even the most biased drivers. The only exception can be the BC STATE X1, which does not have such a range of functionality, but has all the basic characteristics inherent in an on-board computer. In addition, its price is not that high compared to more advanced models.
The most expensive gadgets of this kind are multifunctional dashboards, which include not only an on-board router, but also a stylized instrument cluster.
According to owner reviews, the priority model for Lada Granta is STATE X1, which includes:
- Basic diagnostic functions;
- Low cost compared to others;
- Easy to install.
But still, all the nuances of the purchase depend on what kind of router is ultimately needed. The choice is, of course, small, but quite sufficient to decide on the required set of functions.
EUR - electric power steering
If the EPS diagnostic light comes on or the EPS periodically turns off/on, you should first check the electric power steering through the diagnostic connector.
The same Open Diag application, together with a diagnostic OBD2 adapter, will help with this, or
other scanners: Scanmatic, ScanDoc, Motor-Master. The diagnostic process boils down to identifying errors, decoding them and further repairs according to the type of malfunction.
https://www.youtube.com/watch?v=MsOF8jO_lFc
The check can also be performed without a scanner, in this way:
- Under the steering wheel, near the ignition switch, you should find an 8-pin black connector. You will need to dismantle the casing at the steering column (unscrew the fastening screws from the bottom).
- Next, insert a paperclip and close the two contacts, as in the first photo at the beginning of the article. (these are contacts No. 6 and No. 7).
- Turn on the ignition and look at the control lamp.
- The first signal is a long lamp burning - “1”
- Next, we count the subsequent short signals, if there are 3 short ones then “3”.
- In our case, the result was code “13”.
Which company's on-board computer should I choose?
Car manufacturers do not produce such devices. The technology has been mastered by manufacturers of tuning electronics and spare parts.
Among them:
The Moscow enterprise produces not only on-board computers, but also diagnostic equipment. The production has been in existence for 30 years, there is an established dealer and service network. The buyer enjoys free after-sales support: only the software is updated 10 times a year.
2. Research and Production Enterprise "Orion SPB"
The company from St. Petersburg produces on-board computers without restrictions on the make of the car. You can always choose the right model from the compatibility catalog on the manufacturer’s website.
The company offers a series of on-board computers under the Prestige brand. It is preferable to use it on domestic cars, but there are also universal models. There is support for major protocols.
A company from the city of Tolyatti specializes in the production of BCs for GM AvtoVAZ cars. There is permission for installation on warranty vehicles. There are also universal models.
About energy consumption
The BC STATE model X1 G consumes 0.015 Amps when in standby mode. The rest of the time the current can reach 200 mA. In practice it is difficult to obtain a value exceeding 170-180 mA. For comparison:
- Good (expensive) signaling, standby mode - 10-15 mA;
- Conventional signaling with a key fob - 25 mA;
- Alarm in the “Disarmed” mode – 100-300 mA.
In general, our BC is quite “gluttonous”, but not as much as an alarm system.
Description and location of indicators and instruments on the panel
Designation of indicators on the dashboard First, let's look at the description; the Lada Granta instrument cluster, the diagram of which is shown above, includes the following components:
- Tachometer, this sensor allows you to find out what the crankshaft rotation speed is at the moment.
- Indicator of malfunctions in the operation of the internal combustion engine control system.
- Left turn signal.
- Engine fluid pressure sensor. If it lights up after starting the engine, you need to check the oil level in the unit; if it is too low, there may be a leakage problem.
- Anti-lock braking system indicator.
- Light bulb of the standard anti-theft system - immobilizer. This unit is designed to block the engine from starting in the event of unauthorized entry into the car.
- The antifreeze overheating indicator in the cooling system appears if the engine temperature reaches 115 degrees.
- A light that turns on if the control unit has detected an emergency condition of the brake system. As a rule, its appearance is due to a lack of brake fluid in the reservoir.
- Right turn signal.
- Low battery indicator.
- Speedometer, the needle of which corresponds to the speed limit at which the car is moving. The speed sensor, which displays this information on a scale, is mounted on the gearbox housing.
- Indicator for turning on the exchange rate control system.
- Upshift prohibition lamp (as a rule, not used).
- This indicator appears when the high beams are activated.
- Symbol for turning on the rear fog lights.
- Lamp for low beam lighting.
- Front fog light activation indicator.
- A button designed to reset the daily mileage.
- LCD screen that displays data about the last trip, in particular, mileage. Depending on the vehicle configuration, the data displayed on the screen may differ. In general, the display can display time, mileage, outside air temperature, on-board computer options, fuel volume, as well as information in the form of hints regarding gear shifting.
- Indicator of unlocked doors in the car.
- Symbol of reserve fuel remaining in the tank.
- This indicator appears when the tire pressure is insufficient.
- Signal lamp for EUR operation. If it lights up when the engine is running, then most likely there are problems with the electric power steering system.
- This symbol illuminates when the seat belts are not fastened.
- Engine fault indicator, in most cases not used.
- Airbag status symbol. It always appears after turning on the ignition, since the system is in testing mode. If it continues to light after starting the power unit, this may indicate a problem with the system, so you need to contact service. If this indicator is on, then in the event of an accident the airbag either will not deploy, or it may deploy at the wrong moment while driving, which could be even worse (author - Lada Granta Fan channel).
Diagnostics using a scanner
The method involves connecting an external computer with the program installed. This opens up more opportunities for car diagnostics. In this case, error codes for VAZ 2110 and VAZ 2112 consist of 5 characters.
- P – failure or malfunction of the power plant, transmission;
- B – body systems are damaged;
- C – a problem has been detected in the vehicle’s chassis;
- U – violation of pairing of different modules.
- 0 – general value;
- 1/2 – manufacturer code;
- 3 – reserve.
- 1-2 – violation in the air-fuel mixture supply devices;
- 3 – malfunction of the ignition units;
- 4 – atmospheric emissions control device;
- 5 – malfunction of the engine speed or engine speed meters;
- 6 – failures in electronics;
- 7-8 – malfunction of the gearbox module;
- 9-0 – reserve unit.
The last two digits give the serial number of the breakdown and its location.
How to install the device?
By purchasing the “State” controller model, the owner becomes able to install the device independently after purchasing the Lada Granta; detailed instructions will help with this. This eliminates concerns about loss of warranty service, since the Lada Granta panel is already equipped with the appropriate connector from the factory. After installing the controller, the entire list of electrical devices integrated into the panel is not damaged.
Installation is carried out after removing the factory plug in the designated place on the panel. This device with the attached wiring is installed inside the niche that appears. The end part of the controller cable is brought out to the location of the diagnostic block and connected to its connector. The diagnostic socket is located in the lower part near the passenger seat.
The on-board computer has gained popularity due to the presence of such important and balanced consumer qualities as:
- relatively low price;
- compact dimensions;
- ease and accessibility of installation for the vast majority of Grant owners.
Having decided to purchase this particular model, the owner of the Lada Granta ensures comfortable and safe operation of his “iron horse”.
Video instructions about the operating features of this controller will allow you to study this device in sufficient detail. But more than one “State” can be equipped with a LADA Granta panel. Among alternative products, you should consider the Multitronics model. Various versions of this device are endowed with versatility due to the possibility of their installation in the places of the car’s interior that the owner likes (windshield, panel, etc.).
Installing this option in the Din socket of the panel causes some difficulties due to the need for careful routing of the wiring to the place where the diagnostic block “habits”. For these purposes, it will be necessary to dismantle the dashboard to make technological holes for the wiring “route”. It is recommended to resort to these manipulations using a heated knife, which will avoid noticeable deformations of the panel. The wiring should be firmly fixed to the inner surface of the panel in order to prevent the noise it creates when moving. The case itself, which has a standard computer, is best attached to the panel using liquid nails.
After connecting the router cables to the diagnostic block connector, the device must be adapted to the network, which implies determining a complete list of on-board settings. If this process is not observed for some time, the firmware version should be changed in order to provide it with the ability to support protocols in the “CAN” format.
"Multitronics" - is it a universal alternative?
Thanks to the ability to be fixed in different places on the panel, the Multitronics on-board controller is able to act as a serious competitor to the State. Having a 32-bit processor in its arsenal, this device processes and displays information with enviable speed and clarity. This allows the car to be under the watchful control of the “pilot”, since the computer has the following convenient functions:
- a large number of protocols for diagnosing systems, including in advanced mode;
- the ability to transfer and save statistical data on the movement of a car to a medium on a personal computer;
- voice option;
- parking radars, etc.
The entire specified list of functionality that a standard computer has has been added to the optional list of “Multitronics”. The latter are favorably positioned due to the simplicity of setup manipulations and the ease of “communication” with the interface. This causes a higher cost for these devices compared to the price of a standard computer.
Initially, it was only possible to buy an on-board computer for the LADA Granta in the official sales network of AvtoVAZ.” Since sales of LADA Granta started in 2011, the devices discussed here were unavailable to consumers for some time. This fact caused a slight decrease in the popularity of the AvtoVAZ model.
But now the situation is radically different, since the availability of such a thing as an on-board computer for LADA Granta is unconditional. You can purchase the device both in the dealer network and from individual trading entities that sell auto products for this purpose.