1200 rub. for the photo report
We pay for photo reports on car repairs. Earnings from 10,000 rubles/month.
Write:
Malfunctions of vehicle electrical equipment are very common and occupy one of the leading places in the list of breakdowns. They can be roughly divided into faults of power sources (batteries, generators) and faults of consumers (optics, ignition, climate, etc.). The main sources of power for a vehicle are batteries and generators . The malfunction of each of them leads to a general malfunction of the car and its operation in abnormal modes, or even to immobilization of the car.
In the electrical equipment of a car, the battery and generator work in an inextricable tandem. If one fails, after a while the other will also fail. For example, a damaged battery leads to an increase in the charging current of the generator. And this entails a malfunction of the rectifier (diode bridge). In turn, if the voltage regulator supplied from the generator malfunctions, the charging current may increase, which will inevitably lead to systematic recharging of the battery, “boil-off” of the electrolyte and rapid destruction.
Common battery problems:
- short circuit of battery electrodes/plates;
- mechanical or chemical damage to the battery plates;
- violation of the tightness of battery cans - cracks in the battery case as a result of impacts or improper installation;
- chemical oxidation of the battery terminals. The main causes of these malfunctions are:
- gross violations of operating rules;
- expiration of the product's service life;
- various manufacturing defects.
It is very useful for a motorist to know the main causes of generator malfunctions , how to eliminate them, as well as preventive measures to prevent breakdowns.
All generators are divided into alternating and direct current generators. Modern passenger vehicles are equipped with alternating current generators with a built-in diode bridge (rectifier). The latter is necessary to convert current into direct current, on which the vehicle's electrical consumers operate. The rectifier, as a rule, is located in the cover or housing of the generator and is integral with the latter.
All electrical appliances of the car are designed for a strictly defined operating voltage range. As a rule, operating voltages are in the range of 13.8–14.7 V. Due to the fact that the generator is “tied” with a belt to the engine crankshaft, it will work differently . It is for smoothing and regulating the output current that the relay-voltage regulator is designed, playing the role of a stabilizer and preventing both surges and dips in the operating voltage. Modern generators are equipped with built-in integrated voltage regulators, colloquially referred to as “chocolate” or “tablet”.
It is already clear that any generator is a rather complex unit, extremely important for any car.
Types of generator faults
Due to the fact that any generator is an electromechanical device, there will be two types of faults - mechanical and electrical.
The first includes the destruction of fasteners, housing, malfunction of bearings, pressure springs, belt drive and other failures not related to the electrical part.
Electrical faults include winding breaks, diode bridge faults, brush burnout/wear, turn-to-turn short circuits, breakdowns, rotor beating, and relay-regulator faults.
Often, symptoms that indicate characteristics of a faulty generator can also appear as a result of completely different problems. As an example, poor contact in the fuse socket of the generator field winding circuit will indicate a generator malfunction. The same suspicion may arise due to burnt contacts in the ignition switch housing. Also, the constant lighting of the generator malfunction indicator lamp can be caused by a breakdown of the relay; the blinking of this switching lamp may indicate a generator malfunction.
The main signs of a faulty generator:
- When the engine is running, the battery discharge warning lamp flashes (or stays on continuously).
- Discharging or overcharging (boiling) of the battery.
- Dim car headlights, a rattling or quiet beep when the engine is running.
- Significant change in headlight brightness with increasing speed. This may be acceptable when increasing the speed (re-throttle) from idle, but the headlights, having lit up brightly, should not increase their brightness any further, remaining at the same intensity.
- Extraneous sounds (howling, squeaking) coming from the generator.
It is necessary to regularly monitor the tension and general condition of the drive belt. In case of cracks and delaminations, immediate replacement is necessary.
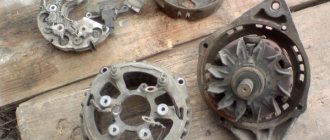
Generator repair kits
To eliminate these generator malfunctions, you will need to carry out repairs. When you start searching for a generator repair kit on the Internet, you should prepare for disappointment - the kits offered usually contain washers, bolts and nuts. And sometimes the generator can only be restored to functionality by replacing brushes, a diode bridge, a regulator... Therefore, the brave person who decides to repair it makes an individual repair kit from those parts that fit his generator. It looks something like this, as shown in the table below, using the example of a pair of generators for a VAZ 2110 and a Ford Focus 2.
| Generator KZATE 9402.3701-03 | ||
| Detail | Catalog number | Price, rub.) |
| Brushes | 1127014022 | 105 |
| Voltage regulator | 844.3702 | 580 |
| Diode bridge | BVO4-105-01 | 500 |
| Bearings | 6303 and 6203 | 345 |
Troubleshooting
On modern cars, using the “old-fashioned” diagnostic method by removing it from the battery terminal can lead to serious damage to many of the car’s electronic systems. Significant voltage drops in the vehicle's on-board network can damage almost all on-board electronics. That is why modern generators are always checked only by measuring the voltage in the network or diagnosing the removed unit itself on a special stand. First, the voltage at the battery terminals is measured, the engine is started, and readings are taken while the engine is running. Before starting, the voltage should be about 12 V, after starting - from 13.8 to 14.7 V. A deviation towards the higher side indicates that you are “overcharging”, which implies a malfunction of the relay regulator, towards a lower level - that no current is flowing. The absence of recharging current indicates a malfunction of the generator or circuits.
Causes of breakdowns
Common causes of generator malfunctions are simple wear and corrosion. Almost all mechanical failures, be it worn brushes or collapsed bearings, are a consequence of long-term use. Modern generators are equipped with sealed (non-maintenance) bearings, which simply must be replaced after a certain period or mileage of the vehicle. The same applies to the electrical part - often the entire components must be replaced.
Also reasons may be:
- low quality components;
- violation of operating rules or operation outside normal operating conditions;
- external factors (salt, liquids, high temperature, road chemicals, dirt).
Self-test of the generator
The easiest way is to check the fuse. If it is in good condition, the generator and its location are inspected. The free rotation of the rotor, the integrity of the belt, wires, and housing are checked. If nothing arouses suspicion, the brushes and slip rings are checked. During operation, the brushes inevitably wear out, they can become jammed, skewed, and the grooves of the slip rings become clogged with graphite dust. A clear sign of this is excessive sparking.
There are frequent cases of complete wear or failure of both bearings and stator failure.
The most common mechanical problem with a generator is bearing wear. A sign of this malfunction is a howling or whistling sound when the unit is operating. Of course, the bearings must be replaced immediately, after first inspecting the seats. Loose drive belt tension can also cause poor generator performance. One of the signs may be a high-pitched whistle from under the hood when the car accelerates or accelerates.
To check the rotor field winding for short-circuited turns or breaks, you need to connect a multimeter, switched to resistance measurement mode, to both contact rings of the generator. Normal resistance is from 1.8 to 5 ohms. The readings below indicate the presence of a short circuit in the turns; above – direct winding break.
To check the stator windings for ground fault, they need to be disconnected from the rectifier unit. If the resistance readings given by the multimeter are infinitely large, there is no doubt that there is no contact between the stator windings and the housing (“ground”).
To check the diodes in the rectifier block, use a multimeter (after completely disconnecting it from the stator windings). The test mode is “diode test”. The positive probe is connected to the plus or minus of the rectifier, and the negative probe is connected to the phase terminal. After this, the probes are swapped. If the values of the multimeter readings differ greatly from the previous ones, the diode is working; if they do not differ, it is faulty. Another sign indicating the imminent “death” of the generator diode bridge is oxidation of the contacts, and the reason for this is overheating of the radiator.
What generators can be installed on the “seven”
The design of the VAZ 2107 allows the installation of not only the G-221A generator. Therefore, if necessary, the driver can install a more efficient device, but in this case some changes will have to be made to the electrical circuit of the car. The question arises: why should a motorcyclist even change his “original” generator?
The G-221A was the optimal device for equipping cars at the beginning of mass production. However, a lot of time has passed since the 1980s, and today almost every motorist uses modern electronic devices:
- sound systems;
- navigation systems;
- additional lighting devices (tuning), etc.
Accordingly, the G-221A generator cannot cope with heavy loads, so drivers begin to look for more powerful units.
At least three more powerful units can be installed on the “seven”:
- G-222 (generator from Lada Niva);
- G-2108 (generator “eight”);
- G-2107-3701010 (Car injection model with carburetor).
It is important that the last two models do not require changes in the design of either the generator housing or its mountings. If you are installing a Niva generator, you will have to make some changes.
Video: principle of operation of the generator
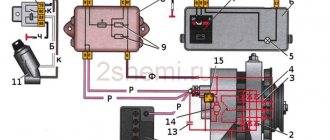
Connection diagram G-221A
As an electronic device, the generator must be used correctly. Accordingly, its connection diagram should not cause misunderstandings. It is worth noting that the “seven” drivers can easily connect all the generator terminals on their own, because the circuit is accessible and understandable to everyone.
Many car owners wonder where to connect which wire when replacing the generator. The fact is that the device has several connectors and wires, and when replacing it is easy to forget which wire goes where:
- The orange one is useless for wiring, you can leave it as is or connect it directly to the gray one to start automatically;
- a thick gray wire goes to the brushes from the voltage regulator;
- the gray thin wire goes to the relay;
- yellow wire - coordinate indicator lamp on the control panel.
Repair and troubleshooting
All mechanical problems are eliminated by replacing faulty components and parts (brushes, belt, bearings, etc.) with new or serviceable ones. Older generator models often require grinding of slip rings. Drive belts are replaced due to wear, maximum stretching or expiration of service life. Damaged rotor or stator windings are currently being replaced with new assembled ones. Although rewinding is common among auto repair services, it is becoming less and less common - it is expensive and impractical.
But all electrical problems with the generator need to be solved by checking both other elements of the circuit (in particular the battery), and directly its parts and output voltage. One of the common problems that car owners have to deal with is overcharging , or, conversely, low voltage of the generator . Checking and replacing the voltage regulator or diode bridge will help eliminate the first malfunction, but low voltage output will be a little more difficult to deal with. There may be several reasons why the generator produces low voltage:
- increased load on the on-board network by consumers;
- breakdown of one of the diodes on the diode bridge;
- failure of the voltage regulator;
- slipping of the poly V-belt (due to low tension)
- poor contact of the ground wire on the generator;
- short circuit;
- drained battery.
Without a properly charged battery, the machine cannot be operated. If you notice that there is no charging on your VAZ 2107, the problem must be repaired immediately. If you continue to use the car, especially at night, the battery will run out very quickly and you will have to use a tow truck or tow truck. To figure out why the battery is not charging and how to fix the problem, you need to start with theory.
Repair instructions for the unit of the seventh VAZ model
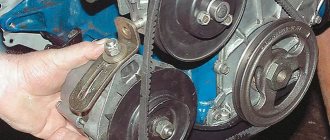
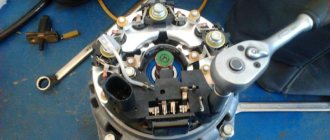
To solve the problem of overcharging, replacing a pulley, regulator or diode bridge, repairs are performed:
- First, the nut that secures the pulley itself is unscrewed; at this moment you need to hold the rotor so that it does not turn.
- The pulley must be moved to the side, the impeller is removed and the key with washers is removed. After dismantling the pulley, the regulator relay is disconnected; to do this, unscrew the fixing bolts in advance and also disconnect the block. The regulator is removed with the brush mechanism.
- After removing the regulator, unscrew the nuts securing the device cover. The cover is moved to the side, after which the sleeve is dismantled.
- Now you need to check the performance of the bearing. If you see that when you turn it, a gap appears, then change the element by unscrewing it with an 8-mm wrench. Of course, to replace it, you need to remove all the screws and fixing nuts.
- The next step will be to dismantle the rotor. As practice shows, performing this procedure without the use of auxiliary tools can be problematic. Therefore, immediately take two small bars and fix them at the edge of the back cover. Using a special drift (preferably made of soft metal), you need to knock out the rotor. If the cover is damaged during dismantling, you can try to process it using a grindstone.
- Check the rear bearing in the same way. If you need to replace the device, remove it from the rotor. It will be more convenient to use a puller for this.
- The next step will be to dismantle the diode bridge. To remove the diode bridge, it is necessary to unscrew the nuts securing the bridge block, as well as the terminals on the winding. Next, you can remove the stator mounting screws and dismantle the device. You need to carefully diagnose the integrity of the winding. If there is damage on it, for example, broken wiring or signs of burning, the winding is changed and rewound.
- Next, you need to remove another nut, after which the bridge can be removed without any problems.
- Use a screwdriver to unscrew the bolt securing the capacitor and pull out the element.
VAZ 2107 generator and reasons for lack of charging
To start the engine and proper operation of the ignition system and other electrical circuits of the VAZ 2107, it is necessary to have DC voltage in the on-board network. When the engine is not started, the battery maintains the proper voltage. After the engine starts, the car's generator charges the battery and maintains the on-board voltage at 13.6-14.2 V. Regardless of engine speed, the output voltage at the generator remains constant. A relay-regulator is responsible for this, which changes the voltage of the generator excitation circuit. If the voltage rises above the permissible level, the winding current decreases, reducing the output voltage. And vice versa.
Why does the charging system work poorly?
The battery is necessary primarily so that electrical appliances can function without the engine running. And when the engine is activated, the generator takes over control and management of the electrical equipment. This unit provides power:
- car injectors;
- fuel pump;
- electronic control system and many other elements.
But most of all, the generator provides recharge to the battery, the service life of which directly depends on whether the charging unit performs charging efficiently. Sometimes even a new generator is not able to cope with its main purpose. Why the unit provides weak recharge to the battery, and what should be understood if the warning lamp does not light, we will analyze further.
How to determine if the VAZ 2107 battery is not charging
The first sign of a lack of charging is a burning indicator lamp on the instrument panel or a voltmeter needle that is not in the green sector when the engine is running. A more reliable way is to check the voltage on the battery using the will src=»https://otvet.imgsmail.ru/download/605f56042e781e448a221a1f36f041e7_i-4.jpg» class=»aligncenter» width=»600″ height=»450″[/img ]
When the engine is running, the normal voltage on the battery is 13.9±0.3 V. When the battery is not charging, the voltage on it is approximately 12 V.
Important: to avoid failure of the regulator relay and the electronic engine control unit, it is prohibited to remove the battery terminals while checking the on-board voltage while the engine is running.
Low and high voltage of the on-board network harms the battery. In the first case, it is discharged, in the second, the electrolyte boils away, which leads to battery failure.
What is needed to repair VAZ 2107 battery charging
To identify and troubleshoot problems, the following devices and tools are needed:
- multimeter;
- control lamp 12 V;
- flat screwdriver;
- knife;
- pliers;
- sandpaper.
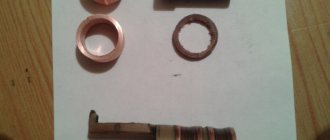
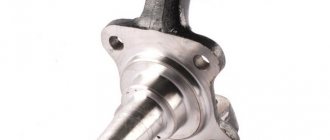
How to change a bearing
During generator repair, the bearing should be checked for play and replaced if necessary. There are two bearings on it: rear 6201 (article - 180201) - 12x32x10, front 6302 (article - 180302) - 15x42x13. For this:
- Remove terminal 30 (nut 6);
- Unscrew two screws and remove the voltage regulator;
- The pulley nut is dismantled;
- The key is removed;
- The bearing lining is dismantled;
- With the help of a device (or without), the old bearing is pressed out and a new one is installed;
- The retaining plate is secured.
Troubleshooting VAZ 2107 battery charging problem
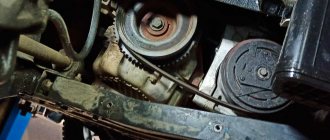
First, you should check the serviceability of the alternator belt - it is this that causes the alternator to rotate and generate current. This belt drives the coolant pump, so this malfunction also manifests itself in engine overheating.
If the charge indicator lamp does not light up, and the voltmeter shows normal voltage of the on-board network, and the battery does not charge, the reason is in the contacts at the terminals.
You should remove the wires from the battery and clean the battery terminals and wires with emery cloth. If the charge does not appear, it is necessary to measure the voltage at terminal “30” (generator output) with the engine running. If the voltage at this terminal and the battery is very different, you need to clean the contacts and ring the wire going from the generator to the battery. The faulty wire must be replaced.
If, when the engine is running, the voltage in the on-board network is within normal limits, but when a load (headlights) is connected, it drops, the reason lies in the weak tension of the alternator belt. As the load increases, the weakened belt slips. A correctly tensioned belt should bend by 12-17 mm with a force of 10 kgf. A loose belt must be tightened or replaced.
Important: if the belt is over-tensioned, excessive load occurs on the bearings of the generator and pump, which can lead to their failure.
Other reasons for the lack of charge may be a broken rectifier diode on the generator, an open or shorted rotor or stator winding.
Diodes can be checked using a multimeter or a test lamp. Using a multimeter, you can check the resistance of the diodes in the direction in which they should be locked. To check with a test lamp, you must remove the “+” terminals from the battery and connect the test lamp. The wire of the test lamp must be touched in succession to the three bolts of the rectifier devices. Then perform the same operation, only disconnecting the “-” terminal. If the lamp lights up, the diode being tested is broken.
If one of the diodes malfunctions, the diode rectifier assembly must be replaced.
A break in the stator winding is determined with a multimeter by measuring the resistance between the rectifier unit mounting bolts. Lack of contact between the winding and the other indicates its breakage. In this case, it is necessary to replace the winding or generator assembly.
A common cause of generator failure is brush wear. To check them, you need to dismantle the brush assembly. The length of the brushes must be more than 5 mm, otherwise they need to be replaced. Also, the brushes may become warped or “stick” in the wells. Therefore, it is necessary to check the condition of their side surface.
Note: the VAZ 2107 generator (carburetor) is no different from the unit for the injection version of the “Seven”. Therefore, all tips for checking and repairing the generator are relevant for both modifications of the car.
If the warning lamp does not light up and other devices do not work when the engine is running, and the battery is not charging, the reason is a blown fuse or a breakdown of the ignition switch (relay).
The reason for the lack of battery charging may be a breakdown of the relay regulator. To check it, you need to connect “+” from the battery to the top contact, and “-” to the left one and check the voltage on the brushes, which should be 12 V. If the voltage is lower, the relay regulator must be replaced.
There are two energy sources in a car. Battery and generator. Moreover, the generator is the main one, since it is able to charge the battery while driving. In the most extreme, desperate cases, battery energy can be used. According to various estimates, in the most optimistic case, you can drive about 100 km on a flat road on a battery. In this case, the headlights should not be turned on, the heater should not be turned off, and, preferably, the ambient temperature should be low and the speed should be constant so that the radiator fan does not turn on. And the battery will be fully charged. Only in this case all the energy will go into the “spark”.
If the VAZ 2107 engine (injector) is running and there is no battery charge, there may be many reasons.
Why does the charging system work poorly?
The battery is necessary primarily so that electrical appliances can function without the engine running. And when the engine is activated, the generator takes over control and management of the electrical equipment. This unit provides power:
- car injectors;
- fuel pump;
- electronic control system and many other elements.
But most of all, the generator provides recharge to the battery, the service life of which directly depends on whether the charging unit performs charging efficiently. Sometimes even a new generator is not able to cope with its main purpose. Why the unit provides weak recharge to the battery, and what should be understood if the warning lamp does not light, we will analyze further.
What reasons can cause the charging relay to fail?
Only two, not counting severe damage to the generator housing:
- “planned” wear of brushes, which are graphite electrodes. In this case, the contact is gradually broken and disappears completely. As a result, no current is supplied to the excitation winding of the generator, and it does not work;
- A short circuit has occurred in the electrical circuit itself, while there is an output current on the generator and battery, but it is higher than 14.8 V.
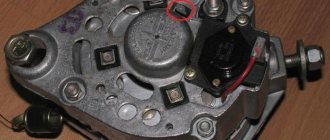
The charging relay is located on the generator, on its back cover, and, no matter what shape and color the “tablet” is, a yellow wire comes out of the generator body to it. The relay is located so that it can be replaced without removing the generator. But for convenience, the pictures show work on a removed generator.
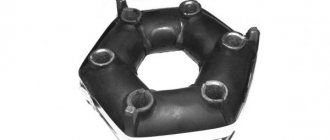
In what situations is replacement necessary?
Wear of the element is characterized by such manifestations as cracks or tears in the canvas, worn teeth and uneven edges. If you ignore such a deplorable state of a very important element, it will come back to haunt you with overheating and boiling of the engine, independent operation of the battery, which will lead to its rapid discharge.
If the belt is severely worn, it also shows signs of noise to the owner - it begins to whistle, especially at low speeds. The next reason for a whistling belt may be water getting on its surface, which occurs due to worn-out pipes of the cooling system - antifreeze begins to leak.
Some belts - oak ones - whistle when the car starts in frosty weather, and after warming up the sound is lost. A weak tension is expressed by a whistle, but in this case it is quite easy to overtighten.
how to remove the generator
from a
VAZ
of the traditional model range.
More details: 2107
.html Subscribe!
How to replace the charging relay?
- Important! First, as always, we turn off the ground, remove the negative wire from the battery terminal, then remove the yellow wire going from the generator to the relay, then use a Phillips screwdriver to unscrew it;
- Then we take it out together with the brushes:
- Now we need to carry out diagnostics. To do this, we test the voltage on the brushes with a voltmeter, and we power the relay itself from the battery, “simulating” the rectified current of the generator. At the same time, we apply (+) to terminal “B”, to the yellow wire, and connect (-) to the other terminal, “ground”. We are familiar with the signs of trouble. If you don’t have a tester, you can take a 1-3 W, 12 V light bulb.
- When installing a new relay, you need to press it firmly during installation, since new, unworn brushes provide more resistance.
If after taking these measures there is no effect, you need to look for the cause in the generator, we’ll talk about this next time. At the same time, remember that if you are removing a generator, then either you have decent knowledge in electrical engineering, or you have someone to give it to. There is no third option, especially if you have an injector.
In conclusion, let me tell you about several other reasons for the lack of charging or imitation, and also give advice:
- If you have a VAZ 2107 injector, then it is strictly not recommended to reset the battery terminal for various “checks” while the engine is running, and especially to allow strangers near the hood for this purpose. This is very harmful to electronic “brains”.
- It is advisable for those who like to “light up” to be able to say a firm “no” if you have a VAZ 2107 injector.
- On the instrument panel, the connectors are not soldered to the board, but riveted. Therefore, in some cars in the cold, while the interior is cold, there is no contact with the charging lamp. It lights up, simulating a lack of current from the generator. After the interior has warmed up, contact is restored and the lamp goes out.
- The next reason for those who like to go to the car wash in the cold. When water gets into the relay and brush assembly and freezes there, there is no charging. The solution is to heat it with any powerful hairdryer.