New generation Lada
The engine of any car, including the Lada Priora, is a rather complex unit, consisting of various mechanisms and systems. The stable operation of the engine is influenced by many factors, including temperature.
If the thermal conditions of the power unit are insufficient, this will affect the quality of formation of the fuel mixture in the cylinders. And when the thermal conditions are higher than required, this can lead to jamming of the cylinder-piston group, serious damage and lengthy and expensive repairs.
At what temperature should the fan on the Lada Priora operate?
Car : Lada Priora. Asks : Zhenya Bald. The essence of the question : what is the optimal temperature for turning on the engine fan?
I connected via elm to see the switch-on temperature, but I couldn’t find such data in it anywhere. I tried to watch it myself, the fan turns on at 98 degrees. It's kind of scary to drive like that.
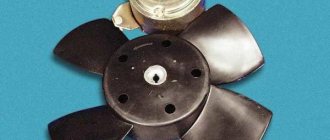
Fan nearby. I checked it by hand, it spins well, without vibrations or problems.
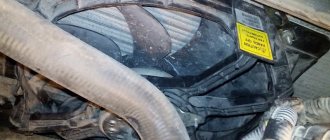
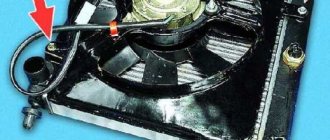
Where is it located?
The fan is located on the inside of the radiator between the engine and radiator. Bolted to the radiator housing. In luxury versions of the Lada Priora, a dual cooling radiator is installed, one for the engine cooling system, and the other for the car's air conditioning system. It should be noted that when the car reaches a critical temperature, these radiators begin to work in pairs and cool the engine more intensively.
Factory setting of fan temperature
The switch-on temperature depends on which ECU is installed and what settings are used in it. In stock, the first fan should turn on at 97 degrees , the second at 104 degrees .
A little more and the fan should turn on. Depends on the settings in the ECU.
We do not recommend the old-fashioned way of turning on the fan with a button.
Optimal temperature
After turning off the fan, the temperature should be at this level. If this is not the case, then look at the thermostat; most likely it circulates the liquid in a small circle.
The optimal temperature for turning on the cooling fan depends on the operating conditions of the vehicle. If the main mileage is on the highway, then the factory settings (universal) will be optimal. If you live in a “warm city” and often get stuck in traffic jams, then it is better to lower the switching temperature. It's calmer this way.
An internal combustion engine is a complex mechanism, in order to ensure smooth operation of which a number of conditions must be met. And the temperature regime is no exception. For example, if the temperature is insufficient, this will negatively affect the quality of the formation of the fuel mixture in the cylinders. If, on the contrary, the heating is too strong, then the cylinder-piston group may jam , which in turn leads to the need for lengthy and expensive repairs.
In some cases, the following happens: the fan does not start due to a loose terminal. It is enough to return it to its place, and the problem will be solved.
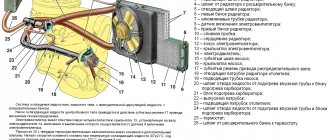
Radiator Inspection
Photo from the inside. We inspect for fluid leaks and strong dents.
Severely clogged cooling radiator.
If you have any more questions, you can leave them in the comments!
Source
Replacing elements
Structurally, the Lada Priora engine cooling system has a simple design. Therefore, we will consider replacing only individual components, with which certain difficulties are possible, especially for beginners.
Replacing the cooling system radiator
This unit on cars rarely changes. Typically, this procedure is necessary when a leak occurs that cannot be eliminated. Its service life can be 10 years or more. Cases when replacing the radiator are simply necessary are as follows:
- unprofessional repairs in the engine compartment, during which the radiator cooler tubes were damaged;
- damage as a result of an accident;
- Increased pressure in the system caused the leak.
Removing the old and installing a new radiator, as well as replacing antifreeze on a Priora with air conditioning, is somewhat more difficult. Therefore, to save time and nerves, it is better to entrust this matter to professionals. If there is no air conditioning, you can change the radiator yourself.
- Unscrew the drain plug at the bottom of the radiator and drain the antifreeze into a suitable container.
- Show all the pipes that go to the radiator.
- Unscrew the fastening nut from the top and right side.
- The fan can be left on the radiator; it can be removed at any time.
- Move the radiator towards the engine and lift it up, thereby removing it from the engine compartment.
If the fan remains on the radiator, you need to disconnect the terminal from it. Installation of a new radiator is carried out in the reverse order of removal. If necessary, you can change the antifreeze.
Replacing the thermostat
Another important element of the cooling system, which can be changed independently. This is done as follows.
- The car needs to be placed on a viewing hole, or at least hang the front part so that it is possible to crawl up from below.
- Unscrew the cap of the expansion tank.
- Remove the engine protection (if there is one) and unscrew the drain plug on the cylinder block from below (not visible from above).
- Before unscrewing the drain nut, you need to place a suitable container under it. Then you can unscrew the plug and drain the coolant. Work is carried out on a cooled engine, otherwise there is a high risk of getting burns.
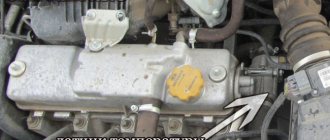
- Under the air filter to the right of the cylinder block you need to find the thermostat and, by loosening the clamp nuts, remove the pipes from it.
- Using a hexagon, unscrew the thermostat fasteners and remove it.
Before installing a new thermostat, you should pay attention to the rubber seal where it is attached to the block. To improve the tightness, it is necessary to coat it with a silicone gasket sealant. Next, all that remains is to install a new thermostat, connect all the pipes and fill in the coolant. After this, you need to start the engine and warm it up to 90 degrees, then inspect the thermostat and pipes for leaks. If necessary, you need to add antifreeze and remove the air lock, if any.
At what temperature does the fan on the Priora turn on: important features of the thermal regime
The engine of any car, including the Lada Priora, is a rather complex unit consisting of various mechanisms and systems. The stable operation of the engine is influenced by many factors, including temperature.
If the thermal conditions of the power unit are insufficient, this will affect the quality of formation of the fuel mixture in the cylinders. And when the thermal conditions are higher than required, this can lead to jamming of the cylinder-piston group, serious damage and lengthy and expensive repairs.
Priora knock sensor
A knock sensor is a device that detects the knock levels of internal combustion engine processes. The installation location of such a device is the cylinder block. Maintaining it makes it possible to obtain high power, as well as achieve good fuel economy without causing damage to the engine.
The detonation process is the main defect of an internal combustion engine, since the force is considerable and it is impossible to ignore it. Among several different devices that are used as performance optimizations, the knock sensor is used to prevent knocking fuel combustions. Fuel detonation can be controlled thanks to the main indicator - the manifestation of high-pitched and ringing metallic sounds, which, according to indicators, are sometimes mistaken for the clicking sounds of the cylinder-piston group. If the process is strong enough, with faulty knock prevention systems the engine begins to fail.
The principle of operation of the cooling system
The main task of the cooling system is to ensure optimal temperature conditions for the Priora engine. The vehicle is equipped with a system with forced circulation of coolant. Its main element is the cooling jacket through which the liquid circulates.
To maintain the integrity of the shirt, you should constantly monitor:
If its amount is too low, the system will not be able to properly maintain the thermal regime of the power plant, and it will overheat. Antifreeze heavily diluted with water will not have adequate frost resistance, and in winter the shirt may freeze.
Another important element of the system is the liquid pump. The purpose of the pump is to ensure the circulation of Antifreeze throughout the system. The Priora pump is belt driven from the crankshaft. The condition of the pump also needs to be constantly monitored. If the bearing in it starts to fail, it will jam. The result of wedging will be:
This, in turn, will damage the gas distribution mechanism.
Until the engine reaches the desired temperature, the liquid circulates in a small circle, that is, it moves only along the jacket. When the temperature approaches normal, the liquid will begin to move in a large circle. In addition to the cooling jacket, it also includes a radiator with a fan installed on it. The cooler starts working only when the liquid temperature begins to exceed the permissible limit. For monitoring, a temperature sensor is built into the cooling jacket, also known as a fan switch on sensor.
The thermostat is responsible for which circle the Tosol moves in. Incorrect operation of the thermostat or its jamming will either lead to overheating of the unit or to the fact that it will not be able to reach the optimal thermal conditions.
This system works on a Priora like this: while the power plant is cold, the thermostat is in a position that blocks the channel going to the radiator. The liquid, thanks to the pump, circulates through the cooling jacket. As it warms up, the thermostat begins to open the channel slightly, and liquid begins to flow into the radiator to reduce the temperature of the liquid itself.
In the summer, when idling in a traffic jam, the air flow passing through the radiator is insufficient, and the temperature continues to rise. The fan switch-on sensor monitors this indicator, and if it begins to exceed the permissible limit, it turns on forced cooling of the radiator, which additionally creates an air flow to ensure cooling of the Antifreeze.
Modernization
If you want to improve the operation of your radiator fan on the VAZ 2109, we offer the appropriate instructions.
To upgrade, you will need to install a second sensor and modify the system somewhat.
- The standard power sensor will be responsible for the operation of the fan at maximum speed.
- An additional sensor will include a reduced speed. It is installed at the top of the cooling system.
Now let’s talk more specifically about how to organize all this.
- Take a temperature sensor whose response temperature is similar to the standard regulator.
- Install it in the upper pipe fitting to the radiator.
- To mount the element, you will need a pair of washers and a nut. Be sure to lubricate the washer with sealant to prevent leakage from the installation hole.
- Buy a resistor to install on the stove fan. It has several outputs, so if desired, you can make several operating speeds.
- It is necessary to make an additional control circuit. Through it, less voltage will be supplied to the motor winding.
- The temperature sensor located in the upper part of the cooling system is responsible for turning it on.
- It is better to do control not by plus, but by weight.
- The system will work through a button in the cabin. To the left of the dashboard there is a grille with two plugs. Cut out one of them and set it to turn off on two modes. You can take the heater switch from a VAZ 2107.
- In the first position the low frequency will be switched on, and in the second – the maximum speed.
- One common wire is fed to the minus.
Such modernization is not provided for by the design of the VAZ 2109. These are modifications made by car enthusiasts. Therefore, installing a second sensor is entirely your personal responsibility.
The fan is an important component of the cooling system of VAZ 2109 injection and carburetor engines. If you wish and have time, you can easily replace or repair it yourself.
For owners of classic cars it becomes one of the important problems. In addition to various nuances that lead to overheating, a non-working radiator fan
almost always, on a hot day, it causes boiling. Why it may not turn on and how to find the reason, you can learn more about this in this publication.
Thermostat malfunction
You should also keep an eye on the thermostat. If it does not work as expected, the power unit will not be able to establish the optimal warm mode. To check the functionality of the thermostat, proceed as follows:
Action
If the pipe heats up much earlier, most likely the thermostat is stuck in the position where the Antifreeze is circulating in a large circle. The thermostat is an element that cannot be repaired; it is simply replaced.
Source
Engine disassembly and repair
Repairs are carried out according to the standard procedure - we find faulty parts and replace them with working ones. The instructions below describe the process of disassembling the unit itself; before that, you need to dismantle it from the Lada Priora and thoroughly clean it of grease and dirt.
From the tools we will need regular and ring wrenches, a ratchet with an extension, screwdrivers, a pry bar and a stand. It is best to carry out repairs in a garage with good lighting.
Instructions
- Using the 13th key, remove the bracket fastenings. 4 nuts hold the front cylinder block support;
- We remove the bracket and move on to the left support - it is removed in exactly the same way;
Why do you need to adjust the fan temperature?
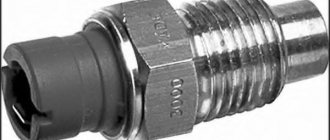
In addition to the not-so-thought-out fan response system to temperature changes, we also get a noisy electric motor that will drown out the music, and in addition the incorrect behavior of the coolant temperature control sensor. We looked into how the temperature sensor works and how it drives the electric fan on 16-valve Priora and VAZ 2110 engines not long ago.
Standard temperature sensor VAZ 2110
Moreover, the firmware of the electronic engine control unit also does not always work correctly, so diagnosticians persistently invite those who are dissatisfied with the operation of the fan to re-flash it. And yet the biggest problem with turning on the fan is that it does not have several operating modes, but throws everything out at once. Naturally, this leads to a sharp drop in voltage in the on-board network, and if it is heavily loaded with additional equipment, then this does not lead to anything good. That is, the fan on VAZ 21126 engines has a number of problems:
there are no additional operating modes, the motor always works at full strength;
excessive fan performance is good in traffic jams and in hellish heat, but not in normal engine operating modes;
the electric motor makes a lot of noise and nothing can be done about it;
the on-board network can be heavily overloaded with current at the moment the electric motor starts;
in many cases, the starting temperature of the fan does not correspond to the operating conditions and many would like to shift the lower temperature threshold another 5-7 degrees lower to avoid engine overheating.
Based on this, many people think about how to adjust the temperature at which the fan turns on.
Main types of breakdowns
There are two fairly common malfunctions: When the cooling fan of the priors does not turn on at the required moment. The device constantly works, despite the low heating of the internal combustion engine. In the first situation, we can talk about technical breakdowns of the device itself or the failure of a fuse or relay. In the second case, we can most likely say that the cause of this behavior is a faulty temperature sensor.
Identifying the causes of problems and eliminating them The reasons that contribute to the improper operation of the node are:
- Failure of the cooling fan relay. This problem is diagnosed by simply replacing a faulty part with a known working one.
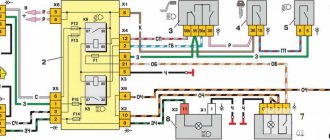
- The second fairly common reason is problems associated with the electric motor itself. If it malfunctions, the rotor stops rotating the impeller. The functionality of the node can be easily checked. Using two wires, it must be directly connected directly to the battery. If the blades do not spin, then the element must be replaced or repaired. To carry out technical work and in-depth diagnostics of the electric motor, it is best to use the diagram.
- The third reason is the temperature sensor. Its breakdowns and improper operation are a fairly common occurrence. Determine the malfunction using the following method. Disconnect the two contact wires from the sensor and connect them together. If the electric drive starts to spin up, this indicates that the sensor has a malfunction.
- Damage or disturbance in the power circuit. In this case, we are talking about a banal wiring break, lack of ground. It is recommended to use a multimeter for diagnostics.
- Malfunction related to the operation of the thermostat.
- Oxidation and damage to the contact chip connected directly to the fan. In this situation, it is necessary to carefully inspect the connector junction and its contacts. If signs of oxidation are detected, clean them.
- The fuse for the Priora cooling fan has blown. Its burnout occurs as a result of high voltage supplied through the on-board network. Replacement is easy and does not cause effort or material costs.
How to change the fan operating mode on Priora and VAZ 2110 16 cl.
Fortunately, we have several options. The most common is flashing the ECM. However, competent work with controller software is the lot of experienced and intelligent diagnosticians, who are worth their weight in gold. You can easily ruin the ECU by inept flashing, and then in the worst case scenario you have to shell out a tidy sum for a new controller. But the problem remains. Therefore, many drivers try to solve the issue of adjusting the temperature of the fan on the VAZ 2110 and Priora using other methods.
How much does engine No. 126 cost?
As it turns out, buying a new 16-valve unit for a Lada Priora is an expensive proposition. Today you can purchase a 16 valve 1.6 liter EURO-3 and EURO-4 engine. The first option costs approximately 102 thousand rubles, and the second – 103 thousand. Motorists are also interested in how much it costs to purchase a used Lada unit. Used ones can be purchased even for 20 thousand rubles. But you can find out what condition this unit is in only after a complete disassembly or a trip to a car service center. The average price for a used one is 50-60 thousand rubles.