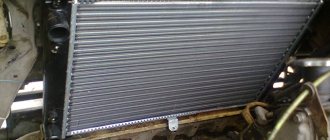
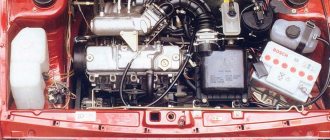
Cooling radiator
As a rule, a modern car, be it a domestic model such as the VAZ 2109 or a foreign car, is a complex system of parts interconnected with each other. If even one link in the chain breaks, it will ultimately lead to the breakdown of others. A car is like a living organism, and for a VAZ 2109, replacing a cooling radiator is a process that will help save not only some parts, but also the engine itself, because a faulty radiator will not cool it properly. Replacing the VAZ 2109 cooling radiator is a mandatory job that you can easily do with your own hands.
What is a car radiator and what is it used for?
A radiator is a part that cools all engine components that heat up during its operation.
The radiator is designed to change the temperature of the heated coolant by air flow. After all, we know well that if the engine does not operate at an optimal temperature, it will simply overheat, boil and fail. Then you will have a lot of trouble on your head. Let's briefly explore the principle of its operation, for a clearer picture.
Heated liquid (antifreeze) passes through the radiator tubes, which is cooled by air flow. Therefore, this important cooling part is installed in its intended place, which is located in the front of the car body, immediately behind the radiator grille, from where the air flow appears when driving. Thus, this very liquid passes through the “honeycomb” of the radiator and cools the heart of the car to its optimal temperature.
Replacing the radiator VAZ 2108, 2109, 21099
≡ 4 November 2015 Category: Repair
The radiator should be replaced if its seal is lost, because sealing is not always effective. Replacing the radiator should begin by draining the coolant. It is better to do this on a cooled engine. There is no need to drain all the liquid; we drain it directly from the radiator. It is more convenient to remove the radiator itself together with the electric fan, and then disconnect it.
We start by using the “8” key to unscrew the engine protection, if any, from the side of the radiator drain plug.
If there is no drain valve, but there is a valve, then in order to drain the coolant without losses, spills, etc., you need to unscrew it with the expansion tank cap closed. First, you need to equalize the pressure in the cooling system to atmospheric pressure by opening the reservoir cap.
ATTENTION: DO NOT PERFORM WORK ON A HOT ENGINE! There is a risk of liquid splashing out and causing burns!
We place a container under the drain where the coolant will be drained. With the lid closed...
unscrew the valve...
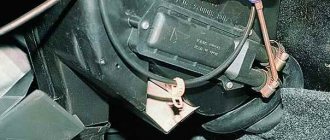
By slightly opening and closing the expansion tank cap, we adjust this pressure. Next, unscrew the screws securing the air filter housing:
and air hose clamp:
Unplug the mass air flow sensor connector and remove the air filter housing,
while opening access to that part of the radiator where the pipes and steam exhaust hose are located:
We begin removing the radiator. Using the “8” head, unscrew the two nuts securing the pressure plate...
... and remove it.
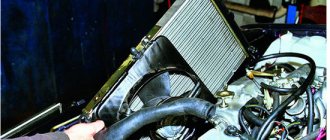
Having tilted the radiator towards the engine, loosen the clamps on the radiator inlet pipe and steam exhaust hose.
The symbols in the figure are as follows: 1. Steam hose 2. Inlet pipe 3. Inlet pipe clamp 4. Steam hose clamp
We also loosen the clamp of the outlet pipe located at the bottom of the radiator:
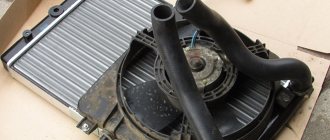
Disconnect the hoses and fan connector. We take out the radiator along with the fan and remove the fan. To do this, use the key “to 8”
unscrew the two nuts and two bolts securing the radiator.
We move the fan to the new radiator:
Let's put everything back together in reverse order. At the bottom, the radiator rests on two rubber pads,
which during assembly should fit into the holes of the cross member. We put the pipes on the radiator fittings and tighten the clamps. We screw on the radiator and air filter. Fill the coolant to the maximum. When filling, to reduce the formation of vapor locks inside the cooling system, it is necessary to remove the hose from the fitting of the throttle assembly:
We start the engine and check for leaks. After a while, check the coolant level; it may drop slightly. This indicates that all vapor formation and air pockets have disappeared. If necessary, coolant must be added.
Please rate the article
( 20 votes, average rating: 4.65 out of 5)
There were 10 comments left on the entry “Replacing the radiator of VAZ 2108, 2109, 21099”.
- Sergey:
09.12.2013 at 18:30
It’s detailed and clear, but the second half of the article without photos is a minus.
Answer
- Sanya:
12/21/2013 at 18:30
Thank you, everything is clear - now I’ll go to the store to buy a radiator.
Answer
- Stas:
05/16/2014 at 18:30
Tell me, who has encountered such a problem? The radiator drain valve broke off at 15k, i.e. half remained in it, and half in the hand). Is it really possible to get the thread out of there?
Answer
- Anatoly:
10/16/2016 at 16:47
This is a two year old question, but it might be useful to someone. You drill a 4-5 mm hole and use a square or a screwdriver (sharp edges are needed) into this hole and unscrew it.
Answer
- Paul:
06/07/2014 at 18:31
To avoid loss of antifreeze (antifreeze), you can use a hose that fits the diameter of the drain hole... and voila! Not a bit missed)
Answer
- Paul:
06/07/2014 at 18:31
I almost forgot, the expansion tank cap should be where it’s supposed to be, without any extraneous mechanical actions aimed at any change in its spatial location.
Answer
- Alexander:
09.21.2014 at 18:31
Everything is clear, thanks for the article. Remove the hose from the throttle body fitting and pour coolant. until it starts pouring out?
Answer
- Ivan:
09.21.2014 at 18:32
Alexander, no, it shouldn’t flow - the hose is above the level of the filler neck (or approximately at the same level). Coolant should be poured until the maximum level is reached.
Answer
- Alexander:
01/07/2015 at 18:32
Don't forget to turn off the "mass". We disconnect the “negative” terminal of the battery, and then go as described above!!!
Answer
- Georgy:
03/04/2015 at 18:32
Article on the case. My features: I could not disconnect the power connector from the fan. I was forced to unscrew the fan on the car and remove the radiator without the fan, which is not good.
Answer
Leave your comment
Click to cancel reply.
Types of radiators
Radiators differ in case material, its quality and assembly method:
- Prefabricated . The very first and cheapest cooling elements that used a mechanical method, where the components were connected mechanically. No expensive material was used and the work was not particularly difficult.
- Brazed copper . The more expensive analogue of the previous type of spare part is practically no different in operation, but it is many times better quality and stronger than the prefabricated one. The main advantages of this type of radiator are good heat conductivity and the possibility of its repair: damaged areas can be soldered and used further. The price ranges from 1000 to 3000 rubles .
- Aluminum welded . It has a one-piece body and design where the latest welding methods are used. They are the most reliable and durable compared to other types. The obvious disadvantage of an aluminum radiator lies in its material, because, as you know, aluminum is not the best heat conductor, but has better heat transfer. And they cope with this by increasing the area of the radiator itself. The price is almost no different from the price of an aluminum radiator.
How it works
The operating principle of the cooling system (CO) is as follows:
- The pump drive operates from the timing belt;
- The system has a volume of 7.8 liters, if you take into account the stove;
- The temperature is controlled by a sensor installed in the cylinder block jacket. Temperature readings are displayed on the instrument panel;
- When the engine is running, liquid from the jacket passes into the radiator (heat is removed there) or into the thermostat (work on a small circuit necessary to warm up the engine);
- Then the cooling liquid, using a pump, passes into the cooling jacket of the engine (injection);
- Due to the pipelines, coolant circulates through the system;
- CO uses a centrifugal pump;
- The radiator is a tubular-plate, dismountable, equipped with a plastic expansion tank;
- Inside, the radiator has aluminum tubes and cooling fins, but there is no filler hole;
- An expansion tank is used to fill and top up coolant. The fan switch sensor is also located there;
- The tank is equipped with a filler neck, inlet and outlet valve;
- To drain coolant from the system, you need to unscrew the drain plugs on the tank, radiator and cylinder block.
If you understand in detail the components of the cooling system and their functions and features, you will be able to carry out repair and maintenance work without outside help, change the radiator or individual components of the coolant.
What does the price depend on?
First of all, you need to know that the cost of a radiator depends on the material from which it is made. But that's not all! Since the price also varies depending on the brand and country of manufacture . You need to know this because the types of car radiators depend on the type of engine and battery power.
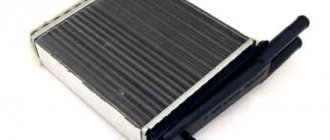
Basically, copper radiators for a car are suitable if heating of the interior is also necessary. This will serve you for a comfortable ride. And aluminum ones have less weight and the possibility of its repair, as mentioned above.
Only high quality will allow you to use your iron horse comfortably and without problems without the risk of harming other parts, because their breakdown is a great inconvenience not only for your car, but also for you. Therefore, you need to buy a quality product with a guarantee.
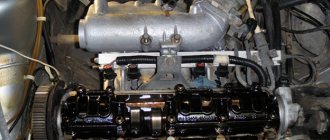
Main design features
- At the bottom of the radiator there are pins into which rubber inserts are installed. These inserts are responsible for shock absorption of the radiator while the vehicle is moving.
Radiator mounting in VAZ 21093
- There is a threaded pipe in the lower part; a plug is screwed into it to drain the brake fluid.
- If you look at the front surface of the radiator, in the right middle part there is a place for installing a fan switch sensor.
- In the upper part there are two cylindrical protrusions for connecting rubber pipes.
- There is one protrusion at the bottom.
Radiator mounting for VAZ 2109
Radiators are made of aluminum or copper alloys. Since such alloys are less susceptible to oxidation in interaction with heated liquids. So:
- On the front of the vaz body there is a spacer transverse channel. It has holes for installing rubber inserts. They are inserted into the spacer there.
Note: Therefore, before installation, they must be soaked in soapy water.
- The inserts must be inserted carefully so as not to disturb the structure of the rubber. Since the edges of the channel have sharp surfaces.
- On the installed inserts, carefully place the radiator on the pins with an angle towards the engine.
Radiator mounting VAZ 21093
- After this, the top of the radiator tilts towards the front decorative grille.
- Under the upper transverse channel there are two studs that are welded to the body.
- A metal spacer bar is screwed onto them.
- This strip secures the top of the radiator.
Note: a rubber gasket is first placed under the bar.
- Secure the top of the radiator with two nuts.
This method provides for mounting the radiator of the engine cooling system.
Examples of prices for a part and its installation
Let's look at examples of prices for the part itself and for its installation.
As is already known earlier, a car radiator for a VAZ 2109 costs from 1,500 to 3,000 rubles . The installation itself can cost 200-600 rubles , it depends on the service where you have your car repaired and on the services provided by the service.
Obviously, the price of a radiator for a “higher class” car will itself be higher.
For example, a radiator on a Mercedes-Benz A-class will no longer cost 1,500-3,000 rubles, but 4,000-10,000 rubles , and its installation will be a more fragile task and will require more time and effort; accordingly, it will take money to install, perhaps even 2 times more than “nine”.
Progress:
- Remove the lower console, which goes from the interior heating control levers to the gearbox housing.
- Move both front seats as far back as possible. If, in addition to the heater radiator, you also want to replace the faucet, then you will need to remove the plastic trim from the thresholds and lift up the carpet.
- File the magazine shelf under the glove compartment on one side; you can screw it back using self-tapping screws.
- After which you will see that you can easily remove the part into the resulting gap without any problems.
- Turn off the heater tap and prepare plugs that you will use as plugs and a container for the remaining coolant to prevent the remaining antifreeze that has accumulated in the radiator itself from spilling.
- Unscrew three bolts on each side of the radiator.
- Loosen only those clamps that fit directly to the radiator, but do not tighten them.
- Now the hardest part is that you need to drain the remaining antifreeze from the radiator. To prevent coolant from spilling on the floor, place waterproof mats or an old cloth under the faucet, at the front passenger's feet, and under the radiator.
- Pull off the pipes from the radiator, the first one to remove is the bottom one, which is located below on the tap; it is closed. Place a container and drain the coolant from the radiator. Keep the cork ready. About a liter of liquid may leak out. You may need to drain the liquid several times, so you will most likely have to plug the pipe with a plug.
- Remove the outlet pipe from the radiator, but do not lower it down, as coolant may pour out of it, keep it at the level of the attachment to the radiator. There is no need to drain the liquid, just plug the pipe with a plug.
- Now you can pull out the radiator itself.
- Replace it with a new one.
- Plug in the top outlet pipe.
- Then the bottom one.
- Tighten the clamps.
- If necessary, remove the air lock.
Determining faults
We identify a radiator malfunction. The first sign of a malfunction is frequent spilling of antifreeze into the tank. In this situation, it is impossible to say with certainty that the problem is in the radiator. The culprit may be the pipes or tap of the heating system. To isolate the version with a tap, just check the car interior for an unpleasant odor and antifreeze drops on the floor covering. If they are not there, then it is definitely not a faucet. To determine the condition of the injectors, enter them for visual inspection. This way you will know whether they will lose or not.
If there are no problems as such, the problem is in the radiator. The problem needs to be solved quickly enough, as antifreeze can get into the living room and ruin the carpet.