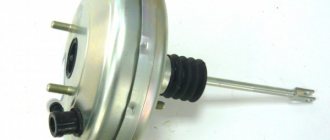
The vacuum brake booster of the fourteenth is a casing with a valve inside. It is divided into two parts by a rubber layer - a diaphragm - one part is atmospheric, and the second represents the vacuum space, which is connected to the intake pipe from the engine.
Vacuum booster
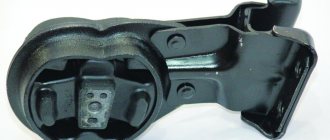
The amplifier valve is a plastic casing that contains the main parts that are subject to wear and cause trouble for the driver in the form of gearbox rattling. The composition is as follows: on the support bushing there is a rod, which is adjacent to the piston and its own buffer. Actually, the valve itself is on its pusher and return springs along with the filter.
The vacuum booster functions as follows: you press the brake to the floor, at this time the piston and valve pusher move in such a way that this opens the space between the two compartments of the unit. Then, a vacuum compartment moves into this space and takes in air. Air presses on the damper between the two parts of the amplifier, creating different levels of pressure in one and the other part. Due to this difference, the valve itself and the rod move, respectively. By lowering the pedal, all parts return to their places, the system ceases to function.
As with all parts of the system of any car, repair of the vacuum brake booster is inevitable. In order to decide on the repair work - whether it will be a DIY garage repair or whether you should go to a service center - you must first determine the signs of a malfunction in the VAZ 2114 vacuum brake booster.
How to check the vacuum booster?
The first cause for concern will be tight pedal pressure and poor brake performance. At idle, when you press the brake pedal, does the engine speed drop or increase? Most likely, the fault lies in the VUT.
There are several ways for self-diagnosis:
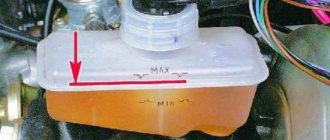
- It is necessary to turn off the engine, start pressing the brake pedal (5-6 times), then fix it in the pressed state. We start the engine and at this moment the pedal should go down 2-3 cm and remain in that position. If it goes to the floor, then the vacuum seal is faulty.
- The engine should run for 2-3 minutes after starting. Then turn off the car and press the brake 3 times. If the pedal is soft on the 3rd press, then the VUT is faulty and there is an air leak somewhere.
- With the engine running, press the brake pedal all the way and hold it. After turning off the engine, keep it for about 1 more minute; if the pedal does not begin to press on your foot in an attempt to rise up, then the VUT is operational. Also, when pressed there should be no hissing sounds of air.
Useful : Replacing brake fluid on a VAZ 2114
When you have carried out diagnostics and discovered one of the listed reasons, it is better to immediately engage in repairs. At some point, due to a malfunction, you may have too tight a brake or lose it completely, and you won't be able to maneuver quickly when you need to. Thus, you can create an emergency situation or harm someone.
Functionality check
This instruction will be relevant when checking the vacuum booster on VAZ models from 2113 to 2115. So the technique is clearly universal.
- Press the brake pedal all the way to the floor about 4-5 times. In this case, the engine should not be started. Due to these presses, you will create equal pressure in two sections of your vacuum booster. The valve will report problems as soon as you start pressing the pedal. If you hear squeaks while pressing, this indicates a serious malfunction.
- Once the pressure is even, start the engine while keeping the brake pedal to the floor. If the brake booster system is working properly, then the pedal will rise by itself after the engine is started. If this does not happen, then you will definitely have to face repair work.
- If the check shows problems with the amplifier, do not forget to additionally check the quality of the hose fastening and the condition of the flange. When the mount is abnormal, this may result in the brake pedal not lifting.
We recommend: How to properly bleed the brakes of a car with ABS?
Sometimes poorly fixed fasteners cause quite expensive and actually unnecessary repairs or replacement of the vacuum booster. Conduct a preliminary check so as not to complicate your life.
When to change the amplifier
Brakes are a whole system that consists of many elements. Each of them must function correctly and efficiently.
In addition to checking the vacuum booster itself, you should inspect the condition of the brake fluid pipes, make sure there are no brake fluid leaks, and look at the current condition of the brake pedal.
If no faults were found in the braking system, you can think in more detail about the issue of replacing the vacuum booster.
There is no point in repairing the element. It's easier to start replacing right away. The functionality of the car and the power that your engine is capable of producing depend on the quality and timeliness of the work performed. Lack of power negatively affects the speed and comfort of movement around the city and beyond.
Replacement
To replace a vacuum booster you will need a certain set of tools and materials. It includes:
- Screwdriver Set;
- Pliers;
- Socket wrench for 13 and 17 millimeters;
- Special wrench for brake pipes;
- New plugs;
- New fittings.
Replacement procedure
Let's get straight to work.
- Removing the vacuum booster can be difficult due to the brake cylinder. Therefore, we advise you to remove it first. Another option is to disconnect the pipes from the brake cylinder and move them to the side for a while. Here you decide for yourself what is more convenient for you.
- The cylinder is not the main problem. It is difficult to cope with the mounting of the vacuum booster. It's just not very convenient to do this. This is the design of the VAZ 2114.
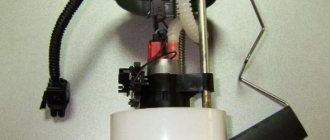
- Start with the valve - remove the hose fasteners from it, remove the support bush, after which you can pull out the brake pin.
- Next, using a 13 mm wrench, all four fasteners of the vacuum booster are dismantled.
- After all the inconveniences of the work done, you can remove the element and get ready to install a new amplifier in its place.
- To do this, you will have to install a special mounting frame. The frame is tightened with a 17 mm wrench, after which the new component is installed inside the car.
- If you want to make your work as easy as possible, do not forget to first connect the brake pedal to the booster with your finger when reassembling it. After this, it is much easier to cope with putting the vacuum seal back into place.
When replacing the vacuum booster, be sure to change the old vacuum hose at the same time. This element is far from eternal, therefore, as it wears out, it will negatively affect the quality and efficiency of the new vacuum seal.
Necessary tool
If you decide to do the repairs yourself, it is better to approach the process carefully. Collect all the necessary tools from the list:
- Screwdriver Set;
- Pliers;
- Collar;
- Extension;
- Kardanchik;
- Socket head 13;
- Open-end wrench for 10 and 13.
In addition, you should keep a container of brake fluid on hand. You may need to top it up after installing a new part. Also choose a suitable place for repairs; it is best to do this indoors, where weather conditions will not interfere with you. Let's look at the question “how to replace the vacuum booster on a VAZ 2114.”
Also check out
- How to replace the cabin filter of a Lada Priora with your own hands
- How to replace a VAZ 2110 timing belt and tension roller at home
- Oxygen sensor. Checking the VAZ lambda probe
- Unscrew the brake cylinder (TC) from the VUT.
Replacing VUT VAZ 2114 on your own
- It is often recommended to disconnect the tubes that complicate the process of removing the VUT, but you can do without this.
- Three of the four tubes coming from the brake cylinder make it difficult to remove the cylinder. To dismantle the cylinder, you can unscrew only one nut to “10”.
How to change the vacuum booster of a VAZ 2114
- Disconnect the hose that goes from the intake manifold to the vacuum booster valve.
Changing the vacuum booster VAZ 2114
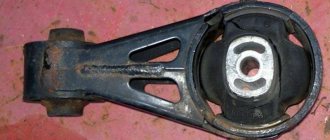
- Remove the mounting bracket. It is better to use a special cardan (its image is in the photo). The VUT itself is attached to the body with four turnkey nuts “13”.
We remove VUT VAZ
- Move the mounting bracket to the new vacuum brake booster (you will need to unscrew a couple of nuts to “17”).
Reassemble in reverse order.
Vacuum booster VAZ 2114
Replacing the vacuum booster on a VAZ 2114
The entire process of replacing the vacuum seal on a VAZ 2114 takes place in the engine compartment according to the following points:
- To access the VUT fasteners, we need to remove the air filter housing.
- We also loosen the adsorber clamp and move the mechanism to the side without disconnecting the hoses.
- Now you can unscrew the two nuts securing the expansion barrel. This is done with a key of 13.
- Remove the pipe from the check valve flange.
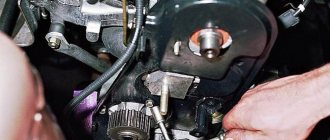
- Now we unscrew the amplifier itself. It is attached to the body with 4 nuts; it is convenient to unscrew them using a wrench, an extension and a cardan. We do this with a 13mm head.
- Remove the spring clip from the pin securing the vacuum seal to the brake pedal and disconnect the mechanism.
- We take out the VUT by pulling it towards ourselves.
- Remove the bracket that secures the element to the car body.
At this point, the dismantling process is completed; installation occurs in the reverse order. The most important thing during installation is to install the rod evenly so that it immediately fits onto the pedal, and fasten the pin from inside the car.
VUT breakdown on the road
Many people are interested in what to do if the brake booster breaks down on the road and how to get home safely. First we need to understand that the vacuum goes from the collector to the amplifier. A pipe comes from the manifold and goes to the valve, which is built into the VUT housing.
In order to eliminate the problem of floating speed due to a breakdown of the VUT, as well as ineffective braking, you need to shut off the line through which the vacuum flows. Remove the pipe coming from the brake booster from the manifold and plug the flange. This can be done using a rubber stopper.
Next, insert something into the pipe that goes to the VUT and use a worm clamp to plug it.
After you carry out the procedure described above, the speed will stop floating and the brakes will be tight, but effective with the proper force on the pedal. If you had to drive a VAZ 2101, the pedal force will be the same, since this car does not have a brake booster from the factory.
Signs of a faulty vacuum brake booster
When understanding the signs of a faulty vacuum brake booster, it is worth noting that its failure can be caused not only by the membrane, but also by adjacent components. Therefore, when a malfunction occurs, each component of the system must be checked. When the VUT fails, the following symptoms can be observed:
- The engine started to stall. This occurs due to air leaking through the system;
- The efficiency of the braking system has significantly decreased;
- The brake pedal is pressed with great force;
- A knocking sound is heard when braking hard;
- When you press the pedal, you can hear a hiss of air.
In some cases, the brake system failure indicator on the dashboard starts to light up, but this is not a clear sign of a failed VUT; the error may also appear due to a problem in other components. We talked about this in this article.
Checking the serviceability of the amplifier
In this section we will tell you how to check the performance of the vacuum brake booster on a VAZ-2114.
All of the recommendations given can be used when checking the unit, both on the thirteenth and fifteenth car models. To check, follow these steps:
- Press the brake pedal all the way about 5 times with the engine off. This action will create uniform pressure in both components of the VUT. When the brake is pressed, the valve will immediately release itself. If you notice a squeak, this is a clear signal that the part needs to be replaced.
- As soon as the pressure is uniform, you need to start the car while holding the brake pedal to the floor. If everything is fine with the unit, the pedal will rise after starting the internal combustion engine. Otherwise, repairs will need to be made to replace the device.
- When you have already realized that the part needs to be replaced, you need to additionally check how well the hose is fixed, as well as the condition of the flange. If these elements are in a condition that does not meet the standard, this may affect the performance of the amplifier. Accordingly, in this case, you may need to tighten the fastenings and the problem will solve itself.
Service replacement cost
You may not be able to change the part yourself because you don’t have enough tools, knowledge, or a place where you can do it. In this case, you can contact a car service; the repair price will be around 1000 rubles, taking into account the average prices in Russia. In this case, the total repair budget will be around 3,000 rubles , unless replacement of additional elements is required. There is one important advantage when contacting a service center. When people who know their stuff work there, they will be able to identify other shortcomings of the system during the analysis and show them to you clearly so that you know exactly what you are paying for. Remember that repairs should be made immediately when the problem is diagnosed, since driving with a broken vacuum booster is very dangerous. For this repair you do not need special knowledge, so you can easily replace the vacuum booster yourself, saving a third of your budget.
Let's summarize
As can be seen from the above, the replacement process is quite simple. The most important thing is to diagnose and accurately identify the cause of bad brakes.
Carrying out the work yourself will take no more than one hour, and the price of replacing a VAZ 2114 vacuum amplifier is from 1,500 to 2,000 rubles. Calculate how much money you earn per hour and decide whether you need to make the replacement yourself.
The process of replacing the vacuum amplifier VAZ 2113, 2114, 2115 is clearly shown in this video:
Source
general information
The design solution of the brake system of the 2114th model is almost the same for most VAZs. Therefore, these instructions will help you change the vacuum seal on many cars.
If you decide to change the device yourself, you need to read the manufacturer’s recommendations in the operating manual of your VAZ. And purchase exactly the vacuum booster whose model is recommended by the car’s creators.
During operation, the mechanical connections of parts become clogged with dust, residual working fluids, and dirt. After a long period, it becomes very difficult to unscrew such bolts and nuts. They seem to grow and become a monolith. To make work easier and not damage the surfaces, you should use WD-40: first spray a small amount of aerosol into the joint and after a few seconds, start working.
Unit cost
It is better to find out how much a vacuum brake booster for a VAZ 2114 costs directly from the stores. Since the regions are different, the price categories are different and it’s easier to navigate the area locally. The approximate cost is from 2,000 to 3,000 rubles. Installing it in the service will cost a third, or even half, of the cost. Despite the inaccessibility of the unit and some inconvenience, it is much easier to change the amplifier yourself. The frequency of breakdowns or replacements directly depends on the quality of the track, driving style and the general wear and tear of car parts, in particular the chassis. Therefore, it is difficult to say that there is any specific regulatory period. The only thing you need to remember is about timely diagnosis: sometimes it’s worth getting confused and going over your fourteenth with the eye of a caring owner. And, of course, you shouldn’t delay repairing or replacing the unit.
Source
Troubleshooting methods
What signs may indicate that the unit requires replacement?
- When applying the same force, the braking process becomes more difficult.
- When you apply pressure to the brake pedal, the speed begins to drop.
- The engine is adjusting.
- The appearance of hissing noises when the brake is pressed while driving. In this case, it is possible to increase engine speed.
- Inadequate operation of the brake pedal.
- Increased fuel consumption.
The results of a simple inspection will tell you whether the device needs to be replaced.
- Method No. 1. With the engine off, vigorously pump the brake pedal to the floor 4-5 times. Detection of creaking or hissing or other extraneous noise during these manipulations indicates that there are serious malfunctions. After this, holding the pedal in the lowest position, turn on the engine. A vacuum will begin to create in the VUT chamber. The pedal should move on its own. If this does not happen, then the breakdown is serious and repair is inevitable.
- Method No. 2. Let the car idle for 3-6 minutes. Silence it. Fully press the pedal (creating a vacuum in the chamber of the device) and release. Repeat again. If the stroke of the lever changes with each subsequent press, it means that creating a vacuum is difficult. Therefore, replacement of the problematic device is required.
- Method No. 3. Start the engine and squeeze the brake lever all the way. Turn off the engine and release the pedal. If it doesn’t move within half a minute, then everything is fine. The opposite result is a signal of a malfunction.
Sometimes deviations appear due to a broken fastening, flange failure, or mechanical damage to the vacuum hose. Therefore, in order not to complicate the situation, the inspection should begin by checking these positions.
At the same time, the condition of the brake pipes and their connections to the body, those places that are potentially places of leakage of special fluid, is examined. Which outwardly manifests itself in the form of streaks on the housing of the vacuum booster or brake cylinder.
Changing a unit yourself is not difficult if you have at least some mechanical skill and understanding of the design of the car. To replace it yourself, you will need the vacuum unit itself, some tools and parts.
How to change it yourself
Let's look at how to change the VUT using the example of the VAZ 2110, 2111, 2112. The design of the system is quite monotonous, therefore, after watching the video, you can replace the vacuum brake booster of the VAZ 2114 and many other cars.
- Remove the low brake fluid level sensor connector.
- Unscrew the 2 bolts 17 securing the brake cylinder to the VUT body. There is no need to unscrew the lines, just move the cylinder with the tank a little to the side.
- Disconnect the vacuum hose from the check valve. Check the condition of the valve and install it on the new brake booster.
- Unscrew the 4 bolts securing the VUT to the engine shield. The working space in the area of the pedal assembly on the interior side is limited, so an extended socket, extension and ratchet are best suited for unscrewing.
- Disconnect the brake sensor connector.
- Pull out the VUT along with the mounting bracket and the brake pedal.
- Using pliers, remove the locking plate of the brake pedal lever rotation axis.
- Pull out the “finger” that secures the VUT pusher in the lever.
- Unscrew the 2 nuts securing the vacuum body to the bracket.
All you have to do is replace it by installing a new amplifier and assembling all the elements in the reverse order of dismantling.
Be sure to correctly install the sealing gasket between the brake cylinder and the housing, if one is present in the design of the vacuum brake booster of your car.
Design options
On some cars, to replace the vacuum seal, you must first disconnect the booster pusher from the lever in the car's interior. As we see in the GAZelle example, this can be done in two ways:
- unscrew the bolt of the fastening element connecting the pusher and the pedal lever;
- loosen the adjusting nut, and then unscrew the pusher from the fastening element. The peculiarity of this method is that after replacement the pusher must be screwed in the same number of turns. To do this, you need to either measure the distance from the edge of the pushrod to the adjusting nut, or count the number of turns. Otherwise, you will not be able to accurately install the adjusting nut on the pusher of the new amplifier.
If during the replacement process the position of the pusher does shift, adjust the free play of the brake pedal.
Stem adjustment
The stem offset determines the distance from the adjusting bolt to the stem buffer. This parameter is extremely important for the normal operation of the braking system. If the overhang is too large, certain contours will jam. A small overhang will increase the free play of the rod (the distance from the rest position to the contact of the buffer).