A coolant sensor is needed to regulate air flow. With its help, the fuel mixture is depleted or enriched. On an injection engine, as a rule, the higher the coolant temperature, the lower the sensor resistance. For example, at a temperature of 100 degrees the resistance will be 177 Ohms, at 80 degrees - 332 Ohms, and at 45 degrees - 1188 Ohms.
The original DTOZH has catalog number 2112-3851010. There are several high-quality analogues: ERA (33026), Luzar (LS 0112), Fenox (TSN 2211207).
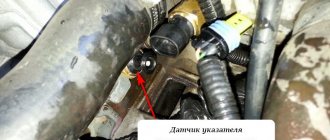
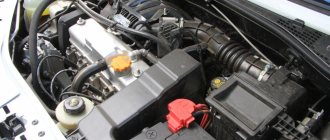
The sensor is installed in the engine coolant flow on the thermostat, on the cylinder head. On vehicles of the LADA 4x4 family, the sensor is installed on the outlet pipe.
Troubleshooting and repair
The first signs of trouble will be:
- problems with cold starting the car;
- the engine stalls periodically;
- fuel consumption increased;
- The temperature alarm indicator is on;
- Inadequate temperature readings on the dashboard.
When faced with one or more problems from the list, you need to understand what the reason is in more depth. Having opened the hood of the Lada Kalina, you should inspect for coolant leaks. One of the main reasons for a malfunction of the meter may be an insufficient level of antifreeze or its leakage. After making sure that there is no leakage, additionally make sure that the antifreeze level is as required; if there is a deficiency, add fluid.
The next step is to check the contacts and electronic circuit. Over time, the wiring wears out, the contacts rust and oxidize. They might even get dirty. It is necessary to clean them and make sure that the electronic circuit is working properly.
Only after the first two steps of the initial inspection can you begin to inspect the meter itself.
Dismantling and inspection are carried out as follows:
- first of all, it is necessary to turn off the power to the vehicle and drain the coolant, only after this can you begin direct dismantling;
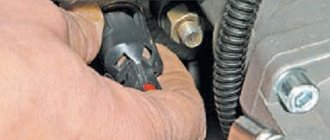
- then disconnect the connecting wires from the meter. Inspect them and clean them;
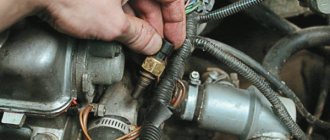
- unscrew the sensor itself, you may need a deep head for this;
- After removing the detector, clean it and check its operation. This is usually done by immersing the sensor in a glass of water, then heating it, then cooling it and measuring the resistance of the meter;
- if the old sensor malfunctions, you must buy a new one, since it cannot be repaired;
- Installation of a new or old working device is carried out in the reverse order of its dismantling. Remember that the sensor must have a sealing ring (if it is an old meter, purchase a new seal for it); in addition, you can use sealant;
- check the operation of the device when the car is running, and also make sure that antifreeze does not leak while the system is running.
DTOZH is not a detail that should be joked with or forgotten about. It makes sense to buy such a spare part immediately when purchasing a car. It is not expensive, but it saves significant amounts of money on excessive fuel consumption and repairs of a “tied” car.
The Kalina engine temperature sensor is needed for the operation of its entire system. If there is no spare part and the device breaks down on the road, it can be replaced with a counterpart that communicates with the dashboard. This temporary solution will allow you to get to the repair point without incident.
The main thing in the car is still the meter that communicates with the ECU. The second only keeps you personally informed of events. Although, given that in a critical situation it is the second one that can turn out to be a lifesaver, we should not forget about its timely replacement.
As a final recommendation, I would like to mention one more detail. Many people add ordinary or distilled water to the cooling system instead of a specialized liquid, believing that this way they cheat the system and save money. In fact, such people are only deceiving themselves.
Filling with distilled water is a last resort when there is no access to normal antifreeze. Even one-time use of such water already causes irreparable damage to the cooling system. Ordinary water tends to affect the mechanisms of the cooling system, cause rust in it, and form a heavy sediment in the pipes. All this clogs the system, spoils it, and ultimately kills. Always use only specialized coolant and remember to replenish its level promptly.
DTOZH or a sensor that measures the temperature of the cooling system fluid is a mandatory part in the engine control system. Based on the data received from it, the composition of the fuel-air environment is automatically adjusted, as well as the crankshaft speed and ignition timing.
Therefore, monitoring the operation of the DTOZh is necessary, and in such Lada models as Granta, Largus, Priora, Vesta, Kalina Xray and all-wheel drive Niva, this manipulation is performed in the same way.
Unpleasant surprises from engine maintenance.
Hello. Today I want to talk about the coolant temperature sensor and the malfunctions associated with it. Picture from free access to the Internet.
Brief information
.The coolant temperature sensor (TES) is an important element of the electronic engine control system (ECM).
The sensor is designed to measure engine temperature.
Based on a signal from this sensor, the ECM, according to the program embedded in it, controls the fuel supply, adjusts the ignition angle, turns the engine cooling system fan on and off. Structurally, the sensor is a thermistor that has a negative temperature coefficient, i.e., as the temperature increases, its resistance decreases.
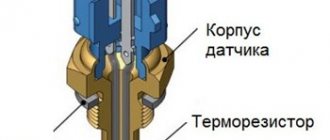
The thermistor itself is placed in a heat-conducting housing with a thread. A plastic connector with 2 thermistor leads is built into the case.
The sensor must have direct contact with the coolant.
In fact, this seemingly simple sensor can bring a lot of unpleasant moments to the car owner.
Symptoms of a malfunction of this sensor may be the following:
- jerking and jerking when the car is moving;
- increased fuel consumption (black carbon deposits on spark plugs);
- increased idle speed;
- poor starting when hot, and in some cases also when cold;
- engine overheating due to incorrect DTOZ values.
The most common reasons: a break inside the DTOZh or the wires leading to it. In this case, the engine malfunction lamp comes on, error: “Engine temperature sensor circuit malfunction.”
But there are also more insidious reasons: the DTOZh can give incorrect readings on the coolant temperature, that is, show a temperature lower than it actually is. For example, it can lower the temperature by 10-15 degrees. In this case, the fault lamp does not light up. The ECM does not send a signal to the engine cooling fan relay in time. The coolant level in the reservoir begins to rise, which can lead to engine overheating. In this case, only the indicator on the instrument panel can show the real temperature.
In this case, you can remove the DTOZH, heat it separately in a kettle and measure with a tester how its resistance changes according to the table.
But it’s better to buy a new one, since these sensors are inexpensive.
The next problem is poor starting on a cold engine. In this case, the error does not appear either. The temperature sensor, on the contrary, shows too high a temperature. For example, the outside temperature is -10 degrees, but the sensor shows +25 degrees. With such a difference, the engine may not start at all. It simply doesn't have enough fuel to start.
Many times such cars were dragged on a cable. When you connect the scanner, everything becomes clear.
I hope the article will be useful to diagnosticians and car enthusiasts.
Source
Operating temperature of 8-valve
How to check the engine temperature sensor with a multimeter
The normal operating temperature for eight-valve engines on Kalinas and Grants is exactly 90 ºC. But owners complain that sometimes it has difficulty reaching 80 degrees even in warm weather. The reason lies in the thermostat - it opens fully at a temperature of 85 degrees. Moreover, the permissible deviation from this value is very large - (85±8.3) ºС.
In other words, the run-up is 77..93ºС.
But the fuel mixture can only ignite normally if the engine temperature is about 90 degrees. This is the value stored in the electronic control unit. If the temperature is too low, the mixture becomes richer (the amount of gasoline increases). This is the main problem that occurs when the temperature drops. And in winter the heater works worse.
Your case
Temperature diagram. Normal operating temperature is at 90 on the instrument panel.
In your case, the thermostat is most likely stuck, usually stuck in the middle. In this case, either repairing or replacing the thermostat will help.
A stuck thermostat valve is a typical malfunction of the engine cooling system.
That is, the liquid that has not yet been heated is supplied to the cooling radiator and blown by a strong wind flow. Indeed, with an increase in air temperature, the problem will partly go away. That’s why they used to put cardboard on it and drive like that for years. But we don't recommend doing this.
Solution
The problem of low temperature of the engine cooling system can be eliminated by installing a thermostat that opens at 92ºC. The WAHLER 3091.92D element performs excellently.
You just have to disassemble it and transfer the inside to Kalina’s original thermostat.
There is a downside: in summer the temperature will be higher, and there is a risk of boiling in a traffic jam. To be more precise, this risk is higher when installing a thermostat with a late opening time!
Be sure to use new gaskets and lubricate them with a small amount of sealant - this will prevent coolant leaks.
New era: latest models with Soviet roots
After the collapse of the Union, the Volzhsky Automobile Plant found itself in a difficult condition, like many enterprises in the country. But by the mid-1990s, the company managed to establish its own car production.
The first model of AVTOVAZ in post-Soviet times was the “ten” - VAZ-2110. Due to the difficulties of the transition period, it was released with a delay of three years, only in 1995. On the Russian market, this car could easily compete with popular foreign cars of that time, such as Daewoo Nexia, Audi 80 or even Opel Astra. Almost immediately the so-called “eleventh” model was released, and a few years later AVTOVAZ released the VAZ-2112. In 2007, Priora, the latest AVTOVAZ model with Soviet roots (with the exception of LADA 4×4), came off the assembly line.
In 2008, during the economic crisis, AVTOVAZ established cooperation with Renault. This served as an incentive to receive financial support from the Russian government and opened a new page in the history of the development of the enterprise. In partnership with the French concern, new LADA models were created: Largus, Granta and Kalina of the second generation.
How to dismantle
VAZ 2114 engine temperature level sensor
Many drivers are confused where the temperature sensor is located in the system, which provides information to the ECU, and where the instrument cluster is. In Kalina, the first controller is embedded in the thermostat, which is located on the coolant outlet pipe from the engine. The transmitting sensor is located nearby; you can find it using a thin wire.
All work on removing and installing parts is carried out with the engine turned off and the negative terminal of the battery disconnected. Dismantling order step by step:
- Loosen the screw securing the air hose coupling to the air filter housing. This will allow you to get to the instrument sensor. If necessary, remove the air filter housing for good access to the sensors.
- Remove the screen or engine cover, using force, remove the cover from the latches.
- Drain the coolant from the radiator. On Kalina, antifreeze or antifreeze is used. To do this, the fluid needs to be cooled, but experienced drivers replace it without draining the antifreeze. In this case, all replacement work will need to be carried out quickly and accurately. Therefore, if the sensor is changed for the first time, it is better to drain the coolant so that an air lock does not form in the system.
- Disconnect the wire block.
- Using a socket head or a 19 mm wrench, unscrew the sensor from its seat. If the coolant is not drained, antifreeze will flow out of the hole. Therefore, experienced drivers who are too lazy to drain it immediately clamp the hole with their finger and insert a new one.
Installation of the elements is carried out in the reverse order - the sensor is inserted into the hole, screwed in, connected to the wire block, and antifreeze is poured. The functionality of the system is checked after connecting the battery.
How is the sensor replaced?
How to replace the engine temperature sensor on a VAZ 2110
It would not be amiss to mention once again that the symptoms described above can be caused not only by a malfunction of the coolant detector.
It is worth paying attention to the fans, checking their functionality, assessing the integrity of the wiring (breaks, breaks), the quality of contacts and terminals (oxidation, rust, mechanical damage), and also inspecting the device located in the cylinder head, since the pointer sensor may also cause data malfunctions. So
First of all, the engine is cooled if the car was running before repair
So. First of all, the engine is cooled if the car was running before the repair.
After the driver has made sure that the engine has cooled down, you can begin replacing:
- De-energize the vehicle system by removing the negative terminal from the battery. If you are not so experienced in repair work under the hood, you can remove both terminals to be sure;
- drain the antifreeze. In all brands of cars, DTOZH are in direct contact with the measurement environment. This means that when removing the sensor from its socket, if the coolant is not drained first, it will rush in all directions, flooding important parts of the car. It's not very good;
- After you have collected the coolant in a container prepared for this, you can begin to dismantle the sensor. You can first disconnect the pipe, which makes it a little difficult to see and access the desired device. Over time, you can get the hang of doing all the manipulations without it, but first it is recommended to disconnect it. Some car owners remove the air filter housing to have more free space;
Replacing the temperature sensor
- disconnect the block of wires going to the sensor from the control system, and then unscrew the device itself using a key of a suitable size (on Kalina this is usually 19);
- install a new one in place of the removed device and carry out the assembly in the reverse order. It is worth considering that some detectors may have weak threads. This can be easily compensated for if, when installing the DTOZH, a seal is used that will prevent antifreeze from leaking through the gaps in the detector socket;
- fill in the coolant, connect the battery, start the engine and make sure that the repair was successful and the system is working properly.
Where can I buy
Spare parts and other products for the car are easily available for purchase at auto stores in your city. But there is another option that has recently received significant improvements. You no longer need to wait a long time for a parcel from China: the AliExpress online store now offers the opportunity to ship from transshipment warehouses located in various countries. For example, when ordering, you can specify the “Delivery from the Russian Federation” option.
Follow the links and choose:
Causes of failure of the coolant temperature sensor
Structurally, the coolant sensor is quite simple, and accordingly, it rarely fails. Usually this happens simply due to its old age or mechanical damage. For example, corrosion of contacts and metal parts of the case may occur due to the fact that instead of antifreeze or antifreeze, ordinary water was poured into the cooling system (and even more so if this water is “hard”, that is, with a high content of metal salts). Also, the reasons for the failure of this device may be:
- Damage to the body. This can be expressed in various aspects. Often, leaks of coolant are visible, which flows from the threads of the sensor or its housing. Also, the electrical contacts and/or the thermistor itself may be damaged, which will produce an incorrect signal.
- Oxidation of contacts. Sometimes situations arise when, under the influence of fumes or simply from old age, the contacts on the sensor oxidize, so the electrical signal does not pass through them.
- Damage to the chip. In some cases, due to mechanical damage, the so-called “chip” may fail, that is, a group of contacts that is connected to the coolant temperature sensor. Simply put, the wires at the base of the connector fray. According to statistics from reviews found on the Internet, this is one of the most common malfunctions that occurs with the sensor and the corresponding system.
- Lost electrical contact inside the sensor. In this case, unfortunately, repair is hardly possible, since usually its body is sealed and does not allow access to the insides of the DTOZH. Accordingly, in this case the sensor only needs to be replaced with a new one.
- Violation of wire insulation. In particular, we are talking about the power and signal wires that go to the sensor from the electronic control unit and back. The insulation can be damaged due to mechanical stress, abrasion, or even simply from old age, when it “peeles” in pieces. This is especially true for those machines that are operated in conditions of high humidity and sudden changes in ambient temperature.
If it is possible to simply clean the body/threads/contacts of the sensor, then to restore its normal operation it is enough to carry out the appropriate measures. However, if the housing is damaged and/or the internal thermistor is damaged, then repair is hardly possible. In this case, you just need to replace the sensor with a new one. Its price is low, and the replacement process is simple and will not take much time and effort even for novice car owners.
Electronic control unit (ECU)
The electronic engine control unit is one of the most important elements of the vehicle's electronic system. People call this block “computer” or “brains”. In this unit, just like in the brain, a huge amount of data received from all sensors installed on the engine is processed.
The breakdown of this unit is a fairly rare problem, but it often occurs on the Lada Kalina due to its unfortunate location. The ECU is located inside the dashboard under the interior heater core. When the radiator leaks, coolant enters the control unit, which leads to its failure.
Signs of malfunction:
The unit cannot have any specific symptoms of a malfunction. If the ECU fails, most often it simply cannot detect the sensor. In some cases, ignition coils stop working due to damage to the radio elements inside the unit.
What is the operating temperature of the Lada Kalina engine?
Normal operating temperature of internal combustion engine: +90. +95, if above +97 then the internal combustion engine will be slightly dulled, but this t is also considered normal, up to +110 is also normal, but the radiator fan should already turn on. If t is below +90, this is not overheating. We look at the thermoelement for grinding into the thermostat cover (so that when closed it does not etch into a large circle) and the serviceability of the thermoelement itself by boiling it in the thermostat cover. If the lower pipe is cold, this is not a fact that it does not poison the large circle.
I purchased a 6-hole thermostat assembled, sealed, with an Quality Control Department stamp, t 85, PRAMO, for 505 rubles. I also had a thermocouple from a viburnum, also at t 85, lying around for a long time. ___________________________________________
Kalinovsky thermoelement:
__________________________________________________
Thermostat with thermocouple:
__________________________________________________
I boiled both thermoelements in this one housing of the new thermostat, the result:
1. Thermoelement from viburnum: opened slightly at +92 (began to let water through at atmospheric pressure) at 96 opened slightly by 5 mm +100 opened by 8-9 mm diluted the water to +83 - almost instantaneous slamming.
2. Stock thermocouple Pramo: opened slightly at exactly +85 and went at atm. pressure +86 hole mm 2-3 +88 hole approximately mm 5 diluted the water to +83 - it slows down for about a minute.
Now do you understand why your operating temperature in winter is +88 and below?
There was a thermoelement left from the new PRAMO thermostat, which turned out to be a little longer (rod) and did not fit tightly into the cover of the Priora thermostat. The cover of the Priorov thermostat was drilled out a little and the thermoelement sat tightly, now it is not blown through. (before these actions I thought about it, I didn’t sit down by two mm)
via FTP video 5:52, 24.4 MB _______________________________________________________________
And now the sea trials of the Kalina thermoelement with the Pramo cover:
In weather -15, VideoAdded t coolant on the move, t air in the driver's compartment, t air flow at the carrier's feet
(16.6 MB)
Via FTP, 16.6 MB ________________________________________________________________
Warming up from a cold start, with on. stove, -16 on the street, -15 coolant, -15 in the cabin, at XX, 24 minutes: here is the video, 63.4 MB:
Warming up from a cold start, with off. stove, -19 on the street, -18 coolant, -17 in the cabin, at XX, 23 minutes: here is the video, 30.4 MB:
After a year, RESULT: Summer is working. temperature +92. +94 (tested at temperatures up to +35 C) Winter working. temperature +90. +92 (tested at temperatures down to -41 C)
Popular Russian cars with galvanized bodies: list
The list of Russian-made cars with a body coated with a layer of zinc is not rich. Of the manufacturers, only the Volzhsky Automobile Plant (VAZ) and the automaker from Ulyanovsk (UAZ) are engaged in this. To reduce the cost, some models are only partially galvanized, i.e., only individual parts are protected. For complete treatment, inexpensive cataphoretic priming of the body with the addition of zinc particles is used. The protection is effective, but cannot protect the metal for more than 5 years. Moreover, one-sided galvanizing is used, when only the outer side is processed, the inner side is primed and painted.
VAZ 2110
The first VAZ model with partial anti-corrosion treatment using zinc
In the 10th family, body corrosion protection by cold galvanizing began to be used in 1999. Nodal connections, i.e., places of welding seams, fastenings and other elements, were subjected to processing. Corrosion of the body began quickly, because there was practically no metal protection.
Lada Kalina 1st generation
The first generation of Kalina family station wagons
The first Kalinas were partially galvanized, the total percentage of treated surfaces is about 50%. These include all attached parts (doors, trunk lid and hood), underbody and front wheel arches.
Lada Kalina 2nd generation
The second generation of the Kalina family in the hatchback body
The first releases of Kalina 2 did not differ in galvanized area from the first “berry” VAZ family. Later models have a completely galvanized body; the side members at the front and rear, the roof and the hood were left untreated. It is worth considering that the chosen processing method does not provide a 100% guarantee of protection against corrosion.
Lada Largus
New model Lada Largus with cladding from Vesta
The Renault Logan clone in a station wagon from VAZ is also only partially galvanized. The front fenders, sills, trunk lid and doors have been treated.
Lada Granta
Granta sedan, car with high-quality galvanization
The Lada Granta sedan is 30% made of galvanized steel. In this case, part of the metal is additionally treated with hot zinc on both sides. The Granta in the liftback body is additionally protected from the bottom.
Lada Vesta
VAZ flagship with galvanized body
The flagship of the Russian automobile industry became the first VAZ car with a double-sided galvanized body, with the exception of the roof of the sedan (the station wagon was completely treated). The bottom and sills are without zinc protection.
X-ray crossover based on Vesta
The crossover from AvtoVAZ is galvanized on both sides, only the roof and bottom are not treated.
UAZ
Domestic SUV UAZ Patriot with the best galvanization
At the Ulyanovsk Automobile Plant, UAZ Patriot cars produced since 2013 were subjected to partial cold galvanization. Since 2014, the Patriot has been processed using the galvanic method (the body is completely immersed in a zinc bath), which provides excellent protection against corrosion.
All models without exception use cold galvanizing and cataphoretic priming, which allows us to provide a guarantee of up to 6 years. Technologies are improving every day, the thickness of the protective coating is increasing. So far, the most protected car from rust is the UAZ Patriot (among domestic manufacturers), but AvtoVAZ is not far behind.
Detecting a sensor malfunction and replacing it
Design of the cooling system of Lada Kalina 1 - expansion tank; 2 — radiator outlet hose; 3 - inlet hose; 4 - radiator; 5 — steam exhaust hose; b — radiator supply hose; 7 — electric fan; 8 — electric fan casing; 9 — coolant temperature sensor; 10 — coolant temperature indicator sensor; 11 — throttle assembly; 12 — bracket for the coolant pump pipe; 13 — coolant pump; 14 — coolant pump pipe; 15 — heater radiator supply hose; 16 — heater radiator outlet hose; 17 — exhaust pipe; 18 — coolant pump pipe hose; 19 — thermostat housing
To determine that the evaporator temperature sensor is faulty, you should first conduct a visual inspection, thorough and consistent
Particular attention should be paid to wires and their connections, since this is where microscopic breaks most often occur. In addition, rust deposits, even in minute doses, can lead to failure.
Cracks in the housing cause coolant to leak, which is also bad. So, if Kalina’s control unit receives dubious information about the coolant level, if the engine begins to give unjustified failures and then completely stalls, if the engine suddenly begins to lose power and controllability while driving, in 80 percent of cases this may indicate sensor malfunction.
Therefore, in order to determine the location of the breakdown, you should first check this device. In addition to these symptoms, the following signs indicate that the coolant temperature sensor needs repair:
- at idle speed the engine is unstable, starting is difficult, stalling occurs;
- fuel consumption suddenly increases;
- The control lamp warns of overheating.
You can determine whether the interior temperature sensor is working by checking the resistance and voltage. To diagnose, you need to remove the sensor, then lower it into a container of water, the temperature of which is alternately changed. In warm water, the voltage should vary from 3 to 1 W for 4-5 minutes. In addition to monitoring the sensor, other systems should be carefully checked.
Radiator and coolant level
It is very important to know here that the radiator cap can only be removed when the engine has cooled down, otherwise it is easy to get a serious burn. The tightness of the lid should also be checked.
If the cover is not sealed, then air enters the system, which leads to overheating of the motor and, as a result, distorted sensor data.
And lastly, it is necessary to monitor the performance of the fan, on which a lot also depends. To dismantle the Kalina DTOZh device, you must first disconnect the negative wire from the battery. Next, you need to drain all the coolant. The third step is to disconnect the wiring from the sensor. Now we arm ourselves with a 21 key and unscrew the device.
Install the new one in the reverse order. Don't forget to fill the radiator with antifreeze at the end of the job. The temperature sensor is changed only as a last resort, when it is known for sure that it is faulty. Checking the device was discussed in the previous paragraph. But sometimes the sensor changes even in its functional state. When is this done? If it is necessary to completely overhaul the Kalina engine or replace it.
Such changes primarily affect the operation of the sensor, so in order to avoid possible difficulties and troubles, it is better to replace the device with a new one. In the event of emergency overheating of the power unit and the sensor, problems occur
Therefore, when repairing the Lada Kalina engine, do not forget to pay attention to the sensor
Source
Classic motors
What engines were installed on the Zhiguli?
- 1.2l 64hp (model 2101)
- 1.3l 69hp (model 21011)
- 1.5l 71hp carb/eng (model 2103)
- 1.3l 63hp with timing belt (model 2105)
- 1.6l 75-82 carb/eng (model 2106)
All “classic” engines are longitudinal in-line gasoline fours with a single camshaft located in the cylinder head. Early versions (models 2101 and 21011) had a problem with premature camshaft wear due to insufficient lubrication, but this problem was eliminated on subsequent models. The cylinder head here is 8-valve, the valves do NOT bend. Valve clearances are quite easily adjusted with nuts, but this procedure must be done often - every 30 thousand km.
Over the years of production, the “classic” engines have also changed little. All of them, in essence, are modifications of their ancestor - the 1.2 liter “penny” engine (model 2101). The main changes were in the geometry of the engines, due to which the volume and power were increased. All “classic” engines have a reliable timing chain drive except the “five” engine (model 2105) - here VAZ engineers unsuccessfully tried to convert the timing belt to a belt drive.
The 1.5 and 1.6l units (models 2103 and 2106) turned out to be more reliable and durable, so they were installed on the “classics” until the last minute.
At first, Zhiguli engines were equipped with Italian Weber carburetors, since 1980 they were replaced with the domestic analogue of Ozon (manufactured by DAAZ), and since 1990, the DAAZ plant supplied AvtoVAZ with Solex carburetors, a French design.
They began installing injectors on “classic” engines only in 2006, when the state banned the production of “non-eco-friendly” carburetor versions. Of course, injection engines have a lot of advantages over carburet engines. The injector practically does not clog, it does NOT need to be cleaned or adjusted, and in winter it starts confidently, regardless of temperature. In addition, fuel consumption on a “classic” with an injector can easily fit into 7 liters per hundred, while on carburetor versions 10 liters per hundred is the norm.
Older versions of Zhiguli engines provide them with good dynamics. In the 0-60 acceleration exercise, a “classic” with a top-end 1.6L engine takes 16 seconds. Maximum speed – 150 km/h.
Cooling system elements
The Lada Kalina cooling system has the following elements: water pump, thermostat, radiator, electric fan, pipes, expansion tank, water jacket and temperature sensor.
Radiator
One of the main elements of the cooling system, which provides direct cooling of the liquid that passes through the element. The part is cooled using a counter flow of air and an electric fan, which is located behind the radiator. Lada Kalina is equipped with 3-row radiators, which provide maximum cooling of the liquid.
The malfunction of this element may be due to contamination. Therefore, it is necessary to periodically clean the part. The most common method among motorists is cleaning using automotive chemicals. But, the most effective is to dismantle the radiator and clean it with steam or a special liquid under pressure.
Electric fan
The cooling system fan provides additional cooling of the radiator when there is not enough oncoming air flow. The most common malfunction associated with the fan is the failure of the fuse and coolant temperature sensor.
temperature sensor
This element ensures timely activation of the electric fan. The principle of operation of the sensor is very simple - I analyze the temperature of the coolant, it sends impulses to the electronic control unit, which, after analyzing the data received, decides whether it is necessary to use the electric fan. A malfunction of the meter can lead to overheating and even greater problems associated with deformation of the cylinder head.
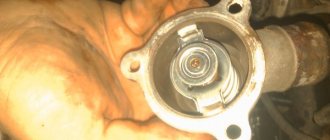
Thermostat
One of the most important cooling elements for Lada Kalina and any other car. When the car heats up, the thermostat is closed, allowing coolant to circulate only in a small circle. After the engine has warmed up to 60-70 degrees Celsius, the thermostat opens wide and fluid begins to circulate through the radiator.
Water pump
The water pump circulates the “coolant” throughout the system. If the element is faulty, then the liquid heats up inside the water jacket of the engine without passing through the radiator, which causes severe heating of the engine and destruction of structural elements. Often, it doesn’t come to this, because the pump is running out and the pump is simply leaking. Replacing an element is quite simple with your own hands, which is what most car enthusiasts do.
Expansion tank and plug
The expansion tank serves as a kind of indicator of coolant in the system. So, it has a minimum and maximum mark on it, which indicate that the coolant should be in these aisles. Also, through the expansion tank it squeezes out the “coolant” in case of overheating.
The expansion tank plug is an element of the cooling system through which hot coolant is actually released into the system and pressure is relieved. Also, through this element the cooling system gases are discharged.
Pipes
Cooling system pipes are elements that serve as a connecting link between different structural parts. It is through them that coolant circulates from the engine to the radiator and vice versa. Failure of these elements can lead to fluid leakage, causing the engine to overheat.
Water jacket
The water jacket is an element of the engine and cooling system, which ensures the heat absorption of the engine coolant for subsequent removal and cooling. This system is located in the cylinder head and cylinder block. When carrying out a major overhaul, it is often discovered that this element has become corroded if the vehicle is operated on water.
MOSKVICH
Another popular Russian car brand. Externally, this car did not differ in any stylish lines, which is why the design of the car turned out to be boring. However, this did not affect the popularity of the cars that were produced under this brand for a very long time. It was truly a people's car in our country.
The most popular models in the entire history of this brand were cars of the following series: “408”, “412” and “2142”.
The production of Moskvich cars started in the pre-war years, but the car was not successful, and this continued until 1949, when the first modern Moskvich model entered mass production under the serial number “400”. After the Great Victory in the Second World War, our country, which captured Germany, received at its disposal, which was located in Brandenburg. It was thanks to technology that it released its first car model, the Moskvich 400, which was created and built on the basis of the Opel Kadett car.
The Moskvich car brand gained its greatest popularity in the 70s and 80s, when the USSR economy was growing and developing. But, unfortunately, having survived the collapse of the Soviet Union, this brand of car has not survived to this day. In 2002 she was declared bankrupt. In 2006, it acquired from our country some car production lines located in Moscow, where some Renault models were subsequently produced and released.
In 2009, the right to the Moskvich brand was acquired by Nemetskaya. The group owns the right to use the name “Moskvich” until 2022.
| Moskvich 400 | Moskvich 401 | Moskvich 423 |
| Moskvich 410 | Moskvich 407 | Moskvich 423N |
| Moskvich 430 | Moskvich 411 | Moskvich 403 |
| Moskvich 424 | Moskvich 432 | Moskvich 408 |
| Moskvich 426 | Moskvich 433 | Moskvich 412 |
| Moskvich 434 | Moskvich 2138 | Moskvich 2733 |
| Moskvich 2315 | Moskvich 2140 | Moskvich 2141 |
| Moskvich Svyatogor | Moskvich Yury Dolgoruky | Moskvich Prince Vladimir |
How to check the sensor
DTOZH for Kalina has catalog article 23.3828; checking the element is mandatory if gasoline consumption increases and difficulties are observed when heating the engine. An enriched mixture will always flow into the cylinders, the radiator cooling fan will constantly work, which will lead to rapid wear.
If the element transmitting signals to the instrument panel fails, the indicator needle will stop moving and remain at zero.
Check the dismantled assembly with a multimeter by placing the element in a container (kettle, pan) with boiling water. As the liquid cools, the instrument readings will increase. How to check step by step:
- Remove the unit from the car.
- Set the multimeter to the ohmmeter position in the range of 100 Ohm–10 kOhm.
- Connect the DTOZH outputs to the multimeter, lower it into boiling water, with the terminals located outside, only the head of the element is lowered into the boiling water, which in working condition comes into contact with the antifreeze or antifreeze in the system.
- Check the table for the relationship between winding resistance and ambient temperature.
| Temperature, °C | Resistance, Ohm |
| −40 | 100700 |
| −20 | 28680 |
| −10 | 16180 |
| 9420 | |
| +5 | 7280 |
| +10 | 5670 |
| +15 | 4450 |
| +20 | 3520 |
| +25 | 2796 |
| +35 | 1802 |
| +45 | 1188 |
| +60 | 667 |
| +80 | 332 |
| +100 | 177 |
Checking the sensor that transmits temperature to the dashboard is carried out in the same way. The ohmmeter readings may differ from those indicated by 15–29 units.
Principle of operation
The design of the sensor is a fairly simple element. It consists of a bronze body and a plastic insert in which a thermoelement is placed. When heated, the thermocouple changes its resistance and sends readings to the ECU. When certain resistance readings are reached, the ECU sends a signal to turn on the fan and other functions for which the DTOZH is responsible.
How to dismantle
Many drivers are confused where the temperature sensor is located in the system, which provides information to the ECU, and where the instrument cluster is. In Kalina, the first controller is embedded in the thermostat, which is located on the coolant outlet pipe from the engine. The transmitting sensor is located nearby; you can find it using a thin wire.
All work on removing and installing parts is carried out with the engine turned off and the negative terminal of the battery disconnected. Dismantling order step by step:
- Loosen the screw securing the air hose coupling to the air filter housing. This will allow you to get to the instrument sensor. If necessary, remove the air filter housing for good access to the sensors.
- Remove the screen or engine cover, using force, remove the cover from the latches.
- Drain the coolant from the radiator. On Kalina, antifreeze or antifreeze is used. To do this, the fluid needs to be cooled, but experienced drivers replace it without draining the antifreeze. In this case, all replacement work will need to be carried out quickly and accurately. Therefore, if the sensor is changed for the first time, it is better to drain the coolant so that an air lock does not form in the system.
- Disconnect the wire block.
- Using a socket head or a 19 mm wrench, unscrew the sensor from its seat. If the coolant is not drained, antifreeze will flow out of the hole. Therefore, experienced drivers who are too lazy to drain it immediately clamp the hole with their finger and insert a new one.
Installation of the elements is carried out in the reverse order - the sensor is inserted into the hole, screwed in, connected to the wire block, and antifreeze is poured. The functionality of the system is checked after connecting the battery.
Idle air control (IAC)
The IAC is installed on the throttle body. Structurally, it is similar to a DC motor with a worm gear. At the tip of the sensor there is a cone head that closes or opens the idle passage in the throttle, thereby regulating the air supply to the engine at idle. This sensor is installed only on a mechanical throttle and is involved in operation only at idle.
Signs of malfunction:
Checking the electrical circuit
Malfunctions in the cooling circuit system are not always associated with faulty sensors; in 70% of cases, the problem is a violation of the integrity of the wires. On Kalina, the block often suffers; the thin plastic at the entrance to the block rots and cracks. After disconnecting the pads from the sensors, the throughput of the circuits is always checked before dismantling the latter.
- The ignition is turned off and the block is removed from the sensor.
- The tester probe (multimeter) is connected to output “B” of the block, the second tester probe is located at ground.
- The ignition turns on.
- The monitor should display a voltage in the range of 4.8–5.2 V. These are indicators of the complete circuit.
- Similarly, the performance of the circuit is checked by resistance. The tester probe is connected to terminal “A” on the block, the second one is connected to the ground of the car. The operating circuit will show a resistance of less than 1 ohm.
If the voltage does not correspond to the operating voltage, then the circuit is checked for an open circuit. The tester probe is connected to terminal “B” on the block and terminal “39” on the controller; if the voltage is normal, then there is a malfunction in the control unit.
The cooling circuit of the Lada Kalina engine is equipped with two temperature sensors, the correct operation of which determines the performance of the engine and its service life. You can diagnose and replace the control elements yourself; it will take about an hour of time and a little skill.
Operating principle
The sensitive element of the coolant temperature sensor is a thermistor, i.e. a resistor whose electrical resistance changes depending on the temperature. High temperature causes low resistance, and low coolant temperature causes high resistance. The controller supplies a voltage of 3.3 V to the coolant temperature sensor circuit.
The controller calculates the coolant temperature based on the voltage drop across the DTOZH. The voltage drop is relatively high when the engine is cold and low when the engine is warm. Coolant temperature is used in most engine management functions.
If a malfunction occurs in the DTOZh circuits, the controller enters its code into its memory, turns on the warning light and the cooling system fan, and calculates the coolant temperature using a special algorithm.