Why do they remove the LADA Kalina bumper?
- While driving, and even in an open parking lot, parts of the car are exposed to constant physical and chemical attack. Therefore, the decorative paintwork of the bumper loses its attractive appearance and requires restoration, which is carried out by removing the bumper.
- The tough and brittle carbon fiber of the bumper can crack even during a minor accident and require repairs. This is especially true in winter, when at low temperatures carbon fiber becomes especially fragile and can burst even with relatively light contact with a snowdrift. Restoring the paintwork and soldering the bumper material requires dismantling this part from the car.
- If the LADA “Kalina” bumper is severely damaged, it needs to be replaced with a new one, which also requires dismantling the old part.
- You have to remove the bumper to replace the Kalina headlight units.
- Tuning a car's front body kit usually requires dismantling the bumper in order to modify it, paint it, or replace it with a finished tuned product.
Reasons for removing the bumper
There are several reasons why you will need to remove the front bumper from Kalina. This is mainly due to physical destruction of both the part itself and the elements underneath it. Let's consider what factors push the owner to begin this difficult task:
- Road accident. Typically, damage to the front bumper due to a collision is the fault of the driver himself. A simple failure to maintain distance can cause disaster.
- Painting work associated with paint fading will also require dismantling the bumper.
We'll paint the bumper
- Tuning . Installing a new body kit will require dismantling the front buffer.
Exclusive tuned bumper
- A separate case may be dismantling the radiator .
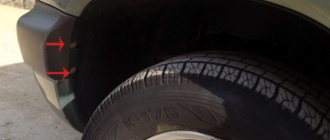
- Damage to body parts when the bumper is not damaged. Hitting an obstacle when the radiator frame is damaged from below.
All these reasons push the owner to dismantle the front bumper. Many of them, not wanting to pay for removal at a car service, do this procedure with their own hands.
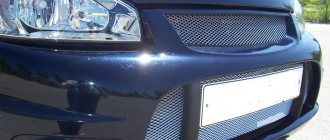
Radiator grille "Priora"
Replacing an element such as a grille
The “Priora” radiator often appears in the minds of the LADA car of this model. This car's grille doesn't have the most attractive appearance. To improve the appearance of the car, car owners often resort to tuning. Designers of automobile corporations never cease to amaze us with new forms and models of vehicles. Small details play an important role in the overall appearance. The radiator grille is no exception.
There are always large holes on the bumper. They serve to keep the engine cool and the engine compartment to be freely blown and ventilated. A mesh is placed behind the radiator grille. It is designed to protect the insides of the car from various debris, insects, and small birds that can get under the hood while driving. The mesh performs a protective function. In tandem with the radiator grille, the mesh also plays a decorative role. This is why craftsmen love to experiment with this part of the body and make the car unique.
If you install a new grille on the LADA Priora, you can significantly change its appearance. Before you begin work on improving the design, you need to know how to remove the grille
. Consultation with a specialist will not be superfluous. An experienced master will give advice, make recommendations and share the secrets of performing the work.
Replacing the Priora radiator grille is a simple process that you can do yourself. The process will depend on which grille you plan to replace the old one with. Before starting work, disconnect the wires from the battery and remove the engine splash guard.
There are two ways, with and without removing the bumper. To remove the grille on a Priora, you need to press on the washer that secures the bumper, and then remove the washers that hold the grille directly.
The LADA Priora se radiator grille is attached with nine self-tapping screws, so there is no need to remove the bumper. Just open the hood and pull it out.
Features of dismantling
Before moving on to the question of how to remove the front bumper of the Lada Kalina, you need to do some preparatory work. The dismantling procedure is carried out in a viewing hole or using a lift, since many of the fixing elements are located below. If this is not possible, you will need to unscrew the bolts blindly. An alternative is to position yourself on the ground to visualize the fastening points.
We recommend performing the activities with a partner. An assistant will be able to hold one part while you unscrew the fasteners from the Kalina front bumper. Independent actions do not guarantee the quality and safety of the process.
For the procedure you will need:
- Extension.
- Screwdrivers - Phillips head and standard version.
- Special head for 8.
- Key for 10.
- Drive with an additional ratchet.
Today, the manufacturer supplies the market with two modifications of Kalina vehicles. They differ from each other in clamps. Therefore, there are some differences in the order of dismantling the part.
Regardless of the modification features, before removing the front bumper of the Lada Kalina, we recommend disconnecting the battery. This helps prevent short circuits when turning off electronic devices.
Necessary tool for work:
- Phillips screwdriver (long and short for easier repair)
- Small ratchet
- Heads for 8 and 10
- A 13mm wrench and socket - useful for unscrewing the bumper reinforcement beam (this is only necessary to remove the headlight)
This is interesting: Replacing coolant on VAZ 11183, VAZ 21116 and VAZ 11186 Lada Granta engines
Step-by-step removal procedure for a 1st generation car
If you are the owner of a first generation Lada vehicle, to dismantle the Kalina front bumper you will need to perform the following steps:
- lift the hood lid;
- unscrew the three screws that are responsible for fastening the plastic radiator grille;
- remove the radiator mesh;
- unscrew the 2 screws located on the bottom mesh and remove it;
- disconnect the fog lamp connectors;
- behind the grille there are two screws that secure the bumper, unscrew them;
- lift the car on a lift or move to a special viewing hole. In this position, you need to remove 3 central and 2 side screws, as well as 2 screws located in front of the wheel arch;
Placement of lower clamps on viburnum
- with careful movements, pry up and snap off the plastic clips holding the part to the body;
- slowly move the bumper towards you, forward. This way the latches are removed from the grooves on the body. Then you can completely remove the front bumper of the Kalina.
How to choose a front bumper for LADA “Kalina”
If you do not take into account tuning parts, there are two types of standard front bumpers for Kalina on sale: painted and unpainted. The first ones must be carefully selected by color so that they do not differ from neighboring body elements. The paintwork changes color slightly as a result of exposure to the sun, so selection by catalog number is not always effective and it is better to choose the appropriate color “on the spot.” Unpainted bumpers are suitable when painting adjacent parts of the car (fenders, hood) is required, for example, after an accident. When purchasing a new bumper, you should pay attention to the following points:
- the paintwork of the part should not have chips or cracks (they especially often appear near the fasteners);
- the plastic of the bumper must be elastic, because excessive rigidity causes cracks even with mild impacts, for example, on snow or sand;
- when purchasing a tuned bumper, you should make sure that it has holes for fog lights;
- There must be stiffening ribs inside the bumper, otherwise it may “lead” and lose its original shape.
What is needed to remove the front bumper of LADA “Kalina”
It is better to carry out work on dismantling the bumper in the inspection hole, because part of the fastenings for this part are located at the bottom of the car. If there is no hole or lift, the job will not be impossible, but you will have to unscrew some nuts by feel or lie on the ground to see the attachment points. It is better to remove and install the bumper with an assistant who can hold one side while you unscrew the fastenings of the other. If you perform the operation yourself, you may not be able to hold the part, which as a result will fall and be damaged. To remove the front bumper of LADA “Kalina” you need:
- crosshead screwdriver;
- socket or socket wrench 10;
- extension;
- wrench (preferably with a ratchet, which will make the work much easier).
Currently, two generations of Kalina have been produced, differing in the way the bumper is mounted. Accordingly, the procedure for removing this part is slightly different.
Advice: before removing the bumper from the Kalina (regardless of the modification), you should remove the ground from the battery to avoid a short circuit when disconnecting electrical appliances.
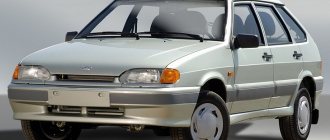
Sports model
If you tune the bumper, the car takes on a completely different look. Kalina brand cars have been produced for quite a long time, so in stores there is a large selection of different bumpers to suit every taste of the car owner. Often a new product is bought in the color of the car body. If you can’t find the perfect color, you can paint the structure yourself. Moreover, both completely in the color of the entire car, and with an insert of a different color.
The Lada Kalina Sport design consists of several components: grille, amplifier, spoiler. A bumper cover is also added here.
The spectacular rear bumper of a car of this brand includes a beautiful and original element - a diffuser located in the central part.
The front bumper has an air intake located in the center, as well as two located on the sides. They cool the radiator and brake discs. When tuning the entire structure, you can install several stiffeners.
In order to tune the bumper on Kalina Sport, you first need to remove the standard structure. After this, installation of the tuned part is carried out in the following order:
- install bumper amplifier Kalina Sport;
- install the main element with a grill.
As a rule, there are no problems with installing this element of the car’s design, although there may be minor difficulties with replacing a regular bumper with a tuned version. For example, the “I am a robot” bumper is several centimeters lower than the factory one, so there is an increased risk of breaking it during installation. If such a bumper is attached to the wings only with the upper screw, when the lower part touches obstacles, the bumper will bend inward. For the “I am a robot” design, it is also recommended to stick a protective film on the bottom of the part so that the paintwork is not damaged.
When installing this structural element, you must remember that it is made of plastic, and it is very easy to damage it, so it is better to install large bulky bumpers using assistants, and if difficulties arise, immediately contact a car service center
In addition, you should be prepared for the fact that any tuning bumper will have to be adjusted during installation, and this should be done with caution.. Today I decided to make a few more topics on repairing the Lada Kalina and stopped at the rear bumper, I decided to prepare material on the removal and installation of this body parts. It took me personally at least one hour to complete this work, although at first I thought that I could do it faster
So, consider below the tool that you will need for this procedure:
It took me personally at least one hour to complete this work, although at first I thought that I could do it faster. So, consider below the tool that you will need for this procedure:
Today I decided to make a few more topics on repairing the Lada Kalina and stopped at the rear bumper, I decided to prepare material on the removal and installation of this body part. It took me personally at least one hour to complete this work, although at first I thought that I could do it faster. So, consider below the tool that you will need for this procedure:
- Ratchet or wrench with 10mm head
- Extension
- crosshead screwdriver
Instructions for the second generation machine
For owners of second-generation vehicles, the procedure has minor differences. We bring to your attention detailed instructions on how to remove the bumper on a viburnum, taking into account changes in the modification:
- Unscrew the 3 bolts located at the bottom.
Central lower screws for Lada Kalina
- Unscrew the two pairs of side screws.
- Remove 2 pairs of screws that secure the fender liners.
- Unscrew the 6 screws located on top.
- Using gentle and smooth movements, release the plastic clips.
- Next, we advise you to use help - carefully pull the part forward, while the latches are removed from the grooves.
- Completely dismantle the element.
Our experiment
The editorial Largus is equipped with a Multitronics C-590 trip computer, which, among other things, allows you to monitor the temperature of the engine coolant with an accuracy of one degree. The information content of a standard device cannot be compared - it shows two tiles on the display if the engine is not fully warmed up, and four at temperatures up to 100°C.
So, during the week, when the temperature in the capital hovered around zero, I collected information about the engine temperature. What happened?
The on-board computer, receiving signals from the “brains” of the engine through the OBD-2 diagnostic connector, displays them on the screen.
The on-board computer, receiving signals from the “brains” of the engine through the OBD-2 diagnostic connector, displays them on the screen.
Removing the front bumper: step-by-step instructions
How to remove the front bumper on Kalina is described in the car's operating instructions. Typically, this procedure does not cause any difficulties for an experienced car owner, so if you do not know how to remove the front bumper, you can study the technical manual, and also consult a more experienced friend. If we talk about step-by-step instructions, it will be as follows:
- First you will need to unscrew the three screws holding the upper radiator trim.
- The second stage of the work is removing the radiator trim. To do this, the front bumper fastenings in the form of two latches located in the corner of the right wheel arch must be disengaged from the brackets.
- Using a Phillips screwdriver, unscrew the three self-tapping screws of the upper fender liner fastening.
- With the “tenth” wrench, remove the three bolts securing the shock absorber to the body.
- The two screws holding the grilles can be unscrewed using a Phillips screwdriver, after which the radiator grille is removed.
- the attachment to the beam is removed in the same way.
- a “10” wrench is used to unscrew the two outer bolts, and a screwdriver is used to unscrew the two middle screws of the upper shock absorber mounting.
- The ampere sidewall flange located on the body bracket is removed. The same operation is performed on the other side of the car.
- The front shock absorber is removed.
- move on to the four bolts that hold the energy-absorbing beam and remove the beam.
Should I change the radiator grille on the Priora?
Lattice
The radiator on Priora is easy to tune. First you need to figure out how to remove the radiator grille.
Sequential steps for replacement
For the work you will need a screwdriver and an awl. Auto mechanics distinguish 2 methods for dismantling the grille.
- The bumper is removed.
- The bumper cannot be removed.
At the first stage, the ground wires are disconnected from the battery. Then the engine mudguard is removed. To do this, you will need to unscrew the 3 bolts from below that attach the bumper to the protective covers. The next step involves removing:
- screws securing the bumper to the front of the body;
- 2 screws for fixing the left and right headlight housings;
- 2 screws on the right and left side of the arches, they attach the bumper to the front fenders.
Kalina 1. Removing the bumper grille (top and bottom).
Removing the grille is completed by removing the bumper. If you remove the Priora se grille using the second method, then you will need to press the locking washer located near the bumper. Then the washers securing the grille are removed. Otherwise, the hood is raised and secured with a stop. After this, the screws securing the combination lights to the front panel are removed. The lights themselves are removed, the electrical wiring is disconnected from them. Using a screwdriver, turn the locking washers 1/4 turn. Then the old grate
The radiator is tilted forward, pulled up and removed.
Replacing and tuning the grille on Priora se are processes that require attention, since this unit provides maximum air flow to the radiator. The procedure will not take much time if you install a branded radiator grille. To secure it, you will need special parts. To do this, it is recommended to determine in advance the location on the bumper where this unit will be installed. In this case, a sealant is used.
Making a part with your own hands
The radiator grille from Priora se is easy to make yourself. To do this you will need the following materials:
- putty;
- fiberglass;
- net;
- dye.
First, the old unit is dismantled. The middle of the part is cut out with a jigsaw. To carry out tuning, holes are drilled in the mounting points. Then you will need a thin and bendable material - plastic or cardboard. It goes around the internal contour of the future unit. It is recommended to note how many centimeters the part will go inside. Based on the obtained dimensions, cardboard or plastic is cut.
Lattice
The radiator is well cleaned with sandpaper and degreased. A solvent is used for this. It is applied to the place where there is contact with the epoxy resin. Otherwise the connection will be loose. To obtain reliable contact and the desired thickness, you will need to repeat this process. As each layer dries, the cardboard or plastic comes off the product. This will allow you to find out whether the material is tightly glued. The next step is to level the Niva surface. For this, putty is used.
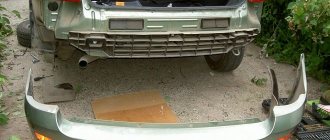
How to replace the front bumper on a VAZ 1117-VAZ 1119?
Note! When you go to the auto store, think about what else you need to buy for the new bumper, for example, as we already said, there is a beam under the bumper, it can be different depending on your car (That is, it can be plastic or metal, it will be metal if you have a viburnum Sport or a new model Kalina), and also if your bumper is equipped with fog lights but the linings into which they are inserted broke upon impact, then you will need to stock up on new linings (These are the mounts where the fog lights are inserted)!
Removal: 1) To remove the bumper, you must first remove the radiator grille; to do this, use a screwdriver to unscrew the three top screws (see photo 1) and then lift the grille a little and disengage its brackets as shown in photo 2 below.
2) Let's move on, now if you have fender liners installed on your car, then unscrew three screws on both fender liners and exactly in those places where the fender liners are attached to the front bumper of the car (see photo 1), then move to the lower part and there on the sides unscrew the two screws securing the bottom trim (see photo 2) and then remove it from the car bumper (see photo 3), then unscrew two more bottom screws (see photo 4) but this time these screws secure the bumper itself to plastic beam that is located under it.
Adjusting the luminous flux from PTF
A car enthusiast needs to know not only how to install and connect fog lights, but also how to adjust their luminous flux. To do this, you need to check the tire pressure, load the car with cargo close in weight to the total weight of the passengers, fill the tank with gasoline, and put on a spare tire.
Then the car (Priora se or another modification) is placed on a flat area opposite a steep smooth wall at a distance of five meters, and the fogs are turned on. Next, the distance from the center of the headlights to the ground is measured, and a line is drawn on the wall five centimeters lower than this distance. After this, you need to adjust the light spot so that its upper boundary is at the level of the drawn line.
The work is carried out for each headlight separately (with one of the headlights closed), after which the results are compared, and the position of the light spots is replaced until both are at the same level. Domestic-made headlights are adjustable only in the “up” and “down” positions; all work with them is done using a long or Phillips screwdriver.
Check and adjust the headlights on a equipped Lada Priora VAZ 2170 car: with a fully filled fuel tank, a set of tools and a spare wheel.
To adjust the headlights on a Lada Priora VAZ 2170, you will need a 6.1 hexagon. Pre-check and, if necessary, adjust the air pressure in the tires.2. Place the car perpendicular to a smooth wall (for example, a garage) at a distance of 5 m. Place an additional weight weighing 75 kg on the driver's seat. Mark the screen on the wall as shown in Fig. 4.4, and draw vertical lines on it: center line O and lines A, B, passing through the points corresponding to the centers of the low beam headlights. These lines must be symmetrical with respect to the center line of the vehicle. At a height h corresponding to the distance of the centers of the headlights from the floor, draw line 1 and 75 mm below it, line 2 of the centers of light spots.3. Turn on the ignition and low beam headlights, turn the headlight electric adjustment knob to position “0” (this position corresponds to the load of a car with one driver). Screws 1 (in the vertical plane) and 2 (in the horizontal plane) manually adjust the light beam to position the light spot for each lights on the screen if the location of the light spots on the screen does not correspond to the figure.5. Adjust the direction of the light spot for each headlight separately. During adjustment, cover the second headlight with opaque material or disconnect the wire connector from it.6. The headlight light is considered adjusted if the upper border of the left parts of the light spots coincides with line 2, and the vertical lines A and B pass through the intersection points of the horizontal and inclined sections of the light spots.
Adjusting the fog lights
Select a flat horizontal area at a distance of five meters from the screen. Any flat vertical surface, such as a wall, garage door, etc., can serve as a screen.
— Check the tire pressure.
— Load the vehicle with a weight close to the weight of the cargo and passengers during the main period of operation.
— Measure the distance from the centers of the fog lights to the ground (floor).
— Draw a horizontal stripe on the screen 50mm lower than the height from the fog lights to the ground.
— Adjust the light spot so that the upper border on the screen is at the level of the drawn strip. The position of the light spot for each headlight is adjusted separately. Close the other headlight tightly during adjustment. The adjustment is carried out by rotating the adjusting screw, which is located in the upper part of the fog lamp.
— Open the headlights. The upper boundaries of the light spots from both headlights should be at the same level. If necessary, further adjust one of the headlights.
The headlights of a new vehicle are set correctly by the manufacturer. However, during operation a situation may arise when it is necessary to adjust the direction of the headlight beams. To do this, it is not necessary to contact specialists; adjusting the headlights is not difficult with your own hands. Let's look at the features of this event using the Lada Priora car as an example.
Installation of bumpers on Lada Kalina
Installing the bumper on the Lada Kalina, both front and rear, is performed in the reverse order.
Before starting work, it is imperative to clean the places where the bumper is attached to the body from dirt and rust. The same applies to the attachment points of the lower grille.
When reassembling the lower grille, as well as the bumper device itself, it is necessary to pay attention to the exact fit of all parts, so if it is done poorly and does not get “in place,” you can only spoil very expensive parts.
The instructions for the car will help you put the front or rear shock absorber back correctly, which you should always have with you. So, for example, if the front bumper mounts cause problems, you can always find answers to the most difficult questions in it. In especially difficult cases, you can ask for help from a more experienced car owner who has already changed this element several times.
Conclusions and recommendations
Replacing a bumper on a LADA Kalina is not a very complicated operation, which is why some experienced LADA drivers claim that doing this is no more difficult than installing a new mudguard. In this case, it is necessary to be very careful and assembled so that it is dismantled and installed back so that its main parts are not damaged. If you meet this requirement, your car will be used for a long time without any major breakdowns.
Sources:
https://site-car.ru/kak-snyat-i-ustanovit-radiator-na-kaline/ https://nadouchest.ru/kak-snjat-nizhnjuju-reshetku-radiatora-kalina/ https://avto- idea.ru/sovety/kak-snyat-peredniy-bamper-lada-kalina/ https://maxmot.ru/kak-snyat-reshetku-radiatora-na-priore/ https://infokuzov.ru/kuzov/zamena- bampera-lada-kalina