Published: 10/20/2020
- Repair or replacement
- Replacing a car's rocker, eliminating play
- Signs of malfunction of the VAZ 2110 backstage
- How to replace the universal joint on a VAZ 2110-VAZ 2112?
- How to repair a gearbox shifter
- Replacing the backstage on VAZ 2110, VAZ 2111, VAZ 2112
- How to choose a new backstage?
- Adjustment
- Instructions for replacing the rocker on a VAZ-2110
- Backstage replacement and repair
- Repair
- Differences between a short-stroke link
Repair or replacement
Before deciding whether repair, adjustment or replacement of the link is necessary, it will have to be disassembled.
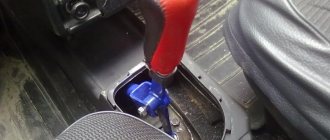
- Remove the cover on the gear shift knob;
- The machine must be installed on a jack or on an overpass (pit);
- Remove the front console, which is bolted on;
- Remove the rocker by unscrewing 6 bolts.
During this procedure, carefully inspect all parts. You definitely need to bend the boot and inspect the condition of the support, cardan shaft, and oil seal.
It may be necessary to use a rem. kit, and perhaps a more complex repair is needed.
If the bushing is deformed, it needs replacement. If the cardan has play, as well as if the hole in the lever axis is worn, a complete replacement of the link and repair belt is necessary. the kit clearly won't help.
It happens that the rocker pad is to blame for the rattling noise when changing gears. Replacing a pillow is a simple operation, but can be beneficial.
Replacing a car's rocker, eliminating play
The design of the gear lever movement device is invented with the aim of uninterrupted operation of the gearbox. You can repair the backstage yourself or with the help of a partner for convenience. Most car enthusiasts are inclined to replace the standard rocker with a short-throw one. Installing a short-throw rocker is a type of tuning that allows you to reduce the limit of movement of the gear shift lever.
When using such a link, gear shifting occurs clearly and quickly. The process of replacing a regular link with a short-stroke one is quite simple. It is necessary to lift the fastening of the iron rod that runs from the gearbox to the shift lever in the passenger compartment. In this case, it is not necessary to remove the link; you only need to disassemble the spherical support.
Then open the iron ring until the plastic tabs move apart and the ball is released. After this, loosen the clamp near the gearbox, disconnect the rod and drag it in using the dirt cover. While in the pit, cut off the parts and weld a pipe into a rod, no more than 2-3 mm thick, and a piece of sheet metal, 5-6 mm thick. The rod is usually cut off by 2-4 cm.
A simpler option, but quite expensive, is purchasing a new rod. A short-stroke slide costs about 700 rubles.
Large play on the rocker is a disease of the car model in question, the cause is the original gearbox driveshaft. To carry out repairs, you need to purchase the cardan itself. For this car, it is suitable from Kalina; it is purchased together with the boot. For the repair itself, a minimum of tools is required: keys “13” and “10”, a screwdriver and a hammer.
https://youtube.com/watch?v=4E5QvJcfEf4
Repair or replacement is carried out on an inspection pit or lift. You will need the assistance of an assistant to make subsequent adjustments to the shift lever. Using two keys set to “13”, stretch the clamp on the rod and pull the drive off the rocker rod. Use a screwdriver to push the boot towards the gearbox or remove it completely.
Unscrew the bolt and knock down the cardan with weak blows of a hammer. Installation of a new one is carried out in the reverse order, that is, first you need to put the boot on and the cardan on the shaft. After the bolt aligns exactly with the recess on the shaft, put the boot on the universal joint.
Making a short-stroke slide with your own hands
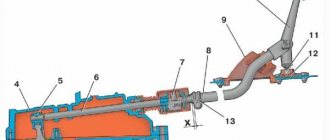
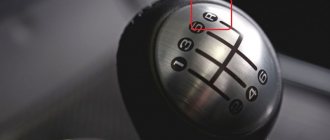
The diagram shows in detail where you need to cut with a grinder, and where you need to cook. So, let's begin the modernization process:
- We raise the place of attachment of the piece of iron that goes from the gearbox to the lever inside the VAZ 2110 interior.
- You can do without dismantling the rocker, the main thing is to disassemble the ball joint.
- Now we need to ensure that the plastic paws release the ball. To do this, you need to unclench the metal ring. We disconnect the rod and carefully drag it inside through the cover, which is responsible for protecting it from dirt. It will be much more convenient to work if the clamp near the gearbox is loosened.
Adjustment is made using this lever.
- Guided by the diagram, we cut off the parts using a grinder. It is necessary to weld a piece of metal pipe with a wall thickness of about 3 millimeters into the rod. To avoid skew, it is necessary to use identical pieces. The pull can be lengthened by 2-4 centimeters.
- All that remains is to raise the hinge with the hook, which serves to prevent an erroneous shift to reverse gear 2110.
Replacement is carried out according to the same scheme. Only instead of welding, a freelance short-stroke rocker from another car is installed. Replacement is a more expensive solution, so doing it yourself is problematic. If you have experience working with gearboxes, then replacing and purchasing a new part will cost about 1,000 rubles.
How to replace the universal joint on a VAZ 2110-VAZ 2112?
It is possible to remove this hinge only on an overpass, inspection hole, or if you raise the car, because this hinge is located under the bottom and you will need to crawl under it to unscrew both bolts that secure it!
1) At the beginning, as you already understood, you will need to crawl under the car, after that, look for the boot there (Indicated by the arrow) and the hinge itself, which is located under this boot, so after that, take two keys in your hands and with one holding the bolt from turning, loosen slightly tighten the nut of this bolt as shown in the figure, and after the clamp nut is loosened, grab the rod with your hand and remove it from the hinge as shown in the small figure.
Before you start unscrewing the nut of the tie rod bolt, drag the boot towards the box so that it does not interfere, and after you disconnect the link, drag the boot towards it and thereby completely remove it from the car!
2) Now you will need to unscrew another bolt that secures the hinge in the front part to the gear selector rod, so after this bolt is unscrewed, you can pull the hinge and calmly remove it from the place where it is installed.
When you install the new joint, you will need to get these bolts into the hole in the gear selector rod, so remember approximately where this bolt is located after installing the new joint in the same place and screw it in so that it fits into the hole in the gear selector rod!
Installing a new hinge is carried out in the reverse order of removal, but only when you install the hinge will the linkage necessarily need to be adjusted, otherwise the gears will not engage clearly and instead of, for example, first gear as mentioned earlier, the reverse gear may easily engage. (For information on how to adjust the rocker, see the article entitled: “Replacing the rocker on a VAZ”)
If you want to study in more detail how the hinge is removed and installed, then watch the video below that clearly shows everything:
I had this driveshaft from a viburnum, and it came to the point that I won’t be able to install it again due to the fact that it transmits all the vibration to the gearshift knob, which is why it constantly cracks.
Top 5 (By votes)
- home
- Articles
- VAZ 2108, VAZ 2109, VAZ 2110, VAZ 1117 Kalina, VAZ 2170 Priora
- We are making a replacement. We are making a replacement.
On VAZ-2108, VAZ-2109, VAZ-21099, VAZ-2110 cars, there is a lot of play in the gearbox and, as a result, unclear gear shifting is not uncommon. We can say that this is a disease or a lack of cars of these brands. And the reason for this “illness”, first of all, lies in the original gearbox driveshaft. If you are interested in how to eliminate this drawback, reduce play in the rocker and increase the comfort of gear shifting on your “eight”, “nine” or “99”, then read the article further...
Installing a short-stroke cardan
The first step is to purchase the cardan itself. The best choice would be a part from Priora or Kalina. Usually it is included in the repair kit with a boot, so the standard boot from a VAZ 2110 will not fit here.
Required tools:
- Hammer.
- Screwdriver.
- Keys for “10” and “13” (2 pieces).
Work is performed only if there is an overpass, inspection hole or lift. It is also recommended to call an assistant for help, since at the end of the process it will be problematic to independently adjust the position of the gearshift lever.
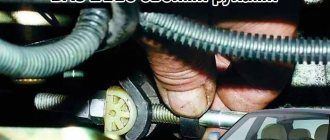
Cardan shaft mounting location. Here you need to unscrew it with the 13th key.
The work proceeds according to the following scheme:
- Armed with two 13 keys, we need to loosen the clamp on the drive rod and then pull it off the rod.
- The next step is to dismantle the boot. Next, use the 10th key to unscrew the bolt, which is a lock on the standard cardan. Now you can remove the cardan with gentle blows of a hammer.
Important: it is necessary to check the condition of the oil seal. If this is the first intervention in the gearbox, then it is most likely in a worn condition, so it is recommended to change the boot.
- We install the driveshaft from the Priora in the reverse order: put on the boot and install the new driveshaft, securely tighten the fixing bolt, and then tighten the boot. All that remains is to put the drive rod on the cardan rod, but the clamp should not be tightened.
- Now the assistant gets behind the wheel and places the gearshift lever in the optimal position. At this time, the clamp is tightened. Done, the replacement is complete, all that remains is to test the switching.
How to repair a gearbox shifter
Let's look at the removal and repair of a gearbox using the example of a manual transmission selector. The automatic transmission gear shift lever is removed in the same way.
Since the design of the lever is quite complex, and its repair requires the use of special tools, the best option would be to contact a car service center.
If you decide to repair the gearbox yourself, stock up on a 10-size wrench, a 12-size wrench and socket head, a 6-size hex key, an extension cord, a wrench, and pliers.
Before starting repairs, remove the gearbox rocker as follows.
Dismantle the lining of the floor tunnel, disconnect the ends of the transmission control drive cables from the levers with which gears are selected and shifted, remove the bracket that secures the cable shells in the sockets of the gearbox selector rocker, remove the cable ends from the sockets of the mechanism.
Next, you need to unscrew the bolts used to secure the gearbox rocker to the base of the body and dismantle the mechanism. Repair of the mechanism is carried out according to the following algorithm.
The tightening of the nut on the selector axis is loosened, while the axis is kept from turning using a hex wrench. The nut is unscrewed, the spring and flat washers are removed from the axle, the axle is removed from the holes in the rocker, as well as the flat and spring washers, the selector lever is removed along with the return spring and the flat washer placed under the lever.
The rubber damping bushing of the return spring is removed from the threaded end of the bolt that secures the transmission lever support cover. If the bushing is significantly deformed, torn or in a hardened state, it should be replaced.
The nut that tightens the bolt that secures the gearbox selector support cover is loosened. Then it is unscrewed, while the bolt is held from turning with a second key, the spring and flat washers located below are removed, the bolt is removed together with the flat washer from the holes of the rocker.
The cover of the manual transmission selector support is dismantled, the lever is removed from the rocker support.
If necessary, plastic crackers are removed from the ball ends of the gear selector knob.
Dismantled parts are carefully inspected. In case of deformation or weakening of the return spring, significant wear of the plastic bushings of the gear selector lever, deformation of the lever, wear or damage to the cotters of the manual transmission lever, they do not need to be repaired, but replaced.
If it is necessary to replace damaged or hardened bushings of the gearbox support, the spacer metal bushings are removed from the holes of the rubber bushings, and then the rubber elements are removed from the holes of the gearbox rocker.
After repair, assembly and installation of the transmission lever linkage is carried out in the reverse order.
Replacing the backstage on VAZ 2110, VAZ 2111, VAZ 2112
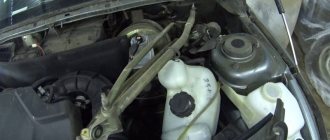
Welcome! The rocker - it is responsible for changing gears in the car, it stands under the bottom of the car and goes into the interior, at the end of the rocker (on its rod) a cover is put on, which is popularly called the gearshift knob cover, you also grab this cover when changing gears in the car .
Note! To replace the rocker on a car of the tenth family, you will need to stock up on: A set of wrenches, as well as an extension cord with a socket head and a screwdriver!
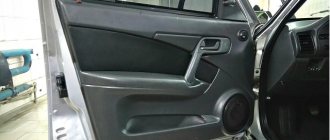
Where is the backstage? As mentioned earlier, it is hidden under a cover (Indicated by an arrow), so to get to it you will need to first pry the cover in the front part with your nails and then remove it from the backstage and then you will have almost complete access to it, and practically because that the rest of the rocker is located under the bottom of the car.
When do you need to change the backstage? Many people at the very last moment think about the rocker, because if the rocker is incorrectly adjusted or worn out, such things happen to the car that the first thing that comes to mind is a malfunction of the box, but still, let's look at these things that will tell you that the rocker is not adjusted correctly or needs to be replaced, firstly, the rocker may stop engaging the first gear, and with the exception of all the others except the first, the fifth may not engage, and the last sign that also indicates a malfunction of the rocker is when you get into the car, engage first gear and then give the gas to take off beautifully, but instead of your car starting to move forward, it suddenly goes back into the car parked behind, of course I don’t want you to find yourself in such a situation, well, the point is that when malfunction or if the rocker is incorrectly adjusted, after engaging first gear, reverse gear can easily engage and you will go back without expecting it.
Video instruction
Content
The gearbox in VAZ 2110 cars is one of the most involved dynamic elements. Because of this, the unit often becomes loose, which makes operating the car inconvenient. A shaking gear shift lever is a fairly common occurrence in domestic cars. There are two ways to combat this defect: constantly adjust the gearbox or make the rocker short-stroke - the process can be done independently. You can also purchase a gearbox repair kit from another VAZ model, which initially comes with a short-throw driveshaft.
This is what the installed short-stroke rocker looks like on a VAZ 2110 car.
What is so good about a short-stroke rocker? Firstly, it guarantees reliable operation of the gearbox over a long period of time. Secondly, the short-stroke version helps to increase the clarity of VAZ gear changes, including in the 2110 model. This is quite enough to make the operation of the power plant more comfortable, because smoothness, stroke and clarity of gear shifting are important for the gearbox.
How to choose a new backstage?
What kind of rocker should I put on a Niva Chevrolet? This question came to the mind of every Niva car owner who had to deal with a malfunction of this element. In fact, there is nothing difficult in choosing a component.
In practice, many car owners of the above car models install mechanisms from classic Fiat cars on their vehicles. According to reviews on the Internet, these devices are completely suitable for installation in a Chevrolet Niva. However, there is also a negative side. In practice, Niva cars equipped with a mechanism from Fiat cars require more careful adjustment of the element. In addition, despite Italian quality, these components of the transmission system are more susceptible to wear and tear.
Therefore, when choosing a mechanism, you should not “be fooled” by the stories of handicraft “garage” craftsmen and come up with a new headache for yourself. For installation in a Chevrolet Niva, it is better to purchase a standard rocker, which is equipped with basic models of Niva cars.
New rocker for Niva ChevroletReplacing an element
As a rule, the need to repair this component arises after installing or repairing the gear shift drive. If you have replaced the drive, but when driving you feel how the vibration of the gearbox lever remains, then, most likely, there is increased play in the lever hinge mechanism. This means that the hinges should be repaired, and accordingly, it may be necessary to replace the rocker.
Read more: Steering wheel anti-theft lock
If you decide to replace a component at home yourself, then prepare in advance everything that you may need during the work process. In particular, we are talking about:
- wrenches on "12";
- wrench set to “14”;
- socket wrench at “10”;
- clamp for securing the gearshift lever cover;
- stationery knife;
- Phillips screwdriver.
Of course, you will also need a new mechanism if you decide to replace it.
First of all, open the hood of your Chevrolet Niva and find the connection between the tip of the gearshift lever and the gear shift rod. Once you see this connection, take the appropriate wrench and loosen the nut of the mounting screw. After this, remove the turnbuckle and its protective cover. Now get into the car and remove the front part of the floor covering. Next, remove the gearshift lever cover frame
Be careful, you will need to remove it carefully to avoid damaging the clips. Next, you will need to turn the shift lever boot inside out. Having done this, you will see the cover fastening clamp
Take pliers or a regular stationery knife and cut through this clamp. After this, the cover can be removed from the lever. Please note: the gearbox lever mounting clamp is disposable. That is, if you bite it with pliers or cut it with a knife, you won’t be able to reinstall the part in its original place. Therefore, when assembling the parts, you will need to install a new clamp. Next, you will need to remove the front portion of the floor tunnel lining. Depending on the year of manufacture of your Chevrolet Niva, the instructions for dismantling the floor tunnel lining may differ. Therefore, we recommend that you use the instruction manual specific to your car. Now look at the gearshift lever. You will see that the axle lock is attached to it: this element must be disconnected from the lever. Having done this, the lever axis can be dismantled, simultaneously removing this axis from the holes of the gear shift lever and the rocker. When the axle is removed, you need to remove the gearshift lever. To do this, you will need to pull the lever itself up. Then take a screwdriver and push the plastic bushing inside the gear lever housing. You need to move this element along the shaft. Now, using a wrench, you need to unscrew several screws securing the gearshift lever housing to the car body. By unscrewing and dismantling the bolts, you can remove the housing and remove the gearbox shaft from it. Next, remove the guide rod from the shaft. Now you will see your backstage. If you see a large play in the hinges of the element that cannot be adjusted, or the hole for the lever axis is too worn, then you need to remove the mechanism and replace it with a new one. Since the process of replacing this element is not so easy, we recommend that you visually inspect all dismantled parts. If you have any doubts about their performance or reliability, it is better to replace them immediately. After replacing the backstage, all parts must be assembled in the reverse order. Don't forget to install a new shift lever clamp.
After installing the rocker, you will need to adjust the gearbox shift drive.
Why change the backstage
There are situations when it is necessary to intervene in the gear shift mechanism due to the failure of a component. But there are cases when an extreme measure is required - replacing the VAZ-2109, 2114 rocker. In these cases, replacement is required:
- An oil leak appeared due to damage to the oil seal. Only the oil seal can be replaced.
- Complete failure of the scenes.
- You have realized the advantages of a short-stroke design and you have the funds for this kind of tuning.
Symptoms of gear shift mechanism failure:
Increased gearshift lever play
Please note that this behavior may also be caused by a loose cardan. Sometimes the bolt securing it gets screwed out, so to reduce the backlash it is enough to tighten it, and first apply a drop of thread locker. Difficulty shifting gears
Sometimes extraneous sounds are heard. Gear shifting is not possible. Inconsistency between the position of the lever and the selected speed. For example, the back one disappears, and the first one is in its place.
If a slight play appears, it is advisable to carry out diagnostics and identify the breakdown of the unit. Make repairs immediately, otherwise one or more speeds will disappear at the most inopportune moment.
Adjustment
The backstage adjustment should be made in several cases:
- after dismantling the gearbox;
- when the cardan has been replaced or the fixing clamps have become loose;
- if the linkage rotates on the hinge.
Of course, this will also be advisable if you have recorded signs of a malfunction of the element, which are described in the previous paragraph.
What to cook?
Before you begin repairs, prepare in advance:
- wrench to loosen the clamp;
- wheel chocks or bricks.
Universal wrench
You will need wheel chocks...
...or the most ordinary bricks
Step by step instructions
To perform repairs, that is, adjustments, you need to perform the following steps:
- First, drive your VAZ 2110 into a garage with a pit or onto an overpass.
- Place bricks or special wheel chocks under the car. Apply the handbrake.
- Climb under the bottom of the car and find the clamp that secures the linkage and hinge.
- Use a wrench to loosen the clamp.
- Then sit in the driver's seat and put the car into reverse. Remember that the lever must be in the extreme left position. Therefore, set it the way you think it should ideally be when engaging reverse gear. It is advisable to do this work with an assistant so that he holds the gearbox lever in the position you set it.
- Now again climb under the bottom of the car and firmly fix the clamp in this position.
Reach under the bottom and loosen the clamp, then set the gearbox lever to the reverse gear position
This completes the adjustment of the device. Take a test drive and check the operation of the unit. If necessary, repeat all steps again.
Backstage adjustment:
Note! Before you go to the auto store and buy a new rocker, be sure to try to adjust the old one first so as not to waste money, maybe everything is fine with the old rocker!
1) At the very beginning of the operation, we will tell you why the adjustment of the rocker may go wrong, namely, after removing the box, after replacing the cardan shaft, or after unscrewing the nuts and bolts that secure the tension clamps of the rods that come from the rocker, and in other cases.
2) Now let’s move on to the actual adjustments, firstly, you will need to first drive the car into a pit or lift it using a lift, then climb under the bottom of the car and there you will find the boot under which the driveshaft itself is located (the boot is indicated by a red arrow), next to with this cardan and the boot that covers it, the end of the rod coming from the rocker itself will be attached, and this end will be attached using a tie clamp, so take two screwdrivers in your hands and with their help loosen the bolt nut a little (the nut is indicated by a blue arrow, and the bolt green), while when you loosen, hold the bolt itself with one wrench so that it does not turn, and with the other at this time loosen the nut, after the nut is slightly loosened, take a screwdriver in your hands and insert it into two holes, namely in the hole between the tie clamp (Indicated by a yellow arrow) and into the hole of the rod itself (Indicated by a white arrow), thereby widening both holes (In fact, these are not holes but a groove, so in the future we will use this word) so that the link rod can easily move relative to gear selector rod.
Note! Before you crawl under the car, put the car into first gear!
3) After you loosen the tension clamp, get out from under the car and return to the car interior. In the cabin, move the gear shift lever all the way to the left, but forward or backward and do not even try to pull it.
4) And to complete the operation, again climb under the car and tighten the nut of the same bolt that secured the tie rod of the rocker link.
Note! When all the operations are completed, test the gearshift lever for functionality, namely, check whether all gears engage clearly, start the car, drive it a little and if the shifter is working, then everything will be fine and you won’t even need to change anything!
By the way, another way (almost the same method) of adjusting the rocker, see the video clip below, in this video an example is shown on a VAZ 2109 car, but don’t pay attention to this, since the entire gear shift mechanism is on front-wheel drive cars VAZ, including the top ten, is practically no different from each other!
Diagnostics
In any car, the gearbox is used to prevent the car from changing gears on its own. This part needs to be monitored and looked after; in addition, over time it becomes loose and requires adjustment. If the adjustment has not been made for a long time or it was performed poorly, then the driver will feel uncomfortable when driving the car.
It is because of this that prevention should be carried out, as well as due attention should be paid to the scenes. If the car begins to behave somehow incorrectly, then it is necessary not to delay the repair.
Gearbox slide
To understand that the rocker requires adjustment or replacement, you just need to monitor the operation of the gearbox.
As a rule, when a failure occurs, the following symptoms appear:
- Difficulty when engaging 1st gear. As a rule, it is difficult to engage the gear; the driver has to practically drive the lever in to engage 1st speed.
- Possibly difficult shifting from 1st to 2nd speed.
- Due to a loose lever, it is not 1st speed that is engaged, but reverse. This is very dangerous, especially at a traffic light, at the start. It is necessary to urgently repair the rocker, otherwise the problem will only get worse.
- Difficulty engaging 5th gear, while other speeds can be engaged smoothly.
- There is play in the shift knob. As a rule, the rocker only requires replacement and adjustment is not necessary.
- Extraneous sounds appeared coming from under the car, or rather from the gearbox. As a rule, the sound becomes ringing. This problem is a disease of the entire VAZ 2110-2112 family. As a rule, such a ringing can appear after repairing the car’s suspension.
- When driving, the speed may jump. In other words, the car, gaining acceleration, independently disables the engaged gear and switches to neutral speed. For further driving, you will need to keep the lever at the desired speed constantly so that it does not jump out.
- Strong vibration that occurs on the shift knob. This is due to the failure of the scenes. It will need to be repaired to solve the problem.
If the symptoms described above appear, then you will need to begin repair work. You should completely replace the linkage or simply adjust it and gear shifting will become comfortable again. Therefore, it should be adjusted before replacing.
Adjusting the work of the scenes
Backstage adjustment
Adjustment is made only in cases where:
- The gearbox was removed and installed back;
- Previously, repairs were carried out to replace the cardan;
- In the case when the hinges on the slide have turned.
Of course, adjustments can be made at other points as described earlier. Do not forget that even minimal gaps can disrupt the correct operation of the entire transmission.
Naturally, before starting repair work and adjustments, you will need to prepare the right size wrenches. With their help, the clamps will be loosened. You should also place bricks, stones or special anti-roll devices under the wheels.
When everything is ready, you can begin the work process itself. To do this you need:
It is recommended to use an overpass or pit for repairs; if these are not available, then use reliable jacks. Next, you should go to the garage. When the car is ready for repair, it is necessary for safety to put on the handbrake and throw bricks or specialized devices under the wheels that will prevent the car from rolling away. Next, you need to crawl under the car and find a special clamp. It connects the hinge and the rocker itself. Then you will need to loosen it using a wrench. Loosen the clamp
Next you need to get out from under the car and get behind the wheel.
Now engage reverse gear, it is only important not to confuse it with 1st gear. Therefore, you should look at the position of the lever, it should be maximally in the upper left corner
It is recommended to do this procedure with someone. This person will need to hold the lever in a locked position. Next, you need to climb under the car again and tighten the clamp, applying great force.
That's the whole process of adjusting the scenes. Nothing complicated, the main thing is to follow safety precautions.
Instructions for replacing the rocker on a VAZ-2110
If adjusting the part does not give positive results, there is only one thing left to do - replace the part or try to resurrect it through repair, but in the latter case you will need the help of knowledgeable repairmen.
Replacing the VAZ-2110 backstage looks like this:
- Prepare the necessary tools in advance so that you don’t have to be distracted from your work later. What you will definitely need:
- screwdriver;
- side cutters;
- set of wrenches.
You won't be able to cope without a repair kit designed specifically for the VAZ-2110.
- Now that everything is at hand, open the hood and find the nut connecting the transmission rod and the tip of the handle.
- Remove the special protective cover from the nut and tighten the turnbuckle.
- Get back into the car and take out the frame that fits the lever that controls the transmission. Clamps may interfere with this work, but you can’t get rid of them, spend a little time and everything will work out.
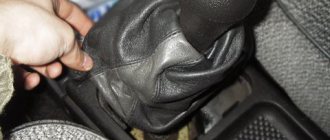
- Turn the cover inside out.
- Using a sharp knife, cut the clamp to secure it and remove the cover. It's okay if you couldn't avoid damaging the integrity of the clamp. It is disposable, so the clamp will still have to be replaced with a new one.
- Get rid of the tunnel lining on the floor.
- Disconnect the axle retaining part from the gearbox handle.
- Pull out the gear knob by pulling the lever up.
- Slide the sleeve inside the lever, which is responsible for the direction of the part.
- Remove the 4 mounting bolts holding the guide bushing in place.
- Remove the housing and remove the shaft.
- Now look at the nodes. If there are signs of wear on the rubber part, the bushing cannot be repaired and must be replaced. If the hole located under the handle axis is severely worn out or the play is noticeable to the naked eye, it’s time to change the link.
- Return all parts to their original place and adjust the operation of the gearbox.
Video on how to replace the rocker on a VAZ-2110:
Backstage replacement and repair
Taking into account the fact that during operation of a car, the rocker on a VAZ or on any other car experiences constant loads, the mechanism wears out, and adjustments get lost
For this reason, it is important to understand what in a particular case would be the optimal solution: repair, adjustment or replacement of the rocker with a standard new one or a short-stroke one
In any case, it is necessary to first disassemble the mechanism. To do this you will need:
- remove the cover on the gearshift knob;
- drive the car onto a pit or overpass/lift;
- remove the tunnel where the gearshift knob is installed by unscrewing the bolts;
- dismantle the rocker itself (on a VAZ 2110 it is secured with six bolts).
During the disassembly process, you need to carefully check the condition of each individual part, you should also bend the boot, check the condition of the support, oil seal, cardan, etc.
If, for example, the oil seal has failed, then it is enough to have a repair kit where such an oil seal is included. This kit will also come in handy if more complex repairs to the backstage are required.
We also note that a common problem that drivers note during operation is the rattling of the rocker. Typically, in this case, if there are no other complaints, the drawstring cushion is often the culprit.
At the same time, replacing the rocker cushion is not a complicated procedure, but the result is often positive and significantly increases the comfort when operating the vehicle.
Another important procedure in the process of servicing the rocker is replacing the rocker rod oil seal. It is important to understand that the serviceability of not only the operation of the scenes, but also the gearbox directly depends on its condition
If drops of transmission oil are visible under the car, this often indicates that the seal is leaking. As a rule, problems with the VAZ 2110 rocker seal appear in the form of a crunching noise when switching.
As for replacing the oil seal, the car needs to be driven into a pit or raised on a lift. Next, you should inspect the rubber boot. If it is not sealed or is torn, traces of oil will be visible.
Then you should bend the boot, disconnect the cardan and thus gain access to the cuff. Now the cardan is removed from the lever, after which it is disconnected from the rocker. After removal, you can get to the oil seal and then use an awl or hook to remove the gearbox cuff.
In fact, such repairs allow you to avoid oil leaks in the gearbox and improve the operation of the gear shift mechanism
Finally, we note that it is also important to carry out adjustments and settings after repairs.
The fact is that even a serviceable, but incorrectly configured rocker will not work properly. By the way, on a VAZ 2110 it’s difficult to set up the rocker yourself. To make the process easier, it is better to immediately invite an assistant.
Installing a short-stroke cardan
The first step is to purchase the cardan itself. The best choice would be a part from Priora or Kalina. Usually it is included in the repair kit with a boot, so the standard boot from a VAZ 2110 will not fit here.
Required tools:
- Hammer.
- Screwdriver.
- Keys for “10” and “13” (2 pieces).
Work is performed only if there is an overpass, inspection hole or lift. It is also recommended to call an assistant for help, since at the end of the process it will be problematic to independently adjust the position of the gearshift lever.
Cardan shaft mounting location. Here you need to unscrew it with the 13th key.
The work proceeds according to the following scheme:
- Armed with two 13 keys, we need to loosen the clamp on the drive rod and then pull it off the rod.
- The next step is to dismantle the boot. Next, use the 10th key to unscrew the bolt, which is a lock on the standard cardan. Now you can remove the cardan with gentle blows of a hammer.
Important: it is necessary to check the condition of the oil seal. If this is the first intervention in the gearbox, then it is most likely in a worn condition, so it is recommended to change the boot.
- We install the driveshaft from the Priora in the reverse order: put on the boot and install the new driveshaft, securely tighten the fixing bolt, and then tighten the boot. All that remains is to put the drive rod on the cardan rod, but the clamp should not be tightened.
- Now the assistant gets behind the wheel and places the gearshift lever in the optimal position. At this time, the clamp is tightened. Done, the replacement is complete, all that remains is to test the switching.
Repair
Regardless of what exactly you do with the rocker - repair, adjust or change, you will still need to disassemble this unit.
Disassembly is performed as follows.
- Remove the cover from your gear shift knob.
- Place the car on a pit, or raise the front end with a jack.
- Remove the front console. It is held in place by mounting bolts.
- Now remove the curtain itself. To fix it, AvtoVAZ used 6 bolts in the case of the VAZ 2110 model.
- When carrying out dismantling work, be sure to examine the condition of all elements.
- By bending the boot, you will gain access to the support, oil seal and cardan shaft.
Changing the boot
Now regarding the repairs. There may be several recommendations in this regard, depending on the current state of the node and its components.
- At best, repairs will require the use of a repair kit for the backstage. It doesn't cost much.
- If the bushing is deformed, it will need to be replaced with a new one.
- Check the lever shaft bore for wear.
- Make sure there is no play in the driveshaft. Otherwise, a regular repair kit will no longer be enough, that is, a complete replacement of the entire backstage will be required.
- Often the culprit of extraneous noise and rattling when shifting gears in gearboxes is the rocker pad. Changing it is quite simple, and even a beginner can perform the operation.
Replacing the oil seal
Quite often, VAZ 2110 owners are faced with a situation where, after parking under the car, they find traces of oil. There are two options here - the oil filter has worn out or there are problems with the oil seal.
As you replace the oil seal, you will be able to simultaneously inspect and change such elements as the cushion, cardan shaft, and boot.
Dismantling works
But let's talk about everything in order. First of all, check whether it is really an oil seal and not a filter. If everything is fine with the filter, then we drive the car into a pit or find another way to end up under the bottom of your VAZ 2110. Beforehand, it would be a good idea to watch video materials regarding your current situation.
- Carefully inspect the boot. If oil leaks from the gearbox through the oil seal on your car, traces of it will definitely remain on the boot.
- Bend back the boot. This way you can get to the cardan, disconnect it and gain access to the cuff.
- You first need to dismantle the cardan from the lever, and only then from the rocker itself. Not the other way around.
- The cardan has been removed, so we move to the oil seal.
- The cuff is removed from the gearbox using a hook and an awl. Therefore, make sure you have these tools at hand in advance.
- Now a new one is installed in place of the old oil seal. Craftsmen have adapted to using ordinary plastic bottle caps. If you get used to it, it turns out to be very easy to change the oil seal.
- After replacing the element, return all dismantled components to their places. If some of them need replacing or signs of wear are already visible, it is better to replace them immediately. It is unlikely that you will want to repeat the same operation in a couple of weeks and lie under your own car.
Repair will not give the desired result if the adjustment was carried out with errors. To do everything carefully and competently, use the help of a partner. One will work under the car, the second will help from inside.
The gearbox is one of the most complex components of a vehicle. However, this does not mean that its repair cannot be done at home on your own. Now we will tell you what the VAZ 2110 rocker is, what may be the reasons for its malfunction and how to repair the mechanism.
Differences between a short-stroke link
The main differences can be seen even in photographs. We see that the short-stroke rocker has smaller dimensions, namely length. To reduce the stroke length at startup, the length of the transmission under the hinge should be increased. Due to this, we can not only get shorter gears, but also maintain the traction axis in its original position.
The photo shows a self-modernized backstage. As an alternative, you can use a part from other VAZ models.
It is worth understanding that after such tuning, you will need to put more effort when changing speeds. After upgrading, switching will resemble joystick control, which is undoubtedly a plus. In addition to the rocker, you can install a backlash-free cardan, which will also have a positive effect on the smooth operation of the gearbox.
Frequent breakdowns of the scenes
A breakdown of the rocker in a VAZ-2110 is accompanied by the following main symptoms:
- A faulty gear lever play means that the part cannot be repaired, only replaced.
- If you hear a ringing in the wings, then perhaps the VAZ-2110 has a built-in part with a manufacturing defect. Sometimes the ringing appears after repair work has been carried out; you cannot leave the car in this condition; the mistakes made will have to be sorted out and corrected.
- If the driver notices that the speed is turned on poorly, use one of the following solutions to the problem - try to repair the rocker, or maybe it’s better to replace it right away.
- When reverse gear turns on instead of first speed, the problem is absolutely not in the rocker; the real cause of the breakdown will still have to be determined.
- Does the gearbox lever vibrate very much while the car is moving? This means that there is significant play inside the gearbox knob hinges.