As you know, the battery is an important element in the design of any car. At the same time, the battery constantly consumes energy to start the internal combustion engine, and also powers various electronic devices connected to the on-board network. Normally, the battery is charged from the generator after the engine is started, but for a number of reasons this process can be disrupted.
As a result, the battery is not fully or partially charged, which causes problems with starting the engine, deteriorates the condition of the battery, etc. Also, a problem with charging the battery often indicates certain breakdowns that require elimination and are in no way related to the battery itself. Next, we will look at why the battery is not charging, as well as how to check, find and fix the problem yourself.
Features of the battery charging system on the VAZ-2107
On the VAZ-2107, the battery or battery performs the same functions as on other vehicles. The battery must support the vehicle's electrical system when the engine is turned off. If the car is in working condition, then all its electrical equipment receives power from the car generator. Its functions include providing electricity to the following equipment:
- Engine ECU (electronic control unit);
- nozzles;
- fuel supply pump (gasoline pump);
- AKB (rechargeable battery).
Generator VAZ 2107 purpose and main functions
The performance of the battery on a VAZ-2107, as on many other cars, depends on three main parts: a generator, a voltage regulator, and connection systems for these two devices.
If, when a breakdown is detected, you still cannot fix the car, then the best solution would be to call a tow truck https://volok-evakuator.ru/lotoshino.html, which will deliver the car to a service station.
A machine generator set, a generator, is an element that performs the task of providing electricity to various components of the car, as well as providing a constant charge to the battery. The main components of the generator set include:
- housing with windings;
- anchor;
- current rectifier;
- stabilizer.
The generator set operates through a drive - a belt passing from the crankshaft pulley.
How to determine the charge level?
Primary control of the charge level on the VAZ 2107 is carried out by instruments on the panel: a control lamp and a voltmeter. If the charge is normal, the indicator arrow will be in the green area, and the control lamp should go out when the engine is running.
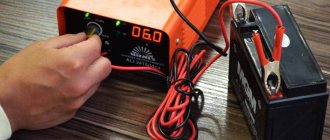
To more accurately check the voltage level, you need a voltmeter. As mentioned earlier, the correct charge is 13.6 - 14.1 volts.
You can purchase a special automotive electronic voltmeter or one combined with a watch. Installed both instead of the standard clock and on the dashboard.
Preparing to Troubleshoot
If a problem is detected, we begin diagnostics. First, let's prepare the tools.
List of tools:
- Multimeter (voltmeter);
- Emery cloth or needle file;
- Knife;
- Pliers;
- 12-volt indicator lamp (control).
How to find the reason for the battery not charging
The first sign of a lack of charging is the warning light on the instrument panel coming on or if the voltmeter needle is not in the green zone when the engine is running. You can more accurately check the voltage on the battery using a multimeter.
When the engine is running, the voltage on the battery should be – 13.9±0.3 V. If the battery is not charging, the voltage will be approximately 12 V.
Warning: to avoid damage to the ECU and regulator relay, do not remove the battery terminals while the engine is running.
Increased or decreased voltage of the on-board network harms the battery. In the first case, the electrolyte boils away, in the second, it is discharged, which leads to failure of the battery.
To find the problem and fix it, you will need the following tools and devices:
- control lamp 12 V;
- multimeter;
- knife;
- flat screwdriver;
- pliers;
- sandpaper.
We check the ignition coil on our own
Welcome, friends, to the DIY car repair website. For every driver, there comes a time when his car for some reason begins to act up, does not start or stops working properly.
There are a great many possible malfunctions when it is impossible to start the engine, but one of the most common breakdowns is a malfunction of the ignition coil.
Even if you are new to this business, there is no need to give up and panic. After all, you can always try to repair your car with your own hands. This is just an excuse to hone your skills in repairing your favorite “iron horse.”
Although the ignition coil is a fairly reliable device, failure nevertheless occurs, albeit quite rarely. First, let's look at what malfunctions happen and how to fix them on your own.
The most common signs and malfunctions of the ignition coil
If you turn the ignition key, the starter works, that is, it rotates, but the engine does not start, one of these signs is a malfunction of the coil, popularly called the reel.
Possible reasons:
- No spark
- There is no current (power) or contact on the wires that go to the terminals
- Chips and cracks in the plastic case
- Primary or secondary winding burnt out
Now let's look at how to identify the malfunction and, if possible, eliminate the cause, and in the future it is even possible to replace it with a new one, since this part cannot be repaired.
How to check the ignition coil yourself
The first thing you need to do is see if there is a spark on the center wire. To do this, we pull it out from the central part of the distributor and lean it against any metal coating, in other words, against the mass at a distance of five to seven millimeters.
If there is a good, fairly powerful spark, then the bobbin is working, if not or very weak, then it is faulty.
How to determine the lack of battery charge
Checking the battery charge
The easiest way to determine the lack of charging is using the car’s instruments, that is, the charging indicator lamp and the sensor (voltmeter) on the instrument panel. The sensor arrow should be in the green sector, and the battery lamp should not light up when the engine is running. Otherwise there is no charging.
But the best way is to check the voltage on the battery with a multimeter. When there is a charge, the voltage on it lies in the range of 13.6-14.2 V, and when there is no charge, it will only have its own voltage of 12 V (± 0.6 V). Under no circumstances remove the terminals from the battery to check to avoid damage to the RR, ECU and other electronic devices on your car.
To troubleshoot battery charging problems, you must use the following tools:
- control lamp 12 V;
- multimeter with a measuring range of up to 60 V AC and DC voltage;
- flat blade screwdriver;
- shaped screwdriver with a Phillips blade;
- pliers;
- knife;
- emery cloth.
A little theory
During operation, a dead battery is charged with a constant voltage of 13.6-14.2 V in the vehicle's on-board network. For proper operation of the car and its systems, this voltage is maintained by the battery itself until the generator rotor begins to rotate at a frequency of 800-900 rpm. Then it produces electricity sufficient for normal operation of the car and charging the battery. Under different engine operating modes, when the engine crankshaft speed changes, the generator rotor speed also changes, which leads to an increase in the voltage at the generator output. To maintain a voltage of 13.6-14.2 V in the on-board network, a voltage relay-regulator (RR) is included in the generator excitation circuit, which, when the network voltage increases above the rated voltage, reduces the current going to the generator excitation winding. The magnetization of the rotor poles decreases, which leads to a decrease in its output voltage.
The reasons that the generator does not charge the battery are related to the elements of the excitation circuit or the output voltage circuit from the generator to the battery, including parts of the generator.
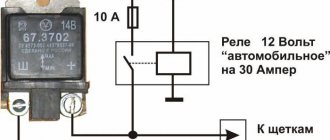
When the ignition is turned on, the lock also turns on the ignition relay. In this case, +12 V passes through the relay contacts and fuse No. 10 of the mounting block, then is supplied to the on-board network and to the output of the battery charge indicator lamp and the charging sensor. Then they go through the diode, the mounting block (plugs Ш5-Ш10), and are fed to plug “61” of the generator 37.3701, which have been installed on the VAZ 2107 since 1988. Next, +12 V goes to the terminal of the built-in PP and through the brush and slip ring to the winding excitation - the starting excitation of the generator is performed. As the engine speed increases, and with it the generator rotor, the phase voltage increases, and through a block of additional diodes it increases the voltage on the excitation winding and on the output diode of the battery charging indicator light. When the output phase voltage reaches +12 V at both terminals of the battery lamp, the voltage is equalized, and due to the absence of a voltage difference, it goes out. In this case, the VAZ 2107 generator produces a voltage of more than 12 V, which charges the battery.
The electrical circuit diagram of the VAZ 2107 car injector differs from the circuit diagram of the VAZ 2107 carburetor only in the presence of a piece of equipment that controls the power system, and does not affect the battery charge. Quite the contrary - malfunctions in the battery charging system can affect the operation of the injection engine ECU.
Powerful electricity consumers are controlled using electromagnetic relays connected to the network. Let's look at ways to troubleshoot battery charging problems for both injection and carburetor engines.
How does the battery charge in a VAZ 2107?
To understand how the process of charging the “seven” battery occurs, you need to know the principle of operation of the generator and understand the connection diagram of these devices.
Design, drive and characteristics of the VAZ 2107 generator
A car generator set serves to provide electricity to the vehicle’s on-board network, as well as to recharge the battery when the power unit is running. Structurally, it consists of the following main elements:
- housings with windings (stator);
- armatures (rotor);
- current conversion module (rectifier);
- stabilizer (voltage regulator).
The generator serves to provide electricity to the on-board network of the machine.
The installation is driven by a belt from the crankshaft pulley.
Throughout its history, the “Seven” was equipped with two types of generating sets: 372.3701 and 9412.3701. They have the same design and operating principle, except that in unit 9412.3701 the fan blades are located inside the housing, and the rectifier module is located outside.
Table: main technical characteristics of VAZ 2107 generator sets
| 372.3701 | 9412.3701 | |
| Rated voltage, V | 14 | 14 |
| Current at rated voltage and armature speed 5000 rpm, A | 55 | 80 |
| Maximum power, W | 770 | 1120 |
| Weight, kg | 4,5 | 4,9 |
The performance of these devices differs greatly in terms of the amount of current produced and power output. Generator 9412.3701 is more productive. It is used in injection “sevens”, where the on-board network is supplemented by an electronic engine control system.
Troubleshooting algorithm
There is no need to think that charging is not happening for some very serious reason. Immediately check the condition of fuse F10, which is responsible for powering the excitation winding of the VAZ 2107 generator. But before doing this, it is better to make sure that the drive belt is intact and its tension is normal. But also pay attention to the fact that you cannot over-tighten it - there will be no recharging of the battery (provided that the regulator is operating in the intended mode), but the bearings will fail much faster.
If charging is not going well, the lamp, for example, burns at half intensity, then the fault must be looked for in the wiring. Namely, in the connections between the battery and the car body. Very often oxidation occurs, which prevents normal contact. Unscrew the nut, thoroughly clean the terminal and body surface, and then install the wire in place.
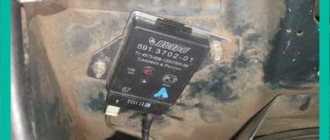
But if everything is fine with the switching, but charging still does not occur, you need to look further for the reason. And the first thing to suspect is the voltage regulator. With its help, the voltage at the generator output is stabilized. If this element fails, the battery overcharges or it does not charge well. Repair of this element is impossible, and the price in stores will be about 300 rubles. There are several options for regulators:
- A separate unit - installed on the body of a VAZ 2107 car.
- Combined with brushes - mounted directly in the generator.
How to check the regulator will be discussed in a separate article. If it is working properly, but charging still does not occur, or it is there, but it does not flow to the battery well, look for a fault in the brush assembly. It is quite possible that the wires that connect the brushes to the contacts have broken. But the most common thing is excessive wear or clogged brushes.
Somewhat less often, failure of the diode bridge or destruction of the stator or rotor windings occurs. To determine these breakdowns, you will need to completely disassemble the generator and carry out diagnostics using a tester and megger. Along the way, of course, it is best to replace the bearings in the VAZ 2107 generator.
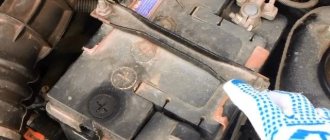
Where to start checking
If the VAZ 2107 battery icon does not light up, the voltmeter gives normal readings, but the battery does not charge, which means there is no (or insufficient) contact at the terminals. Their severe oxidation can cause the voltage from the generator to the battery simply not to flow. Therefore, it is necessary to remove the terminals, thoroughly clean them, as well as the battery terminals, then reconnect the battery to the on-board network and check the functionality of the charging system.
In the case when the voltage on the VAZ 2107 battery is still below normal, you need to measure it at the output from the generator with the engine running. Is there a big difference between the readings on the terminal and on the battery? Try cleaning the contacts and checking the wire connecting the battery to the generator. Broken - requires replacement.
The next element that is checked is the generator drive belt. If it becomes loose, it will slip along the pulley, which is why the generator will not be able to generate the required amount of electricity. And although charging will be carried out (provided the circuit is in good condition), it will not be enough. At the same time, the engine is running, the voltmeter shows the norm. However, if the system is loaded a little more - for example, by turning on the headlights - then the voltage drops sharply. Then, if the battery charge on a VAZ 2107 disappears, this indicates that the tension belt is loose and slipping. The belt should be tightened; if it wears out during operation, replace it. But you can’t overtighten either: excess belt tension puts an overload on the pumps and generator bearings.
The third component of the circuit that is checked during the initial diagnosis is fuse No. 10 (in the fuse box). It is he who is responsible for supplying voltage to the battery: the VAZ 2107 battery charging fuse has blown - the system will not work.
If everything is in order with the terminals, belt, fuse, the reasons for poor charging of the VAZ 2107 battery need to be looked for further.
Troubleshooting
The first thing to do is check the tension of the alternator drive belt. Let's look at the main reasons why charging on a VAZ-2107 may fail. The reasons can actually be anything - even a simple broken belt. Over time, it wears out and becomes unusable. On the "sevens" the belt also drives the coolant pump. And if the belt suddenly breaks, this can be seen by the fact that the temperature of the antifreeze in the engine block will instantly increase.
If the control light in the dashboard does not light up, and the voltage in the on-board network is at a normal level, but there is still no charging, you can look for the cause of this phenomenon in the terminals and contacts that connect the wires. Remove the terminals from the battery to clean them. Very often they are covered with a layer of oxides that interfere with the conduction of current. The result is a large voltage drop. Quite often, the fault lies not even in the charging wires themselves, but in the bus that connects the body, the engine block and the negative terminal of the battery.
Indicator light
As can be seen from the diagram, the charging system involves a large number of components and each of them can cause poor charging or its absence. To monitor the battery charging process, the car's dashboard is equipped with a control light.
If the system is in good working order, the control signal turns on after the factory. But when the engine enters operating mode, the VAZ 2107 battery charging light does not light up. This means that the battery's energy supply is replenished from the generator. At the same time, the needle on the voltmeter moves to the green sector.
What is needed for repair?
In the event that the VAZ-2107 has lost its charge, you need to start repairs as quickly as possible. It is impossible to carry all the tools and equipment with you, but it is still worth having a minimum set in the glove compartment or trunk.
More specifically, you need to have the following set of tools:
- Voltage measuring device (multimeter).
- Lamp 12 volts and power no more than 3 W.
- Screwdrivers – flat and Phillips.
- Stationery knife for cleaning wires.
- Pliers.
- Sandpaper.
Having this entire set of tools, you can begin to carry out repairs. Fortunately, on a VAZ-2107 it’s quite easy to do this with your own hands.
Confronting attackers
Due to the fact that the battery is not cheap, the issue of protecting the VAZ 2107 battery from theft is quite acute. It’s not difficult to open the hood of a “classic,” which is why thieves are keeping a close eye on the “Sevens.”
Experts offer several options for preventing theft.
- Secure parking or secure garage.
- installation .
- Installation of the hood lock. Let’s be clear right away: few people take this step. Welding work is required, the appearance deteriorates, and it is quite easy for a professional to pick the lock.
- Take the battery with you. Labor-intensive, inconvenient, but effective. On the other hand, if the car is left for a short time, it is defenseless: they can even remove the battery in a supermarket parking lot.
- Reliable battery fixation. Almost the most popular method. The fasteners are secured with a secret that prevents dismantling and makes theft difficult. In combination with an alarm it is a very effective technique.
Related link:
Adjusting the valves of the VAZ “Classic”
But all experts agree that the most reliable protection for the VAZ 2107 battery against theft is comprehensive. A combination of multidirectional measures will give the best results!
More complex breakdowns
If, when the engine is running, the voltage in the on-board network is in the normal range, but when the load increases, it immediately drops, then we can say that the alternator belt is very loosely tensioned. Quite often, at low speeds, the belt even begins to whistle. It should be noted that with normal belt tension, the sag should be no more than 17 mm. Moreover, the force should be no more than 10 kgf. If the belt is very loose, it needs to be tightened. If tension cannot be achieved, a new one should be installed.
No charging: signs and reasons
If the voltage from the generator for some reason stops supplying the battery, it will be discharged in a few days . And in the event of a complete failure of the battery installation, you will have to provide the entire on-board network, including the ignition system, yourself. So she can work for no more than an hour.
Signs of no charge
Symptoms that the alternator is not charging the battery include:
- a constantly burning or intermittently turning on warning light on the dashboard;
- rapid battery discharge;
- reduction in the performance of individual electrical devices on the machine's on-board network.
Signal lamp
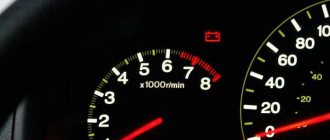
There is a special lamp on the dashboard of the “Seven” that indicates that the battery is not charging. If the generator circuit is operating in normal mode, the lamp lights only when the ignition is on until the power unit starts operating. After starting the engine it should go out . If it continues to light, most likely the battery is not charging.
The first sign of a lack of battery charging is a constantly burning red lamp in the form of a battery.
It also happens that the control lamp turns on periodically. This is a sign that voltage is either not supplied to the battery at all, or is supplied inconsistently.
Battery drains quickly
If the generator or its circuit malfunctions, the battery will not receive the voltage necessary to charge it. In addition, she will have to power part of the car’s electrical equipment, consuming her own electricity. In such a situation, the battery will quickly run out. You will be able to understand this when difficulties arise in the process of starting the engine. Receiving insufficient energy, the starter will sluggishly turn the crankshaft flywheel or only “click” the traction relay.
Reduced electrical performance
Some electrical appliances will also help you understand that the generator is not operating normally. If you suspect a malfunction in the operation of the generator set, you can, for example, start the engine, turn on the headlights (if they have conventional incandescent or halogen lamps) and see how they shine . If the generator malfunctions, their brightness will be an order of magnitude lower, because the lamps are also designed for a certain rated current. A decrease in performance may also be observed at the heater fan. It will spin the blades noticeably worse. When it is turned on, the light from the headlights will be even weaker.
Reasons for lack of charging
There are few reasons for the battery not charging. These include:
- violation of the integrity (break) of the drive belt;
- belt loosening;
- a break in the wiring of the electrical circuit of the generator or severe oxidation of the connecting terminals;
- rectifier malfunctions;
- voltage regulator failure;
- a break in the generator windings or a short circuit.
Belt break
Although the belt is designed for 50 thousand km, it can break even after several days of use. Especially if there are defects in the pulleys of the device itself, the crankshaft or the pump. In itself, a break in the generator drive belt is not dangerous for the engine, but only if this malfunction is detected immediately. And the point here is not so much the lack of charging, but the pump stopping. If it stops working, the engine will instantly overheat. And this is already fraught with burnout of the cylinder head gasket with all the ensuing consequences. So if the warning light comes on or other symptoms of alternator malfunction occur, the first thing to do is check to see if the drive belt is intact. To do this, you need to stop the engine, open the hood and perform a visual inspection of the generator set drive.
If the belt breaks, not only the generator stops working, but also the pump.
Loosening the belt
The drive belt must have a certain tension. When the tension is weakened, it will slip on the crankshaft pulley, not providing the number of rotations of the generator rotor that is necessary to generate current with the required parameters. A sign of a loose belt is a characteristic whistle, which most often occurs when air humidity increases. When the belt slips, the warning light usually does not come on, but in some cases it may turn on for a while or blink.
If the generator belt tension is weak, it may slip on the pulley.
Open circuit and terminal oxidation
The battery will not charge even if the integrity of the wires in the generator connection circuit is damaged. The battery charging circuit is quite simple: just one wire connects the positive terminal of the battery to terminal “30” of the generator set. It is through this that the voltage is supplied. The battery negative is connected to ground, to which the generator housing and the corresponding winding terminals are also connected. You just need to check for contact between the indicated points in the circuit.
Oxidation of the battery terminals, as well as their unreliable connection to the wire tips, can also significantly affect the current supply . You can check the condition of the terminals visually, but you cannot determine how the current flows by eye. It is better to once again clean and retighten all wire connections on the battery and generator.
When the battery terminals oxidize, the contact deteriorates and the charging current stops flowing.
Failure of the rectifier module
If the rectifier breaks down, no current will flow from the generator to the battery. The block itself is a board with six silicon diodes (3 positive and 3 negative). If at least one of them burns out, the rectifier will need to be replaced, since it cannot be repaired.
Video - Battery protection from theft
When the engine starts, there is a normal charge; as the engine heats up, the charge level becomes less. I changed the “chocolate”, stretched the ground wires - nothing changed. I removed the generator and sent it for diagnostics - they said that everything was working, normal. I don’t even know what to do anymore. They say that this often happens in injection classics.
- Why does the VAZ 2107 battery drain quickly? – 6 answers
- It's hard to start a car - 3 answers
- Why might the new generator fail? – 6 answers
- The battery on the 2107 was not connected correctly – 6 answers
- Tachometer needle jumps at 2107 - 6 answers
I have a similar situation with the 2107 classic injector. If the issue is resolved, please share your experience. I replaced both the LV and the diode assembly on the standard generator, and even replaced it with two new generators. I replaced the negative wire and moved its other end from the cylinder block to the receiver bolt. I called and cleaned all available contacts and terminals. Now I’m working on a version of detecting a current leak or connecting an unauthorized consumer. Which appears only when the load is turned on, in the form of headlights, heaters, emergency lights, glass heater, etc. A pointer tester is only needed for measurements. Turn it on in DC current measurement mode at a high limit, probably 10 A, between the battery terminal and the tip of the negative (or positive) wire. Turn on the ignition, look at the ammeter readings, at least before turning on the radiator fan. Record the constant value or change in current, within what limits and for how long. Gradually add a load (connect low beam, then high beam, then others) and monitor the change in current in a similar way. An anomalous value should appear, something higher than 7-8 A. After identifying such a current value, take turns on the mounting block, remove the fuses and monitor the ammeter needle. There will be a fuse, after disconnecting which the current will decrease to less than 7-8 A, jump or stop changing. The circuit that this fuse protects should be carefully examined for its connections, routing locations, etc. It would be good, for clarity, to connect a voltmeter to the battery terminals. I myself, urgently, cannot do this kind of thing. Try it if it seems convincing. Then report the result.
When starting the engine, especially in winter, the starter consumes a large current, therefore the battery is intensively discharged.
The engine started, the battery began to charge from the generator (restore consumed energy). The ammeter will then show increased energy consumption.
As the engine warms up, the battery charges and energy consumption decreases. Consequently, the ammeter shows a decrease in energy consumption, down to zero, when the battery is fully charged. That's the whole theory.
And the next thing, if you have a generator with a 6-diode bridge, then replace the bridge with an 8-diode one. In this case, it will be necessary to use the central terminal of the winding (star) of the generator.
And set the voltage regulator to 14.5 V, for example Germany. And also, replace all incandescent lamps with LED ones and you will be happy.
The lifespan of a car battery largely depends on the alternator. It is he who keeps the battery in working condition, charging it with electricity. The slightest malfunction in its operation can damage the battery.
Generator repair
If the generator set has been dismantled and problems are found in its component parts, work should be done to replace them. Repair of the VAZ-2107 generator is carried out as follows:
- fix the impeller with a screwdriver;
- unscrew the fixing bolts;
- remove the pulley parts;
- unscrew the bolts securing the cover. Take out the pin;
- use a hammer to knock off the stator cover;
- remove the bushing located under the front cover, which also needs to be removed;
- knock out the rotor with gentle blows of a hammer;
- unscrew the nuts securing the rectifier to the winding terminals;
- unscrew the nut with the abbreviation “30” and remove the washer;
- replace structural elements;
- assemble the device;
This completes the work of replacing generator parts.
Video repair of VAZ 2107 generator
For more information about generator repair, watch the following video:
Generator diagnostics
In order to check the diodes, you need to use a multimeter or a test lamp. Using a multimeter, you can measure the on-state resistance of semiconductors. In order to diagnose devices using a lamp, you need to disconnect the positive terminal from the battery. One wire must be connected to the positive terminal of the battery, and the second to the three bolts of the rectifier diodes.
Afterwards you need to perform a similar operation with the negative terminal turned off (and the positive terminal turned on). If the lamp starts to light up, this may indicate that the corresponding diodes are broken. The best option is to install a new diode block. But in order to save money, you can replace only those that are faulty.
The main condition for repairs is to do everything carefully. The current flows in this node is large, so weak insulation will lead to the formation of a spark gap, which will cause failure of not only the semiconductors, but also the generator windings. If the charging light is on on a VAZ-2107, this may indicate that one of several components has failed.
A few more words about the voltage regulator
Finally, it should be added that in cars such as the VAZ 2107, it is necessary to check the voltage supplied from the generator to the battery with a voltmeter at least once a month. We discussed how to do this above. The fact is that a car device that shows the battery charge level very often lies, showing us the norm, while the voltage at the battery terminals during engine operation is lower or higher than it. And here the danger is not so much the lack of charging as the so-called overcharging. It occurs when the voltage regulator malfunctions and is characterized by the supply of voltage to the battery, the value of which is greater than prescribed.
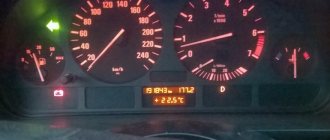
I personally had to face a similar problem. It all started when the relatively new battery stopped holding a charge. When using the car every day, it started without problems. But as soon as the car sat for a week, the starter made it clear with its clattering that it would not work without the “lighting” wires. A visit to an auto electrician showed that the outermost “bank” of the battery was swollen. This means that the electrodes in it are short-circuited. Why did they suddenly close if everything was in order? After starting the engine, the electrician measured the voltage at the battery terminals. The voltmeter showed 17.2 V, which is unacceptable for this battery model. At the same time, the device on the panel faithfully gave out the “norm”. Checking the voltage regulator confirmed the auto electrician's diagnosis. It was faulty. Replacing the device took no more than half an hour. And the repairs, it would seem, didn’t cost much. The battery, of course, had to be replaced, since with the onset of cold weather it began to discharge even faster.
About six months later, I accidentally noticed that the car’s headlights began to shine noticeably brighter. Then one of the headlights burned out. A week later, another one burned down. Without waiting for the battery to swell again, I decided to carry out diagnostics and repairs myself. Armed with a multimeter, I went to the garage. The measurement results again showed that the voltage regulator was faulty. This time the generator produced 15.6 V. I no longer went to the electrician. I removed the generator myself, replaced the regulator and installed everything in place. The control voltage measurement showed 14.2 V. After that incident, I regularly measure the voltage twice a week. More than a year has passed and everything is back to normal.
Unfortunately, the VAZ 2107 cannot be called a reliable car. But it still has one advantage - simplicity of design. Therefore, it is not at all necessary to contact specialists if minor malfunctions occur.