Why does the starter not respond to turning the ignition key?
After turning on the ignition, power from the battery is supplied to the on-board electrical systems and the computer (if equipped). If there is an immobilizer (standard or an installed security system), this occurs only after the tag is recognized. When the key is turned to the start position or the start button is pressed, the contacts of the solenoid relay are closed, resulting in power being supplied directly to the starter. At the same time, the starter overrunning clutch (Bendix) engages with the flywheel crown, setting it in motion and ensuring the engine starts. Often, switching is carried out through an additional starter control relay, which removes the load from the lock.
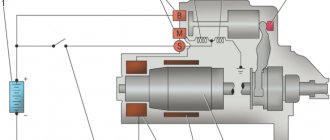
Ignition switching circuit
If a problem arises at any of the above stages, the car will not start: you turn the ignition key and the starter is silent. As a rule, the reasons for this behavior lie in:
- ignition switch contact group;
- alarm and immobilizer;
- control relay;
- wiring from the control relay to the starter;
- starter solenoid relay.
More information about why the starter does not work with the ignition key can be found in the table.
The starter does not work from the ignition key: reasons
| Problem | Cause of malfunction |
| Starter motor faulty | The electric motor fails due to overheating, short circuits in the windings, wear of the brush assembly, and jamming of the gearbox. |
| The circuit from the ignition switch to the starter solenoid relay is faulty | Wiring break or short circuit. Often occurs after repairs, installation of additional equipment, or as a result of mechanical wear during long-term use. |
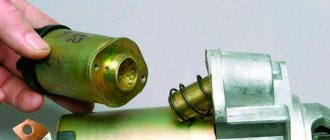
| Damage to the ignition switch (deformation of the cylinder) | Deformation due to overheating, which in turn occurs due to poor contact. Damage is also possible due to the mistaken use of an inappropriate key. |
| Electrical malfunction of the ignition switch contact group | The layer of oxides formed on the contacts prevents the flow of current. Also, the contacts may move away due to deformation of the rotary sleeve on which the mating parts are attached. |
| Start blocking by installed alarm | A voltage surge in the on-board network or loss of power (disconnection of a terminal or discharge), failure of a transistor or microrelay responsible for turning on the start line in the base unit of the security system. |
| Immobilizer malfunction/decoding | Voltage drops and sudden loss of power (battery discharged or terminal removed), software failure, failure of microelements. If the immobilizer does not recognize the mark, the starter does not turn after turning the ignition key, and the immobilizer symbol usually lights up or flashes on the indicator panel - an image of a car with a key or lock. |
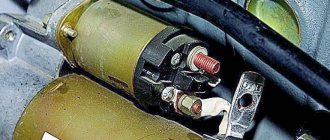
| Failure of the solenoid relay | Burnout or short circuit of the winding as a result of overheating due to the flow of increased current or being under load for an extended period. The root of all problems is usually oxidation of the internal and external contacts of the solenoid relay. |
| The limit switch for the automatic transmission selector position, the brake pedal for an automatic transmission or the clutch for a manual transmission is faulty | Sensors fail due to mechanical wear, and their wires and terminals can oxidize or fray. Because of this, the ECU does not allow the starter to start. |
| Starter relay failure | If the starter control relay is stuck or shorted, it cannot supply power to the control terminal of the solenoid relay. |
| Poor “+” contact from the battery on the starter | The power contact terminal oxidizes under the influence of moisture and heat. The nut that holds it to the starter stud can come loose due to vibrations. |
| Poor ground contact at the battery terminal, car body or engine | Due to oxidation, the contact of the ground wire deteriorates; the same thing happens when its nut is unscrewed under the influence of vibration. In this case, the passing current may be enough to turn on the on-board network and the ECU, but not enough to drive the starter electric motor. |
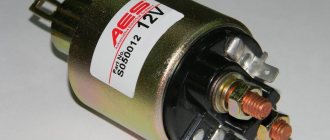
Types and design of electric starter relay
There are three types of starter relay:
- blocking (preventing the device from starting when the engine is running);
- unloading (converting lower currents into stable 12 V);
- retractor (traction), which is attached directly to the starter.
The first two are certainly important, but they are not installed on every car, unlike the “traction” one, without which the engine will not start.
The traction electromechanical relay is responsible for:
- The bendix is thrown into engagement with the flywheel.
- Closing and holding the bridge between the “plus” of the relay and the starter.
- Stable power supply to the brush assembly of the electric starter.
- Timely shutdown of the trigger mechanism.
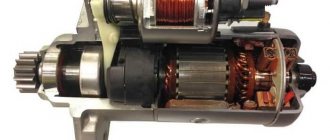
Starter solenoid relay diagram
Inside, it is arranged simply: under the metal body there is a two-winding coil with a core. On the one hand, the body has a protruding rod (the pulling end of the armature), on the other, an ebonite cover with three terminals (2 powerful contact bolts and one “pin”). The lower bolt is connected to the plus of the electric starter by a power wire (oblique). The armature - a metal core - “walks” longitudinally inside two windings (coils): “retracting” (VO) and “holding” (CU). When retracted, it presses on a movable electrode, at the end of which a spring-loaded copper contact plate is attached. At the end of the armature (core) stroke, the plate is pressed against the “nickels” of the bolts, closing a short circuit - from one to the other, and then to the electric starter brushes.
The edge of the core is connected to a fork lever that moves the Bendix gear forward. In the non-working position, it protrudes far from the body, and when current is supplied to the pulling coil, it goes under it, “pulling” the upper edge of the “fork” behind it. Swinging on the axis, its lower edge moves forward - carrying out, through the driving clutch, the Bendix (gear with a freewheel) into engagement with the teeth on the flywheel crown. When this happens, a metallic knocking or clicking sound is heard.
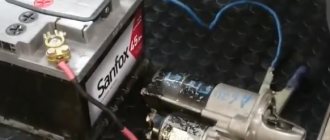
What to do if the starter does not turn the engine from the ignition switch
If when you turn the ignition key the car does not start, and nothing happens at all, in some cases you can correct the situation by supplying power to the starter, bypassing the lock. This solution is suitable for cases where the electric motor itself and the solenoid relay are in good working order. In this case, you need to proceed according to the following algorithm:
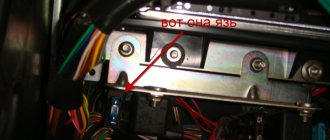
Control wire terminal
- Turn on neutral gear and ignition.
- Find two terminals on the starter: a thick power wire from the battery positive and a thin control wire from the control relay.
- Using a metal object (screwdriver, key, wire), close the power and control contacts.
- After the starter operates and the engine starts, immediately open the contacts.
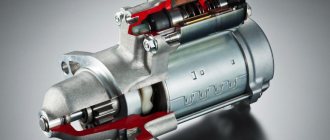
Starter malfunctions
Most often, in the event of such malfunctions, it is necessary to dismantle the unit.
In this case, you need to know the most vulnerable parts of the starter, namely:
- Brush unit;
- Windings;
- Solenoid relay.
Each element requires special inspection and proper maintenance.
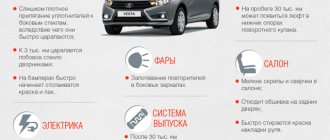
Frequent malfunctions on popular cars
In most cases, the starter does not turn when the ignition key is turned due to oxidation and mechanical damage to the wiring. If there is poor contact with the “+” terminal of the battery, the control relay or ground, the starter does not receive enough current to crank the engine . Therefore, first of all, you need to look at the contacts in the engine compartment and check for voltage at the terminals with a tester. The most common malfunctions of specific car models, due to which the starter does not respond to the ignition key in the table.
| Why does the starter not work from the ignition key on popular car models? | |
| Auto | Weakness |
| VAZ 2110, 2111, 2112 | Wires of the central locking and ignition switch, which melt due to power surges. |
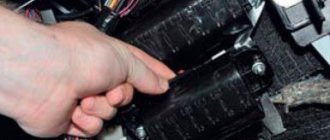
| VAZ 2108, 2109, 21099, 2113, 2114, 2115 (Lada Samara) | Oxidizing contacts of the control relay located in the engine compartment above the VUT, as well as the wiring extending from it. |
| VAZ 2101, 2102, 2103, 2104, 2105, 2106, 2107 (Classic) | The contact “nickels” of the solenoid relay often burn or oxidize. The contact group of the ignition switch fails. On later models, for example, 2107, problems with the control relay are similar to Samara (see above). |
| Niva | On old Nivas (before 21213), the ignition switch contacts burn and oxidize. On newer ones (after 21214), the starter control relay, located under the hood near the brake fluid reservoir, often fails. There is a drainage tube located nearby that drains water from under the glass, moisture from which gets onto the relay, which leads to oxidation of its contacts. |
| Lada Priora | Immobilizer problems due to which it does not see the key. |
| Lada Kalina, Lada Granta | Failure of the immobilizer, blocking the start, malfunctions in the contact group of the ignition switch and failure of the additional starter relay K3 in the fuse block. |
| UAZ | Malfunction of the 5-pin starter control relay and solenoid relay. |
| Gazelle | Poor contact of wires and failure of the starter relay. |
| Peugeot 307 | Solenoid relay fuse F8 blows, poor ground contact. |
| Kia Sid | The limit switch of the automatic transmission selector, which determines the P and N positions, is faulty. There may be poor contact at the starter terminals or at the point where the ground wire is attached to the body. |
Starter windings
A possible cause of this malfunction may lie in the windings inside the starter. This problem reveals itself primarily by a specific burning smell and a change in color (it can even be reflected on the starter housing), and there may be signs similar to a malfunction of the brush assembly.
In this case, of course, you can try to repair the unit, but it is easier and better to replace it altogether, besides, repairing will not ensure long-term performance of the starter; it will still fail in the near future.
The main thing is that when the solenoid relay is activated, but the starter does not turn, it is necessary to accurately determine the cause of this malfunction, then it is easier and faster to eliminate it. And if you can’t handle it on your own, it’s better to contact a service center.
Answers to frequently asked questions
How can you tell if the starter relay is not working?
To determine whether the starter relay is working, apply power from the positive terminal of the battery directly to the control contact of the relay. After this, a click should sound; if it is faulty, there will be no sounds.
How to check whether the starter is working or not?
To check the serviceability of the starter itself, you need to apply current to it directly by connecting the power wires of the retractor relay (thick wire from the battery) and the electric motor (stud with a thick wire from the retractor to the starter). A working starter should start moving.
What to do if the starter does not work after turning the ignition key?
First, make sure there is voltage at the battery terminals. If you don’t have a tester, this can be done using a 12 V lamp. Then try to apply voltage directly to the starter: use a screwdriver to close the pin to which the wire from the battery goes and the control contact located nearby. If there is no reaction, check the quality of the contacts of the terminals on the battery, the ground contacts (with the body and the engine) and the contacts of the starter itself by cleaning and tightening the terminals. If the battery is discharged or the starter is faulty, you need to start the car with a pusher (manual transmission) or tow it to the repair site.
Why does the starter not work with the ignition key?
The main reasons why the car does not respond to the ignition key:
- control relay failure;
- breakdown of the ignition switch/contact group;
- wire break or short circuit;
- problems with the anti-theft system (alarm, immobilizer);
- breakage of the solenoid relay;
- starter motor failure.
If the starter turns directly, but not from the key, then the last two problems can be eliminated.
Source
Brush unit
If the problem cannot be solved, then the reason lies elsewhere. More often than not, this problem is caused by the brush assembly. In this case, you cannot do without disassembling the unit, since only when disassembling the starter can you get to the brushes themselves to see their condition.
Their wear can only be determined visually. Presumably, such a malfunction can be calculated only by the duration of its operational life. This can only be corrected by replacing the brush assembly.
The starter clicks but does not turn, what is the reason?
Good afternoon. Many car enthusiasts are familiar with the situation when the starter clicks but does not turn. As luck would have it, such situations happen at the most inconvenient moments, for example, at gas stations or when leaving for work.
In today's article, we will tell you how to determine the malfunction and, if possible, start the car to get to the repair site.
Before telling the troubleshooting algorithm, let's look at the starter device. For clarity, watch this video:
As you can see, the starter is a regular DC motor and relay. When you turn the key in the ignition and hear a click, it is the solenoid relay that clicks (the coil and contacts at the top of the screen in the video). If the starter does not rotate, but clicks, the following options are possible:
- The battery is dead.
- starter relay failed
- The contact coins in the solenoid relay are burnt.
- The starter brushes are worn.
- the starter armature is jammed.
- power plus is not supplied to the starter (because if there is no mass there will not even be retractor clicks)
Below we will analyze each of these faults in detail, and tell you which faults will allow you to start the car on the spot, using the existing starter, in order to get to the service station.
A severely discharged battery is the most common cause of clicking noises when turning the ignition key.
The error looks like this:
In our video you can see that when starting, at first, the starter barely turns the engine, and then it just crackles…. If the battery is severely discharged, the starter will not even try to crank the engine but will immediately make nasty clicking noises.
The fact is that the battery voltage is not enough even to operate the solenoid relay!
Options to solve the problem:
- light a cigarette from another car (we have a separate article about this on our website).
- start the car from a pusher/tug (if it has a manual transmission).
- remove and charge the battery.
Starter relay failure.
Relay failure manifests itself as a quiet click when turning the key.
In this case, you can start the car using a simple screwdriver. This is done like this:
Attention! If you are not confident in your abilities, you should not do this. It is better to contact specialists or call a tow truck. If you make a mistake when starting this way, the vehicle may move unintentionally or catch fire due to a short circuit.
Vehicle with manual transmission:
- set the parking brake.
- turn on neutral gear.
- open the hood and prepare a flathead screwdriver.
- turn the key in the ignition switch to the ignition on position.
- Using a screwdriver, we close two contacts on the solenoid relay (as in the video).
- After starting the engine, remove the screwdriver and drive to the repair site.
Mechanical problems
Rarely on cars with high mileage is it possible for the Bendix to simply stick into the crown tooth. Initially, both the flywheel ring gear and the Bendix teeth have lead-in chamfers, allowing the gears to mesh even if the Bendix tooth does not precisely fit into the gap between the flywheel teeth. Wear over time leads to dulling of the lead-in chamfers, and a situation is possible when a Bendix tooth rests against a flywheel tooth, preventing the retractor relay core from reaching the end of the stroke and closing the power contacts.
You can “revive” the car simply: either short-circuit the terminals on the solenoid relay so that the rotor turns to a different position, or, if there is no convenient access to the starter, turn the crankshaft itself by the generator or power steering pulley using a socket and ratchet. But this is an “emergency” method - you should not postpone repairs, since similar problems will continue in the future.
Frequent breakdowns
Proper operation of the starter ensures proper operation of the vehicle's drive. Not all failures in this area can be corrected during starter regeneration. It often becomes necessary to replace the starter with a new one. Wondering whether the starter does not turn the reason for this, the driver is at a loss.
Common starter problems include:
• incorrect operation of plain bearings;
• wear of motor brushes;
• damage to the electromagnetic switch;
• destruction of the flywheel.
A specific diagnosis of a starter malfunction is the task of an experienced mechanic. However, there are a few noticeable symptoms that should prompt the average user to visit the garage.
The first and most obvious sign is that the engine won't start at all and you can't hear the starter sound. However, it may be too noisy due to excessive wear on the coupling sleeve or a broken rotor. A slow starter that does not allow the engine to operate sufficiently may be due to a damaged solenoid switch.
Damage is most often associated with its overheating, corrosion and poor assembly, due to which the starter may be incorrectly matched to the vehicle or incorrectly assembled with the engine mechanisms. It is worth keeping in mind typical faults, because not all of them are suitable for replacing the entire device at once.
Replacing the Bendix starter: step-by-step instructions with photos
Like the brushes, you can also replace the Bendix with your own hands without much difficulty. This section provides step-by-step photo instructions for replacing the Bendix starter. As in the previous case, it is quite universal.
Step 1: Start by unscrewing the brush assembly nut from the relay bolt.
Unscrewing the brush assembly nut from the relay bolt
Step 2. Then you need to remove the contact of the brush assembly output from the relay bolt, which was discussed above.
Removing the brush assembly output contact
Step 3. Then you need to unscrew the tension screws that secure the traction relay to the mask. There are three of them and they are all located nearby.
Unscrewing the clamping screws
Step 4. Next you need to pull the relay out of its seat.
Removing the relay from its seat
Step 5. Only after this can you unscrew the coupling bolts of the starter itself as in the instructions above in step 3 and remove the motor from the housing.
Unscrewing the starter pinch bolts
Removing the motor from the housing
Step 6. The next step is to remove the relay core.
Removing the Relay Core
Step 7. Next you need to remove the gearbox from the housing. You are almost there.
Removing the gearbox from the housing
Step 8. You need to remove the fork from the gearbox that secures the bendix.
Removing the fork that fixes the bendix
Starter fork removed
Step 9. Then you need to knock the retaining ring off the gearbox shaft. To do this you will need a hammer and chisel.
Removing the retaining ring from the gearbox shaft
Retaining ring removed
Step 10. All that remains is to remove the old damaged bendix and replace it with a new one.
Removing a damaged bendix
Step 11. At this stage, you should install the new bendix in its rightful place.
Installing a new Bendix
Step 12. Now you need to assemble the starter by repeating steps 9 to 1 in reverse order. The locking ring is clamped using pliers.
Reassembling the starter
Working principle of VR
A constant plus is supplied from the battery to the upper power bolt of the “traction” bolt. In the free state, the contact plate does not touch the “nickels” of the power bolts in the cover. Both windings – the pull winding (VO) and the holding winding (CU), are connected with one terminal to a small “control” terminal, which receives the starting pulse from the ignition key (plus). The second output - a more powerful VO - goes to the jumper with the lower power bolt (plus of the starter electric motor), and the OU - to the “ground” (housing).
Starter connection diagram
As soon as the ignition key closes the power supply circuit to the VO, the current in it will create a magnetic field, under the influence of which the core will move inside the housing, push the bendix forward, and press the plate to the terminals. The plate will create a “short path” for high voltage current - from the top bolt, to the bottom and to the starter brushes. When the current flows through it, the “minus” disappears from the traction winding. Now only the holding one starts working, which is still energized (and will be as long as the ignition key remains in the “Start” position).