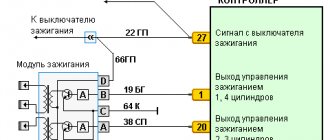
The ignition system (Fig. 1) uses an ignition module consisting of a two-channel electronic switch and two two-terminal ignition coils. The ignition system has no moving parts and therefore requires no maintenance. It also has no adjustments, since the ignition control is completely electronic.
Rice. 1. Ignition system VAZ-21214. 1 - battery, 2 - main relay, 3 - ignition switch, 4 - spark plugs, 5 - ignition module, 6 - controller, 7 - crankshaft position sensor, 8 - drive disk, E - matching devices.
The ignition system uses a spark distribution method called the "idle spark" method. The engine cylinders are combined in pairs 1-4 and 2-3, and sparking occurs simultaneously in two cylinders: in the cylinder in which the compression stroke ends (working spark), and in the cylinder in which the exhaust stroke occurs (idle spark). Due to the constant direction of current in the primary and secondary windings, the sparking current of one spark plug always flows from the central electrode to the side electrode, and the second - from the side to the central one.
Ignition control is carried out by a controller that uses information about the engine operating mode received from sensors of the engine management system.
The ignition system has the following four circuits
Ignition control circuit for cylinders 1 and 4.
The controller generates an ignition control signal to contact “B” of the ignition module. This signal is used to switch the primary winding of the ignition coil and provide high voltage to the spark plugs of cylinders 1-4.
Ignition control circuit for cylinders 2 and 3.
The controller generates an ignition control signal to contact “A” of the ignition module. This signal is used to switch the primary winding of the ignition coil and provide high voltage to the spark plugs of cylinders 2-3.
Ignition module.
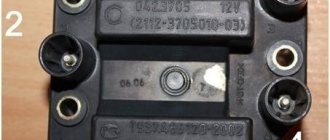
The ignition module (Fig. 2) contains two ignition coils and two powerful transistor valves for switching the primary windings of the ignition coils. The controller controls the module by sending signals through the ignition control circuits “1-4” and “2-3”. If any element of the ignition module malfunctions, the entire assembly must be replaced.
| Rice. 2. Ignition module. |
Power circuit.
The car's onboard voltage is supplied from the ignition switch to contact “D” of the ignition module.
Ground circuit.
The ground connection circuit goes from the end of the cylinder head cover to contact “C” of the ignition module.
Removing the ignition module
1. Disconnect the wire from the negative terminal of the battery. 2. Disconnect the wiring harness connector from the ignition module. 3. Disconnect the spark plug wires. 4. Remove the ignition module by unscrewing the fastening nuts.
Installing the ignition module
1. Install the ignition module on the bracket on the engine and secure it with nuts, tightening them to a torque of 3.3. 7.8 N. m. 2. Connect the spark plug wires. 3. Connect the wiring harness. 4. Connect the wire to the negative terminal of the battery.
To generate a spark in Niva cars, an ignition module is used. Older Nivas were equipped with a distributor; this part did not inspire reliability and required special attention and frequent revision. With the transition of Niva to injection engines, the need for a distributor disappeared, and it was replaced by a more reliable ignition module.
In this article we will talk about the ignition module of a Niva car, namely how to check it, signs of malfunction and much more. After studying this article, you can easily find a breakdown in your car related to the MH.
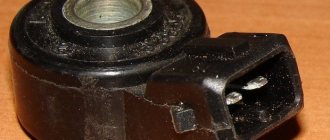
Purpose and design of the part
The purpose of this sensor is one thing - to supply a reliable spark to the combustion chamber of the car through high-voltage wires and a spark plug. To be more precise, the ignition module does not supply a spark, but only the voltage necessary to form a spark on the spark plug.
The design of the part is made of heat-resistant plastic, in which two coils are placed. Each of the coils is responsible for the operation of two cylinders. The coils have a primary and secondary winding in which high voltage is generated.
Module differences
There are two types of ignition modules for Niva. The first type was installed on Niva until 2006, and it migrated to the Lada 4x4 from the VAZ 2112.
VAZ 2112 module
The Niva received a new type of module from the VAZ 2111.
VAZ 2111 module
Visually, these two details are quite difficult to confuse. They differ from each other in weight and dimensions; the weight of the MZ from the VAZ 2112 is much greater than from the VAZ 2111.
Candle making options:
Checking the DPD with a VAZ 2110 multimeter
To increase productivity when creating these products, some technological features are used, which in theory can increase productivity, and as a result, the highest quality fuel combustion:
- Platinum coating. Allows you to increase the service life up to 50 thousand kilometers due to the fact that the surface becomes more resistant to the combustion products of the fuel mixture.
- Multi-contact spark plugs. Typically used in cars that are operated in regions with predominantly low temperatures. Such products make it possible to improve the starting of a cold car in the morning. In summer, it is recommended to replace them with regular ones.
Examination
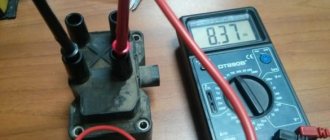
The module can be checked using a special diagnostic tool ELM327 or using a multimeter. Since not every car enthusiast has a diagnostic device, it would be most correct to talk about checking the MH using a simple multimeter.
To check the MH you will need a regular household multimeter, also known as a tester. The test consists of measuring the resistance of the windings.
Step-by-step verification process
Checking the resistance of the secondary winding
- To do this, set the resistance measurement limit on the multimeter to 20 kOhm.
- We connect the probes to the terminals of the module and look at the readings of the device.
- The winding resistance should be around 5 kOhm.
Checking the primary winding
- It is necessary to set the switch on the multimeter to measure resistance with a limit of 200 Ohms.
- We connect the multimeter probes as shown in the picture and measure the resistance.
- The resistance should be around 5 ohms.
Why does the MH break down?
The ignition module fails due to the use of low-quality spark plugs, as well as due to the use of old high-voltage wires whose insulation has lost its properties.
If the MZ gets wet, for example, by driving a Niva along a ford, then the likelihood of it breaking is quite high.
In order for the ignition module to work much longer, it is necessary to change the spark plugs and high-voltage wires on time.
Symptoms of a problem
How to correctly set the ignition on Izh Jupiter 5
As already mentioned, symptoms of a faulty ignition module are also typical for many other components of the car. There are almost no signs that directly indicate MH. This significantly complicates repairs. However, with experience, conclusions about a malfunction of the Chevrolet Niva ignition module can be drawn from the following symptoms.
- Two cylinders are not firing at once. This is the only sign that, although not always, indicates MH. The likelihood of this increases if cylinders 1 and 4 or cylinders 2 and 3 are not working at the same time.
- Idle speed “floats”.
- Diagnostics shows misfires in all cylinders.
- As the engine warms up, its power drops and interruptions appear.
- The CHECK ENGIN alarm comes on.
Also interesting: Diagram and pinout of the Niva 4x4 instrument panel (VAZ 2121, 2131) » Lada.Online
It should be noted that a complete failure of the motor, in which the engine does not start at all, happens very rarely. Basically, this symptom of a malfunction of the Niva-Chevrolet ignition module indicates damage to the low-voltage part of the wiring.
Often the cause of problems with the Niva Chevrolet ignition module are breaks in the second winding, because it is this that generates the high voltage pulse. This mainly happens due to the fault of car owners:
- in case of untimely replacement of failed high-voltage wires
- installing spark plugs that do not match the car model.
- moisture ingress due to improper washing
Also, the cause of burnout may be delamination of the solder due to increased vibration during frequent use of the engine at high speeds or during frequent temperature exposure - engine overheating.
Problems with the ignition module can be determined in advance, since two coils do not fail at the same time, so car owners will still have the engine start, but with some difficulties:
- it takes a long time to gain working momentum
- floating idle speed
- excessive engine vibration
- jerking while driving
But these problems may be associated not only with the ignition module, so before replacing it is recommended to check its condition
Connecting high voltage wires
The sequence of connecting the high-voltage wires plays a huge role, since the spark in the cylinder is supplied in a certain order, which is indicated by the crankshaft position sensor. As soon as the piston reaches TDC, a spark is supplied to it to ignite the air-fuel mixture.
Below is a diagram of how to connect high-voltage wires on a Niva.
Replacing the Niva 21214 timing chain on an injector with your own hands, video
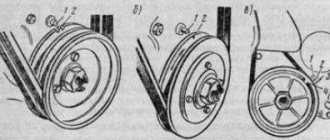
Here we will talk about independently replacing the timing chain drive on a Niva 21214. The timing belt affects the operation of the entire car, so the importance of this unit should not be underestimated. Replacing a chain drive is a rather complicated process, which, however, can be done by any car enthusiast, provided that he follows the instructions and shows a little diligence.
A chain has significant advantages over a belt drive. These include, first of all, its reliability. While a belt can break, this rarely happens with a chain. Usually it just stretches. It lasts much longer than the belt, which means it needs to be changed less often. But still, the chain does not last forever, and after a while it also has to be replaced with a new one. When replacing the chain yourself, it is very important to set the marks correctly and follow safety precautions.
When to change the timing chain?
The manufacturer does not give clear recommendations regarding the timing of replacing the timing chain on the Niva. Experts assure that the need for replacement may arise no earlier than after 100,000 km. But it is very important to periodically carry out diagnostic procedures for chain transmission. It may well happen that the chain weakens. This will be noticeable by the characteristic sound that the running engine will make. First you need to try to tighten the chain. If this cannot be done in the usual way, replacement becomes necessary. In this case, you can contact a service center, where this repair will be carried out by professionals, or you can try to change the chain yourself. The latter option is preferable in terms of savings and gaining the necessary experience.
If the mark on the camshaft gear does not match the mark on the bearing housing, it's time to take action. The chain drive also needs to be replaced if chips or cracks appear on it. All this suggests that your chain has served its intended life and it is time to replace it.
So, you have decided that you will make the replacement yourself. What do you need to do next? First of all, go to the store and buy a new chain there. You can check the quality of the chain you are purchasing. We take the chain and place it flat on our palms. If its sagging exceeds 1 cm, you better look for consumables elsewhere. In addition to the chain itself, you will also have to buy a set of oil seals, a tensioner, dampers, and a set of gaskets. Then we prepare the tools that will be useful in the work and begin the repair.
Replacing the chain drive
- Place the car on a level surface. Open the hood. Disconnect the battery. Remove the air filter.
- The choke cable should be disconnected and moved away. It is also necessary to disconnect all electrical drives and pipes.
- Remove the fan, generator belt and pump roller. The belt should be thoroughly examined. If deep cracks or other damage is found on it, it must be replaced with a new one. Remove the tray protection and thoroughly clean its cover.
- Remove the valve plug. Unscrew the camshaft sprocket screw.
- Take a wrench and unscrew the ratchet nut.
- Now we begin to rotate the crankshaft until the marks on it and on the engine casing completely coincide. Make sure that the marks also match on the bearing housing and camshaft sprockets.
7. Then remove the casing covering the motor. To do this you will have to remove several bolts. We remove the sedative. Unscrew the screw securing the oil supply pump. There is no need to remove the screw. It should only be loosened and left in place.
8. We begin to remove the tension element mechanism. We remove the MM line, remove the pressure sensor, after which you can remove the tensioner itself.9. We turn out the screw on the camshaft gear. We remove the gear. After this, remove the timing chain. At this point, the parsing process can be considered complete. Now we assemble the mechanism.10. We take the purchased oil seals and begin to install them in place of the old ones. First of all, we change the crankshaft oil seal. After removing the old component, clean the installation location and install a new oil seal. First, it is recommended to lubricate the new oil seal with engine fluid, for example.11. Now we take the chain in our hands and also begin to lubricate it. After this, we put the drive on the crankshaft gear, the oil pump and then the camshaft. This sequence must be followed. When tensioning the chain, you need to ensure that the alignment of the marks is not disrupted.
12. Install the tensioner and carefully tighten the nuts securing it. We tighten the screws on the sprockets and check the alignment of the marks again. To do this, turn the crankshaft to the right again.13. We put the generator belt in place. If the old belt is in good condition, then it is quite possible not to change it.14. We lubricate the gasket that we will install on the cylinder head and install it. Don't forget to clean the seat from traces of the old gasket. We put the head in place and carefully tighten all the fasteners. We install all other parts in reverse.
Now let's check the operation of the mechanism. To do this, start the engine and listen to how the engine operates. By hearing it is quite possible to determine whether everything was done correctly or something went wrong. If the sound is familiar, rustling, then everything is done correctly. If there is a characteristic grinding sound, the procedure must be repeated.
Replacement video
When does a belt need to be replaced?
- during scheduled maintenance (if the mileage is 100 thousand km); if the marks on the camshaft sprocket do not match the mark on the bearing housing identified during phase diagnostics; when the pump that drives the “water pump” fails; if the chain is damaged (wear, stretching or cracking), requiring urgent replacement and adjustment according to the marks.
Advice : if the engine does not pull and does not gain speed, you need to check the DPKV and timing marks and set the TDC (engine top dead center) on the flywheel. Both pulleys (inlet and outlet) are placed along the marks with the chain tensioned.
Location of Timing Pulley Marks for Car Niva 21214 Injector
Chevrolet Niva timing belt replacement
And with such a jump, the valve should already be bent. The fuss for half a day begins. Maybe the drive disk has moved? I go to the store and compare - all the marks are there. In general, as a result of long jumps, we find the reason - the camshaft is turned to 1.
Part 2. Valve + piston = repair Niva Chevrolet NIVA Chevrolet 4+4
Well, that’s right, the factory doesn’t give a damn about the marks, but the fact that later someone will be *******, dealing with this fool, is not their problem.
Phase adjustment in case of mismatch
If the notches do not match, work continues:
- The “whiskers” of the lock washer are bent. The fixing bolt is unscrewed using a key set to “13”, and the position of the camshaft sprocket is loosened. The first gear on the gearbox is engaged, allowing you to avoid spinning when unscrewing the crankshaft gear bolt. The fastener is removed with a lock washer. To prevent the bolts from falling into the engine sump, use a deep-head wrench or unscrew the bolt by hand. Remove the chain tensioner using a screwdriver. It should be replaced if it is stretched or strained, during scheduled maintenance, after 60-80 thousand kilometers.
- The camshaft sprocket is removed. If you pull it towards yourself (a distance of 5-10 cm), it will be removed along with the chain. Check for wear on the sprocket teeth, which form an inverted “V” shape. The part must be replaced if there are grooves on the leading part of the teeth. On a working mechanism, the chain moves on the teeth. The scrolling step is one tooth. The sprocket with chain is placed on the camshaft flange. When the chain moves on the sprocket, its holes will not line up with the pin. The crankshaft should be rotated in the specified direction until the mark and pin match. It is important to secure the part with a bolt and washer (without tightening it all the way). After turning the crankshaft twice with a special wrench, check the placement of marks on the camshaft gear and bearings. If the marks correspond, their adjustment has been successfully completed. The fastenings of the crankshaft and camshaft sprockets are tightened tightly.
If there is a discrepancy, you must repeat the steps.
For clarity of the obtained result, it is suggested to look at the example in the photo .
In the upper corner is an overview of the notch placed against the DPKV core. Below is an asterisk on the flange. The dot is visible opposite the bed in the aluminum cylinder block.
Important ! The large mark for the phase sensor is ignored in the gear assembly. The work uses small lines. The CPPS (crankshaft position sensor) is installed against the 20th gear tooth. When a match is achieved, the bolts securing the crankshaft and camshaft sprockets are tightened.
How to set the ignition on a Niva 21214 injector
We independently set the timing marks on the Chevrolet Niva
The gas distribution system of any engine must work correctly. If problems occur in its operation, this leads to premature wear of the motor and numerous breakdowns. To accurately adjust the timing, special marks are used, according to which the shafts in the engine are aligned. We will tell you about the correct placement of marks on a Chevrolet Niva car in this article.
Why are timing chain marks set?
The engine of any passenger car has 2 shafts: camshaft and crankshaft. In most cars they are connected by a belt drive. On a Chevrolet Niva car this is a chain transmission, and a single-row chain is used there. The advantages of such a system are obvious: the chain, unlike a belt, never slips on the pulleys and lasts much longer. However, the chain can stretch over time, and the teeth on the shaft sprockets can wear out or even break. This will lead to desynchronization of the camshaft and crankshaft. Their work will not be coordinated, so the engine may fail. Therefore, when adjusting or replacing the timing chain, it is very important to align the engine shafts in accordance with the marks on the pulleys and timing case. This is not easy to do, since, firstly, the marks are located in hard-to-reach places, and secondly, they need to be set very accurately, since the chain, unlike a traditional belt, cannot be slightly tensioned if necessary.
How to install an injector on a Chevrolet Niva (with photo)
- The car is installed on the inspection hole. Wheel chocks are placed under the rear wheels and the hand brake is applied.
- The car hood is opened, unscrewed and the fan is removed. The radiator is also unscrewed and carefully moved to the side (it is not necessary to drain the coolant from there).
- Access to the engine valve cover is provided.
Its fastenings are unscrewed with an open-end wrench, then it is carefully removed. There is access to the timing chain and the upper camshaft sprocket. The shaft pulley is rotated with a special wrench until the mark on the camshaft sprocket aligns with the protrusion on the timing case. The mark on the timing case is aligned with the mark on the camshaft sprocket
The mark on the crankshaft sprocket is precisely aligned with the DPKV core
Consequences of incorrect installation and adjustment
- Characteristic extraneous clicks appear in the engine, which become louder as the vehicle speed increases.
- The engine is unstable even at idle speed.
- The car's acceleration time increases significantly because the engine does not respond well to pressing the gas pedal.
- Acceleration occurs in jerks, during which clouds of black smoke may fly out of the exhaust pipe.
- Valve wear accelerates many times over, and if the shafts are out of synchronization too much, the valves become deformed and their seats break.
- Incorrect adjustment can also lead to a broken timing chain. This, in turn, can puncture the radiator, break the fan and other engine parts.
- The engine constantly overheats, and the consumption of engine oil and antifreeze can increase significantly.
As can be seen from this article, correctly set timing marks are the key to long and uninterrupted engine operation. There is nothing complicated about this; even a novice car enthusiast can do it. It is important to take your time, follow the above sequence of actions, and also try not to drop the sprocket lock washers into the engine sump. Because it will be very difficult to get them from there.
how to set the ignition on a Niva 21214 injector: The article provides step-by-step instructions for setting timing marks on a Chevrolet Niva car.
Prerequisites: In winter, the engine began to misfire when cold, resetting the error helped, but until the next start, when it was cold. I recommend that you first carry out an inspection to check the spark plugs, wires, and lastly there is the ignition module itself.
New ignition module
Checking the battery with a multimeter
They are attached completely differently. Therefore, the new one, unlike the old one, is held on by one bolt, and not by three. I secured the controllers to a corner, which I attached under the air filter mounting bolt.
The letter designations are clearly visible on the device body. Because it is in it that a high-voltage pulse is generated, and there, in most cases, a break or rupture of the turns can occur.
It happens because of the following: The car was operating when the high-voltage wires were not working - approx.
And also the cause of the malfunction may be a soldering failure; this usually happens due to frequent vibration. Or moisture formed during washing or condensation. Testing with the engine running is done as follows.
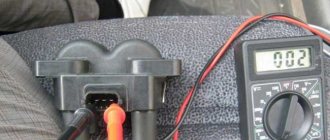
The first contact of the tester is in socket D, the second is to ground. The multimeter switch position is 20 volts. If there is power, the tester shows 12 volts. The first contact is in socket C, the second is ground.
Switch on 20 Ohm ohmmeter. Normally it shows less than 1 ohm, that is, the mass is normal. The first contact is in socket B, the second is ground.
20 volt switch. The norm is not less than 0.3 volts. If this is the case, it means that a normal pulse is coming from the Hall sensor to position B. Contact A is checked in the same way as the previous one.
Chevrolet Niva ignition coil
If such a check shows the norm, you need to test the module. The old spark plugs are black with soot, but there is nothing criminal in appearance. We install new ones, pray and start them. Vzhiiiihh - it started, it doesn’t bother. I warmed up the engine a little, I try to drive - everything is cool, I’m on my way. I fly home quickly, joyful, it’s already 8 pm.
I think to myself - lucky that there are candles. It happens - it breaks through.
The next day in the morning I take my wife to work for 15 minutes there, I drive back and almost approach the house, I feel that the traction has disappeared, I press on the gas and the car slows down. A couple of seconds later the engine started up.
Damn, I think it’s good that I got there on my own. Google says - change the high-voltage wires, they also break through and in theory they should also be changed more often, and not ride on the same wires for years.
BB wires I take the bus and go to the nearest spare parts store. The choice is not great, there are no branded and cool Teslas and the like. This is especially true when operating in difficult conditions, when the engine operates at high speeds, while the travel speed is low and, as a result, the interior ventilation is insufficient.
On the Niva Chevrolet, the spark plugs are closely related to the previous device. And if they malfunction, all the same problems as described above are possible. Spark plugs fail especially often in winter. This is due to the fact that the car is not used so often and mainly for short trips. Due to the low ambient temperature, the candles do not warm up to the maximum temperature at which they self-clean from carbon deposits.
If problems occur, it is necessary to replace the spark plugs in a timely manner so that this does not affect the performance of other system components. Spark plugs for the Chevrolet Niva must be purchased specially for eight-valve injection engines.
Loading ..
When purchasing, you should pay attention to the gap between the electrodes. It should be no more than 1.5 mm
If this distance is greater, this will affect the duration of the candle.
Remove the engine screen. We remove the tips of the high-voltage wires from the ignition coil terminals. Having released the lock of the engine control system wiring harness block... ...disconnect the block from the coil connector. Using a 5mm hexagon, unscrew the four screws securing the coil to the bracket... ...and remove the coil. Install the ignition coil in reverse order. For the correct connection of the tips of high-voltage wires... ...the cylinder numbers are marked on the coil body next to its terminals.