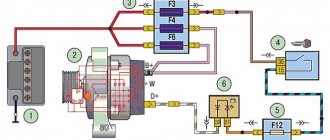
Basic faults
The frill trim of the VAZ-2170 is characterized by one unpleasant malfunction. Over time, due to temperature changes and the sun, gaps appear between the frill and the windshield. This happens to owners of pre-restyling Priors - the old-style linings were not equipped with additional fasteners, so a gap between them and the glass appeared quite quickly.
In many cases, the spare part has to be changed as soon as it swells. Otherwise, the consequences may be negative. When water gets under the seal, there is a risk of accelerating corrosion. Water gets on metal parts and slowly destroys them - this applies to ordinary clamps and entire units.
Before purchasing a part, make sure that the part number for the Priora car matches the part you need. The mounting locations for the pre-restyling and restyled windshield parts are the same, so no significant modifications will have to be made. Troubleshooting is only possible by replacing the windshield seals.
Jabot “High with mesh” on VAZ 2170-71-72 Priora
Installation:
The frill is fixed to the external heater intake using self-tapping screws. After installing the frill, you will receive the following advantages: less dirt and leaves will clog and better streamlining.
Applicability:
VAZ 2170, 2171, 2172 Priora.
Attention! When placing an order, indicate the color you need. '>
Cabin filter
All modern cars, including domestic ones, are equipped with this (Chevrolet Niva is no exception). The cabin filter helps prevent dust and dirt from entering the vehicle. The manufacturer recommends replacing them once every 20 thousand kilometers. If the car is used in extreme conditions (for example, frequent driving on dirt roads), this period must be reduced to 8 thousand.
Some premium cars, for example the Mercedes S-Class, are equipped with a carbon cabin filter rather than a paper one. It fights pollution better, but its price is 10-15 times higher than usual. By the way, the replacement schedule is 50-100 thousand kilometers. A dirty cabin filter can reduce air flow in the ventilation system.
How does this affect condensation accumulation? Everything is very simple. A clogged cabin filter not only allows air to pass through poorly, but also has difficulty releasing moisture. Due to a clogged ventilation system, water can accumulate in its cavities and cause not only fogging of the glass, but also an unpleasant odor. If your car windows sweat, what should you do? As a rule, this problem is eliminated by replacing the cabin filter with a new one. The cost of the paper element is low - only 250-300 rubles.
Replacing the cabin filter Lada Priora detailed instructions
The need to replace the cabin filter usually arises after a specific smell appears from the heater air ducts, or when the air flow is what is called “barely, barely.” However, it is necessary to change the cabin filter not when it is completely damaged or has ceased to perform its air purification function. Replacing the cabin filter should be done regularly, this will allow you to avoid unpleasant odors and dust in the car interior; in addition, you also need to change the cabin filter because a lot of bacteria accumulate on a dirty surface, which you and your passengers will have to breathe.
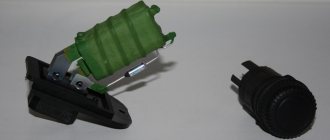
Lada 2112 Snow Queen › Logbook › Installation of Jabot from Priora.
For two and a half weeks I couldn’t get around to making a new review) and finally it happened)))
My old Jabot was very battered by life, the fastenings for the washer nozzles fell off, the plug also ran away in an unknown direction, for the ice cracks in the corners, I would like to especially thank the engineers and the design team of our valiant AvtoVAZ.
In general, after reading the articles here, I finally decided to change the standard Jabot to a Jabot from Priora.
To install a new Jabot, you need to drill two additional holes.
One more point, because... The frill of the Priors comes “naked”, the rubber bands for the wipers will have to be rearranged from the old factory Jabot.
We also take new nozzles and install them in a suitable place at our discretion. You will also have to slightly alter the water supply to the washer nozzles (see photo)
The tees and tube were bought at a pet store, specifically in aquarium supplies.
I bought larger self-tapping screws compared to the standard ones, because the standard ones, frankly, don’t hold a damn thing at all. And the new ones somehow look better and neater than the factory ones; it’s not clear what’s wrong with the washer.
The front seal will also have to be installed from the old Jabot.
After installation, we install decorative plugs and adjust the washer nozzles.
This completes the installation work)
The most terrible and tormenting question for everyone is about cutting off the studs. If the factory frill was of a new type, then you won’t have to cut anything, the pins will simply be covered with plastic and that’s it, but if the frill was of the old type, then you will have to call in a sawing tool to help))))
I’m very pleased with the new frill, if only because it consists of two halves, and this makes life so much easier when replacing the cabin filter. Now you can unscrew only 5-7 screws instead of 4 nuts and 22 self-tapping screws as before, and you no longer need to remove the brushes), the car began to look more serious.
If you suffer from Prior’s disease, namely, the frill puffs up from the heat and moves away from the windshield, then the half that never needs to be removed, I’ll put it on a sealant and everything will be cured)
I also plan to install side windshield drains like on the Priora, so that the front side windows are not covered with dirt from the windshield.
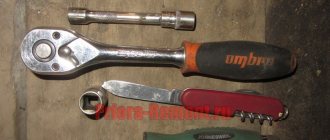
Special thanks to my assistants namely:
Senior Researcher - Screwdriver)
And for the older sister-hostess - a screwdriver (an irreplaceable thing when working with car upholstery, it turns gently and accurately, without tearing off the edges or turning the screws)
The report is finished, thank you for your attention!
Good luck to everyone, kindness and according to tradition, Thumbs up!
Replacing the old type frill
- In order to replace the frill with a VAZ 2110, you should prepare the following tools: a wrench with a size 10 head and a flat and Phillips screwdriver.
- Next, you can remove the cladding; to do this, unscrew the nuts on it from the edges, using a wrench with a head.
- Then take a Phillips screwdriver and unscrew all the screws on the surface of the frill.
- Also, use a screwdriver to remove the latches on the back.
- After this, carefully disconnect the tubes from the windshield washers and you can remove the upper part of the lining.
- Then remove the leads on the wipers and unscrew them with a key.
- It is also worth checking all the places under the installed plugs; screws are usually located there.
- The windshield cover has a lock in the center; it can be removed carefully.
- And to gain full access, you need to unscrew another part of the frill, the sound insulation and the casing itself.
- Then you can install the frill back on the VAZ 2110, but only the procedure is carried out in the reverse order.
Useful tips
To get rid of condensation on the windows as much as possible, ventilate the car interior once a year. It is better to do this on a dry sunny day. Open the doors and trunk of the car completely for a day. Excess moisture will evaporate even from the most hidden places. After thoroughly drying the interior, you will no longer wonder why the windows in your car sweat.
If the problem of foggy windows has already overtaken you, you need to know how to properly remove moisture from the surface. Many have encountered the situation: if you remove water from the inside of the glass, the next day there will be strong stains. It will not be possible to remove them with air conditioning or a strong air flow. But this problem can be fixed. Experts recommend using microfiber cloths. Their appearance is presented below.
They efficiently remove moisture from the surface without leaving streaks. For the best effect, it is recommended to wipe the glass diagonally. This way you will always have clean, streak-free glass.
Why does the windshield constantly sweat from the inside: the main reasons
The windows in the car fog up from the inside due to the fact that the temperature in the cabin exceeds the outside temperature. As a result, the moisture contained in the cabin condenses on the glass. If the air humidity is high, then the windows cease to be transparent at all. This is why the inside of the windshield fogs up especially heavily when it rains (although this can happen in dry weather).
WATCH THE VIDEO
From all of the above, it follows that in order to eliminate condensation in the car interior, it is necessary to minimize the moisture content in the air. Its amount may be increased for several main reasons:
- Water on rugs or damp shoes
- Large number of passengers (breathing releases a lot of water)
- Wet interior
Most often, the windows in the car's interior sweat because of this. The recommendations in this case are simple: you need to take care of your shoes and cleanliness in the car, and also, in case of fogging, wipe the windows. In addition, before accepting passengers, you should warm up the car. However, there are other reasons why car windows sweat.
The cabin air filter is dirty
- Google+
- LJ
- Blogger
Foggy glass may be a sign that the air filter needs to be replaced. If it is dirty, moisture simply cannot escape from the car. In addition, air pollution appears in the cabin, and when the ventilation is turned on, no air flow is felt. Experts recommend not to wait for such consequences, but to replace the element every 10,000-20,000 km.
Problems with climate control
Due to a clogged drain hole, the moisture content in the cabin increases. This is what causes the car windows to sweat. All that needs to be done in this case is to clean the system.
Water entering the cabin
Moisture can enter the car not only through the doors, but also through the ventilation. All cars have drainage holes under the hood. If they become clogged, water will accumulate and enter the ventilation system. Because of this, the windshield sweats from the inside.
Wet sound insulation
Materials used for sound insulation in cars can absorb water well. This is especially common after driving through puddles or in rainy weather. To prevent the windows from sweating in the car, it is necessary to dry the material.
What to do if the glass sweats when the air conditioner is running
Quite often, motorists experience windows fogging up when the air conditioner is running for a long time. In this case, moisture forms outside. In fact, this process is normal (again, there is a large temperature difference). Therefore, there is no need to worry in this case.
Replacing a new type of frill on a VAZ 2110
- The frill of the new type consists of several parts and is removed in parts.
- Along the edges of the cladding there are two nuts, which are also unscrewed using a socket wrench. After this, several self-tapping screws are unscrewed; they are closed with plugs.
- And they immediately remove the sound insulation, having first unscrewed the screws. All this will be located at the top of the windshield, and at the bottom there is another part of the frill. It is secured with 12 self-tapping screws; they are unscrewed using a Phillips screwdriver.
- Also, do not forget about the drainage flap, which is carefully moved to the side and the hose is removed from the washer.
- Then this shield is removed and then the lower part of the frill is removed.
Is it possible to make a replacement?
The old model of the VAZ 2110 cladding has a big drawback: the wiper arms wear out.
This can be eliminated by filing the friction point or simply replacing the frill with a new VAZ 2110 model. That is, from here we can conclude that the old and new type of frill are easily interchangeable with each other. And all the fastenings do not need to be redone, but when installing a new model, it happens that gaps appear between the windshield and the rubber. But all this can be easily removed with a file.
But there are several reasons for this:
- The frill is of poor quality.
- Discrepancy in body geometry.
But before installation, you need to purchase special plugs for attaching the wipers and a hose for the washer.
Now it’s worth considering the processes for replacing both the old and new frill models.
Rugs
Many motorists do not pay attention to this little detail. But it is because of the floor mats that many people sweat from their car windows. What to do in such a situation? Replacing these elements does not always help. If you install other floor mats in your car, you may still experience water pooling inside. You need to overcome the source of the problem. Perhaps the problem is hidden in a leaky windshield seal. As a result, water enters the interior and onto the floor mats through the drainage.
This problem often occurs on cars that have been in serious accidents, where the body geometry was incorrectly restored or the windshield was replaced poorly.
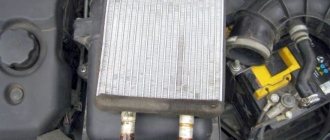
The next thing you need to pay attention to is the heater radiator. On most modern cars it is located in the central part of the instrument panel.
At the same time, you may see greasy, oily stains on the rugs. Sometimes they have a certain shade - yellow, red or blue (depending on what kind of antifreeze was used in the system).
If the “water” accumulated on the mat has a greasy film, the problem is definitely a coolant leak. Owners of domestic cars, including VAZ 2108-21099, often encounter it. How to achieve tightness? It is necessary to check the condition of the pipes that are supplied to the heat exchanger. If they do not fit tightly, also replace the clamps. The presence of the slightest cracks on the rubber pipes indicates their leakage. In rare cases, the radiator itself is replaced (for minor damage, repairs by soldering are possible).
As you can see, wet mats installed in the car interior can become a symptom of a faulty heater radiator. Turning on the heater at full power will not solve the problem - the antifreeze will run even faster.
How to remove condensation
After condensation appears, many motorists immediately turn on the heater or open a window. These methods do work, but they may not be enough. If visibility does not improve, you need to wipe the windows diagonally (this leaves fewer streaks) with a clean cloth or napkin.
Anti-fog chemicals
- Google+
- LJ
- Blogger
You can find products on sale that help get rid of condensation. They can be in the form of a liquid or mastic, and are used both on the inside and outside of glass. The anti-fog agent must be applied to a dry surface and rubbed. After this, a transparent film will appear on the window, repelling water. In winter, you can use anti-ice products.
You can also make your own windshield defogger. To do this, you will need to mix glycerin with alcohol, and then apply the mixture to the window.
Video - How to get rid of internal glass frost
Solving the problem of quickly removing windshield icing worries almost every driver in the winter. This is especially true for those whose car is parked. If you leave a heated car outdoors in the evening, you will find ice (frost) on the windows in the morning. The intensity of icing will depend not only on atmospheric conditions, but also on the condition of the vehicle. If there is high humidity in the cabin for any reason, icing at subzero temperatures cannot be avoided in any case. And in order to defrost the windshield using the standard heating system, you will have to spend a lot of time burning precious fuel.
Quick defrost options
There are many ways to quickly defrost a windshield. However, not all of them are effective and safe. Many people believe that the simplest method of removing ice from the windshield is to remove the frost with a scraper or pour hot water on it. Let us immediately note that these procedures lead to the appearance of microcracks on the surface of the glazing. This may subsequently cause the glass to break.
- Industrial alcohol
. According to the experience of experienced craftsmen, you can quickly defrost a windshield using technical 90% alcohol and a regular plastic sprayer. After processing, the ice on the windshield almost immediately turns into a jelly-like state. Having removed this “mush” with a brush or rag in a few minutes, you can immediately hit the road after the engine has warmed up. - Chemicals
. To quickly defrost glass, you can also use various chemical compositions, which today are presented in a large assortment in any household chemicals store. However, not all of these drugs are effective, so you should be more careful when choosing them.
- Salty water
. If you don’t have any special defrosting liquids on hand at this moment, you can use the old proven remedy - salt water. Mix 2-3 tablespoons of salt in one liter of warm water and pour the solution into a regular spray bottle. Spray generously onto the icy surface, and then remove the remaining ice with a rag. In this case, you need to avoid getting the salt solution on the seals and plastic. - Saline swabs
. If you don't have a spray bottle, you can make swabs by wrapping a "mush" of salt in a rag and then blotting the ice onto the glass. After defrosting the glass, do not forget to wipe the glass with a clean cloth. - Salt and glycerin
. You can remove frost from the inside of glass using a glycerin solution. To prepare it you will need two parts glycerin, one part table salt and a regular spray bottle.
You can make such protection yourself or buy a complete set in a store. The film will prevent frost from forming, and you will not have to defrost the glass in the morning. If there is no film, as a last resort, try to cover the windshield with any other material. In this case, do not forget to first equalize the air temperature in the cabin with the environment. If you do this, then in any frost there will be minimal icing.
The windows in the car freeze from the inside, what should I do? Many Russian car enthusiasts have probably encountered this problem. Our climate is famous for its low temperatures in winter, so every driver is faced with the problem of frozen windows.
In addition to the negative aesthetic side, this can lead to unpleasant consequences in the form of accidents. Because poor visibility makes it more difficult for the driver to see the danger. And starting every morning by cleaning or warming all frozen windows is simply unrealistic. That is why many car enthusiasts are interested in a very winter question - when the windows in the car freeze from the inside, what to do? After all, everyone understands why glass freezes on the outside.
Prerequisites
The question of why the VAZ 2110 windows sweat is one that many owners of a similar car model periodically ask themselves. And it’s not without reason
The problem is urgent, and it should be solved promptly, since it complicates the process of driving a car, and in general, attempts to wipe the windshield turn off attention from the road traffic, and it won’t be long before you become involved in a road accident. And no one needs this
Logically, if the glass fogs up, there is only one reason - high humidity in the cabin. But when asked why windows fog up, many begin to generate their own versions. Skeptics believe that you shouldn’t expect much from a brand like VAZ, but those who know how to think logically suggest that perhaps the problems lie in the air filter, while others blame the air supply system for everything.
Someone is right, but someone just needs to be open-minded about the manufacturer of the VAZ 2110.
If the glass fogs up for a long time, and the problem is not found, then other problems will appear, such as corrosion and a specific odor, since excess humidity is an ideal environment for fungus, mold and harmful bacteria. As you can see, efficiency is the main thing here!
Causes of high humidity
Superficial reasons
Before starting diagnostics, take into account factors that are not related to the operation of VAZ 2110 systems. For example, the windshield fogs up due to external climatic conditions. Wet weather, and the accompanying wet shoes and rugs that absorb large amounts of moisture, will provoke condensation on the coldest areas inside the VAZ 2110 interior, which are the glass. The problem can be eliminated by ventilating the interior and drying the rugs.
Moisture on the carpet of VAZ 2110
In winter, such a factor can be a car heater. Moisture enters the interior through the stove opening, the function of which is to intake air. It is located at the top of the hood. The snow that has accumulated there begins to melt as the engine heats up, and as a result, there is a high level of humidity in the cabin. In winter, to eliminate this problem, remove snow from the hood as often as possible.
Installation of frill from Priora new model
You will need: buy an updated trim/jabot (catalog number: left part - 2170-8212735, right - 2170-8212734), a water-reflective shield (2170-8119054) and a frill mounting sleeve (1118-8212778).
- We install new mounting bushings;
- We modify the water-reflecting shield by attaching it to the frill honeycomb and cutting off the excess parts;
- Make sure that the frill hooks fit under the glass without problems. If necessary, cut off part of the sealant or file the hooks;
- If the car has air conditioning, separate the excess element from the right side of the trim.
Tip: to prevent leaves from getting into the ventilation system, install an aluminum mesh on the inside of the frill using clamps.
Have you ever had to change the frill on a Priora? Should we consider installing a new frill? Let us remind you that the seat covers are also borrowed from the updated Priora.
Key words: frill Lada Priora
Jabot of a new type
The part from Priora 2 even fits a pre-restyling car - the installation locations remain the same, and the additional fasteners work as hooks, so installing the linings is quite simple.
The new sample part consists of several components:
- Water reflective shield. Catalog number: 2170-8119054 – 300 rubles.
- Left part of the part. Catalog number: 2170-8212735 – 800 rub.
- Right pad. Catalog number: 2170-8212734 – 800 rubles.
- Mounting sleeve. Catalog number 1118-8212778 – 20 rub.
Why do car windows freeze and how to fix it?
To eliminate this scourge, you need to figure out what happens to the air in the cabin, which, when the temperature drops, leaves condensation on the windows and freezes at sub-zero temperatures.
Every car has vents designed to circulate air, and they often become clogged, both inside and out. In the absence of ventilation, the cooled air has nowhere to escape and the effect of a thermos is obtained.
Attention! To eliminate or check the ventilation, you must contact a car service center. There is also the opposite side of the coin, when there are too many ventilated places in the car, this may be due to damaged door seals, glass, worn locks or hinges in the doors
There is also the opposite side of the coin, when there are too many ventilated places in the car, this may be due to damaged door seals, glass, wear of locks or hinges in the doors.
With increased exposure to outside air, the car interior cools very quickly, and the air, when rapidly cooled, condenses dew on the windows. These faults can also be checked when diagnosing the car at a car service center.
In addition to malfunctions of the car’s ventilation system, there are also many factors in its care and operation. In winter, as a rule, there is snow on the street, which is safely brought into the car along with shoes, because it is not possible to cleanly sweep snow off shoes all the time.
This snow quickly melts in the form of water and ends up on the floor mats. It all depends on the driver what kind of mats he uses in winter. If they are rag, then this material, even rubberized, perfectly absorbs moisture; if you frequently leave and enter the car, these mats can pick up a large amount of melted snow and do not have time to dry out.
Accordingly, after parking the car overnight, the heated mat continues to dry out and evaporate moisture into the cabin air, and then, according to the old scenario, the air cooled down, dew fell on the windows, the windows became covered with frost, and in the morning there was a problem.
This effect can be corrected with the help of rubber mats, which do not absorb moisture, but may not cause much discomfort; when moisture accumulates from the snow, they can collect a small puddle in your feet.
Therefore, during the operating day, you sometimes need to take them out and wipe them with a rag, but this is not particularly convenient. It is also advisable to carry out the same actions before overnight parking.
Fogging and further freezing from the inside of the car windows may be associated with malfunctions of the interior heater system. As soon as a small leak appears, the windows in the cabin begin to sweat; this reason is easily recognized by the characteristic smell of antifreeze.
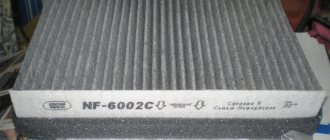
Article number and cost of the original cabin filter for the VAZ 2112 and its analogues
The cabin filter used depends on the year of manufacture of the vehicle. Until 2003, the VAZ 2112 was equipped with a cleaner with article number 2110812202003. Its price ranges from 250 to 350 rubles. Finding this consumable is very difficult. The low popularity of the filter has led to the fact that it is not available for retail sale. For replacement, car owners usually purchase analogues. The best alternative options are Nevsky Filter NF6001 and Ekofil EKO-04.01. Their cost ranges from 180 to 250 rubles.
The seat often does not correspond to the filter size. This applies to both the original and its analogues. As a result, after installing the cabin filter, significant gaps form around the consumable. A significant air leak occurs through them, making the installation of a filter element pointless.
To combat the gap between the filter element and the seat, car owners use foam plastic or foam rubber. The consumable is glued along the contour. A homemade sealing frame eliminates air leaks, which prevents dust and foreign odors from entering the cabin.
After 2003, a new filter element began to be installed on the VAZ 2112 with a 16-valve engine. Its article number is 21110812202183. The cost of such a consumable is 300-400 rubles. Please note that old and new filters are not interchangeable.
In addition to the original filter element, its analogues are available for sale, produced by third-party manufacturers. Many of them have very decent quality and attractive prices. The table below presents the best alternatives to the original cabin filter.
Table - Analogues of the original new cabin filter
| Firm | Article number | Approximate cost, ruble |
| Shafer | SAK658 | 280-355 |
| Bosch | 1987432435 | 740-890 |
| TSN | 21118122012 | 110-135 |
| A.G. | AG5010 | 210-250 |
| WIX | WP9398 | 350-430 |
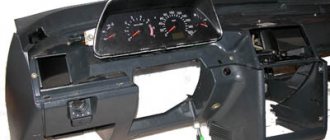
Replacement: removal and installation of the trim (frill) on the Priora
In order to remove the cover, you need to prepare the following tools:
- Head wrench “13”,
- Phillips screwdriver, flat screwdriver,
- Marker.
Follow these steps to remove the windshield seals from the Priora:
- Tighten the handbrake, remove the negative terminal from the battery.
- Using a marker, mark the points on the windshield opposite which the windshield wiper motors are located.
- Lift the hood.
- Hook the decorative cap of the electric motor with a screwdriver and remove it. Using a socket wrench, remove the nut that holds the wiper arms in place. Remove the washer from the recess and remove the lever along with the wiper.
- Next, unscrew two self-tapping screws securing the consumables from the sides, and then four self-tapping screws located in the center. Remove the screw plugs by prying them off with a flat-head screwdriver.
- Next, unscrew three more self-tapping screws on the side, remove the right and then the left part of the windshield trim.
There will be nothing new in the process of installing an old-style seal: you must perform all the steps in the reverse order. However, if you want to install a frill from a restyled VAZ-2170 onto a pre-restyled one, perform the installation following the following algorithm:
- Place the bushings in place.
- Attach the water-reflective shield to the seal so that the honeycombs match.
- Check that the fastening hooks provide a sufficiently tight fit to close the body. If necessary, adjust the size of the hooks by cutting off part of the sealant.
- Separate the excess part of the part if the car is equipped with air conditioning.
How to remove a frill on a Priora
- Unscrew the nuts “13” and remove the wipers (leashes);
- Remove the six screws for the top fastening of the trim;
- Remove the seal and unscrew the seven screws of the lower lining fastening;
- First remove the right part of the frill (passenger's side), and then the left (driver's side).
Lada Priora with Panasonic or Halla air conditioning
The process of replacing the cabin filter in a Lada Priora with a Panasonic or Halla air conditioner is similar. The only difference is in the fastening of the filter cover; on the Panasonic air conditioner it is secured with a screw, and on the Halla it is secured with a lock. Procedure:
- Unscrew the screw securing the sound insulation and turn it to the side.
- Remove the filter plug by unscrewing the screw or snapping it off from the top (depending on the type of air conditioner).
- Remove the cabin filter.
Lada Priora noise insulation fastening screw, Lada Priora cabin filter cover, Lada Priora cabin filter replacement with air conditioning
Installing the cabin filter is carried out in reverse order. Catalog number: filter for air conditioner Panasonic 2170-8122020-01, Halla 2170-8122020-11. It will be more convenient to insert the filter into the hole if you bend the filter at 90 degrees, as shown in the video:
Let us remind you, do not forget to change the engine oil on your Lada Priora on time.
Replacing the cabin filter on a Priora
If the heater is not blowing well or the windows in the car interior are fogging up, do not panic, the problem may be a clogged cabin air filter (also known as the heating and ventilation system filter). Depending on the vehicle configuration, the guide on how to change the Priora cabin filter may differ slightly, let’s figure out what the difference is.
Why is this happening?
The main source of this problem in a car is moisture. Moreover, it can happen not only in wet weather. In combination with cold glass, moisture produces condensation. As a result, small drops of water form on the inside surface of the window and windshield. Of course, this negatively affects visibility and, as a result, traffic safety.
Often, excess moisture is removed from the interior by turning on the heater or blowing on the windshield. But this does not always give the desired result. Condensation still forms on the windows. If your car windows sweat, there may be different reasons. Let's look at ways to solve this problem.
Replacing the air filter of a VAZ 2170 with Halla air conditioner (Halla)
Replacing the cabin filter is carried out in the same way as in the case of a Panasonic air conditioner. The only difference is in the fastening of the filter plug; in Halla it is on a latch:
This filter replacement process is shown in the video:
Basic faults
The frill trim of the VAZ-2170 is characterized by one unpleasant malfunction. Over time, due to temperature changes and the sun, gaps appear between the frill and the windshield. This happens to owners of pre-restyling Priors - the old-style linings were not equipped with additional fasteners, so a gap between them and the glass appeared quite quickly.
In many cases, the spare part has to be changed as soon as it swells. Otherwise, the consequences may be negative. When water gets under the seal, there is a risk of accelerating corrosion. Water gets on metal parts and slowly destroys them - this applies to ordinary clamps and entire units.
Before purchasing a part, make sure that the part number for the Priora car matches the part you need. The mounting locations for the pre-restyling and restyled windshield parts are the same, so no significant modifications will have to be made. Troubleshooting is only possible by replacing the windshield seals.
Tips to help car owners cope with the most common problems in winter.
We remind you how to deal with common winter problems: foggy windows, trouble starting, frozen windows/doors and locks.
Most even modern engines need to be warmed up. But only older cars need to be warmed up for a very long time before setting off.
If the car key has an electronic board, then you cannot heat the key with a lighter.
Snow or dirt stuck to the wheel affects its balance
The lower the air temperature, the more viscous (thick) the engine oil becomes. As a result, when starting, a cold engine experiences increased resistance. That is why until the engine warms up, the car consumes the maximum amount of fuel. But frozen oil also affects the operation of the car’s battery, which needs a lot of energy to turn the starter. But there is a problem: the lower the temperature outside, the faster the battery loses its charge.
It is not surprising that the most common problem faced by thousands of motorists in winter is battery drain. All this leads to the fact that many car owners cannot start the engine. By the way, the problem with starting the engine is not always associated with a discharged battery
So if your car won't start in cold weather, it's important to diagnose the real problem. Naturally, if it’s all about the battery, it’s enough to charge it or buy a new one if, for example, the battery has lasted for more than 4-5 winters
It’s easier to buy a new one than to constantly suffer from engine failure.
Another typical winter problem is reduced visibility due to fogging of the windows inside the car and icing outside. Interestingly, both problems are most annoying when the temperature hovers around freezing, or slightly below zero.
But did you know that windows can also fog up from the outside when there is steady frost outside and the temperature does not fluctuate? In this case, the heat in the car can have the opposite effect, that is, the windows will fog up on the street side.
In addition to reducing visibility, foggy windows can make driving dangerous and uncomfortable.
Many problems arise with warming up the engine when the car is idle. Some recommend not warming up the car, but immediately starting driving at low speeds to speed up the warming up of the power unit. Others advise heating for as long as possible. So who is right? Probably, as always happens in our world, the truth is somewhere in the middle. Yes, you definitely need to warm up the car.
But in moderation. Again, it all depends on the distances you travel. For example, if your trips are mostly short, then it is better to warm up the car longer, otherwise it will not have time to warm up. If you drive long distances every day, then there is no point in warming up the car for a long time - you will do it along the way. And, of course, it all depends on the temperature. Naturally, when the street is below -15-20 degrees, it is better to warm up the car well.
But did you know that the most common problems can be prevented? For example, in order to minimize the risk of glass fogging, you need to change the cabin air filter on time. Also, car windows should always be cleaned and degreased. In particular, do not forget to turn on the air conditioner when excess moisture forms, which, of course, will not cool at negative temperatures outside. But nevertheless, it will perform an important function in the car to remove excess moisture from the interior.
Also, take care of winter engine oil in advance, which is more intended for operating the engine in winter. Check the battery in advance and carry out preventive maintenance by adding water and electrolyte if necessary. In general, in order not to get a headache in winter, you must remember that the sled needs to be prepared in the summer.
To make it easier for you to learn how to solve the main problems with your car in winter, we have collected for you answers to the most frequently asked questions from car owners:
If the wiper rubs against the frill trim, then you can do one of two things:
- 1) It is necessary to drill 5 mm holes along the edges of the cover. After this, secure the overlay using a metal bracket approximately 15 mm wide. Press the resulting structure on top with an elastic band. The result is practical and beautiful: the wiper does not scrape against the frill, and the trim itself does not dangle.
- 2) Heat the plastic of the wiper arm with a hairdryer and bend it in place - this will prevent the wiper arm from rubbing against the frill.
If the lining on the frill dangles and rattles, then it is best to use a sealant for window and door frames - it needs to be glued at the point of contact between the lining and the frill on the underside of the latter. This way we will prevent the lining from rocking and the rattling will stop.
source
Question.
Car: VAZ-2112, manufactured 10.2002, the frill looks like an old model (plastic, goes in continuation of the hood). You can see how the left wiper touches the plastic frill and lifts it a little. At high speeds, the wiper generally hits the plastic, making an unpleasant sound. Please advise what to do? I don't want to cut the plastic, it will be noticeable.
Lex83, Moscow, Central Administrative District Answer 1.
Unfortunately, there is nothing you can do here. Design feature of the old frill. But the old frill has a plus - the glass will not fog up in the rain.
Exodus, Moscow. VAO. Answer 2.
What if you unscrew the wiper and move it one notch higher????
Juno Answer 3.
Well, for 1.5 years now it has been touching me and knocking at speed, and I cut out a small hole, it still knocks, if I cut out the hole even more, the wiper will fly off the glass and onto the pillar. Rearranging the wiper doesn't do anything. It does not lie horizontally on the glass. There are no adjustments either. In short, leave it alone, removing the wiper drive assembly and using a sledgehammer to change the wiper stroke still won’t work. In general, I noticed that the movement of the wipers looks different for different 10-current ones. Some swing more, others have less. And there the mechanics are pressurized and unregulated. In my upright position, the driver's seat reaches the strut at speed, but for others it doesn't reach 7 cm. Well, what can you do here?...
DEN_103, Kiev Answer 4.
I've seen so many people with an old frill, they all just have a small triangle/semicircle cut into the frill in the place where the wiper knocks on the frill. In general, business for 5 minutes.
GENA, Tomsk Answer 5.
I also have 2000 21102. The left wiper also affects it. Over time, the wiper itself and the frill in the place where it touched were worn out. Now, at high speed, the wiper almost reaches the seal and a knock is heard, but I have forgotten about it. You can't do anything.
Locky, Kazan Answer 6.
I also suffered for about six months. One of the wipers also touched. Then I found a smart serviceman at the service station - I took a key for 12 or 14, in my opinion, unscrewed a couple of screws that secure some kind of boot under the hood to the Jabot - I climbed in there with the key. After 2 minutes, I pulled out my hand with the key and screwed everything back on. I tried it and it really helped. Since then I have been happy!
Rusfatman, 64 rus Saratov Answer 7.
Apparently, in the old frill there are bolts securing the frill to the body under the top of the frill. He loosened them, moved the frill and twisted them for just two minutes. We (a new type of frill) have these bolts in direct visibility, under the plugs.
GENA, Tomsk Answer 8.
It was also a pity to cut at first - then I got sick of it. I cut out a triangle for the wiper and everything is ok! To prevent it from flying out, move it a little lower. Or the frill acts as an “original” limiter. Check the play (in general, the windshield wiper mechanism itself gives play over the years) and the fit of the wiper on the windshield wiper (may be spinning) There are already a lot of tips here - try something in order, it should work. SMU, Moscow
Replacement: removal and installation of the trim (frill) on the Priora
In order to remove the cover, you need to prepare the following tools:
- Head wrench “13”,
- Phillips screwdriver, flat screwdriver,
- Marker.
Follow these steps to remove the windshield seals from the Priora:
- Tighten the handbrake, remove the negative terminal from the battery.
- Using a marker, mark the points on the windshield opposite which the windshield wiper motors are located.
- Lift the hood.
- Hook the decorative cap of the electric motor with a screwdriver and remove it. Using a socket wrench, remove the nut that holds the wiper arms in place. Remove the washer from the recess and remove the lever along with the wiper.
- Next, unscrew two self-tapping screws securing the consumables from the sides, and then four self-tapping screws located in the center. Remove the screw plugs by prying them off with a flat-head screwdriver.
- Next, unscrew three more self-tapping screws on the side, remove the right and then the left part of the windshield trim.
There will be nothing new in the process of installing an old-style seal: you must perform all the steps in the reverse order. However, if you want to install a frill from a restyled VAZ-2170 onto a pre-restyled one, perform the installation following the following algorithm:
- Place the bushings in place.
- Attach the water-reflective shield to the seal so that the honeycombs match.
- Check that the fastening hooks provide a sufficiently tight fit to close the body. If necessary, adjust the size of the hooks by cutting off part of the sealant.
- Separate the excess part of the part if the car is equipped with air conditioning.
After installation, check if there is a gap between the spare part and the glass. If there is a gap, this means that it can quickly grow with temperature fluctuations. It should seem that the windshield seal is “tight” so as not to allow any leaves from the trees or a drop of water to pass through. A loose position will render the presence of the part useless.
Old style overlay - differences
The frill trim of the new generation of Priora cars is enthusiastically appreciated by drivers, which replaced the old part. There are significant advantages to this:
The new form factor features added stiffening ribs to prevent deformation during temperature fluctuations. To ensure that the seal fits as tightly as possible to the body, additional fasteners were added, which are located close to each other. The air intake honeycomb has a different structure so as not to allow leaves to pass through, but at the same time take in a sufficient volume of air.
The windshield fogs up from the inside - how to fix the problem?
Every motorist, regardless of what car he drives, has encountered such a seemingly insignificant problem as fogging of car windows. Contrary to popular belief, the cause of this phenomenon is not alcohol consumed by the driver or passengers of the vehicle, although this factor contributes to an increase in the intensity of fogging.
The danger of this phenomenon lies in a significant deterioration in visibility, leading to a decrease in control of the road situation by the driver of the car, that is, it directly affects the level of traffic safety. How to deal with fogging of car windows?
To determine optimal and effective methods to combat this phenomenon, it is necessary to understand the causes of its occurrence.
Fighting bloating Priora frill
| All owners of LADA Priora have noticed that in hot weather the frill (wind lining) of the car swells from the sun. Soon this case was recognized as a warranty case and they offered to replace the frill with a new one. However, after replacement, the problem repeats again, and the pad becomes a consumable. Let's look at all the ways to combat this disease. |
The reason for the swelling of the Priora frill is the poor quality of the plastic.
The cracks that appear as a result of swelling do not look aesthetically pleasing, and also contribute to even greater penetration of water under the lining (water still seeps under the lining in its normal state). It is not clear whether excess moisture will affect the operation of the micromotor gearbox or the wiper motor, but it is recommended to eliminate the gaps in the frill as soon as possible. AvtoVAZ’s response to the problem with the Priora frill :
On cars of the LADA PRIORA family, there is a discrepancy in the form of warping of the wind window frame linings det. 2170-8212734/735/730 (hereinafter referred to as the overlay).
If warping of the linings is detected on cars during pre-sale preparation, as well as when contacting owners of cars under warranty, the discrepancy should be eliminated by replacing the linings and applying double-sided adhesive tape (form “3M”, 6 mm wide) to the linings of the wind window frame in the following technological sequence:
- degrease the glass surfaces and linings in places where they are glued;
- In the place where the tape is glued, apply primer type 4297 to the surface of the lining;
- glue the adhesive tape onto the overlay according to Figure 1; the tape should not protrude beyond the overlay;
- before installing the trim on the car body, remove the protective film by 20-30 mm, tighten the screws securing the trim, then remove the protective film completely;
- tighten the screws securing the lining in the sequence indicated in Figure 1, roll the gluing area with a force of 0.5+ 0.1 kgf.
Even before the official response from AvtoVAZ, craftsmen tried to solve the problem with swelling of the frill in various ways, including using sealant or double-sided tape. This solution is temporary, so other methods have been proposed to combat this problem:
The bulges on the reverse side do not have stiffening ribs, so the first method is to strengthen the frill . This can be done with any suitable material, for example, epoxy resin. On the back side of the removed cover, where the stiffening ribs go, pour epoxy glue (pre-mixed with hardener). This is quite enough for the lining to become more rigid and the swelling to not reoccur, but if you wish, you can further strengthen the structure by placing metal plates (from a children’s mechanical construction set) before pouring the glue.
Another method is based on modifying the frill fastening . We press the places of swelling with screws close to the glass. For aesthetics, use black screws with a thin head. The main thing is not to forget to lubricate the drilled holes and screws well with thick polymer mastic. And also, don’t hit the windshield with a self-tapping screw, which is very close. By the way, self-tapping screws can be replaced with plastic clips.
The easiest method to combat bloating is hand molding . The point is to evenly heat the swollen parts of the lining and straighten them in the opposite direction. In this case, it is important not to overheat the plastic and not bend it too much. After installing the frill in place, the elastic band should fit snugly against the windshield.
Now you can buy Priora frills from different manufacturers, for example:
- 2170-5206064/65 (Chelyabinsk);
- 2170-8212730/35 (Syzran).
Some also have low-quality plastic, and the other half are generally crooked, so the problem is still relevant. Some try to fight not the consequences, but the cause, covering the frill from the sun with homemade covers on a hot day.
They say that the new Priors are equipped with the same linings, but they are glued with mastic along the entire length from the factory. By the way, the frill can be modified and a protective mesh installed. How did you deal with the problem of the windshield swelling?
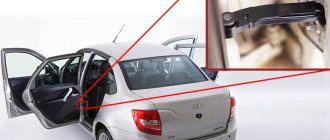
Photo source:
- Frill deformation
Keywords:
- jabot priors