16.08.2012
parking lights
Side lights are lamps that let another car know about your dimensions. For example, stopping at the side of the road on the highway and turning off the ignition, the low beam goes out, but the dimensions remain. And according to traffic rules, for your information, parking on the side of the road is allowed only with the lights turned on.
In this article we will look at the main reasons why the lights on the VAZ 2114 do not light up. This article is suitable for all samar owners, both the first generation and the latest.
Dimensions do not work on VAZ 2114
According to these Rules of the Road, on any moving vehicle, including the VAZ-2114, the headlights must be turned on, along with which the side lights must also be turned on. In addition, they must be turned on when the car is stopped or parked on the road in the dark and in conditions of insufficient visibility. Therefore, they must always be in good working order.
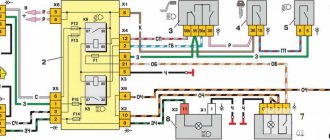
The electrical circuit of the side lights of the VAZ-2114 is not so complicated and, if desired, any self-respecting driver will be able to find a malfunction associated with the failure of its operation. To do this, you need to know that terminal No. 1 of the side light switch is always supplied with positive voltage from the battery, bypassing the ignition switch. If the side light switch key is in the on position, then electric current flows to two fuses F10 (7.5A) and F11 (7.5A), which respectively protect the electrical circuits of the left (F10) and right (F11) side lights. The further path of the current lies to relay K4 (lamp health monitoring relay), and then to the front and rear side lamps.
When only one of the side light bulbs does not light, then we check whether it has burnt out. If it burns out, then we replace it with a new one of similar power, but if it is intact, then we will have to look at the condition of the contacts of the cartridge in which it is inserted. In the rear lights, due to moisture getting into them, oxidation is possible, both of the tracks and the pads through which voltage is transmitted to the terminals of the side light lamp.
Another reason why the headlight lamp does not light up may be the lack of voltage at the corresponding terminals of the rear light blocks or headlight blocks. Then, using a tester, you will have to ring the corresponding wires:
- The right front marker does not light up (check the yellow wire from terminal No. 4 of the headlight to terminal No. 8, block X6 of the mounting block);
- The right rear light does not light up (check the yellow wire from the right rear light block to terminal No. 9, block X9 of the mounting block);
- the left front marker does not light up (check the yellow-black wire from terminal No. 4 of the headlight to terminal No. 10, block X6 of the mounting block);
- the left rear light does not light up (check the yellow-black wire from the right rear light block to terminal No. 17, block X9 of the mounting block);
If both lamps on the right or left side of the car stop working, then troubleshooting should begin by checking the corresponding fuses located in the mounting block under the hood of the VAZ-2114 car, since the simultaneous burnout of two dimensional lamps at once is unlikely. The blowing of fuse F10 is very easy to determine, since it will lead to the cessation of combustion of the backlight lamps of the instrument switches. Also, the reason for turning off the side lamps may be the failure of relay K4.
3 comments
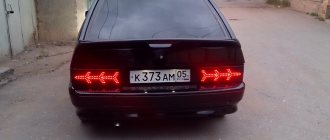
When you press the brake pedal, the rear turn signals turn on. When you turn on the turn signals, the rear lights begin to switch and shine like garlands?
When connecting to the board in the chip (connector), the wires were not connected correctly. And the chip itself is apparently not original, but was attached by someone illiterately, despite the diagrams. You have the wire that is responsible for the turns - in place of the dimensions. It is easy to treat. You need to transfer the wires from the wiring to the chip. You need to find the ground on the rear stopper board (there is a green stripe on the board that runs under each light bulb socket); see which wire is connected through the chip and connect to the black wire from the rear wiring. Then we take the wire on the chip below and connect it in the following sequence: 1 wire in the chip with black (ground), 2 - blue (turn signal), 3 - red (stopak), 4 - yellow (marker)
On the right side, the dimensions do not light up, the fuses are intact, and the light bulbs are intact. Could it be K4?
Source
Dimension fuse is on
If the fuse is constantly on, then two options are possible:
- poor contact in the fuse box;
- Somewhere there is a short circuit (short circuit).
- We take a 12 volt light bulb and connect two wires to it, + and -, respectively.
- We take out the blown fuse and connect the wires from the light bulb to the places where it contacts the block. If the lamp is on, then there is a short circuit somewhere.
The only way to find the location of the short circuit is to turn it off in order and check in the same way everything that this fuse is responsible for.
- Wires that go to the trunk lid and to the license plate lighting. Most often, they are the ones who fray and short out.
- The next weak point, which is why the VAZ 2109 does not light up, then unhook the cable, which is located at the driver’s left foot, which is not on the engine shield, but on the back side of the wing, under the carpet. Having disconnected the cable, we just disconnect the circuit for the license plate illumination and the lampshade.
- If after this our light on the fuse box goes out, then we have found the place where it shorts. Next, you need to completely look at the wiring and treat it with electrical tape.
Source
The instrument panel backlight has disappeared, what should I do?
The dashboard going out is a nightmare for any driver, since with the disappearance of the light, other malfunctions may follow, such as non-functioning speedometer and other indicators.
Therefore, it is worth understanding that if the instrument panel does not light up, then this problem must be eliminated immediately, but not all car enthusiasts are capable of this.
It is worth understanding that if the backlight disappears, then the problem lies somewhere in the electrical circuits. This is where you need to look for the problem. This will require design knowledge of the vehicle's on-board circuit, a tester and related tools, such as electrical tape, a soldering iron or more. Of course, it is not always possible to eliminate the problem locally, and faulty products have to be replaced completely.
Causes of malfunction
Where does the problem lie? As mentioned earlier, it is worth looking for problems in electrical circuits. Let's look at the main locations where problems may be hiding:
- Fuse.
- Backlight bulbs and their electrical circuit.
- Wiring.
- There is a fault in the fuse box.
- Damage to the board.
Solutions
So, when all the main reasons are, so to speak, “in the face,” you can try to determine the exact location of the breakdown, and also fix it yourself. As always, it is worth noting that if a motorist does not know the design of the car or is not confident in his abilities, then it is recommended to contact a specialist car service center.
Fuse
General view of a blown fuse
Probably the first cause of all electrical circuit malfunctions is the notorious fuse.
This is where you should start troubleshooting. To find out which fuse is responsible for the instrument lighting, as well as its location in the mounting block, you should refer to the technical documentation. Also, on the fuse cover it is written which element should be checked. If the fuse is found and replaced, but the problem does not go away, then you should look for the source in another place.
Light bulbs
Recently, it has become fashionable to install LED lighting for the VAZ dashboard with your own hands. However, not all car enthusiasts correctly connect it to the on-board network. This can cause the light to go out at the most inopportune moment. So, it’s worth checking the contacts of the entire backlight circuit.
There have been cases where, as a result of bumps, all the light bulbs burned out at once. In this case, you need to look for a breakdown in the wiring, you can get stuck like that again!
The same applies to standard incandescent light bulbs that come with the car from the factory. Thus, a break or burnout of one of the light elements can lead to the fact that the entire backlight stops working. If you run the tester through the entire circuit, you can easily find an open circuit.
Wiring
The most unpleasant and hardest-to-test element of a car is the wiring.
So, a broken wire can cause the dashboard lights to stop receiving power and therefore not light up.
In order to eliminate the malfunction, you need to use a multimeter to test all the wires that are responsible for the car’s instrument panel lighting. So, any, even insignificant, wire that breaks can cause the light in the dashboard to go out.
Oxidized contacts in the mounting block.
Another cause of malfunction can be oxidized wire pads.
Accordingly, there will be no contact, and not only will the light in the instrument panel not light up, but the other indicators located here may also not work. To fix the problem, you will have to disconnect the wire block on the fuse block and the parting panel itself. After this, clean the contact group and connect everything back. If everything worked, then the reason was found.
Safety block
Another important element that can rarely fail is the mounting block.
Thus, burnout can occur directly in the branches of the block itself or in the mounting socket. To eliminate the malfunction, you will have to remove the part from the car and check it sequentially using a tester.
Many auto mechanics do diagnostics directly without removing the safety block. But only professionals can do this, but the average car enthusiast will have to remove the product. If, after all, the mounting block “died”, then the element will have to be replaced, since it is almost impossible to repair it.
Check the contact group of fuses for malfunction.
The board is damaged
Repair and diagnostic operations of the dashboard board.
The worst thing that can happen and what every car enthusiast fears is the burning of the dashboard, or rather the control board.
There is only one way out - replacement, but many car enthusiasts manage to resurrect such elements using a soldering iron. Although, as practice shows, in 50% of cases it does not last long.
The main reason for board burning is a short circuit. In this case, often the place where the wiring is connected and the most vulnerable point – the backlight – is on fire. If incandescent lamps are installed, they will be dark or black, but the LED backlight burns out in the places where the solder is connected to the board.
Dimensions of VAZ 2114
The side light signals on second-generation Samaras, which include the VAZ 2114, are located in accordance with the regulations in front and behind the car, two lights on each side of the car, closer to the edge, next to the turn signals.
- The front side lights are white, the rear lights are red. The front ones are located in the headlight block, the rear ones are located in the taillight block.
- The side lights are turned on and off by pressing the “side light switch” key, which is installed in the exterior lighting switch block. The keys are located in the central part of the instrument panel above the on-board computer display. When the side lights are turned on and the side light bulbs come on, a green indicator lamp lights up on the button.
- There is a side light fuse installed in the side light circuit. It is located in the mounting block located in the engine compartment under the hood. There are two fuses, one for each side of the side lights. Fuse F10 is located in the circuit of the left side dimensions, it also controls the operation of the warning lamp on the instrument panel, fuse F11 is the right side dimensions.
Additional Tips
Sometimes VAZ 2114 owners are faced with the opposite situation, when the rear lights themselves work, but the indicator on the power button does not: this is almost always a sign of a faulty wiring in the interior panel. You can deal with the problem by removing the entire key block and thoroughly wiping its contacts.
In general, the side lights on this VAZ model should not often fail, since the contact pads for their fuses were specially increased in width in order to ensure a tight connection.
In addition, experts advise that in frequent breakdowns of dimensions there is a malfunction in the mounting block itself or its electrical circuit. Such a problem must be eliminated as soon as possible to eliminate the risk of a wiring fire.
Finally, you should pay attention to the tightness of the entire rear light unit and prevent moisture from getting inside, which can easily cause the lamp contacts to sour.
Car parking lights are classified as signal lights. On modern cars, they act as signals indicating their presence on the side of the road or in a parking lot, as well as the size of the object. The rules for operating vehicles and traffic rules establish that the driver is obliged to indicate obstacles in the form of a car in the dark when stopping or parking by turning on the side lights. And when there is fog, the side lights turn on together with the fog lights. There are front and rear dimensions.
Why don't the lights light up?
Malfunctions that occur in the operation of side lights worry every motorist because it makes it difficult to use the car at night. After all, the traffic rules clearly state the requirements when stopping the car and turning off the ignition at night to indicate the car with illuminated side lights. Failures in the side light circuit can manifest themselves in different ways.
- One of the side light bulbs does not light up. The most likely cause is a burned out light bulb. Less common problems with poor contact are oxidation or poor connection. And very rarely - a breakdown in the wiring to the contact group of this light bulb. Although rare, this also happens. If the light bulb burns out, it needs to be replaced. To do this you need:
a) when replacing the marker lamp in the front headlight:
- turn off all exterior lights and open the hood
— unscrew the screws securing the plastic casing on the headlight with inoperative headlights
— having pulled out the socket with the burnt-out light bulb, remove it and replace it with a working one, without needing to disconnect the block with wires
- install the cartridge and casing in place
b) when replacing the side light bulb in the rear light unit:
- turn off the lights and open the trunk
— remove the decorative upholstery and pull out the block with wires from the contact group
- squeeze the side clamps and pull out the contact panel for the rear light with the non-working bulb
- remove the burnt out lamp by pressing it and turning it counterclockwise
Replacing a broken light bulb
To repair the rear lights of a VAZ 2114, you need to follow a number of simple recommendations:
- turn off the vehicle's power supply;
- open the trunk, remove the decorative trim;
- Squeeze the latches and remove the contact panel of the entire flashlight;
- press down the faulty lamp and turn it counterclockwise to remove it.
Next, it is advisable to “ring” the lamp with a tester to make sure that it was its malfunction that was the cause of the problem, after which it should be replaced with a new analogue, and you can begin assembling the lamp in the reverse order.
Some Lada owners, faced with the fact that the dimensions on their VAZ 2114 do not work, do not bother and change the entire headlamp assembly - especially since they are not so expensive. This can be considered a convenient solution, since such a replacement eliminates for some time the possibility of failure of other lamps in the flashlight, in addition to the marker lamp.
In some situations, the breakdown of the dimensions does not represent a complete non-functionality of the lights, but simply a weaker glow, which indicates a problem with the supply of current to the contacts. To fix the problem, it is enough to clean the entire contact group in the control unit under the hood, and if that doesn’t help, you will have to check each group leading to the rear light separately.
Rear lights on VAZ 2114 do not light up
When both side light bulbs on one side of a car, left or right, fail, the reason is always clear. The fact is that the safety block contains one fuse responsible for each side. It is necessary to replace the corresponding fuse and the problem will be eliminated.
At the same time, there is a constant discussion on the Internet on forums about whether the front lights on a VAZ 2114 don’t light up or why the rear lights on a VAZ 2114 don’t light up. Quite a lot of opinions and different experiences are expressed. If we summarize all this, we can draw the following conclusions.
The side lights of the rear hemisphere are located in the rear light block, in which a generally recognized disease is constant oxidation and corrosion of the contact groups. For preventive purposes, it is necessary to constantly monitor this board.
The same is possible on the contacts of the front headlights. Nevertheless, from practice there are cases when, when checking the performance of light bulbs, it turned out that they burned out on both sides at the same time (maybe one by one, but the driver did not notice this in time). At the same time, the amateur master checks everything, just not the light bulbs, claiming that the probability of simultaneous failure of the lamps is absolutely minimal. But auto electricians first check the lamp and contact.
Source
We repair damage to the front and rear side lights on a VAZ 2114
Any car, according to today's standards of traffic regulations, must be equipped with a certain set of lights of various colors and sizes. This includes brake lights, low beam and high beam headlights. But the dimensions of the VAZ 2114 are of most interest:
- Front right and left;
- Likewise the rear ones.
Rear marker lights
Engineers positioned them so that they can be seen from any side, that is, from each side of the car. Their purpose is to notify drivers about the presence of a car in a particular place with constantly burning yellow lights. In addition, side lights must be turned on along with low beam headlights when driving according to today's traffic rules. Accordingly, their absence entails the imposition of a fine, so it is necessary to monitor the condition of the dimensions regularly, and repair breakdowns in a timely manner. Let's figure out why the dimensions of the VAZ 2114 do not work and how this issue can be resolved in any case.
When should the side lights be turned on?
The driver is required to turn on the lights whenever there is poor visibility on the road, as well as when driving through a tunnel.
Conditions for poor visibility include:
- heavy rain/snow;
- fog;
- dusk/predawn.
It is very important to turn on your side lights when driving in fog. At the slightest sign of its appearance (especially in the dark), you need to turn on the dimensions, indicating the boundaries of your own vehicle.
If you are forced to stop on the side of the road in conditions of insufficient visibility, you should definitely turn on the side lights, and in the dark, also turn on the emergency lights. Such actions will protect you and help other road users not to get into a situation where a car suddenly appears out of the fog/darkness in front of them.
TECHNICAL DEVICE
In some situations, it happens that the rear lights of a VAZ 2114 do not light up, in other cases only the front ones, but their structure and operating principle are identical. The side lights are located in the turn signal housing, while the front and rear lights find a place in the headlight housing in the same area. There is a special button for the side lights on the dashboard, which allows you to control them; next to it there are headlight switches and other lighting. When the driver touches this button and turns them on, at the same time the corresponding light on the dashboard lights up, which will not allow the driver to forget about the action taken.
Wiring damage
One of the unwanted breakdowns is damage to the wiring. Small contacts, resistors and plugs are difficult to repair without tools. Lack of power to the connectors and bulb sockets leads to their malfunction. As a DIY repair attempt, you can disconnect the plugs and connectors, and then clean all contacts from oxides. In rare cases, this procedure can restore contact. The backlight of the VAZ 2114 dashboard is not a key design component, but its absence seriously complicates the process of operating the car at night. When replacing lamps, you can carry out overexposure procedures and replace standard elements with LED ones. In addition to increased brightness, you will get a longer service life. The photo above shows a detailed diagram of the connections of the VAZ 2114 instrument panel.
TROUBLESHOOTING AND THEIR REMOVAL (REAR AND FRONT DIMENSIONS)
Now we just have to figure out why such problems occur and how to solve them, for example, how to replace a side lamp on a VAZ 2114 in any part of the car. So, first of all, let’s figure out why the lights don’t light up and what reasons there could be for this:
- No voltage on headlights;
- The lamps are burnt out;
- The fuse has blown;
- The fuse box has failed;
- The button to turn on the lights is broken.
So, now we need to understand each specific option in more detail, for example, why the left rear light does not light up. The first and most logical reason is that the lamp simply expired and burned out, just as happens with ordinary household light bulbs. Now it needs to be replaced; this is done in the same way in all parts of the car:
- First you need to find where the headlight housing or collar housing is located from the inside and remove the protective cover; on the VAZ 2114 it is clearly written on it how this is done. Everything will come out together with the base;
- Now you need to find the size in the base and carefully pull it out;
- We take out the lamp, it is simply inserted here with a latch;
- We insert the new one so that it clicks and assemble everything in the reverse order.
As for the fuses, if the rear right indicator light does not light, then in order to do without special tools and diagnose the cause, you just need to replace the suspicious fuse with a new one and see if the situation improves. If the lamps light up, then it was the problem, but if not, then you will have to look for the cause further. The tail light is always off. A very weak point is a design flaw in the contact group in the headlight.
To understand why the rear lights on a VAZ 2114 don’t light up, you need to look at the car’s electrical circuit; power to the lights goes along with the headlights, and if they don’t light up only at the front or rear, then it’s the wiring. It will have to be checked, but without the special knowledge of an electrician, it is unlikely that you will be able to find an open circuit or some other reason on your own. But if the right indicator light on a VAZ 2114 or only the left one does not light up, then it’s all a matter of fuses, replacing them is simple - take out the old ones and insert new ones in the same place. Checking the button is also quite simple - you need to remove it from the panel and short-circuit the wires; if the lamps light up, then it’s the problem. You will need to find a new button that will fit there and install it.
PRICES OF COMPONENTS
There is also a separate section for prices for all the parts that may be needed when repairing this part of the car, because if the side lights on a VAZ 2114 or the fuses have blown, they will still have to be replaced with new ones. In any case, all the components are quite cheap, all we might need:
- Marker lamp;
- Fuse;
- Power button;
- A whole fuse block.
Today, an ordinary white light bulb costs up to 30 rubles; of course, the price depends on the individual pricing policy of a particular seller. Individual fuses can be selected for up to 50 rubles, unless, of course, you want to install a higher quality option. Button, if you look for exactly the same one as the original one, you will have to pay up to 300 rubles. In some situations, more serious problems may arise and you will have to change the entire unit, this is quite an expensive proposition, together with all the wires it will cost up to 1000 rubles.
Based on this, we can say that you need to carefully monitor your car and try to avoid any serious malfunctions; if something breaks, fix it right away, don’t start it.
Source
Damaged contact board
One of the unpleasant variants of the problem is damage to the contact board. Carrying out its repair in a garage is impossible, especially in the absence of an understanding of the placement of elements on the diagram. The presence of damage on its surface covers all the causes of the malfunction, so the best solution to the problem is to replace the assembled part. The price of a new contact board for the “four” is 2000-3000 rubles. If there is damage to the glass or failure of the tachometer, speedometer, fuel level and temperature gauge motors, we recommend buying an assembled panel, its price is 5000-6000 rubles (instrument panel from VDO). If the backlight on the instrument panel suddenly stops lighting, then it is worth examining the condition of the wiring and plugs supplying power to the lamp. At the moment when the backlight disappears, you can operate the car, but at night there will be a problem with poor visibility of the arrows.