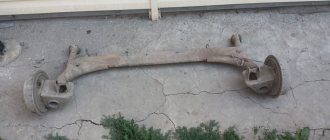
Possible reasons for replacing the rear beam of the tenth model
The rear suspension of a VAZ car, in general, is constantly subject to intense wear. From time to time, knocking, grinding and other extraneous sounds may appear, clearly hinting that something is wrong with the car. The struts, springs, and suspension linkage bushings are checked. Specifically, the beam is the last thing to sin.
However, there is nothing eternal in the world, much less perfect. In pursuit of these simple truths, the motorist decides to completely replace the suspension. Even if the condition of the beam on your VAZ 2110 is satisfactory, its design itself is far from perfect. And the driving characteristics of the car can be improved, at a minimum, by replacing the rear suspension with “Priorovskaya”.
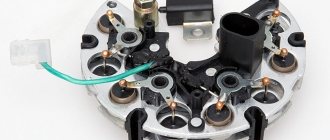
In more modern car models, a so-called torsion bar is used to strengthen the suspension. This also ensures a more even load distribution between the shock absorbers and improves the vehicle's driving characteristics. Fortunately, many of the “Prior” features are perfectly applicable on VAZ cars of the tenth model. That is why replacing the rear beam of a VAZ 2110 is very popular among car tuning enthusiasts.
Many go further, deciding to install an independent rear suspension for their iron horse. This is quite a serious and responsible tuning of a VAZ. Because such pleasure is very expensive. This also means more expensive maintenance due to the complexity of the independent suspension beam design.
Torsion bar in beam
But the issue of this kind of modernization concerns not only the price, but also the risks associated with it. Handicraft designs often turn out to be technologically ill-conceived and cannot withstand the workloads of the VAZ 2110. As a result, the rear suspension can fall apart at any moment right on the road. Agree, you definitely don’t need such “pleasure,” so buy the product only from trusted brands and stores (for example, the same Tehnomaster, Avtoprodukt and other VAZ distributors).
Selecting New Items
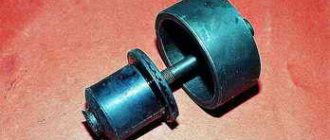
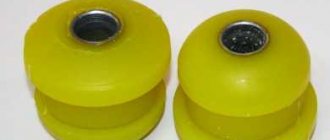
Polymer
To replace and ensure reliable operation of the car, you need to purchase excellent silent blocks. It’s easy to choose them if you know certain aspects:
- For the VAZ 2110 model, elements with catalog number 2110 2914054 are suitable. They have the required external diameter corresponding to this specific VAZ model;
- Do not try to purchase a silent block from a 9 and install it on your 10. Nothing will come of similar events, no matter what anyone says;
- Make sure of the quality of the products. Low-grade silent blocks have flooded the market, but their service life leaves much to be desired. Excellent parts made from quality materials that can withstand extreme loads and temperatures.
How to correctly replace the rear beam using the example of a VAZ 2110
The instructions are suitable for almost any domestic car with semi-independent rear suspension. A design of exactly this type is installed on the VAZ horse Lada 110. Having gotten rid of the stock beam, you are completely free to install a number of alternative solutions, but in no case should you forget about the prudence of such a choice, which we discussed in more detail in the previous section.
It will be extremely convenient to carry out work on a special lift, where you will have a lot of free space, natural light and other amenities. The replacement can be easily done in the inspection hole, or simply on bare ground, or at worst, by jacking up the rear of the car. Now you can proceed directly to dismantling the “ten” beam itself, installed from the manufacturer.
- 1. Remove the rear wheels of the car. We disassemble the brake pads and remove the brake cables and hoses from the beam and the engagement in the brackets;
- 2. Disconnect the parking brake cylinders from the brake system;
- 3. Next, you should disconnect the elastic lever of the VAZ sorcerer from the beam;
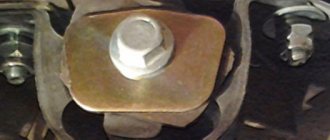
- 4. The wheel hub base is attached to the rear suspension parts using four 17 mm socket bolts. They should all be unscrewed. After which you can freely tilt to the side the entire axle assembly with the tens of brake mechanism shield;
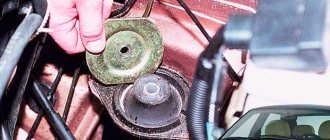
- 4. To remove the beam, all that remains is to unscrew the bolts at the points where it connects to the car body. Let's start by disconnecting the lower bolts of the shock absorber struts;
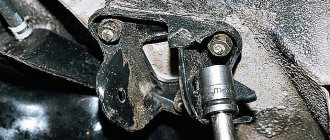
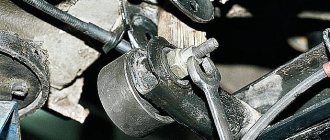
- 6. Next, on both sides of the rear beam, unscrew the nut holding the suspension arm to the bracket;
- 7. Now nothing will stop you from removing the product from under the body of your car by removing the bolts of the rubber-metal hinge. If necessary, the brackets for attaching the VAZ rear suspension arm are also dismantled.
With this we can say that the replacement of the rear beam of the VAZ 2110 is almost complete. Most manufacturers promise that their product fully fits the standard stock suspension mount, so you shouldn't have any problems with reassembly. As you can see, the procedure is not particularly complicated and can be done by almost any motorist without the need to seek help from a service station and waste money, respectively.
Garage or service station
All car owners can be divided into two categories:
- Those who carry out most of the repairs themselves in their garage, and only in emergency cases turn to a car service;
- Those who prefer not to touch anything with their own hands, but completely entrust repairs and maintenance to the masters of service stations.
Each of them is right in their own way. Therefore, we have no right to reproach those who do not want to carry out repairs themselves. After all, garage and professional repair of silent blocks, like other components, has its advantages.
STO has the following advantages:
- A high-quality, responsible car service provides a guarantee for repairs performed;
- In the event of a repeated breakdown covered by the warranty, repairs will be carried out free of charge;
- Professionals are professionals; they have extensive experience and knowledge, which allows them to competently perform their work.
But first you need to find such a car service, which, alas, is not an easy matter. Many provide a guarantee, but when you re-apply, they do everything possible to prove that the breakdown does not comply with the terms of the guarantee. A banal trick.
Repairing your garage will provide the following advantages:
- Significant financial savings, since you only have to spend money on consumables;
- The quality of the work performed by a master is always in doubt if you do not know this person personally. So self-repair may be much better than at a service station;
- You purchase the silent block, and the master only installs it. Why pay money for work that you can do yourself?!;
- Guarantee that a new one will be installed instead of the old silent block. Questionable service stations can easily install an old, more or less usable silent block instead of the one you gave them. You know what the result is.
Stories from our readers
“Fucking basin. "
Hi all! My name is Mikhail, now I’ll tell you a story about how I managed to exchange my two-wheeler for a 2010 Camry. It all started with the fact that I began to be wildly irritated by the breakdowns of the two-wheeler, it seemed like nothing serious was broken, but damn it, there were so many little things that really started to irritate me. This is where the idea arose that it was time to change the car to a foreign car. The choice fell on the melting Camry of the tenth years.
Yes, I had matured morally, but financially I just couldn’t handle it. I’ll say right away that I am against loans and taking a car, especially not a new one, on credit is unreasonable. My salary is 24k a month, so collecting 600-700 thousand is almost impossible for me. I started looking for different ways to make money on the Internet. You can’t imagine how many scams there are, what I haven’t tried: sports betting, network marketing, and even the volcano casino, where I successfully lost about 10 thousand ((The only direction in which it seemed to me that I could make money was currency trading on the stock exchange, they call it Forex. But when I started delving into it, I realized that it was very difficult for me. I continued to dig further and came across binary options. The essence is the same as in Forex, but it’s much easier to understand. I started reading forums, studying trading strategies. I tried it on a demo account, then opened a real account. To be honest, I didn’t manage to start earning money right away, until I understood all the mechanics of options, I lost about 3,000 rubles, but as it turned out, it was a precious experience. Now I earn 5-7 thousand rubles a day. I managed to get the car buy after half a year, but in my opinion this is a good result, and it’s not about the car, my life has changed, I naturally quit my job, I have more free time for myself and my family. You’ll laugh, but I work directly on the phone)) If If you want to change your life like me, then here’s what I advise you to do right now: 1. Register on the site 2. Practice on a Demo account (it’s free). 3. As soon as you get something on the Demo account, top up your REAL ACCOUNT and go to REAL MONEY! I also advise you to download the application to your phone, it’s much more convenient to work from your phone. Download here.
To replace a beam with your own hands you will need:
- Set of wrenches with all heads and sockets
- Special wrench for unscrewing brake pipes
- VD-40
- A piece of pipe for keys
To conveniently unscrew the nuts securing the beam to the body, you need to cut the spanner to “19”. Before starting work, first remove all the nuts and brake pipes in the pit. It is also advisable to remove the “Sorcerer” rod; it is mounted on a rod, at the end there is a clamp in the form of a cut washer.
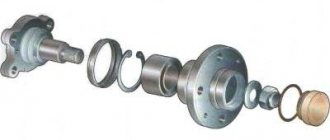
Now we jack up the car, remove the wheels, drums, and brakes so that only one hub remains.
We unscrew the 4 step bolts with an open-end wrench set to “17”.
We unscrew the brake pipes from the hoses at any connection. This should be done somewhere easier, because... With the beam removed, it’s easier to unscrew the remaining tubes, or it’s even possible to replace these short ends. Otherwise, you can change the entire circuit.
We unscrew the beam from the racks and from the body.
We knock down the hubs and unscrew the hoses, tubes, and handbrake mounting brackets.
If you bought a Priora beam without silent blocks, then we press in the polyurethane using a press-in puller (long bolt, stops, VD-40).
Don't forget to stretch the hubs.
We put everything back together in reverse order. We check the connections of the tubes and hoses, tighten the nuts, bleed the brakes and rejoice.
Conclusion
Installing a beam from Priora on a VAZ 2110 made it possible to improve the car’s handling, and the slips and unnecessary squeaks disappeared. Now I began to take turns more confidently.
To bring the top ten completely closer to the Priora, you need to replace the front suspension, VUT, adsorber, mirrors or interior.
Welcome, friends, to the DIY car repair website. A characteristic knocking sound in the rear of the car, a suspicious creaking of rubber while driving, deterioration in handling, excessive wear of the rear tires - all these are signs of wear on the silent blocks.
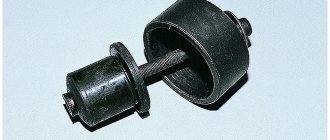
Silent blocks of the rear beam of VAZ 2110
In such a situation, inaction can only aggravate the problem and lead to an accident on the road. To avoid this, it is necessary to replace the silent blocks of the rear beam of the VAZ 2110. But how to do this correctly? What aspects should you pay attention to? Let's look at the main issues in more detail.
Tools for work
Replacement parts are highlighted in red: hinge, bolt, nut and spring washer.
In order for the replacement of the rear beam silent blocks to be successful, you will need the following tools:
- Liquid soap or special lubricant. Previously, they used ordinary soap solution.
- A set of keys. It is better to prepare end and cap ones. There must be keys for 17, 19 and 24.
- Ratchet for heads.
- Hammer and chisel for knocking out old parts.
- To make the disassembly process easier, it is better to use WD-40 liquid, which must be applied to all rusty nuts.
It is best to apply the penetrating agent to rusty nuts the night before.
As for new parts, branded spare parts from AvtoVAZ have the article number 21100291405400 . You can buy reinforced VTR silent blocks made of polyurethane. Their article number is LADA0401RP , although they cost several times more.
It all started with the fact that after buying the car, having seated a couple of passengers back, the wheel began to scrape against the fender, and it was also clearly visible that the right wheel was pushed outwards more and was also shifted back. To identify the problem, I went to a friend’s service center, several people lifted it up, looked at it, and came to the conclusion that the beam had moved. Well, without hesitation, I decided to buy a Priora beam since it is reinforced with a torsion bar, which means the handling will improve. Additionally, I decided to supply the supplies with negative camber from SS-20, so I should get a beam similar to the factory Grant one. Due to the negative, grip in corners will be improved and controllability will increase. Tire wear will not be affected by -1 degree.
I bought in the store: Priora beam bare catalog number “2170-2914008-00”, rear beam silent blocks “2110-2914054-00”, stabilizer bushings so that the torsion bar does not rattle “1118-2916040”
I started with the stabilizer bushings, sprayed it with air for lubrication, bent the small mounting torsion bar and the bushing went in without problems, it was not convenient to do it with an assistant alone.
Next you need to press in the silent blocks, I don’t have any special tools, but you can get by with two things) a sledgehammer and straight hands =) spray everything with air.
I put a sledgehammer on top and hit it a couple of times with a hammer, the silent block climbed halfway. Then I placed the beam on the pipe to hammer the silent block in completely, a couple of blows...
Let's continue. We lift the car on both sides, just enough for the wheels to spin, but you can also raise it higher so that it’s comfortable to spin.
At the same time we clean it with a metal brush
and the beam fastenings and also spray with water. We unscrew the guides, I didn’t screw in the guides because I had changed the hub before and decided to screw in the guides so that it would rest against the hub, but with the slightest effort the thread was covered) probably someone had already screwed it up before me. After waiting a little, we take some kind of block or piece of wood))) and the main tool for repairing Russian cars - a HAMMER)
We lie down under the car, place the block on the edge of the drum and regularly turn the drum. After
and take out the handbrake cable, and also unscrew the fasteners of the handbrake cable on the beam. We generously spray the 4 hub mounting bolts with water and repeat the algorithm on the other side. We took off the hub mounting bolts with an 8 hexagon, I had to shorten it a little so that I could put it in the bolt, I only had 5 bolts out of 8 unscrewed, 4 on the side where I recently changed the entire hub, on the other side only one bolt came off for the rest
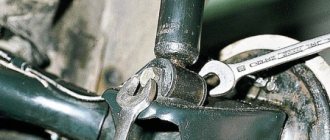
Be sure to buy a wrench for unscrewing the brake pipes; it will always come in handy.
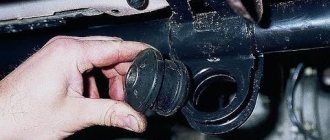
We crawl under the car and unscrew the brake hoses from the pipes, so that all the brake fluid does not run out into the hose; we screw in the bolt, if I’m not mistaken, to 8. Relieves the craving for the sorcerer. We unscrew the 2 nuts of the beam and the 2 nuts securing the struts, take out the bolts and the beam and lay the beam on the ground, take it out.
We unscrew the hub to the end, 90% percent that they will stick to the casing and come off, but this is not important to us)
Welcome, friends, to the DIY car repair website. A characteristic knocking sound in the rear of the car, a suspicious creaking of rubber while driving, deterioration in handling, excessive wear of the rear tires - all these are signs of wear on the silent blocks.
Silent blocks of the rear beam of VAZ 2110
In such a situation, inaction can only aggravate the problem and lead to an accident on the road. To avoid this, it is necessary to replace the silent blocks of the rear beam of the VAZ 2110. But how to do this correctly? What aspects should you pay attention to? Let's look at the main issues in more detail.